Working with Paths
|
| < Day Day Up > |
|
If you're going to make FreeHand work for you, you must learn to control paths. I'll assume that you're capable of placing and modifying points on a path. This section explains how those paths can be manipulated to suit your purpose.
Pressure Pen on OS X
Unfortunately, the Variable Stroke pen does not work with a pressure sensitive pen (Wacom tablet) if your machine is running FreeHand 10 on OS X. The pen itself works; you just can't obtain a variable stroke through the pressure sensitivity of the pen. It does work fine on all other Mac and PC operating systems, however, and has been fixed in FreeHand MX.
Adjusting path between points
I'm fairly methodical, so I like to place a point and control the path as I draw an object. Some of you like to place multiple points in a hurry, and go back and modify each to fit. For you, there's the Subselect tool. Just click the tool between points on a path and you can bend the path. The bending is accompanied by the extension of control handles (that can be further extended or withdrawn). This will not work on a path made with the Rectangle or Ellipse tool — unless you first ungroup the path (see Figure 7-11).

Figure 7-11: An ungrouped ellipse turned into a teardrop with a single click and drag
You also use this same tool or Pen/Bezigon tool plus the Alt (Option) key to adjust individual control handles. If you have the Subselect tool active and hold down the Alt (Option) key, you duplicate the object. If you click the Subselect tool on a segment and begin to move the mouse, you move only the object.
Add points
When you need more points on a path, simply choose Xtras ® Distort ® Add Points. FreeHand places a point between every two points in the path. These points are placed equidistantly between existing points, and you can add as many as you want. This Xtra works on envelopes, as well.
| Cross-Reference | For more information on envelopes, refer to Chapter 11. |
Roughen/Smooth
These two Xtras distort paths by changing the path's texture. Activate the Xtra by clicking its icon to open the Roughen dialog box. You'll see a slider and two buttons. The slider determines how much of a change you want to make to the path — the smaller the number, the less the distortion. However, the actual degree of distortion is determined by how far you click and drag the mouse. The two buttons are Roughen and Smooth. Both add points to the line, with Roughen adding corner points and Smooth adding curve points. The number of points added to the path is based on the slider's position, but the number in the field doesn't really correspond to the actual number of points. In Figure 7-12, two identical circles were distorted with a setting of 9, and both circles ended up with a total of 32 points. The left circle has been smoothed, and you can see curve points and control handles on the selected half. The center circle was roughened the same degree, and you can see that no control handles are on the points. The square on the far right was smoothed with a value of 3 (creating 8 curve points), and roughened on the other edges with a value of 35, resulting in 128 corner points.

Figure 7-12: Both Roughen and Smooth add points and distort the path.
Expand Stroke
This is another Xtra that is good to get to know. It's useful in quite a few instances for both boilerplate drawing and line/style techniques. Choose a unit of measurement that you're comfortable with in choosing a stroke width before you open this Xtra, because you can't make a change after the dialog box is open. My inch-to-point mental conversion abilities are severely hampered, so I change the units of measurement to points or picas. That way I'm converting apples to apples (or Windows to Windows).
| Tip | There is an easy workaround to the units-of-measurement situation in virtually any of FreeHand's value-input text fields. Just type the desired units, such as 0p4 or 4pt to get a 4-point line. If you want a quarter-inch measurement and the units are set to millimeters, type .25in; if you want metric measurements, use mm or cm as a suffix to the number. |
Select a path and double-click the Expand Stroke icon to open the dialog box shown in Figure 7-13. The stroke width of your selected path will be in the dialog box. If you want to, you can leave this value, or you can move the slider or enter a new number in the text field. Choose the type of cap and join, and enter a miter limit before clicking the OK button.

Figure 7-13: The Expand Stroke dialog box converts a path into a compound path.
The result of your Expand Stroke depends on the condition of the stroke and fill attributes you have previously set. That is, if you happen to have a red fill and a 4-point green stroke set as your default, the new compound path also has those attributes. That may be exactly what you had in mind. If not, just make the appropriate changes. I like to use Expand Stroke to make wires or other objects by using the expanded stroke as a clipping path and placing objects inside the clipping path with Paste Inside.
Inset path
This is a dual-purpose tool; even though it's called Inset Path, you can also "outset" a path. By default, this Xtra is designed to move the path inwards on itself by the distance you enter in the text field or determine by using the slider, as shown in Figure 7-14. Note that the path itself is going to change — if you want to see the original path and the results of your Inset Path activity, you must first clone the original path.

Figure 7-14: The Inset Path dialog box
The Steps field in the dialog box determines the number of iterations of the object that will be inset. Six steps were used for the example in Figure 7-15. The left group of boxes was set for a Uniform inset, the middle group is Farther, and the right group is Nearer.
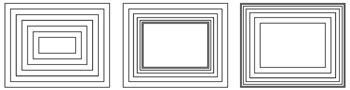
Figure 7-15: Inset Paths, left to right: Uniform, Farther, and Nearer
To outset an object, put a minus sign (–) in front of the number in the Inset field. In this manner, you can put round corners on a square box or triangle, as shown in Figure 7-16. The gray objects in the centers of these examples were modified with a negative amount in the Inset Path dialog box. I set the square to a multiple of 2 and Farther and rounded the joins; the star has a multiple of 3, is set to Nearer, and has rounded joins; the triangle has a beveled join. The result of an Inset Path operation is a compound path, giving you many options pertaining to fills, strokes, and transformations.
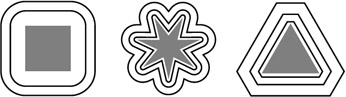
Figure 7-16: Inset Paths was applied to each of the gray objects (the objects were turned gray after Inset Paths was applied).
|
| < Day Day Up > |
|
EAN: 2147483647
Pages: 491