Creating an Ecard Application with Flash Remoting
|
| < Day Day Up > |
|
To get a feel for Flash Remoting, you start by constructing an ecard application for the Habitat Alert site. This basic application shares some qualities with the "drill down" application you constructed in Chapter 51, but the entire card selection and viewing interface will be built in Flash MX, rather than in standard HTML.
| Caution | Flash Remoting requires that your users have Flash Player 6 or greater. |
The application uses a Flash interface, enabling a user to select from a thumbnail images of picture "postcards." After selecting a card, the user sees a full-sized version of the card as an animated Flash movie. The movie displays for a few seconds and then a Next button appears. After the user clicks the button, the movie advances to the next frame that has a form that allows the user to specify a greeting and the e-mail address of another user to whom the card will be mailed. The recipient will get an e-mail announcing the card and containing a link to view the card and custom greeting.
As you may have guessed, this application draws much of its information from a database. The titles, thumbnail paths, and Flash movie names for each postcard are stored in a table named cards. The users' custom greetings and e-mail addresses are inserted into a table named greetings. You'll find the Microsoft Access database titled ![]() ha.mdb on the CD-ROM accompanying this book. Note that if you've worked the examples for the Habitat Alert site in the previous chapters, you'll already have the database installed as a datasource and may skip the next section.
ha.mdb on the CD-ROM accompanying this book. Note that if you've worked the examples for the Habitat Alert site in the previous chapters, you'll already have the database installed as a datasource and may skip the next section.
| Note | Why store the card information in a database? Why not just hard-code the titles and thumbnail images into the Flash movie? The reason is that you're creating an ecard application that will be scalable, so that if Habitat Alert wants to add new cards or modify data on existing cards, they can do so simply by editing text information in the ecards database, rather than having to redesign a Flash movie. |
Setting up the datasource
If you completed the newsletter application in Chapter 48, you should already have the datasource ha defined in ColdFusion administrator, and you can move on to the next section. If you didn't, start by copying the database ![]() ha.mdb from the CD-ROM to a folder within your ColdFusion MX Web root. If you're using ColdFusion's built-in Web server, a good path is c:\cfusionmx\db.
ha.mdb from the CD-ROM to a folder within your ColdFusion MX Web root. If you're using ColdFusion's built-in Web server, a good path is c:\cfusionmx\db.
Next, open the Habitat Alert site in Dreamweaver and define a new datasource. In ColdFusion administrator's datasource panel, name the datasource ha; then navigate to the location of the database.
Creating the ColdFusion summary function
When users visit the ecard section of Habitat Alert, the first page they'll see is a Flash MX interface showing the current list of card titles and thumbnail images stored in the database. We'll call this the "summary" page. You'll use ColdFusion to retrieve this list with a <cfquery> and then pass the results to Flash for display.
| Note | When using Flash Remoting, it's important to pay close attention to the folder and filenames you use for your ColdFusion MX templates, because when you call a ColdFusion template from Flash, the folder in which the template is stored becomes the name of the ActionScript service, and the template filename becomes the ActionScript function. You learn more about this in the next section. |
Using Dreamweaver's Files pane, create a new folder within the Habitat Alert site titled ecards. Within it, create a new ColdFusion document titled ![]() get_all_cards.cfm. Listing 54-1 shows the entire contents of the page. Note that because Flash MX will be handling the display of data, this ColdFusion page doesn't need the standard HTML headers automatically inserted by Dreamweaver when a new page is created. You can simply delete them.
get_all_cards.cfm. Listing 54-1 shows the entire contents of the page. Note that because Flash MX will be handling the display of data, this ColdFusion page doesn't need the standard HTML headers automatically inserted by Dreamweaver when a new page is created. You can simply delete them.
Listing 54-1: get_all_cards.cfm
<cfquery name="flash.result" datasource="ha"> select id, card_title, card_thumbnail, card_movie from cards </cfquery>
Listing 54-1 contains a basic ColdFusion MX query that retrieves the ID, title, and thumbnail columns for all records found in the cards table. There is one unique element though: notice that the query name is flash.result. This is the special variable name used to pass information between ColdFusion and Flash. In the next section, you learn how this query object becomes available to your Flash display page.
Using Flash Remoting to link ColdFusion with Flash
A Flash movie is the logical choice as a user interface for choosing the ecard and entering the ecard greeting and other data. Flash Remoting makes it possible for a Flash movie to interact with ColdFusion files and retrieve information from a database. You could hard code the Flash movie with the names of the ecards and their titles, and load the thumbnail images from the document library. However, this method requires you to update the Flash movie every time the client adds or deletes an ecard from the queue, or modifies an existing ecard. Updating the database is the easier and more elegant solution.
The structure in the previous section contains information about only one user. What if you want a single variable object that contains similar data about several users? Enter the array variable, which — among many uses — may be used to store data for more than one user.
To illustrate this concept, consider a ColdFusion query that returns just one user record from a database. That's similar to a structure, because it contains only one first_name column, one last_name column, and so on. However, if the same query returned information for several users, there would be more than one value for first_name, last_name, and so on. That's more like an array. To put it another way, a structure contains data much like a single database record, whereas an array is capable of containing multiple records and thus can be used more like an entire database table.
In fact, it's helpful to think of arrays like database tables that are stored in memory — as a variable — rather than in a file. Though you never work with arrays in a graphic interface, they store information much the same way as a table.
Unlike structures, arrays are typically used with numbers rather than key names. For example, to define a two-dimensional array (you learn more about dimensions in a moment) called users that holds data on three users, you use code like this:
<!---create a new, two-dimensional array called "user"---> <cfset users=ArrayNew(2)> <!---define the first user as array row "1"---> <cfset users[1][1]="McKinley"> <cfset users[1][2]="Morganfield"> <cfset users[1][3]="15 Park Place"> <cfset users[1][4]="Clarksdale"> <cfset users[1][5]="MS"> <!---define the second user as array row "2"---> <cfset users[2][1]="Ellas"> <cfset users[2][2]="McDaniel"> <cfset users[2][3]="1241 Gretsch Drive"> <cfset users[2][4]="McComb"> <cfset users[2][5]="MS"> <!---define the third user as array row "3"---> <cfset users[3][1]="Eugene"> <cfset users[3][2]="Klein"> <cfset users[3][3]="12 Witz Avenue"> <cfset users[3][4]="Newark"> <cfset users[3][5]="NJ">
In a two-dimensional array, each array element is referenced by a pair of numbers, each in brackets. To use the database-table analogy, the first number refers to a row, while the second refers to a column.
To display a specific element of an array, you use the same syntax, referring to it by its "row" and "column:"
<cfoutput>#users[3][2]#</cfoutput>
This snippet returns the value Klein, or the second column in the third row of the array users.
The Flash Remoting service is standard with ColdFusion MX. However, you have to add the necessary components to create remoting applications with Flash MX. You can download these components from Macromedia's Web site at this URL: http://www.macromedia.com/software/flashremoting/downloads/ components/. If you purchased Macromedia Flash Remoting MX, you already have the components installed. Figure 54-1 shows the Remoting objects that are added to the Flash MX Actions panel after you download the remoting components from Macromedia's Web site. Note that the Actions Panel has been enlarged in this screenshot so that all of the Remoting additions are visible.
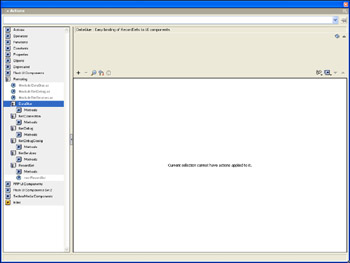
Figure 54-1: Flash Remoting adds several objects to the Flash MX Actions panel.
The Flash Remoting objects, as with other ActionScript objects, are organized in their own book. The objects in the Remoting book have their own methods and make it possible for you to create a connection with the gateway to Netservices.
About the Ecard Flash movie
The source file for the Flash movie (![]() eCard.fla) for this exercise can be found on the CD ROM that accompanies this book. The movie is comprised of three frames. In the first frame, ActionScript calls the ColdFusion file to retrieve the information from the database. The information is stored in four arrays. After the arrays are populated, the loadMovie action is used to load a thumbnail image into a target window. Users can preview available ecards by clicking the forward and back arrows shown in Figure 54-2. The images could have been loaded into smaller windows, much like a table in an HTML image gallery. However this would limit the number of ecards that could be displayed in the interface. Loading individual images into the window allows for future expansion should Habitat Alert decide to increase the number of ecards they make available to users.
eCard.fla) for this exercise can be found on the CD ROM that accompanies this book. The movie is comprised of three frames. In the first frame, ActionScript calls the ColdFusion file to retrieve the information from the database. The information is stored in four arrays. After the arrays are populated, the loadMovie action is used to load a thumbnail image into a target window. Users can preview available ecards by clicking the forward and back arrows shown in Figure 54-2. The images could have been loaded into smaller windows, much like a table in an HTML image gallery. However this would limit the number of ecards that could be displayed in the interface. Loading individual images into the window allows for future expansion should Habitat Alert decide to increase the number of ecards they make available to users.
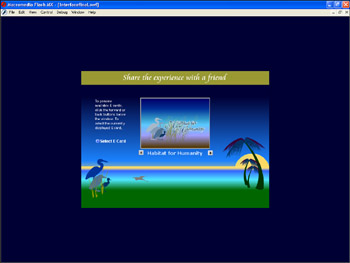
Figure 54-2: The first frame of the Flash movie enables users to preview available ecards.
After the viewer chooses an ecard, the ecard is loaded into Level1 of the ecard movie. Frame 2 of the movie uses a timer component to pause the movie for a few seconds allowing the viewer to look at the Ecard. Then the movie advances to Frame 3. The ActionScript on Frame 3 loads a Next button, that when clicked unloads the ecard movie. After the movie unloads, the viewer sees the form that can be filled in and submitted to send the Ecard and a personalized greeting to a friend or colleague.
Flash MX has several components that can be used for applications of this sort; for example you can use the list box, or combo box components, and use a function to populate either component with the results of the ColdFusion query. However, this is only advisable when you have a small number of objects to display from the database. When you create an application for an application with multiple items in a database, using a list box component or combo box component limits you to the number of records you can use from the database. By using an associative array, as is the case with this ecard application, you have access to multiple records from a database and room for future expansion.
Users can select an ecard by clicking the button below the text to the left of the image window. After clicking the button, the movie advances to the next frame and the SWF file corresponding to the image is loaded into Level 1. A timer pauses the movie on the second frame and then advances the movie to the third frame. An additional SWF movie is loaded into Level 2. This movie has one object, a Next button, that when clicked unloads the ecard movie and reveals the form used to input the recipient's data and a greeting, as shown in Figure 54-3.
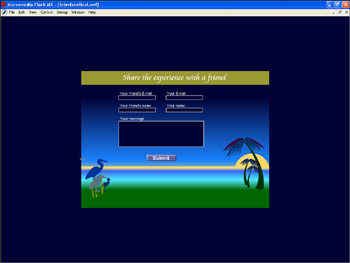
Figure 54-3: The third frame of the movie provides users with a form for entering data.
After users enter data, they send the ecard by clicking the Submit button. Clicking this button sends the greeting information to the database. At this point, ColdFusion files take over the process.
Creating the Flash summary frame
For an ecard application, you can create a Flash movie with animation and sound. You can also create a more elegant user interface than is possible with standard HTML. For this tutorial, an interface has been created and populated with a target window, plus there is an animation of a bird to keep viewers entertained while selecting an ecard. To follow along with upcoming sections, copy the ![]() eCard.fla file from the Chapter 54 folder on the CD ROM that accompanies this book, launch Flash MX, and open the file.
eCard.fla file from the Chapter 54 folder on the CD ROM that accompanies this book, launch Flash MX, and open the file.
The ActionScript in the first frame of this application connects the Flash movie remotely to NetServices. After the remote connection is made, the ColdFusion file in Listing 54-1 is summoned as a service. The results of the file are loaded into arrays.
Creating the remote connection
When you create your own Flash Remoting applications, the first order of business is to create the ActionScript to remotely connect the Flash movie with Net Services. You accomplish this by including the NetServices.as object to your script. You'll find this object by opening the Actions panel and navigating to the Remoting book that was added when you downloaded the Remoting components from Macromedia's Web site. You can add the NetServices.as object to your script in Normal mode by double-clicking its title, or by selecting and then dragging and dropping it into the Script pane. If you add the object in this manner, Flash automatically adds a semi-colon to signify the end of a line of code. Switch from Normal mode to Expert mode and delete the semi-colon, otherwise you get an error message. The following code shows the proper format for adding this object to your script.
#include "NetServices.as"
Creating a gateway connection
After enabling net services, you must supply the URL where the NetServices can be accessed by the Flash movie. You need to create a gateway connection as well. You achieve both of these tasks by adding methods of the NetServices object. When you are initially creating your Flash application the URL for the gateway to flashservices will be your local host, which ColdFusion MX defines as: http://localhost:8500/flashservices/gateway.
Next you create the code that sets the gateway connection. This involves adding setDefaultGatewayURL to the script and defining the default gateway. The default gateway you set when testing the application with the ColdFusion MX is the local host on your system. The URL to the default host on your local computer is: http://localhost:8500/flashservices/gateway. You have to change the URL to the directory where flashservices reside on your Web hosting service before uploading the application. The next step is to add the createGatewayConnection method of the Net Services object to your script, which connects your application to the Flash Remoting service on your application's server. In the case of the ecard application, you'll be connecting to a ColdFusion server; hence it makes sense to give the object the name of CFServer. You can do this by creating a named variable and setting it equal to the createGatewayConnection method of the NetServices object, or by entering the code in Expert mode. When you create your own Flash Remoting applications after you define the URL for Flash services and create the gateway connection, your code should be similar to Listing 54-2.
Listing 54-2: Creating a Gateway Connection
#include "NetServices.as" NetServices.setDefaultGatewayURL("http://localhost:8500/flashservices/ gateway"); CFServer = NetServices.createGatewayConnection();
Accessing NetServices
For a Flash application to communicate with ColdFusion files, you use the getService method of the NetConnection object, which is located in the Remoting book in the Actions panel. For the ecard application, you need to unpack the information from the database as defined by the query in the ColdFusion file: ![]() get_all_cards.cfm. When you call a NetService, the service is defined by the server directory where the function is located. In the case of the ecard application, the ColdFusion file is located in the server's ecard directory; hence the service is ecard. You need to name the service object. You can do this by creating a new variable, or by hard coding the script in Expert mode. For the ecard application, you'll be getting the information about each ecard from the database. One of the items you'll be using will be the title of each ecard; therefore you can name the service object, svcTitles. After you define the service, you add the ColdFusion function to your ActionScript. The ColdFusion file
get_all_cards.cfm. When you call a NetService, the service is defined by the server directory where the function is located. In the case of the ecard application, the ColdFusion file is located in the server's ecard directory; hence the service is ecard. You need to name the service object. You can do this by creating a new variable, or by hard coding the script in Expert mode. For the ecard application, you'll be getting the information about each ecard from the database. One of the items you'll be using will be the title of each ecard; therefore you can name the service object, svcTitles. After you define the service, you add the ColdFusion function to your ActionScript. The ColdFusion file ![]() get_all_cards.cfm queries the database for the information needed in your Flash movie. You add that information to the service as a function. To add the service to your script, insert the ActionScript code shown in Listing 54-3.
get_all_cards.cfm queries the database for the information needed in your Flash movie. You add that information to the service as a function. To add the service to your script, insert the ActionScript code shown in Listing 54-3.
Listing 54-3: Accessing a Remote Service
svcTitles = CFServer.getService("habitat_alert.ecards", this); svcTitles.get_all_cards();
Creating the function
After you call the remote service, you create ActionScript that interprets the results into a format that you can utilize in your application. For the ecard application, you'll need the following fields from the cards table of ecard database: ID, card_title, card_thumbnail, and card_movie. After your application remotely calls the NetService, the data from the ![]() get_all_cards.cfm file is returned as a result. The result of the remote service contains the items from the database queried by the ColdFusion function.
get_all_cards.cfm file is returned as a result. The result of the remote service contains the items from the database queried by the ColdFusion function.
To create the function that interpolates the data, you begin by creating a new array for each item queried. You populate the arrays with items from each database field using a for loop. The number of items in the database fluctuates; therefore your loop executes until the number of items (length) of the database is exhausted. The final duty your function performs is to load the first ecard thumbnail into a target window instance, which has been labeled, eCardTarget and resides on the root timeline. To finalize the code for the first frame of the e card application, enter the code shown in Listing 54-4.
Listing 54-4: Creating the Result Function
function get_all_cards_Result(result) { card_id = new Array(); titles = new Array(); thumbnails = new Array(); movies = new Array(); for (var i = 0; i<result.items.length; ++i) { card_id[i] = result.items[i].ID; titles[i] = result.items[i].card_title; thumbnails[i] = result.items[i].card_thumbnail; movies[i] = result.items[i].card_movie; } loadMovie("images/" + thumbnails[0], "_root.EcardTarget"); _root.eCardTitle.text = titles[0]; k = 0; } No doubt you noticed the addition of a new variable, k, as the final line of code. This initializes a counter for the buttons that load the ecard images. Your code for the first frame of the ecard application should read as shown in Listing 54-5, which includes a stop() action at the start of the script. This action prevents the movie from going to the second frame until the user selects an ecard.
Listing 54-5: ActionScript for the Application's First Frame
stop(); #include "NetServices.as" #include "NetDebug.as" NetServices.setDefaultGatewayURL("http://localhost:8500/flashservices/ gateway"); CFServer = NetServices.createGatewayConnection(); svcTitles = CFServer.getService("habitat_alert.html.site.ecards", this); svcTitles.get_all_cards(); function get_all_cards_Result(result) { titles = new Array(); card_id = new Array(); thumbnails = new Array(); movies = new Array(); for (var i = 0; i<result.items.length; ++i) { titles[i] = result.items[i].card_title; thumbnails[i] = result.items[i].card_thumbnail; movies[i] = result.items[i].card_movie; card_id[i] = result.items[i].ID; NetDebug.trace(card_id[i]); NetDebug.trace(titles[i]); NetDebug.trace(thumbnails[i]); NetDebug.trace(movies[i]); } loadMovie("images/" + thumbnails[0], "_root.EcardTarget"); root.eCardTitle.text = titles[0]; k = 0;
Coding the buttons
Users click the buttons at the bottom of the target window to view images of the ecards. When the user clicks a button clicked, a new image loads and the title of the image updates as well. As previously mentioned, the image loads into a target window with the instance name of EcardTarget. A dynamic text box below the target window with the instance name of EcardTitle, displays the name of each ecard. The counter you initialized in the get all cards Result function increments by 1 when the user clicks the Forward button and decrements by 1 when the user clicks the Back button. The Forward button's code has a conditional statement that prevents the variable from exceeding the number of elements in the array, and the Back button's code has a conditional statement that prevents the variable from having a value less than 0. Listing 54-6 shows the code for the Forward button. Listing 54-7 shows the code for the Back button.
Listing 54-6: ActionScript for the Forward Button
on (release) { ++k; if (k>titles.length-1) { k = titles.length-1; } loadMovie("images/" + thumbnails[k], "_root.EcardTarget"); root.eCardTitle.text = titles[k]; }
Listing 54-7: ActionScript for the Back Button
on (release) { --k; if (k<0) { k = 0; } loadMovie("images/" + thumbnails[k], "_root.EcardTarget"); root.eCardTitle.text = titles[k]; } After viewers decide which ecard to send, they can select it by clicking the Select E Card button. The ActionScript for this button, shown in Listing 54-8 is fairly straightforward. It advances the movie to the next frame and loads the ecard SWF file into Level 1 of the movie.
Listing 54-8: Coding the Select Ecard Button
on (release) { gotoAndStop(2); loadMovieNum("site/ecards/" + movies[k], 1); } Notice that the code that loads the movie is an expression. It concatenates the directory (ecards) where the ecards reside on the server with an element from the array movies. The element corresponds to the counter variable.
Coding the second and third keyframes
The ActionScript for the second and third keyframes of the movie are fairly simple. In the second frame of the movie, add a stop() action. If you examine the second frame of the movie closely, you'll notice a registration point outside the boundaries of the Stage. This is a timer component, which pauses the movie for a period of four seconds before advances to the third frame.
| Tip | The timer component pauses a movie on a frame for the time period you specify in the Parameters tab of the Property inspector. To use the timer in another movie, choose File ® Open as Library. Navigate to the directory where the FLA file for this exercise is stored. Drag the timer component into the current document library, and add it to the movie keyframe where you want to pause the production. |
The third keyframe loads another movie into Level 2. The movie has one object, a Next button, that when clicked unloads the ecard movie, as well as the Next button movie. The code for the third keyframe is shown in Listing 54-9.
Listing 54-9: ActionScript for the Third Keyframe
loadMovieNum("next.swf", 2); stop();
Creating the Flash detail frame and form
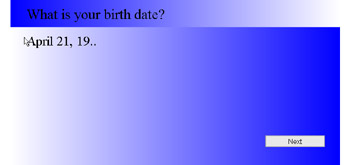
The third frame of the ecard movie contains input text boxes where users enter their names and e-mail addresses, as well as the recipient's name and e-mail address. There is also an input text box in which the user can compose a greeting, as shown in Figure 54-4. The Submit button at the bottom of the Stage compiles the information and forwards it the ColdFusion page detailed in the next section.
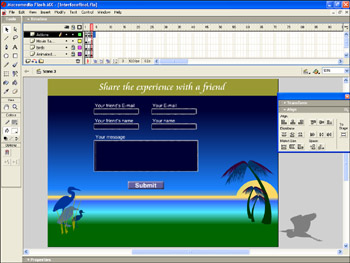
Figure 54-4: Users enter information and send the ecard from frame 3 of the movie.
Each input text box has been given a unique instance name. When users click the Submit button, the data is compiled and forwarded to the ![]() send_card.cfm page. To finalize the code for the project, select the Submit button and then open the Actions panel. Create a variable for each field in the greeting table of the ecards database and set its value equal to the text data in each input text box. You use the getUrl action to send the information to the
send_card.cfm page. To finalize the code for the project, select the Submit button and then open the Actions panel. Create a variable for each field in the greeting table of the ecards database and set its value equal to the text data in each input text box. You use the getUrl action to send the information to the ![]() send_card.cfm page. The POST method is used to send the variables to the ColdFusion page. The complete code for the Submit button in the ecard application is shown in Listing 54-10.
send_card.cfm page. The POST method is used to send the variables to the ColdFusion page. The complete code for the Submit button in the ecard application is shown in Listing 54-10.
Listing 54-10: ActionScript for the Submit Button
on (release) {card_id = card_id[k]; sender_email = _root.senderemail.email3.text; sender_name = _root.sendername.email4.text; recipient_email = _root.friendsemail.email1.text; recipient_name = _root.friendsname.email2.text; greeting = _root.yourMessage.message.text; getURL("http://localhost:8500/habitat_alert/html/site/ecards/send_card. cfm", "_self", }
When you're creating an application that uses Flash Remoting, it's difficult to tell whether you've received the queried information from the remote service. You can enable the NetConnection Debugger by adding one line of code to your ActionScript: #include "NetDebug.as". After you add this line of code to your script, you can then use the trace method of the NetDebug object in the same manner as you'd use a trace in a nonremote Flash application. The following is the code for frame one of the ecard application with the trace method being used to check array contents.
stop(); #include "NetServices.as" #include "NetDebug.as" NetServices.setDefaultGatewayURL("http://localhost:8500/flashservices/ gateway"); CFServer = NetServices.createGatewayConnection(); svcTitles = CFServer.getService("habitat_alert.html.site.ecards", this); svcTitles.get_all_cards(); function get_all_cards_Result(result) { titles = new Array(); card_id = new Array(); thumbnails = new Array(); movies = new Array(); for (var i = 0; i<result.items.length; ++i) { titles[i] = result.items[i].card_title; thumbnails[i] = result.items[i].card_thumbnail; movies[i] = result.items[i].card_movie; card_id[i] = result.items[i].ID; NetDebug.trace(card_id[i]); NetDebug.trace(titles[i]); NetDebug.trace(thumbnails[i]); NetDebug.trace(movies[i]); } loadMovie("images/" + thumbnails[0], "_root.EcardTarget"); root.eCardTitle.text = titles[0]; k = 0; } You open the NetConnection Debugger by choosing Window ® NetConnection Debugger prior to testing your movie. The NetConnection Debugger is shown in the following figure.
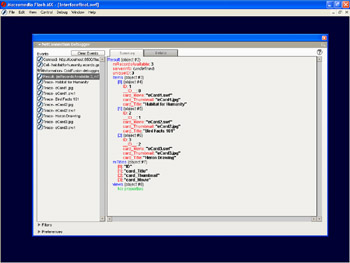
You can debug your Flash MX remote applications using the NetConnection Debugger.
Creating the ColdFusion action page
After the user has selected a card and supplied details, such as the recipient name, e-mail address, and so on, the Flash movie sends the form data to ColdFusion MX for processing. In this final step, the user leaves the Flash interface and is taken to a ColdFusion template that performs three actions:
-
Saves the data entered by the user in the "greetings" table
-
Sends an e-mail to the recipient announcing the ecard
-
Displays a confirmation to the user that the announcement has been sent
The action page uses neither flash.params or flash.result, because the Flash movie will simply be passing along standard form data.
Create a new ColdFusion MX document in the ecards folder titled ![]() send_card.cfm. Listing 54-11 contains the basic code, although you can customize the e-mail announcement and sender confirmation text to your liking.
send_card.cfm. Listing 54-11 contains the basic code, although you can customize the e-mail announcement and sender confirmation text to your liking.
Listing 54-11: send_card.cfm
<!---insert the greeting data into the database---> <cftransaction> <cfquery datasource="ha"> insert into greetings (card_id,sender_email,sender_name, recipient_email,recipient_name, greeting) values (#card_id#,'#sender_email#', '#sender_name#','#recipient_email#', '#recipient_name#','#greeting#') </cfquery> <!---get the greeting_id number of the greeting just inserted---> <cfquery name="get_last" datasource="ha"> select max(greeting_id) as [new_id] from greetings </cfquery> </cftransaction> <!---send mail to the card recipient---> <cfmail to="#recipient_email#" from="webmaster@habitatalert.com" subject="Someone Has Sent You an E-Card"> Dear User; A member of our Website has sent you an e-card. To retrieve it, please visit this URL: http://localhost:8500/habitat_alert/html/site/ecards/view_card.cfm?gree ting_id=#get_last.new_id# </cfmail> <!---display a confirmation to the sender---> <html> <head> <title>Card Sent</title> <meta http-equiv="Content-Type" content="text/html; charset=iso- 8859-1"> </head> <body> <h2>Card Sent</h2> Your card information has been stored, and an announcement has been sent to <cfoutput>#recipient_name# at #recipient_email#</cfoutput>. </body> </html>
In Listing 54-11, the first <cfquery> tag inputs the sender's greeting data into the greetings table using SQL's INSERT command. Next, the second <cfquery> section uses the SQL aggregate function max() to retrieve the greatest ID number present in the greetings table. In this case, this number will be the one Microsoft Access autogenerated when <cfinsert> inserted the sender's data. This number is important, because it uniquely identifies the current greeting.
Notice that the two queries are enclosed in a pair of <cftransaction> tags. The function of this tag is to group multiple queries so that ColdFusion treats them as one event. In this case, it performs the insert and retrieves the maximum greeting_id in one step. Why? Consider a very busy Web site in which two unique users submit the ecard form at the same time. If ColdFusion processed the queries separately, it's possible that it might insert one user's data first and then report the wrong maximum greeting id to the other user's page. By using <cftransaction>, you can ensure that the maximum greeting_id returned to the user is the one created by the insert of that person's distinct information.
Next, an e-mail is sent to the card recipient via the <cfmail> tag. The body of the mail includes the full URL path to a page called ![]() view_card.cfm and a query string containing the greeting ID of the new greeting inserted by this template.
view_card.cfm and a query string containing the greeting ID of the new greeting inserted by this template.
| Caution | Remember that the "from" value in any <cfmail> tag needs to be an address that's acceptable to the SMTP server through which the mail will be sent. |
Finally, a confirmation is displayed to the sender, showing that mail has been sent. For verification, the recipient's name and e-mail address are also displayed.
Creating the ColdFusion view page
When a recipient receives an e-mail announcement, it contains some text like this:
From: website@habitatalert.com To: someuser@somedomain.com Subject: Someone Has Sent You an E-Card Dear User; A member of our Website has sent you an e-card. To retrieve it, please visit this URL: http://localhost:8500/habitat_alert/html/site/ecards/view_card.cfm?gree ting_id=5
You now need to construct ![]() view_card.cfm, the page that displays the card and greeting to the recipient. In essence, this page functions much like the detail pages described in Chapter 51, where an item ID is passed in the URL, a query is performed using the passed ID as input, and the resulting item details are displayed to the user.
view_card.cfm, the page that displays the card and greeting to the recipient. In essence, this page functions much like the detail pages described in Chapter 51, where an item ID is passed in the URL, a query is performed using the passed ID as input, and the resulting item details are displayed to the user.
The greeting_id passed in the recipient's URL enables you to query for the greeting details, but you also need a second query to get the details on the card itself — the title and the flash movie, for example. Take a look at Listing 54-12.
Listing 54-12: view_card.cfm
<!---get greeting details based on greeting_id passed in URL---> <cfquery name="get_greeting" datasource="ha"> select recipient_name, sender_name, sender_email, greeting, card_id from greetings where greeting_id = #URL.greeting_id# </cfquery> <!---get card details based on the card_id retrieved by the previous query---> <cfquery name="get_card" datasource="ha"> select card_title, card_movie from cards where id = #get_greeting.card_id# </cfquery> <html> <head> <!---begin cfoutput section---> <cfoutput> <!---show recipient name in page title---> <title>A Greeting Card for #get_greeting.recipient_name#</title> <meta http-equiv="Content-Type" content="text/html; charset=iso- 8859-1"> </head> <body> <!---show recipient name in header---> <h2>A Greeting Card for #get_greeting.recipient_name#</h2> <!---embed flash movie based on the card_movie value retrieved in the "get_card" query---> <div align="center"><object class codebase="http://download.macromedia.com/pub/shockwave/cabs/flash/swfla sh.cab##version=6,0,0,0" WIDTH="550" HEIGHT="400" ALIGN=""> <param NAME=movie VALUE="#get_card.card_movie#"> <param NAME=quality VALUE=high> <param NAME=bgcolor VALUE=##000033> <embed src="/books/2/375/1/html/2/#get_card.card_movie#" quality=high bgcolor=##000033 WIDTH="550" HEIGHT="400" NAME="#get_card.card_movie#" ALIGN="" TYPE="application/x-shockwave-flash" PLUGINSPAGE="http://www.macromedia.com/go/getflashplayer"> </embed> </object></div> <p align="center">#get_greeting.greeting#</p> <p align="center">This card has been sent to you by <ahref="mailto:#get_greeting.sender_email#">#get_greeting.sender_name#< /a>, courtesy of Habitat Alert</p> <p align="center">To send your own greeting card, click <a href="http://localhost:8500/habitat_alert/html/ecard.html"> here</a></p> <!---end cfoutput section---> </cfoutput> </body> </html>
The first query retrieves the greeting details; the second gets the card details based on the card_id retrieved by the first query.
Listing 54-12 also uses <cfoutput> a little differently than previous examples. Usually when <cfoutput> is used to display the results of a query, it's used in conjunction with a query attribute, such as the following:
<cfoutput query="some_query_name">
But in this case, your template contains two queries and your display needs to draw information from both of them. The solution is to use a generic <cfoutput> and then supply the name of a query as a qualifier, each time you reference a variable, as in the following snippet, which references the title returned by the get_card query and the greeting returned by the get_greeting query:
<cfoutput> #get_card.title#<br> #get_greeting.greeting#<br> </cfoutput>
Listing 54-12 also embeds the relevant Flash MX movie, based on the filename stored in the card_movie field. Finally, it displays the sender's greeting and name, and provides a link to the main ecard page to enable the recipient to send his or her own ecard.
ColdFusion Components, by Samuel Neff
Components are as notable an enhancement to ColdFusion MX as user defined functions were to ColdFusion 5. With ColdFusion components developers not only have a new mechanism for code reuse, but they are introduced to a programming concept long held as the cornerstone of advanced software design. Components bring the power of object-oriented programming but keep the tradition of simplicity that has made ColdFusion the ideal development platform for the Web.
A ColdFusion component (CFC) is a collection of properties and functions used to encapsulate related functionality. To demonstrate, look at an example from a survey question application. The following skeleton code outlines a component for a list of survey questions.
<cfcomponent> <cffunction name="getQuestionIdList" returnType="string" access="remote"> </cffunction> <cffunction name="getQuestionText" returnType="string" access="remote"> <cfargument name="questionId" type="numeric" required="true"> </cffunction> <cffunction name="setAnswerText" access="remote"> <cfargument name="questionId" type="numeric" required="true"> <cfargument name="answerText" type="string" required="true"> </cffunction> </cfcomponent>
Creating a Component
All code within the CFC must be contained within cfcomponent tags. Only comments can be placed outside these tags. Within the component you're defining three functions with the cffunction tags. The only required attribute is name. The returnType attribute defines the type of value being returned from the function. String indicates any text value and void indicates the function does not return anything.
Two of the functions require arguments. To define a function's arguments use the cfargument tag. This tag accepts a name and type and validates on each call that the value passed matches the type specified. You can also optionally specify that the argument is required, and in cases where it is not, you can specify a default value.
Dreamweaver MX can be helpful in creating CFCs; it provides a graphical user interface for creating the component structure. To create the above component using Dreamweaver MX's interface, follow these steps.
-
If the Application panel is not visible, click on Window and then Components.
-
If the Application panel is already visible but collapsed, click the arrow next to Application to expand it.
-
Click on the Components tab inside the Application panel.
-
If you haven't already defined a site, click on the "site" hyperlink to define a site. See Chapter 48 for information on defining a site.
-
If you haven't already identified the document type for the site, click on the "document type" hyperlink to specify the server model as ColdFusion.
-
If you haven't already specified the testing server information, click on the "Testing Server" hyperlink to specific the testing server details.
-
If you haven't already specified the RDS login, click on the "RDS" hyperlink to enter the RDS password.
-
If CF Component is not selected in the drop down box, select it.
-
Click on the Plus sign next to the drop down box to display the Create Component interface.
-
Under Name enter questionAnswer.
-
Under Component Directory specify a directory under your wwwroot to store the component.
-
In the Sections list box, click on Functions.
-
Click the Plus sign to add a new function.
-
Under Name enter getQuestionIdList.
-
Under Access enter remote.
-
Under Return Type enter string.
-
Repeat steps 13 through 16 for each of the functions in the above listing.
-
In the Sections list box, click on Arguments.
-
Select getQuestionText from the drop-down list box.
-
Click on the plus sign to add an argument.
-
Enter questionId for the name.
-
Enter numeric for the type.
-
Click the Required check box to specify the argument as required.
-
Repeat steps 18 through 22 to add the arguments for setAnswerText.
-
Click OK.
-
Dreamweaver MX displays a new CFC with the functions and arguments you specified.
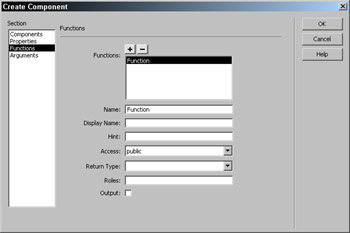
Using Dreamweaver MX to create a component outline
In the questionnaire example, you run database queries within each of the functions to provide the desired functionality:
<cffunction name="getQuestionIdList" returnType="string" access="remote"> <cfquery name="questionIdQuery" datasource="StudioMXBible"> SELECT QuestionID FROM Questions </cfquery> <cfset idList=ValueList(questionIdQuery.QuestionID)> <cfreturn idList> </cffunction> <cffunction name="getQuestionText" returnType="string" access="remote"> <cfargument name="questionId" type="numeric" required="true"> <cfquery name="questionQuery" datasource="StudioMXBible"> SELECT QuestionText FROM Questions WHERE QuestionID=#Arguments.questionId# </cfquery> <cfreturn questionQuery.QuestionText> </cffunction> <cffunction name="setAnswerText" access="remote"> <cfargument name="questionId" type="numeric" required="true"> <cfargument name="answerText" type="string" required="true"> <cfquery name="questionQuery" datasource="StudioMXBible"> UPDATE Answers SET AnswerText= <cfqueryparam cfsqltype="cf_sql_varchar" value="#Arguments.answerText#"> WHERE QuestionID=#Arguments.questionId# </cfquery> </cffunction>
Notice that the functions, getQuestionIdList and getQuestionText, which return a value do so through the cfreturn tag. This tag accepts an expression and returns the expression to the caller as the function result. With your component completed, you're ready to begin using it in your application.
Save this file to a new folder within your wwwroot and call it questionAnswer.cfc.
Using a Component from a ColdFusion Template
To begin with, you to create a simple HTMLform that displays the questions and an input block for users to provide an answer. Enter the following code into a blank ColdFusion template and save it as survey.cfm in the same directory as questionAnswer.cfc.
<cfoutput> <form action="action.cfm" method="post"> <cfset qaCFC=CreateObject("component","questionAnswer")> <cfloop index="questionId" list="#qaCFC.getQuestionIdList()#"> <h3>#qaCFC.getQuestionText(questionId)#</h3> <textarea name="Answer_#questionId#" cols="60" rows="5"></textarea> </cfloop> <br/> <input type="Submit" value="Submit"> </form> </cfoutput> ColdFusion MX includes three mechanisms to create a CFC from local CFML code, cfobject, cfinvoke, and CreateObject. Besides structure, the primary difference between these methods is component life. When used independently, cfinvoke creates the component, calls the method, and then releases the component. With cfobject and CreateObject the programmer is in complete control of the component life, which is important when calling multiple functions of the same component within a request.
Because your component simply encapsulates functionality and does not store any of its own data, you can store the component in the default Variables scope and allow it to be released at the end of the request. When components are used to store data and encapsulate functionality, they can be stored in the Server, Application, Session, and Request scopes. For more information on scopes refer to the "A Word About Variable Scopes" sidebar in Chapter 48.
With you form page created, you can move on to the action page and use the same component for storing data back to the database:
<cfset qaCFC=CreateObject("component","questionAnswer")> <cfloop index="varName" list="#Form.fieldNames#"> <cfif ListGetAt(varName,1,"_") IS "Answer"> <cfset questionId=ListGetAt(varName,2,"_")> <cfif Len(Form[varName])> <cfset qaCFC.setAnswerText(questionId,Form[varName])> </cfif> </cfif> </cfloop> <h3>Answers updated</h3> When you review the code in the ColdFusion templates and ColdFusion component, compare them with the equivalent code using traditional methods. Traditionally a form template would include a query to retrieve the data and populate the form from the query results. The action template reads the form data and creates queries to update the database. This traditional development style intertwines the database access and form display code which hampers maintenance. With the survey questionnaire example all code regarding the database interaction is entirely encapsulated within the component. The form templates concentrate on form display and leave all database interaction to the component. The result is a clear separation between business logic and display code. This simplifies development and maintenance.
Save this last file as action.cfm and test it by starting with the surven.cfm form, answering the questions, and clicking submit.
Using a Component from Flash MX
To understand upon why this separation is beneficial, take your example to the next step. The HTML form is functional, but you want the application to be more appealing. To accomplish this, you move the client code to Flash MX. From within Flash you build a form and then call your component through Flash Remoting.
Flash MX application that provides the question-and-answer form for your component
To begin working with the Flash MX example, download and install the Flash Remoting components from Macromedia's Web site, as explained earlier in this chapter. Then create a new movie with two dynamic text fields named question_txt and answer_txt and a push-button named next_pbtn. The push-button should be labeled Next and should have a click handler of nextQuestion. With this layout complete, add the following ActionScript to the first frame:
#include "NetServices.as" if (inited==null) { inited=true; NetServices.setDefaultGatewayURL("http://127.0.0.1/flashservices/gateway"); var gate = NetServices.createGatewayConnection(); var qaCFC = gate.getService("StudioMXBible.Components.questionAnswer",this); qaCFC.getQuestionIdList(); } This code sets up a connection to the Flash gateway on the local host. Then it retrieves the questionAnswer component. The fully qualified component name is a modified version of the component's path. In this case, the component is stored as /StudioMXBible/Components/ questionAnswer.cfc. Change the path to the component to reference the component you createed earlier in this tutorial, relative to the wwwroot and using dots instead of slashes.
After you have a connection to your component, you can call the getQuestionIdList method to retrieve a list of question IDs. Notice that even though the function returns a value, you do not set variable equal to the returned value, because all calls to CFCs are asynchronous. Flash initiates the call and immediately returns execution to your Flash application. When the CFC is done processing and returns the value, it calls a function within your Flash application that has a name identical to the component method with the suffix _Result.
var idArray=new Array(); var questCounter=-1; function getQuestionIdList_Result(idList) { idArray=idList.split(","); nextQuestion(); } As you can see the value returned from the component method is passed to the Result function as an argument. Because it is a list, use the String object's split() method to create an array for easier manipulation:
function nextQuestion() { if (questCounter>-1) { qaCFC.setAnswerText(idArray[questCounter],answer_txt.text); } questCounter++; if (questCounter < idArray.length) { qaCFC.getQuestionText(idArray[questCounter]); question_txt.text="Retrieving next question..." answer_txt.text=""; } else { question_txt.text="The survey is complete. Thank you."; answer_txt.text=""; next_pbtn.setLabel("Close"); } } function getQuestionText_Result(questionText) { question_txt.text=questionText; answer_txt.text=''; } Because you've initialized the question counter to negative one, you use that to determine whether you have an answer to save. If you do, call the component function to save the current answer. Then increment the counter. If there are still questions remaining, call the component to retrieve the next question. Then update the application user interface to inform the user that you're retrieving the next question. If you're already on the last question, tell the user that the questionnaire is complete.
The listing also includes another result function for retrieving question text. Upon receipt you update the two text fields. Notice, however, that there is no result function for the setAnswerText function, because this function does not return a value.
That small bit of ActionScript is all that is required to create a database-driven Flash application. Compare this to using LoadVariables and XML in previous versions of Flash and you'll see that using CFCs is not only simpler but provides for code that is easier to understand and maintain.
Components can and should revolutionize the way you program in ColdFusion. They add structure and facilitate the encapsulation of data and business logic. Using components leads you to developing applications in a multitiered approach, which improves maintainability and flexibility. While there may be a small adjustment in programming style to use components, you will find the change beneficial.
ColdFusion MX XML Support, by Samuel Neff
Extensible Markup Language (XML) is a structured data format ideal for serialization and data exchange. Converting data to an XML format encapsulates the data itself and descriptors about the data, referred to as meta-data. This encapsulation greatly simplifies automated communications and collaboration.
ColdFusion developers have long had the ability to convert any data to XML through Web Distributed Data Exchange (WDDX), an XML grammar developed by Allaire for this specific purpose. With ColdFusion MX, developers now have the ability to work with any XML data using native ColdFusion tags and functions.
Creating an XML Document Object
ColdFusion MX provides three mechanisms for creating an XML document object including one new tag and two new functions. The cfxml tag enables you to embed XML text within your ColdFusion template and create an XML document object from that text, as in the following code.
<cfxml variable="MyXML" caseSensitive="> <classroom roomNumber="210"> <teacher> <firstName>John</firstName> <lastName>Smith</lastName> </teacher> <students> <student> <firstName>Jim</firstName> <lastName>Johnson</lastName> </student> <student> <firstName>Jane</firstName> <lastName>Davis</lastName> </student> </students> </classroom> </cfxml>
As you can see you wrap the XML content inside the cfxml tag, which takes two attributes. variable is required and provides a name for the new XML document object. caseSensitive is optional and specifies whether ColdFusion should enforce the case of the elements and attributes during lookups. Even with caseSensitive set to no, the default, ColdFusion preserves the case of XML elements and attributes, and leaving it at no enables you to use the simpler structure dot notation, discussed later in this tutorial.
To examine how ColdFusion MX stores an XML document object internally, the cfdump tag introduced in ColdFusion 5:
<cfdump var="#MyXML#" label="MyXML">
XML Document Object Explained
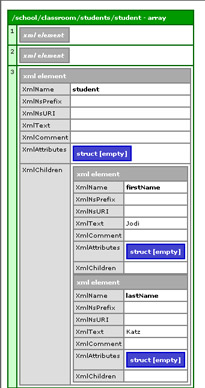
At the very top, MyXML is an XML document object (see the following figure) which contains one immediate child, classroom, also referred to as the root element. classroom is an XML element node that is treated internally much like a structure. The XmlText key provides the text contained within the element but not in any child elements, which in this case is none. The XmlAttributes key provides a substructure with key-value pairs associated with each attribute. In this case it contains the roomNumber attribute and the value 210.
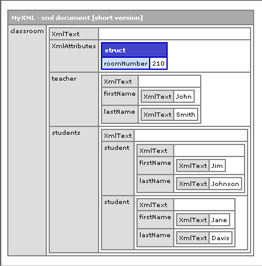
ColdFusion MX's internal representation of your XML document object
In addition to these two built in keys, classroom also has two child elements, teacher and students, as structure keys. Each of these is also an XML element node with keys for XmlText and the child elements. This implementation of using structure type objects internally makes using XML within ColdFusion much simpler when compared to DOM-compliant object models. For example, if you want the classroom teacher's first name, you simply reference it as follows.
<cfoutput>#MyXML.classroom.teacher.firstName.XmlText#</cfoutput>
The first variation arises when you look at the students element and its child elements, student. Because there are two student elements within students, student is stored as an array. To reference any of the student values, use array notation after the student element reference. For example, if you want the first student's first name, reference it as follows.
<cfoutput> #MyXML.classroom.students.student[1].firstName.XmlText# </cfoutput>
Modifying an XML Document Object
This structure and array based implementation also means you can use all of ColdFusion MX's structure and array functions to modify an XML document object. You combine these functions with the new XmlElemNew function to add new students to your classroom.
To add another student, need to create a new student element and then add the student as a child of the students element. However, you can't directly add the student to the student array; you have to use the special XML element key XmlChildren, which lists all child elements of a parent element:
<cfscript> newStudent=XmlElemNew(MyXML,"student"); ArrayAppend(MyXML.classroom.students.XmlChildren, newStudent); </cfscript>
With the new student added, you can specify the student's information via the firstName and lastName elements using the same functions:
<cfscript> firstName=XmlElemNew(MyXML,"firstName"); firstName.XmlText="Jill"; lastName=XmlElemNew(MyXML,"lastName"); lastName.XmlText="Jones"; ArrayAppend(MyXML.classroom.students.student[3].XmlChildren,firstName); ArrayAppend(MyXML.classroom.students.student[3].XmlChildren,lastName); </cfscript>
Searching an XML Document Object
ColdFusion MX also supports complex searches on an XML document object using the W3C standard language called XPath. XPath is used to specify a set of XML nodes based on certain criteria. To fully understand the power of XPath, you enlarge the classroom example to include a small school.
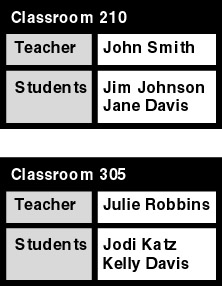
<cfxml variable="MyXML"> <school> <classroom roomNumber="210"> <teacher> <firstName>John</firstName> <lastName>Smith</lastName> </teacher> <students> <student> <firstName>Jim</firstName> <lastName>Johnson</lastName> </student> <student> <firstName>Jane</firstName> <lastName>Davis</lastName> </student> </students> </classroom> <classroom roomNumber="305"> <teacher> <firstName>Julie</firstName> <lastName>Robbins</lastName> </teacher> <students> <student> <firstName>Jodi</firstName> <lastName>Katz</lastName> </student> <student> <firstName>Kelly</firstName> <lastName>Davis</lastName> </student> </students> </classroom> </school> </cfxml>
An XPath expression is a path structure to a specified XML element node. Youstart all your XPath examples with the document root, '/', and drill down from there. The following example returns all students in the school:
<cfset studentNodes=XmlSearch(MyXML, "/school/classroom/students/student")> <cfdump var="#studentNodes#" label="/school/classroom/students/student">
The elements returned by a call to XmlSearch()
By using XPath you listed all students in the school, regardless of which classroom they are in. XPath also provides for filtering the returned list using square brackets. For example, the following XPath expression returns all students with the last name Davis:
<cfset studentNodes=XmlSearch(MyXML, "/school/classroom/students/student[lastName='Davis']")>
The filtering expression can even use any valid XPath selector. For a more complicated example, use the following XPath expression to return all students whose teacher's last name is Smith.
<cfset studentNodes=XmlSearch(MyXml, "/school/classroom/students/student[../../teacher/lastName='Smith']")>
As you can see, XmlSearch is a powerful tool for finding and listing XML elements within a ColdFusion MX XML document object. Another equally powerful function new to ColdFusion MX is XmlTransform, which performs XSLT transformations on an XML document object.
Transforming an XML Document Object
XSLT is a stylesheet language for transforming one XML document into a different XML document. This is commonly used when sharing data between programs that use a different XML grammar or for creating a standard compliant document out of custom XML. Although XSLT is far beyond the scope of this book or tutorial, you review a couple of simple examples.
For your first XSLT demonstration, create a new ColdFusion template that includes the code from Listing 1, the simple classroom example. Then add the following code.
<cfsavecontent variable="classroomToSchoolXSLT"> <xsl:stylesheet version="1.0" xmlns:xsl="http://www.w3.org/1999/XSL/Transform"> <xsl:output method="xml" indent="yes"/> <xsl:template match="/"> <school> <xsl:apply-templates/> </school> </xsl:template> <xsl:template match="node()|@*"> <xsl:copy> <xsl:apply-templates select="node()|@*"/> </xsl:copy> </xsl:template> </xsl:stylesheet> </cfsavecontent> <cfset school=XmlTransform(MyXML, classroomToSchoolXSLT)>
First notice that you used the cfsavecontent tag instead of the cfxml tag. ColdFusion MX always uses a plain string for the XSLT and not an XML document object. After you have your XSLT stored as a string in a variable, use the XmlTransform function to create a new XML document object by applying the XSLT transformation to the classroom example.
Let's examine the components of your XSLT. It starts with a stylesheet element within the XSLT 1.0 namespace, http://www.w3.org/1999/ XSL/Transform and specifies that this is a version 1.0 stylesheet. Then you specify what type of output you want to return from the transformation with the output element. Options are xml, html, or text. output also has an indent attribute, which enables creation of pretty printed XML documents.
Next you have two template elements, which provide a match pattern and replacement content. The match attribute is an XPath expression that returns a set of nodes in the source document. ColdFusion MX replaces each of the nodes returned by the expression with the content within the template element.
The first match pattern returns the root of the document. This is not the root element, but the root of the document itself. The content of this match indiciates that you want to enclose the entire document inside a school element. Then you use the apply-templates element to continue matching source elements against patterns in the XSLT.
The second match pattern is actually two patterns. The pike character (|) is a union operator that matches both sets of expressions. The node function returns any node other than the document node and attributes. The @* expression matches all attributes. For each node you find, you use the copy element to copy the source node forward.
Because all this transformation does is wrap the source inside a school element, it is not a useful example but is simply a demonstration of the technology. For a more practical example, use XSLT to create an XHTML document out of your school example, as follows:
<cfsavecontent variable="schoolToXHTML"> <xsl:stylesheet version="1.0" xmlns:xsl="http://www.w3.org/1999/XSL/Transform"> <xsl:output method="html"/> <xsl:template match="school"> <html xmlns="http://www.w3.org/1999/xhtml"> <head> <title>Our School</title> </head> <body> <xsl:apply-templates/> </body> </html> </xsl:template> <xsl:template match="classroom"> <table border="1" bgcolor="blue" bordercolor="blue" cellpadding="3" cellspacing="2"> <tr> <td colspan="2" style="color:white;font-weight:bold"> Classroom <xsl:value-of select="@roomNumber" /> </td> </tr> <xsl:apply-templates/> </table> <br/> </xsl:template> <xsl:template match="teacher"> <tr> <td bgcolor="lightblue">Teacher</td> <td bgcolor="white"> <xsl:value-of select="firstName"/> <xsl:text> </xsl:text> <xsl:value-of select="lastName"/> </td> </tr> </xsl:template> <xsl:template match="students"> <tr> <td valign="top" bgcolor="lightblue">Students</td> <td bgcolor="white"> <xsl:apply-templates/> </td> </tr> </xsl:template> <xsl:template match="student"> <xsl:value-of select="firstName"/> <xsl:text> </xsl:text> <xsl:value-of select="lastName"/> <br/> </xsl:template> </xsl:stylesheet> </cfsavecontent> <cfset xhtml=XmlTransform(MyXML,schoolToXHTML)> <cfoutput>#xhtml#</cfoutput>
This longer example matches each of the XML elements in the source document and replaces them with snippets of XHTML resulting in a complete XHTML document to display each classroom within a separate table.
An XHTML representation of our school data after applying an XSLT transformation
As you can see, ColdFusion MX has gone far beyond basic support of XML. It includes a simple- to-use object model for creating, modifying, and reading XML document objects as well as functions for advanced searches and transformations of XML. These tools will greatly simplifyy the implementation of XML technologies in your applications and automated communications.
|
| < Day Day Up > |
|
EAN: 2147483647
Pages: 491