Using Functions to Validate Form Data
|
| < Day Day Up > |
|
As you grow in your usage of ColdFusion MX and begin to develop larger and more complex sites, its likely you'll wish you had more control over the data your users supply in your sites' Web forms. For example, if you create a user registration form in which the users must supply their first and last names, how can you be sure they actually supplied that information when they submitted the form?
The solution to this and similar problems is to use ColdFusion MX to validate form data before it gets inserted into a database table. In this way, you can be sure that you're getting a complete name, address, phone number, or whatever other data you require of your users. Form validation techniques also help ensure that you're building a solid database, and that ColdFusion MX templates that "read" that user data later will remain error free because they're getting names, phone numbers, and addresses in the format they expect. This type of form validation is known as server-side validation because the actual checks are done by the server, as opposed to the client (the user's browser).
| Tip | ColdFusion MX offers a client-side tool to perform basic form validation: <cfform> (which is discussed in more detail later in this chapter). However, <cfform> requires the user's browser to be JavaScript enabled, so for flexibility's sake it's important to be familiar with both <cfform> and server-side validation principles like those described in this section. |
To understand form validation, take a look at the basic HTML form shown in Listing 50-1. You'll also find the form's source code on the CD that accompanies this book.
Listing 50-1: registration.htm
<html> <head> <title>Registration Form</title> <meta http-equiv="Content-Type" content="text/html; charset=iso- 8859-1"> </head> <body> <h2>User Registration Form</h2> <form action="registration_action.cfm" method="post"> <p>First Name:<br> <input type="text" name="firstname"></p> <p>Last Name:<br> <input type="text" name="lastname"></p> <p>Your Email:<br> <input type="text" name="email"></p> <p>Your Age:<br> <input type="text" name="age"></p> <p>Your Five-Digit Zip Code<br> <input type="text" name="zipcode"></p> <input type="submit" name="Register"> </form> </body> </html>
In Chapter 48 you created an action page similar to the one that would be required by the form in Listing 50-1. But that page didn't include any measures for checking that the users supplied information in all of the boxes, whether they supplied the correct type of information for each form field, and so on. It's time to take things a step further and learn how you can use ColdFusion MX functions to handle this type of validation.
To work through the following examples, you'll need to set up a datasource titled "registration":
-
Start by copying the sample database
 registration.mdb from the CD-ROM to your hard drive. If you're using ColdFusion's built-in Web server, a good place to store the database is c:\cfusionmx\db.
 -
Open ColdFusion administrator using either its Start Menu icon, or by entering its URL in your browser: http://localhost:8500/cfide/ administrator (remember that if you're not using ColdFusion's included Web server, the "8500" port is usually not required in the URL).
-
Navigate to the Data Sources page, and enter "registration" as the new Data Source Name; "Microsoft Access" as the driver. Click "Add".
-
On the next screen, click "Browser Server" next to the Database File box. Navigate to where you stored the
registration.mdb database and select it. When you return to the main data source dialog, click "Submit."
| Note | Remember that If you're working with Windows 98 or ME, the process of setting up a datasource is slightly different. You'll need to first set up a Windows ODBC datasource using the "ODBC Datasources" icon in your Windows control panel. Then return to ColdFusion Administrator's datasource page, supply a datasource name and choose "ODBC Socket" as the driver type. When you submit this information, you'll see a list of all your Windows ODBC datasources, from which you can pick the one you set up in the previous step. |
Once your datasource is set up, you can use the registration database to test the following examples.
Start by considering a basic <cfinsert> action. The action page for the form in Listing 50-1 might contain a <cfinsert> tag to insert the form data into a database table, as follows:
<cfinsert datasource="registration" tablename="users" formfields="firstname, lastname, age, email, zipcode">
But what happens if a user types in only a first name and leaves the other fields blank? If your datasource is a Microsoft Access database with the default design parameters, ColdFusion MX simply inserts the contents supplied in the firstname form field and allows the rest to remain empty. That doesn't create a very useful user record.
One method of ensuring you get a complete user record is to change your database table design to Required=Yes for critical fields like firstname and lastname. A user who types in only a first name sees a ColdFusion MX error message like Figure 50-2.
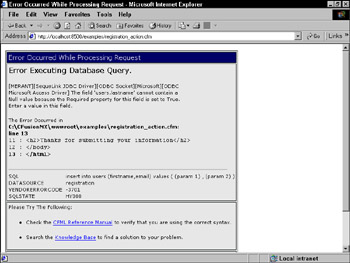
Figure 50-2: An error message displays when a form is submitted without required data.
Checking data length with Len()
The trick is to use a ColdFusion function called Len() in conjunction with a <cfif> statement to make sure the user supplied data in all of the required fields. If a user skips one or more fields, your action page displays a prompt for the user to return to the form, rather than try to insert the incomplete data as-is.
Len() is short for "length." It takes a variable name or a string as input and returns as output the number of characters present. That makes it a great way to check for fields that may be empty, because if a user doesn't supply a value for firstname, its length will be 0. Here's an example of Len() in action:
<cfif Len(form.firstname) gt 0 and Len(form.lastname) gt 0> <cfinsert datasource="registration" tablename="users" formfields="firstname, lastname, age, email, zipcode"> <cfelse> You haven't supplied a full first and last name. Please use your browser's "back" button to return to the form and try again. </cfif>
The preceding code uses Len() to determine whether either the firstname or lastname fields have been left empty. If not, the <cfinsert> is performed. If so, the user sees a prompt.
Because the form in Listing 50-1 requests a five-digit ZIP code, you could also use Len() to ensure that the user supplied five digits:
<cfif Len(form.zipcode) eq 5> <!---perform database insert---> <cfelse> You must supply a five-digit zip code. Please use your browser's back button and try again. </cfif>
Checking numeric fields with IsNumeric()
Now consider the age form field. A user might accidentally or mischievously type some text there, rather than a number, which would create a user record that might cause problems. For example, if you later design a template to display user data sorted by age, your template might fail with an error because some user records would contain text in the age field rather than a number.
As with the first and last name fields in the previous section, one solution is to change your database table's design so that age is a numeric field. This disallows the insertion of text data, but it also causes your users to see a ColdFusion MX error page rather than a friendly prompt.
The function IsNumeric() provides a solution. Like Len() it needs only one item as input: either a variable or a text string. It returns a 0 (false) if the input is non-numeric, or a 1 (true) if the input is a number. Here's how it appears in action:
<cfif IsNumeric(form.age)> <cfinsert datasource="registration" tablename="users" formfields="firstname, lastname, age, email, zipcode"> <cfelse> You must supply a numeric age. Please use your browser's back button and try again. </cfif>
| Tip | ColdFusion MX functions like IsNumeric() that return a true or false can stand alone in a <cfif> condition. For example, the condition <cfif IsNumeric(form.age)> is satisfied if age is a numeric value. To check for a negative value, use <cfif not IsNumeric(form.age)>. |
Using <CFFORM> to create client-side form validation
The server-side validation methods described thus far in this chapter offer a lot of flexibility for verifying your users' data, but you can imagine how it might be tedious to write such code to validate forms with 20 or more fields. Fortunately ColdFusion MX includes an alternative option that's a little more convenient. It's called <cfform>, and it enables you to create a form page that's validated on the client side — that is, the validation is built into the form rather than the action page. If users don't provide the correct type of data specified by a <cfform> element, they get a pop-up notification when they try to submit the form.
The only drawback to <cfform> is that your users must have a JavaScript enabled browser, and — with some of the more sophisticated tags in the <cfform> family — the latest version of Java Runtime Edition installed on their computers. This isn't as much of an issue as it would have been say, three or four years ago, but it's worth considering if your intended users may have JavaScript disable.
The <cfform> tag functions as a replacement for a standard HTML form. To use it, your form page must be a ColdFusion template (a .cfm file) rather than an HTML document. You open and close a <cfform> block the same way you do a standard form:
<cfform action="some_action.cfm" method="post"> <!--- cfform or standard html form elements go here---> </cfform>
Within the block, you can use the companion tags of <cfform> to create input elements. The most common of these is <cfinput>, which essentially duplicates a standard HTML form input except that it enables you to specify whether it's a "required" field. As you'll learn later, <cfinput> has other benefits as well.
Each element is validated separately and can have a unique error message appear when the a user leaves a field blank:
<cfform action="some_action.cfm" method="post"> First Name: <cfinput type="text" name="firstname" required="yes" message="You must enter a first name"><br> Last Name: <cfinput type="text" name="lastname" required="yes" message="You must enter a first name"><br> <input type="submit" value="Submit Registration"> </cfform>
Users who fail to provide data in any <cfinput> box that has been designated as "required" see a pop-up alert containing the text specified in "message," as in Figure 50-3.
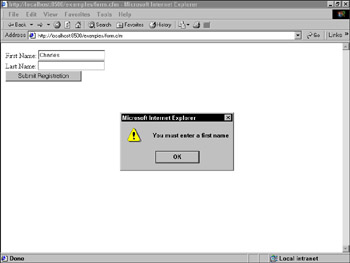
Figure 50-3: An error message occurs when a <cfform> element is required but is left empty.
You can also use <cfform> to do more sophisticated checks on data than whether it exists or not. For example, you can verify whether a user has entered a phone number by using the validate attribute with a <cfinput> box:
Telephone Number: <cfinput type="text" name="phone" required="yes" validate="telephone" message="You must enter a phone number in the format xxx-xxx-xxxx">
The "telephone" validate attribute is just one of several supported by <cfform>. You can also validate dates, European dates, times, integers, ZIP codes, credit-card numbers, and social security numbers. Check your ColdFusion MX documentation for more information on <cfinput> validation types, as well as other input tags in the <cfform> family.
This client-side method obviously makes for less code on a form's action page, because the form itself already verified the existence of all required fields.
Combining validation elements
Now that you've gained some understanding of how you can use functions to validate data, take a look at the complete action page in Listing 50-2 to see how functions can be combined with a <cfif> statement to check for several conditions.
Listing 50-2: registration_action.cfm
<html> <head> <title>Registration Status</title> </head> <body> <cfif Len(form.firstname) eq 0 or Len(form.lastname) eq 0> <p>You must supply a complete first and last name</p> <cfelseif not IsNumeric(form.age)> <p>You must supply your age as a numeric value</p> <cfelseif Len(form.zipcode) neq 5> <p>You must supply a five-digit zip code</p> <cfelse> <cfinsert datasource="registration" tablename="users" formfields="firstname, lastname, age, email, zipcode"> <h2>Thanks for submitting your information</h2> <p>Your information has been saved in our database. Thanks!</p> </cfif> </body> </html>
|
| < Day Day Up > |
|
EAN: 2147483647
Pages: 491