Using Video in Your Site
|
| < Day Day Up > |
|
The limited bandwidth of the Internet is the restraining hand when it comes to adding video files to your Web pages; video clips should be small in download size or visitors should be offered the option to choose to view a video file.
| Tip | As you would with audio files, give your site visitors the total file size for a video clip so they can make an informed decision. |
Video is a great way to entertain and educate your audience. You may add AVI or MOV files to your pages by linking to the file with a standard anchor tag using the Property inspector or by embedding the file just as you would an audio file.
Common Video Formats
AVI (Audio Video Interleave) is the current standard for Internet video and is supported by the Windows platform. AVI files don't require any special hardware, but cannot be used for full-screen motion pictures because of frame size limitations.
ASF (Advanced Streaming Format) may soon replace the AVI format and is also supported by newer versions of Windows. It uses streaming media technology to provide live video over low- and high-bandwidth connections.
MPEG (Moving Pictures Expert Group) requires an MPEG player to view the videos that have .mpg or .mpeg extensions.
MOV/QT (QuickTime) is supported by most browsers. The latest QuickTime formats use MPEG4 technology.
RA (RealVideo) uses streaming media technology to provide live video over low- and high-bandwidth connections.
Typical Browser Plug-in Implementations
QuickTime Player
The QuickTime Player plug-in is supported by all Macintosh and earlier Windows platforms and can play MPEG video on Windows. This powerful and well-designed plug-in supports MPEG video and audio, plus many other formats (MOV, QTVR, AVI, AIFF, WAV, AU, MIDI, and so on), and it fits seamlessly into the visitor's Web experience. You can download this software from www.apple.com/quicktime/download.
QuickTime pros:
-
It supports most file formats.
-
It offers a well-designed controller interface.
-
It uses smart-streaming based on current downloading speed.
-
It's powered by an efficient MPEG playback engine.
-
The basic player is free.
QuickTime cons:
-
It doesn't use the standard Windows user interface look and feel.
-
It's not supported by newest Internet Explorer browsers on the Windows platform (IE5.5 and 6.0).
-
It costs $30 U.S. to enable professional features for editing video files.
Windows Media Player
Streaming playback of embedded video and audio is directly integrated into recent versions of Internet Explorer on the Windows platform. Although older versions of Internet Explorer browsers try to use the installed-on-demand ActiveX control called ActiveMovie, newer browsers typically use Windows Media Player, which is also available for the Macintosh platform but is not generally preinstalled in browsers on that platform. Download the latest Windows Media Player plug-in at www.microsoft.com/windows/ windowsmedia/players.asp.
Windows Media Player pros:
-
It is a standard part of Windows.
-
It supports many file formats.
-
It has a simple user interface.
-
It uses an efficient MPEG playback engine.
-
It uses hardware acceleration, for example MMX, if available
-
It's suitable for playing local files as well as files on Web sites.
Windows Media Player cons:
-
It's not typically installed on Macintosh platform and must be downloaded.
-
It might require manual configuration of a Web browser.
RealPlayer
Another plug-in used to play Web video is the RealPlayer — a free plug-in that is available for all platforms. With streaming audio/video support and handy subscription and channel features, RealPlayer is capable of handling most file types but is not installed by default. You may download the RealPlayer from www.real.com/realoneplayer.html.
RealPlayer pros:
-
It's cross-platform.
-
It includes a free player.
-
It can handle most media types.
RealPlayer cons:
-
It's not typically preinstalled.
-
It often plays media in a separate window instead of inline.
Adding video to your pages
To link to a video file, build a link in your page and use the Property inspector to select the video file. If the user's computer understands the file type and has a helper application or plug-in to handle the file, the browser plays the file. If not, a dialog box opens so users can select of a playback application or the file to their hard drive.
To embed a video into your page, you can use the <embed> or <object> methods. Using <embed> works only with plug-ins. Using <object> is designed to work with ActiveX components. ActiveX controls are reusable components (like miniature applications) that act like browser plug-ins. The ActiveX object in Dreamweaver lets you enter the appropriate classid, codebase, and parameters necessary for the user's browser to properly display the object. ActiveX is not supported on the Macintosh platform or in Netscape browsers. When using ActiveX components, you must supply a classid to identify the ActiveX control to be used. A classid supplies a long string of numbers and letters that indicate the registry status of the object. The codebase supplies a URL for downloading the control object if the user's computer doesn't have it available. To learn more about ActiveX technology, visit the Microsoft site (www.microsoft.com) and type active classid into the search field.
Internet Explorer and the QuickTime Player plug-in
Until recently, the plug-in installed as part of QuickTime worked for Netscape browsers and Microsoft Internet Explorer on Windows and Macintosh. Now Windows users who try to play a QuickTime movie in Internet Explorer version 5.5 (sp2 or later) or Internet 6.0 will encounter a broken plug-in icon until they install the new QuickTime ActiveX control from Apple in addition to the QuickTime plug-in. Users of other browsers on Windows or Macintosh are unaffected; they may use the plug-in installed with QuickTime and do not need to get the new QuickTime ActiveX control.
QuickTime uses a plug-in mechanism to display movies from your Web page in the user's browser. If you follow the Dreamweaver MX Help instructions for inserting video into your Web pages, you would use an <embed> element to display QuickTime content within the browser; however, to overcome the problem for newer IE browsers on the Windows platform, you should wrap the <embed> code within the <object></object> tags to make the new ActiveX control for QuickTime available to the browser, as in the following code example:
<object class codebase="http://www.apple.com/qtactivex/qtplug-in.cab" width="360" height="228" > <param name="SRC" value="Birdy_Flight.mov"> <embed src="/books/2/375/1/html/2/Birdy_Flight.mov" plug-inspage="http://www.apple.com/quicktime/download/" width="360" height="228" name="movie1"> </embed> </object>
When using this method for QuickTime movies (.mov) the classid must always equal clsid:02BF25D5-8C17-4B23-BC80-D3488ABDDC6B. The codebase must always equal www.apple.com/qtactivex/qtplug-in.cab, and the plug-ins page must always equal www.apple.com/quicktime/download/.
Habitat Alert site Let's use an MOV file from the Habitat Alert project site to set up the ActiveX and plug-in methods for viewing the movie in a Web page.
-
Open the file quicktime_movie\index.htm from the Site panel (window). This file is set up to accept a video file and has buttons that you use later to control the movie through JavaScript.
-
Place your cursor into the table cell <td> just above the Play and Stop buttons. Choose Insert ® Media ® ActiveX.
-
In the dialog box that opens, select the
 Birdy_Flight.mov file from the quicktime folder.
 -
With the object selected in the document window, go to the Property inspector and set the following values, as shown in Figure 41-4:
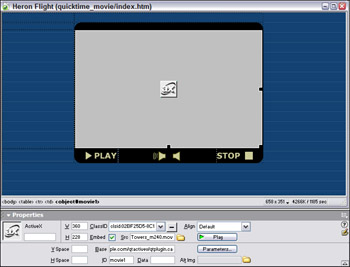
Figure 41-4: Enter settings required using the Property inspector.-
W: 360.
-
H: 228.
-
ClassID: clsid:02BF25D5-8C17-4B23-BC80-D3488ABDDC6B.
-
Embed: Enable by checking the box.
-
Src:
Birdy_Flight.mov. (You will have to click the Browse button, then show All Files in the Files of Type menu for the Select file dialog box.) -
Base: http://www.apple.com/qtactivex/qtplugin.cab. (Dreamweaver actually codes this as codebase=http://www.apple.com/qtactivex/qtplugin.cab.)
-
ID: movie1. (Dreamweaver adds this to the object code only.)
-
-
Save and try your page in an Internet Explorer browser. You won't see your movie yet because IE doesn't know the source for the movie file. If you look in your existing code, you should see that no src information appears in the <object> code, only in the <embed> code. To rectify this, you must add the parameter SRC=.
-
Click the Parameters button. Click the Add (+) button and type SRC into the Parameters field. Tab twice to get to the Value field (the first tab only selects the dynamic data icon) and enter the path to your movie. The path you would use is
Birdy_Flight.mov. Tip You can copy the src path from the Property inspector's Src field before you click the Parameters button, which is a good idea when the path is more complicated than the one used in this example!
-
Tab twice to add a new parameter or click the Add (+) button again. This time you add a parameter that keeps the controller from showing, as you will be using JavaScript to control your movie. Add CONTROLLER=FALSE, putting CONTROLLER into the Parameters and FALSE into the Values, as you did with SRC.
-
Save and test your movie in IE and in NN4x. The movie should load but not play. You can press the spacebar to see the movie play; spacebar is the keyboard shortcut enabled in QuickTime to toggle start/stop movie. Keep this page open for the next exercise.
Tip You can find a complete list of the parameters available for QuickTime movies at www.apple.com/quicktime/ authoring/embed.html.
Using JavaScript to control a QuickTime movie
With the exception of Internet Explorer 5 for the Mac OS platform, you can use JavaScript to control the play of your QuickTime movie in most modern Netscape and Internet Explorer browsers. To allow the use of JavaScript to control the movie, you must pass a parameter to the plug-in that says that JavaScript is enabled.
-
Habitat Alert site Select the movie object in the file quicktime_movies\index.htm and click the Parameters button.
-
Click Add (+) to add a new parameter and type ENABLEJAVASCRIPT into the first field, tab twice, and type TRUE into the value field.
-
Click OK to close the dialog box. Save your file.
At this point, only the <object> has a reference name for the movie file (movie1), which is written as in the tag. However, you also need a reference name in the <embed> tag so that JavaScript can control the file. Normally, you would add a name by typing it into the field at the top-left corner of the Property inspector when you have the object selected. However, at the time that this exercise was written, if you add a name there, it is written as name="movie1" (which is correct), but it is placed in the <object> and <embed> tags. Having name="" in the <object> tag causes JavaScript control of the QuickTime movie in Netscape 6x browsers to fail.
-
To work around the bug, add movie1 into the field, but then switch to Code view and delete name= "movie1" from the object tag.
-
Save your file and keep it open for the next exercise.
Scripting the movie control buttons
To control your movie using JavaScript, you enabled the use of JavaScript via a parameter. Now you need to use JavaScript to pass play, stop, and other functions to the QuickTime movie. To do this, you add some JavaScript to the hrefs of the buttons already in place in your file.
Habitat Alert site To control your movie, add JavaScript to the links for the buttons in the file. The script will reference the movie1 object.
-
Select the Play button in the quicktime_movies\index.htm file.
-
Type javascript:document.movie1.Play(); and press Enter to be sure that the value is accepted.
-
Select the Stop button and type javascript:document.movie1.Stop(); and press Enter.
-
Select the SoundOn button and type: javascript:document.movie1.SetVolume(100);.
-
Select the SoundOn button and type: javascript:document.movie1.SetVolume(0);.
-
Save your file and preview in IE6, NN4x, and NN6x browsers to be sure that the buttons work.
Two very important settings required to properly display your movie are width and height. To determine the dimensions of your movie, press F11 to open the Assets panel and click the Movies icon. Select your movie listed in Movies Assets. If your movie is not displayed, try clicking the Refresh icon to update your movie assets. When you have the movie selected, right-click (Control+click) the movie and choose Edit. This should open the QuickTime Player. Under the Movie menu item, choose Get Movie Properties. The first menu in the dialog box that opens lets you choose the video (Movie) or audio track(s) and the second gives you the choices for different properties of the tracks. Choose Movie in the first menu and Size in the second. Note the width and height and use the values in Dreamweaver.
For the controller to appear properly, add 16 pixels to the height of a movie. Never set height or width to less than 2, even if the movie is hidden. To hide the movie controls, set the HIDDEN parameter equal to true.
The most common JavaScript functions include the following:
-
Play(); — Starts the movie.
-
Stop(); — Stops the movie.
-
Rewind(); — This causes your movie to rewind to the beginning.
-
Step(1); — This steps the movie frame by frame in a forward direction.
-
Step(-1); — This steps the movie frame by frame in a backwards direction.
-
SetVolume (n); — Sets the volume of the audio track with n being a value between 1-100.
To read more about controlling movie and track properties of a QuickTime movie through JavaScript, see http://developer.apple.com/ techpubs/quicktime.
|
| < Day Day Up > |
|
EAN: 2147483647
Pages: 491
- Structures, Processes and Relational Mechanisms for IT Governance
- An Emerging Strategy for E-Business IT Governance
- Measuring and Managing E-Business Initiatives Through the Balanced Scorecard
- Measuring ROI in E-Commerce Applications: Analysis to Action
- Technical Issues Related to IT Governance Tactics: Product Metrics, Measurements and Process Control