Setting Form and Form Object Properties
|
| < Day Day Up > |
|
All form tags require certain properties. Use the contextual Property inspector to select and add properties for your form tags. To access any existing form tag's properties, first select it in your page.
The Property inspector makes form-building a breeze because all the properties are right there — no digging around in a book looking up what properties are expected. If you prefer to hand-code, tag hints and code-balancing features in Dreamweaver speed up the process.
Naming form objects
Every form and form object is given a name by Dreamweaver. Naming the form or form object makes it possible to reference or control it through scripting. You can change the name using the Name field in the Property inspector. Some FormMail CGI scripts require specific names for specific tags to work properly. Logical names are easier to read when name-value pairs are sent via e-mail.
Form properties
Specify a path to the script or dynamic page (application) that will process the form data in the Action field. Use the Browse button to locate the script or page, but often these are not contained within your site and must be hand-written. Add a method for transmitting the data to the server, if needed. The following form methods are available:
-
POST — Embeds the form data in the HTTP request.
-
GET — Adds or appends the value(s) to the URL requesting a dynamic page. This method is limited to a total of 8,192 characters. If the amount of data sent using the GET method is too great, it will be truncated, resulting in errors. Because values are readily visible in URLs, it is unwise to send sensitive user data using the GET method.
-
DEFAULT — Uses the browser's preferred or default method. Typically this is the GET method.
Choosing an Enctype sets a MIME type for the data you submit for processing. The default coding for all forms according the W3C standards is application/x-www-form-urlencode and is generally used with the POST method. For uploads of files, use the multipart/form data MIME type. Also, Dreamweaver now offers a target option to specify the destination window to be used by returned data.
| Cross-Reference | More information about window targets is located in Chapters 39 and 42. |
Form object properties
You use the Property inspector to set certain required and optional properties for form tags. Some form objects have more requirements than others:
-
Text Fields — Choose single, multiple, or password. Specifying display size and the maximum number of characters the user can enter is optional. Text entered via the browser into a password text field displays as bullets, Xs, or asterisks, depending upon the user's system and browser.
-
Radio Buttons — Radio Groups must share a common name. You specify a value for each button. When the user chooses a button, the result is name=value chosen. You may opt to have one button preselected.
-
Check Boxes — These objects have unique names. You set a value for each box. Generally, the value implied is yes if chosen and no if not. For example: The label next to a check box might read, "Would you like a brochure?" The name of the check box might be send_brochure, and its value, if checked, should be set to Yes.
-
Menus and Lists — This form object defaults to menu; to add a list, select that option. Menu and list options are added by clicking the List Values button. In the dialog box (Figure 38-5) the left column is what the user sees. The right column is the value passed via the form submission.
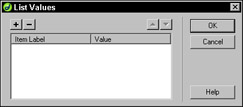
Figure 38-5: The List Values dialog box is where you add list or menu items.
Habitat Alert site In the following steps, you use the Property inspector to add some properties to the form elements:
-
Click the form. Use the Property inspector to name this form quicksearch in the Form Name field.
Tip Check to verify that you are really in the form by looking at the Tag selector. Do you see the <form> tag? If not, you are not really in the form. Go to Code view if necessary to place your cursor inside the form tags.
-
Select the forms text field. Set the object's name to item and set its Char Width value to 12. Select the <input> tag in the Tag selector and right-click (Right (Control)+click) to apply the .formbox style.
At this point in the development cycle, additional style rules have been formulated and two style sheets are being used.
-
Select the form button and use the Property inspector to change the Label from Submit to Go (Figure 38-6).

Figure 38-6: The text field with a value of 12 and a Go button -
Save your page and keep it open for the later exercise.
|
| < Day Day Up > |
|
EAN: 2147483647
Pages: 491