Chapter 33: Building a Simple Page
|
| < Day Day Up > |
|
![]() Download CD Content
Download CD Content
In the previous chapter, you learned how to create and open a new document. Here you see how to add and format content to control how that content appears in the page. This chapter covers the basics of simple page layouts from page properties to HTML structural markup. Text and images are easily added and formatted using the Property inspector and Tag editors, which enable you to insert empty tags or wrap selected tags around your content and control dimensions, colors, and alignment of page elements with a few clicks. You can even edit and optimize your images in Macromedia Fireworks directly from Macromedia Dreamweaver.
Setting Page Properties
Setting the Document Title and other page properties will control how a user views your page in a browser. If you don't set these properties, browser and platform-specific values are used by default. Use the Page Properties dialog box to apply the settings used by the entire document.
To access Page Properties (Figure 33-1), choose Modify ® Page Properties (Control+J (Command+J)). When you have selected values, the OK button closes the dialog. You can choose not to accept the new values by clicking the Cancel button. Clicking the Apply button forces the page to update while the dialog box is still open. Keep in mind that Apply presumes you accepted the values. Canceling after applying does not revert the properties to default settings.
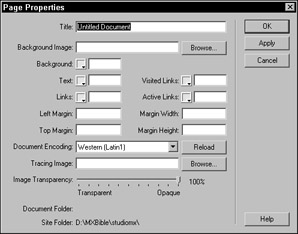
Figure 33-1: The Page Properties dialog box sets the properties of the <body> tag.
| Tip | You can always use Edit ® Undo or the History panel to back step. Dreamweaver remembers 50 history steps. You can control the number of steps Macromedia Dreamweaver remembers in the General category in your preferences (Edit ® Preferences). |
The document title
The document title appears in the title bar of the Dreamweaver Document window and most browser windows. Unlike many programs, in Dreamweaver the filename used when you save a page and the document title are not one and the same. Setting a document title is not required but is highly recommended; since most search engines on the Web catalog titles and display them in search results. Effective titling of your pages can improve a user's chance of finding your site.
Dreamweaver adds "Untitled Document" between the <title></title> tags in the head of the page when it is saved. Add a new title in the Title field of the Page Properties dialog box.
| Tip | A Title field is also available in the Document bar in Design view. |
Adding a background image
You can make your pages more visually interesting with the use of a background image — a special type of image that is displayed beneath the content of your page. Background images tile or repeat horizontally or vertically based on the dimensions of the image and the current width and height of the document window.
Fireworks MX See Chapter 23 to learn how to make your page background image. Background images can also be used in table cells, as covered in Chapter 34.
| Note | Because you may not be working through the chapters in chronological order, we will not provide instructions on adding files to the root folder you created in Chapter 32. Instead you'll need to define a new site for each site folder in the chapterXX_exercise folder. |
Habitat Alert site Before doing this exercise copy the Habitat Alert folder (in the chapter33_exercise folder) onto your hard drive. Then define the folder as a new Dreamweaver site (refer to the "Defining a Site" section in Chapter 32).
Hint: If you already have another Habitat Alert site defined, then choose the Edit Site option in the Site panel of the Site Definition drop-down menu and change the path to the Local Root folder.
To add a background image to the index page of the Habitat Alert site, follow these steps:
-
Double-click the
 index.htm page to open it (html\site\index.htm).
 -
Choose Modify ® Page Properties.
-
Type Habitat Alert for the title.
-
Click the Browse button and navigate to site\sharedimages\ backgrounds\banner_bg_4html.gif, select it. and click OK.
-
Click in the color box for the Background and choose white.
Background refers to the page background color, although a background image may supply the actual color(s) displayed.
Caution It is recommended that you always set a background color for your page, especially if you use a background image that is dark with light or white text. Choose a color that is close to the background images color. If your image is not found, the page color ensures that the text is still readable.
-
Leave the text and link fields blank. You will be adding this using CSS in Chapter 36.
By default, browsers display all text in black. Links also have default color settings. If the user has not visited the link's destination, the link is displayed in a vivid blue. Visited links default to purple and when the user clicks a link, most browsers change the link color to red while the mouse is being clicked.
-
Set all the Margins to 0.
Margins cause page elements to be offset from the edges of the browser window. To control the margin offsets of your page, add specific values to override the default browser settings. The top and left margins show Internet Explorer settings; Margin Width and Height are Netscape-specific.
-
Click the OK button to close the Page Properties dialog box.
-
Save the file.
The Color button is used throughout Macromedia's MX programs. In Dreamweaver, click the button to access the color picker. Click any of the 216 colors in default Color Cube palette to select a color. You may also type in a specific hexadecimal value in the field next to the current color swatch. To remove a color, remove the hex value or (easier) click the Default color (no color) button. To choose colors other than those shown, click the Color Wheel button to access your system's color picker. You may also sample color from anywhere in the program.
To sample color outside of the program on the PC, first click the Color button with the pointer tool; then click again and keep the mouse pressed. Move the cursor outside of the application window and release when over the desired color. This presumes that you are not working in maximized mode. Macs may sample colors outside of the program without the extra step.
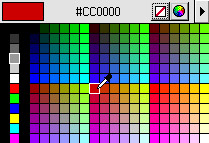
The color button opens a color palette.
The Color palette's panel options offer other color palettes and controls whether Macromedia Dreamweaver "snaps" your sampled color to the nearest Web-safe value.
Creating the mission statement page
Habitat Alert site This is a simple page that you later learn to control with JavaScript behaviors. Before doing this exercise copy the Habitat Alert folder (in the chapter33_exercise folder) onto your hard drive. Then define the folder as a new Dreamweaver site (refer to the "Defining a Site" section in Chapter 32).
Hint: If you already have another Habitat Alert site defined, then choose the Edit Site option in the Site panel of the Site Definition drop-down menu and change the path to the Local Root folder.
-
Open
mission_statement.htm from the Find folder (habitat_alert_start\html\site\find \mission_statement.htm). -
Press Control+J (/Command+J) to open Page Properties.
-
Set the properties using the values listed in Table 33-1.
-
Click OK to accept the values and close the dialog box.
-
Save the file.
Table 33-1: Habitat Alert Page Properties Property
Value
Title
Mission Statement
Background Image
find/images/vert_stripe.gif
Color
#FFFFFF (white)
Text
#003366 (blue)
Links
#666600
Visited links
#666633
Active links
#006699
Left margin, Margin Width
100, 100
Top margin, Margin Height
0, 0
|
| < Day Day Up > |
|
EAN: 2147483647
Pages: 491