Making a Puzzle Using ActionScript
|
| < Day Day Up > |
|
The puzzle you are going to make can be used in any Web site requiring a puzzle. You'll see in the project that it's easy to use the same puzzle and code and simply change the image (if it's the same size). The puzzle pieces you will be using were made in FreeHand, and the file is provided for you. The finished project is shown in Figure 28-6.
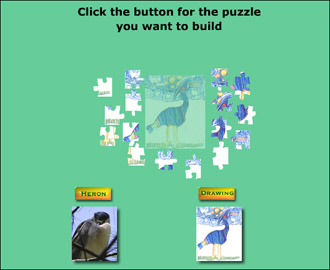
Figure 28-6: The finished puzzle project
Making the puzzle pieces
Habitat Alert site To make a puzzle out of the heron image used on the Habitat Alert's homepage, follow these steps:
-
Open a new Flash movie. Double-click Layer 1 and name it puzzle base.
-
Choose File ® Import, navigate to the chapter 28_exercise folder, and select
 puzzle1.jpg. Because this folder has another puzzle with a number Flash thinks they may belong together and gives you a message asking if you want to import as a sequence. Click No. Move the image off the Stage.
 -
Choose File ® Import, navigate to the chapter28_exercise folder, and select
puzzle.FH10. In the FreeHand Import dialog box, choose Flatten and accept the defaults. -
Zoom out so you can see the entire puzzle. Use the Arrow tool to draw a selection around the puzzle shapes (marquee select), and group (Control+G (Command+G)).
-
Choose Edit ® Select All. In the Align panel be sure the To Stage button is not selected (very important), and click the Match width and height button. Now select the To Stage button; then click the Center Horizontal and Center Vertical buttons (top row).
-
These puzzle shapes, which were made in FreeHand, are horizontal and vertical lines that are grouped. Select the outline of the puzzle and ungroup it. Figure 28-7 shows how it looks ungrouped. The blue rectangles you see each represent a group for each horizontal and vertical row.

Figure 28-7: The puzzle's horizontal and vertical lines that are still selected after the first ungroup -
Ungroup again. The result after ungrouping will look like Figure 28-8. Notice the little dots in the lines, which show they are now ungrouped. Do not deselect yet.

Figure 28-8: The puzzle pieces aligned and ungroupedTip Once they are ungrouped and you deselect, the puzzle will be behind the bird image.
-
Choose Edit ® Select All (Control (Command)+A).
-
With everything still selected, choose Modify ® Break Apart. You see a shadowed, dotted overlay on the puzzle (Figure 28-9). When you deselect and select each puzzle piece (centers not outlines), the individual pieces should be indicated by the dots. I say should be because it's possible you will have pieces connected, and this can be quite trying. See the sidebar, "Troubleshooting the Puzzle," to see what causes pieces to be connected and how to fix the problem.

Figure 28-9: The dotted image after the pieces have been broken apart -
Save your file.
When you design the puzzle shapes you have to be careful that there are no openings. Each of the horizontal and vertical lines must touch the edges. Even if they touch, you may have to adjust them. Don't let any lines overlap the bounding shape. I had to fix the puzzle shape (the one supplied doesn't need adjusting). Test in Flash; alter them again where the shapes were connected, then edit, and so on.
Converting to Movie Clips and naming instances
You will now change the 16 puzzle pieces into separate Movie Clip symbols.
-
Select the top-left piece, and choose Insert ® Convert to Symbol (F8).
-
For the Behavior, select the Movie Clip and name it MC1, and click OK.
-
Repeat for each piece ending with MC16. Notice that you can no longer see the puzzle shapes.
-
Although you can't see the shapes, the puzzle outline is still in your movie and you need to remove it. Open the Movie Explorer (Window ® Movie Explorer). Be sure the Show Graphics, Buttons, and Movie Clip button is selected (second from the left). The Movie Explorer is shown in Figure 28-10.

Figure 28-10: The Movie Explorer with the Movie Clips button being clicked -
In the Movie Explorer, select MC1 from the puzzle base layer, and shift+select all the Movie Clips through MC16. Choose Edit ® Cut (Control+X [Command+X]).
-
On the Stage marquee, select the puzzle shapes and delete them.
-
Choose Edit ® Paste in Place to return your puzzles pieces. Lock the puzzle base layer by clicking the dot below the lock icon in the Timeline.
-
Select the puzzle base layer, and click the plus sign to add a new layer on top. Double-click the new layer's name and name it pieces.
-
Select Frame 1 of the piece's layer, and choose Edit ® Paste. (The pieces are still in memory because you have recently cut them.) The pieces are now on the new layer.
-
Move the pieces off the image in the puzzle base, in other words, to the white area. Be sure none of the puzzle pieces touch the puzzle base image (Figure 28-11).
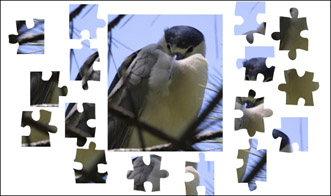
Figure 28-11: The pieces moved off to the side -
Now you need to set the instance names and target for the puzzle pieces. The name and target coordinates will be used when you add the ActionScript. The puzzle targets are the location of each piece in the puzzle base. Lock the pieces layer.
-
Unlock the puzzle base layer. In the Movie Explorer, select the Show Frames and Layers button at the top. In Layer one select MC1.
-
In the Property inspector, type base1 for the instance name. Repeat for the rest of the pieces, ending with base16. Notice in the Movie Explorer that the instance name has been added. Figure 28-12 shows the Property inspector. The instance name for the first piece is shown. The x and y coordinates for this instance name are now the target that will be used to identify where the puzzle piece belongs.

Figure 28-12: The Property inspector showing the instance name and x, y coordinates of the first puzzle piece -
Check to be sure that the Pieces layer is locked; then in the Property inspector, choose Alpha from the Color drop-down menu, and type 40% or select it with the slider.
Dragging the pieces
You are going to enable the user to drag the puzzle pieces in the puzzle pieces layer by using the press and release mouse events of buttons. To set up the puzzle pieces, follow these steps:
-
Unlock the pieces layer and lock the puzzle base layer.
-
Open the Actions panel (F9). Select the MC1 puzzle piece. Select Expert Mode from the Options pop-up menu, and type the following code:
on (press) { this.startDrag(); } on (release,releaseOutside) { this.stopDrag(); }This code makes the enables the user to drag a puzzle piece. Next you must determine whether the puzzle piece is in its proper place. You need to determine whether the puzzle piece is over the puzzle target. You are going to utilize one of the Movie Clip properties called _droptarget. The __droptarget command returns the name of the object on the stage that the puzzle piece you have selected is over.
-
After this.stopDrag(); press Enter/Return and add the following code:
if(eval(this._droptarget)==_root.base1){ this._x=_root.base1._x; this._y=_root.base1._y; }This piece of code checks to see whether the item you are dragging is on top of the base1 instance on the stage. If it is in the right place, it sets the x and y positions of the piece to the base instance on the stage. The piece snaps into place when it's close to the correct location. The finished code will look as follows:
on (press) { this.startDrag(); } on (release,releaseOutside) { this.stopDrag(); if(eval(this._droptarget)==_root.base1){ this._x=_root.base1._x; this._y=_root.base1._y; } }Next you add a bit more code to make the puzzle piece snap back to its original location if it's in the wrong place. If you use the Movie Explorer to select each puzzle piece from the pieces layer you will be able to see the x, y coordinates in the Property inspector. This way you won't have to write them down when you edit the ActionScript for each piece. Just look at the Property inspector and type the coordinates to the code.
-
In the Actions panel while the MC1 (base1) piece is selected, highlight the last two curly brackets ( } ) and overwrite with the following code:
} else { setProperty (this, _x, 115.3); setProperty (this, _y, 69.0); } }This bit of code is saying that if the puzzle piece isn't dropped here return it to these x, y coordinates. The else statement is checking to see whether the drop target is correct, or else (if it isn't) returns the piece to its original location. Replace the x and y coordinates in the two setProperty lines with the x and y coordinates that are shown in the Property inspector.
-
Save your file and test the movie (Control ® Test Movie). You should be able to select the first puzzle piece you just added ActionScript to and place it over the correct target in the puzzle base. The puzzle piece should snap into place. If it's in the wrong location, it snaps back to its original location. If there are errors, you will be notified in a dialog box. The most likely errors to occur are typos. Check your code carefully.
-
The easiest way to add the script to the rest of the pieces is to copy this code and then select each piece and paste into the Script pane. Change the base name number and the x, y coordinates for each piece. Save the file. A copy is saved for you named
puzzle1.fla. -
Save and test your movie. You can change the base layer to an Alpha of 0 if you don't want it visible at all.
Multiple puzzles
You are going to make a Flash movie with two buttons so you can have multiple puzzles. The first thing you do is change the puzzle picture; then you load the puzzle of choice from the main movie.
For any image you want to swap with this puzzle (that's right, swap, no additional coding required) you need another image the same size as the original image. ![]() puzzle2.jpg is in the same puzzle folder with the first bird puzzle; use that one. To swap the image, follow these steps:
puzzle2.jpg is in the same puzzle folder with the first bird puzzle; use that one. To swap the image, follow these steps:
-
Open
puzzle1.fla from the chapter28_exercise folder if you've closed it. -
Choose Modify ® Document and change the background color to #66CC99 (a light green).
-
Open the Library panel and right-click (Control+click) the first bird image and choose Properties. In the Properties dialog box, choose Import, and select
puzzle2.jpg. Click OK. That's all there is to it, you now have a new puzzle (Figure 28-13). 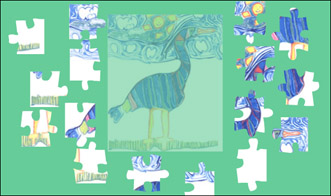
Figure 28-13: The bird puzzle changed into a different puzzle -
Save the puzzle as
puzzle2.fla and test the movie. You can close this file. -
Open a new Flash movie and choose File ® Import to Library. Select the heronbutton, drawingbutton, puzzle1_thumb, and puzzle2_thumb images from the chapter28_exercises folder and click Open. All four images will now be in the Library.
-
Use the Text tool and type Click the button for the puzzle you'd like to build and center it at the top of the Stage. I used the font of Verdana and size of 18.
-
Drag the buttons and images from the Library (F11) to the stage and arrange as shown in Figure 28-14. As you can see there is plenty of room to add more images.
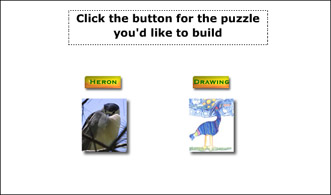
Figure 28-14: The interface for selecting the puzzles -
Select the heron button and choose Insert ® Convert to Symbol. Select a Button behavior and name it heronbutton. Click OK. Repeat for the drawing button.
-
To load the movies by selecting a button, select the heron button, open the Actions panel, and choose Expert Mode. Add this code to the heron button and then the drawing button (change the filename on each):
on (press) { loadMovie ("puzzle1.swf", 0); }The puzzle loads into level 0 and overwrites the interface file. If this movie is embedded into an HTML file, you can use named anchors so that the browser's back button works. The next step shows you how to add a named anchor.
Cross-Reference Embedding Flash movies is covered in Chapter 41.
-
Select the first frame and in the Property inspector in the Frame field, type interface, and select the Named Anchor box.
-
Save your file as
puzzleinterface.fla.
Load into the same window
With this example the puzzle loads into the same window as the thumbnails instead of overwriting them. You accomplish this by loading the puzzles into different levels.
-
Open puzzleinterface2.fla from the chapter28_exercise folder.
-
Open
puzzle1.fla. With both layers unlocked, choose Edit ® Select All, and click the Free Transform icon. Drag one of the corners in and press the Shift key to constrain. Check the Property inspector and make it about 270 × 180, anywhere close will work. This size will fit on the bottom of the interface for the puzzles. -
Save as sm_puzzle1. Repeat for
puzzle2.fla and save as sm_puzzle2.On the CD-ROM A copy of the small puzzles are on the CD-ROM if you'd rather skip Steps 2 and 3.
-
In the main movie (puzzleinterface2.fla) select the heron button, and open the Actions panel in Expert Mode. Type the following code:
on (press) { loadMovie ("sm_puzzlel.swf", 1); }This code tells Flash to open the bird puzzle file in level 1. When a movie loads into the same level, it replaces the current movie. When it loads into a different level, the main movie is still present. Select the drawing button and add this code to the Actions panel in Expert Mode:
on (press) { loadMovie ("sm_puzzle2.swf", 1); }Figure 28-15 shows the buttons on the bottom of the Stage in level 0 and the heron puzzle loaded on level 1.
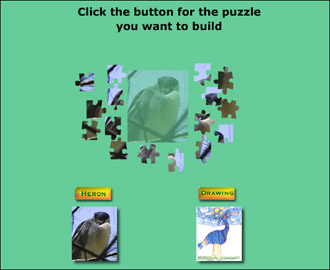
Figure 28-15: The buttons visible while a movie is loaded
|
| < Day Day Up > |
|
EAN: 2147483647
Pages: 491