Using Symbols
|
| < Day Day Up > |
|
There are three types of symbols: Movie Clips, buttons, and graphics. When you make a symbol, it is automatically stored in the movie's Library. To insert the object into the movie, you drag instances of it onto the Stage from the Library. When an instance of a symbol is placed on the Stage, there is little to no increase in the file size.
You can alter these instances to appear differently when in fact they are still an instance only of the original symbol. The movie has to call the symbol only once; then Flash stores information about any size, color, or transparency changes you've made.
Symbols also save you a great deal of time if you have to edit them. When you edit the original symbol, all instances are changed automatically. You'll love this if you've ever had to change an element in a large Web site without symbols.
After you start making symbols, you should develop your own (or a company) naming convention. The symbols must be named so you can reference them when adding ActionScript. Because symbols are stored in the Library, it's vital that you understand how to use the Library.
You can convert an existing object on the Stage into a symbol by choosing Insert ® Convert to Symbol. When the Convert to Symbol dialog box opens (Figure 26-2) name your symbol and select the type you want.
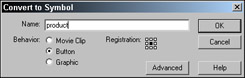
Figure 26-2: The Convert to Symbol dialog box
If you want to add a new symbol, choose Insert ® New Symbol, and the same dialog box opens. Name it, choose the type, and click OK. The symbol is now in the movies Library. You can drag the symbol onto the Stage.
Movie Clip symbols
Each Movie Clip symbol has its own timeline and layers. Movie Clip movies can be used in a single frame on the main Timeline. One of the best advantages of Movie Clips is that they play independently of the main Timeline. Because you can add actions to Movie Clips, there are infinite possibilities. You can generate dynamic animation, such as an object that moves during playback when the user presses keys on the keyboard.
Movie Clip is one of Flash's predefined objects. Movie clips can be instances, but they can also be objects. As an object they have characteristics you can access and control. Some of the properties you have control over govern appearance, for example transparency, visible or color, size, and position.
To convert an object into a Movie Clip, choose Insert ® Convert to Symbol, name it, and select the Movie Clip option. To convert a movie on your Stage into a Movie Clip, follow these steps:
-
Select any frame (of the movie you want to make into a Movie Clip) that doesn't contain a Keyframe and choose Edit ® Copy Frames (Control+Alt+C[Command+Option+C]). Alternatively you can right-click (Control+click) and select Copy Frames.
-
Choose Insert ® New Symbol (Control+F9[Command+F8]) to convert the movie into a symbol. The Symbol Properties dialog box opens.
-
In the Symbol Properties dialog box, choose Movie Clip.
-
After Step 3 the Stage is empty, because you are in Symbol Editing mode. In the top-left corner, you see Scene 1, but the name of your movie is in white, indicating you are in the Symbol Editing mode. The Stage and Timeline you see are both for the current symbol. Select the first frame of the Timeline and choose Edit ® Paste Frames (Control+Alt+V[Command+Options+V]).
-
Double-click the layer 1 name and give it an appropriate name.
The Movie Clip is now in the Library ready to be inserted in the main Timeline of a movie.
Empty Movie Clips
You can use an empty Movie Clip when you don't want graphics. Empty Movie Clips can still have actions attached to them. They are similar to invisible buttons (later in this chapter). Empty Movie Clips can have instance names so you can control them with ActionScript. To make an empty Movie Clip, follow these steps:
-
Choose Insert ® New Symbol.
-
Give the symbol a name.
-
Choose the Movie Clip behavior and click OK.
-
Return to the main scene.
-
Drag an instance of the Movie Clip from the Library to the Stage. A white dot on the Stage represents the empty Movie Clip.
Button symbols
Button symbols are popular and useful for navigation buttons. You can add sound, animation, and actions to button symbols. To make a button symbol, follow these steps:
-
With a new Flash movie open, choose Insert ® New Symbol. In the Symbol Properties dialog box, choose the Button behavior, and click OK.
-
You are now in Button Edit mode. Take a moment to look at the Timeline (Figure 26-3). Notice the Up, Over, Down, and Hit tabs. Up is the default. Draw a button, drag on a button graphic, or import one.
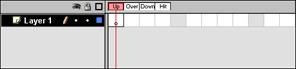
Figure 26-3: The Button Symbol editor -
Select the frame under the Over tab, and choose Insert ® Keyframe (F6). Change the button's appearance for the Over state.
-
Repeat Step 3 for the Down state.
-
Select the frame under the Hit state, and choose Insert ® Keyframe (F6). The user can't see what you draw here. Draw a rectangle large enough to cover the button, otherwise only the text will be the "hit" area. The hit area is the area in which the action assigned will be triggered when the mouse passes over it. In this case, it's a rollover.
-
Notice your button is a symbol in the Library. If you didn't name your button in the Symbol Properties dialog box, you can do it now by double-clicking the symbol name and giving it a suitable name. Click Scene 1 to return to the main movie. To use your button, drag an instance from the Library to the Stage.
| Note | You can test your button by choosing Control ® Enable Simple Buttons. |
Invisible button symbols
Invisible buttons are not a separate or different kind of symbol. Because they are used so frequently as "hit" areas they need to be mentioned. An invisible button is a hotspot to which you can assign actions. You put them over other objects. Because they are a transparent blue color, you can position them easily.
| On the CD-ROM | In the Bonus Tutorial folder on the CD-ROM a tutorial folder named "FLA_369" uses invisible buttons to rotate a product 360 degrees. |
To make an invisible button, follow these steps:
-
With a new movie open (or your current movie) choose Insert ® New Symbol. In the Symbol Properties dialog box, choose Button behavior and click OK.
-
Select the frame below the Hit tab and choose Insert ® Keyframe (F6).
-
Draw the shape of your invisible button. The color of the fill makes no difference and a stroke or no stroke makes no difference. It is added to the Library.
-
Click Scene 1 to return to your main movie. You can drag the invisible button from the Library onto the Stage.
-
Click on the Control menu and check to see that the Enable Simple Buttons option is unchecked.
-
The invisible symbol is invisible in the Library so drag the name onto the Stage. But once on the Stage it isn't invisible to you, so you can easily position it.
Graphic symbols
Graphic symbols have the least capabilities in Flash. They are great for repeating static elements or for simple animations. You cannot add actions or attach sound to a graphic symbol. To make a graphic symbol, follow these steps:
-
With a movie open, choose Insert ® New Symbol. In the Symbol Properties dialog box, choose the Graphic Behavior and click OK.
-
You are now in Symbol Editing mode. You can draw, drag, or import the content for the symbol. It will be added to the Library.
-
To return to the main Timeline, click Scene 1. Drag an instance of the graphic symbol onto the Stage wherever you want it, and as many times as you want to.
Editing symbols
To edit a symbol do one of the following:
-
Double-click the symbol instance on the Stage.
-
Double-click the symbol icon to the left of the symbols name in the Library.
-
Click the arrow for the Edit Symbols icon on the stage and symbol bar, and select the symbol you want to edit from the list.
Above the Stage is the scene and symbol bar. Notice after you double-click a symbol or choose it from the Symbol list that you'll see the symbol name on the bar as shown in Figure 26-4.
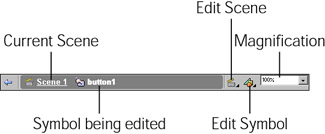
Figure 26-4: The bar above the stage showing the scene and/or symbols in the edit mode
|
| < Day Day Up > |
|
EAN: 2147483647
Pages: 491