Understanding Exporting
|
| < Day Day Up > |
|
Before you begin exporting, it's important to have your site structure set up. Setting up your folders locally in the same way that they will be uploaded saves you many headaches. If you are using Dreamweaver and save your site files in one folder and then move the file to another folder, all the links to your images are broken, so it's better to save in the same folder that the file will ultimately be in.
When you choose to export images as well as the HTML of a Fireworks document, the images and the HTML file (containing a table that places all the image slices back together) are generated.
If you export from Fireworks and expect to insert the Fireworks code into a Dreamweaver document, the HTML file and the images must be saved in the same folder as the file into which you will insert the Fireworks code. Otherwise all your image links will be broken. For example, a simple site structure might be a site folder called Bookstore with a subfolder of images and another subfolder called assets. If your site's HTML/HTM files are kept in the Bookstore folder, you would want to export your Fireworks document containing the HTML document into the Bookstore folder and designate that the images be exported to the images folder.
Export Wizard
The Export Wizard is especially helpful to new users who are not familiar with optimizing images. The Wizard can help you decide which format to use and help you decide on the settings to use. To use the Export Wizard, follow these steps:
-
Open an image to export and choose File ® Export Wizard. Figure 23-16 shows the opening dialog box for the Export Wizard. If you had a file size limit you could select the Target Export file size option and enter a number.
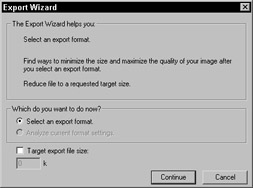
Figure 23-16: The Export Wizard opening dialog box -
Select the Select an Export Format option and click Continue. The next dialog box asks how to handle frames if there are any. The choices are as follows:
-
Animated GIF
-
Javascript Rollover
-
Single Image File
-
-
Choose the appropriate option if you have any frames; then click Continue. The next dialog box asks what the destination of your image will be. The options are as follows:
-
The Web
-
An image editing application
-
A desktop publishing application
-
Dreamweaver
-
-
Select The Web and click Continue.
-
The Analysis Report dialog box opens with recommendations for your selected image. If there is more than one option, such as JPEG and GIF, click Exit.
-
The Export Preview window opens showing you both GIF and JPEG. The first image shown is the smallest. You can decide which one looks best. You can change the optimization settings in this dialog box. You can also click the File tab and alter the scale size or the crop size if a crop selection is made. The Animation tab enables you to alter some of the animation settings.
-
When your image is ready to export click the Export button.
Continue with the export. The next section, "General exporting options," details how to complete the export.
General exporting options
The Export dialog box is present each time you export an image no matter which exporting method you choose. This section looks at the various options for exporting (Figure 23-17).
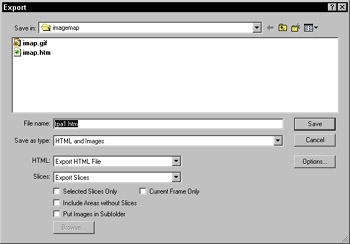
Figure 23-17: The Export dialog box
To export, follow these steps:
-
Select an image and use one of these methods to open the Export dialog box:
-
Choose File ® Export.
-
Click the Quick Export icon (the round Fireworks icon with an arrow in the top right of the document window) and choose the appropriate application to which to export.
-
Choose File ® Export Preview; optimize and click the Export button.
-
Right (Control)+click an image and choose Export Selected Slice.
-
Use the Export Wizard and click the Export button from the Export Preview dialog box.
-
-
Navigate to the folder you want to export to. If you are developing a site it's a good idea to export into the root folder of the Web site.
-
Name your file.
-
Select the type of file from the selections in the drop-down menu. The options are as follows:
-
HTML and Images - This option exports the image, JavaScript, and the code necessary to place everything into a table.
-
Images only - This option exports only an image or selected images with no HTML or JavaScript code.
-
Dreamweaver Library (.lbi) - A Library folder is necessary to export into. The HTML and images will be exported as a Dreamweaver library item.
-
CSS Layers (.htm) - This option exports images, layers, and frames as CSS layers that can then be used in Dreamweaver.
-
Director (.htm) - Export buttons and rollovers as Director cast members.
-
Layers to Files - Exports each layer as a separate file.
-
Frames to Files - Exports each frame as a separate file.
-
Lotus Domino Designer - Exports rollovers and buttons as image wells.
-
Macromedia Flash SWF - Export animations or maintain vectors by choosing this option.
-
Illustrator 7 - Exports as a vector image but may loose effects applied depending on the application in which it is opened.
-
Photoshop PSD - A native Photoshop format. You can choose to maintain editability or appearance.
-
-
If the HTML field is active, choose to export the HTML file or to copy it to the Clipboard.
-
The bottom portion of the dialog box has several important options spelled out here:
-
Selected Slices Only - When selected, only the slices you have selected will be exported.
-
Include Areas without Slices - When selected the areas of the image that are not specifically defined by a slice are also exported. They are sliced according the automatic slicing guides (red lines).
-
Current Frame Only - If selected, an image with multiple frames exports only the current frame. If unselected, all frames are exported and the filename ends with f2, f3, and so on.
-
Put Images in Subfolder - If selected, the Browse button is active so you can browse to a subfolder or make one to store the images in.
-
Option button opens the HTML setup dialog box, which is detailed in the next section.
-
-
Click Save when you are finished.
HTML setup
You can access the HTML Setup dialog box by choosing File ® HTML Setup or by clicking the Options button in the Export dialog box.
The General tab
The Export panel includes an Options button with more options. Click it to open the HTML Setup dialog box. The General tab is where you choose the application you will be using the code in, the extension of your choice, whether to add comments, and whether you want everything in lowercase.
The Table tab
The Table tab (see Figure 23-18) has some important options. The Space with options includes 1-Pixel Transparent Spacer, which is probably the most often used option because it generates a transparent image as a space holder. When you export, you will notice one file called ![]() spacer.gif when you look in the folder to which you exported. This is a 1-pixel by 1-pixel transparent file that is used as a spacer to keep a table's structural integrity. This spacer is known by several names and is frequently called a shim or a transparency.gif.
spacer.gif when you look in the folder to which you exported. This is a 1-pixel by 1-pixel transparent file that is used as a spacer to keep a table's structural integrity. This spacer is known by several names and is frequently called a shim or a transparency.gif.
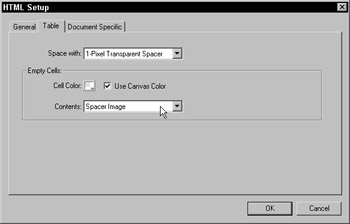
Figure 23-18: Table options tab
You can also choose to export using a nested table, which places one table into another table. This sort of table layout does not require spacers. Or, you can choose to export only a table with no spacers at all. It will probably be fine in Internet Explorer, but Netscape Navigator often does not hold the table's integrity if empty cells exist. To help prevent the presence of an empty cell, you could also choose Non-breaking Space instead of Spacer Image for the Contents option.
| Note | In Netscape if a nonbreaking space is used instead of a transparent image, the table doesn't show any background image or colors. |
If your table has an image in every cell, Single Table-No Spacers works just fine.
Document Specific tab
This tab enables you to set the naming conventions to use for automatically naming exported images. This is also where you make the selection necessary if you are exporting a nav bar with multiple pages.
Exporting HTML and images
Use the HTML and Images option when you want to export an entire document as a Web page or when you want to export an image that has a behavior attached. To export an image as a generic HTML and Images file follow these steps:
-
Open the
 ha_sliced_done.png image from the chapter23_exercise folder. This is a sliced and optimized file. This isn't the way you are going to export for the Habitat Alert site but you can practice on it.
 -
Choose File ® Export. In the Save in box, choose a place on your hard drive to save this exercise.
-
In the Save as Type field, choose HTML and Images.
-
In the HTML field choose Export HTML file.
-
In the Slices field choose Export slices.
-
Check Include Areas without Slices.
-
Check Put Images in Subfolder. Don't browse for a folder, a new folder named images will be automatically added.
-
Click on Save.
Exporting images only
You can export one slice or you can Shift+select multiple slices to export by following these steps:
-
Select a slice or slices.
-
Choose File ® Export.
-
Navigate to the location to which you want to export.
-
Name your file.
-
In the Save as Type box choose Images Only.
-
In the Slices box, choose Slices Only; uncheck the Include Areas without slices option.
-
Click Save.
Exporting the Habitat Alert layout
Habitat Alert site Most of the slices in our Habitat Alert layout are exported using slices only. You also export the navigation later in the chapter using another method.
| Note | In the Dreamweaver section you will define a site and add folders for the site's structure. On the CD is a site folder you can use for this exercise. |
To export the slices, follow these steps:
-
Open the
site_layout.png file from the habitat_alert\ designfiles\Fireworks folder. You are using the site file found in the root site so that when you edit in Dreamweaver, it knows where to locate the source file. -
Right-click on the bird image only. (Be sure the slice name is circle0 and not circle_btm.) Choose Export Selected Slice.
-
The Export dialog box opens. Export into the habitat_alert folder you saved to your hard drive. The path is habitat_alert\html\ sharedimages\circlebirds.
-
This option automatically has the Selected Slices only option checked.
-
The Frames option is active because there are other bird images being stored on other frames. They will be getting a random script applied to them in Dreamweaver. Uncheck the Current Frame only option because you want to export all the images.
-
Click Save.
Note Open the circlebirds folder and notice the naming of each image. The images in the frames each have a frame number after them. You may want to change the names. We changed ours to circlepic1, and so on.
-
Repeat for the Location slice (Home) and save in the habitat_alert\htmlsharedimages\locations folder.
-
Repeat for the main navigation buttons and the gold boxes below then. When selecting small slices, zoom in so you can select them. Export to the sharedimages\mainnavs folder. Again you may want to rename the images in the frames. The images in the frames will be used in Dreamweaver as rollovers.
Note Because you exported including all the frames, a few blank images will be generated where the frame is empty. Just delete these.
-
Zoom in and select the banner_bg slice. It's the long thin one on the top right. This is your background slice. Repeat Steps 2 - 6, except check the Current Frame only option.
-
Select the circle0 slice and cut it (Control [Command] + X). Then export the slice under it named circle_btm into the backgrounds folder. Paste the circle0 back into the document.
Note When a slice overlaps another, you need to move it to export the entire slice below it. Turning off the top slice in the Web layer doesn't do the trick. By cutting and pasting the top slice, you ensure that it's replaced in the same location.
-
Shift+select the logo and the banner_left slice and export to the sharedimages folder.
Exporting with the Export Area tool
The Export Area tool is located on the pop-up menu of the Crop tool. This tool is similar to the Crop tool in the way it defines an area but it doesn't affect the original image. To export using the Export Area tool, follow these steps:
-
Habitat Alert site Open the
site_layout.png file from the habitat_alert\designfiles\Fireworks folder you saved to your hard drive. -
Select the Export Area tool and drag around the main navigation buttons only. Use the handles to adjust the size. Don't get the gold slices below or the line with shadow.
-
Double-click when the area is defined.
-
Choose File ® Export.
-
Navigate to the navbuttons folder in your root folder and open it.
-
Name the file navigation_buttons_fw.png.
-
In the Save as Type box, choose HTML and Images. In the HTML box, choose Export HTML file.
Note You can use any export option you'd like, depending on the type of image you are exporting. Since you have JavaScript attached you are using the HTML and Images.
-
If you want the images put in a separate folder, check that option and click the Save button.
Exporting as a Library Item
If you want to use your image as a Library Item in Dreamweaver follow these steps:
-
Select a slice or area. (See Export area.)
-
Choose File ® Export.
-
In the Save as Type box, choose Dreamweaver Library. A message opens telling you to have a Library folder in the root. Click OK.
-
In the new window that opens, if you don't have a Library folder, click the Create New Folder icon (the solid yellow folder) and name it library. Click Open. Otherwise navigate to your Library folder.
-
In the Slices field, choose Export Slices and check the Put Images in Subfolder box.
-
Export into the Library folder.
Exporting to Macromedia Flash SWF
Flash MX It seems like only yesterday that GIF animation was the option of choice for animations, but Flash has quickly become the favorite choice for full-featured animation. Based on a recent survey, which revealed that 96.4 percent of all Web users already have the Flash player, many more Web sites are featuring Flash animations instead of GIF. One of SWF or Flash animation's greatest appeal is the small file sizes.
You can export Fireworks images as Flash SWF files, or you can use a native Fireworks PNG file and import it into Flash. For instance, if you apply a gradient transparency in Fireworks you have to export the transparent object over the area you want to appear transparent. But the same image imported into Flash has true transparency and can be placed on top of any object.
To export as Flash SWF, follow these steps:
-
Open the document you want to export and make the appropriate selections.
-
Choose File ® Export.
-
In the Save as Type box, select Macromedia Flash SWF.
-
Click the Options button to set your export options. Figure 23-19 shows the Macromedia Flash SWF Export Options dialog box.
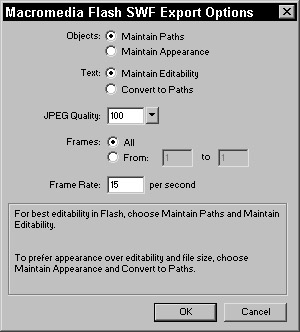
Figure 23-19: The Macromedia Flash SWF Export Options dialog box -
The following object and text options are available; select the ones you want:
-
Objects: Maintain Paths converts paths into editable Flash paths.
-
Objects: Maintain Appearance converts paths into bitmapped images.
-
Text: Maintain Editabiltiy converts Fireworks text into text that is editable in Flash.
-
Text: Convert to Path converts the text into a bitmap.
-
-
If you are exporting a JPGE image, select the quality setting you want.
-
Select All Frames or only the frames you want to export.
-
The last option is to set the Frame Rate per second.
-
When you are done with your selections, choose OK and the choose Save in the Export dialog box.
SWF exports from Fireworks can be used as they are for Web viewing or inserted into Dreamweaver or another layout editor without even using Flash. But the real purpose of the ability to export as a Macromedia Flash SWF file is to reuse the artwork you made in Fireworks in Flash.
Vector content remains vector in Flash if you choose the Maintain Paths and Maintain Editability options. But many actions you can take in Fireworks are lost when exported for use in Flash. Some of the things that are not compatible with Flash include Live Effects, Opacity (objects with opacity become symbols with an alpha channel), and blending modes. Masks, slice objects, image maps, and behaviors, such as rollovers, are lost as well. Other features lost are things such as feathering, layers, and some text formatting. Anti-aliasing isn't maintained on export. But this isn't a problem because Flash automatically applies it to documents itself. If you keep in mind that the main reason to use a SWF export from Fireworks is to reuse the art then you will do fine.
Exporting to PSD
PSD is the native file format of Adobe Photoshop. If you want to open your Fireworks PNG files in Photoshop, or share your files with someone who will use Photoshop, you can export a Fireworks file as a PSD file. When you export as a PSD, you have the option of exporting with better editability over appearance or better appearance over editability. But keep in mind that Fireworks paths are always converted to bitmap images. To export for Photoshop, follow these steps:
-
Select an image to export and choose File ® Export.
-
From the Save as Type box, select Photoshop PSD.
-
In the Settings area you have four options:
-
Maintain Editability over Appearance will place each object on a separate layer and the effects will remain editable. It will convert text into editable text. Effects that don't have an equivalent in Photoshop will be discarded.
-
Maintain Fireworks Appearance converts objects into layers and renders the effects and text into images.
-
Smaller Photoshop File flattens all the objects and layers into one layer, producing a smaller file size.
-
Custom enables you to select separate setting options for objects, effects, and text.
-
-
When you are done making your selections, click Save.
Exporting as vectors
You can use Fireworks vectors as paths in FreeHand, Illustrator, or Flash. You maintain only the path, a solid fill, and stroke. Any effects will be lost. To export a vector shape for FreeHand, Illustrator, or Flash, follow these steps:
-
Select an image and choose File ® Export.
-
In the Save As Type box, choose Illustrator 7.
-
Click the Options button. Figure 23-20 shows the Illustrator Export Options dialog box.
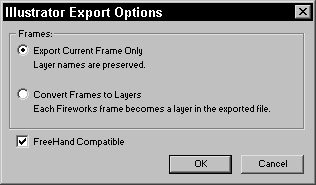
Figure 23-20: The Illustrator Export Options dialog box -
If you want to keep the elements on individual layers, select Export Current Frame Only. If you want each frame on a separate layer, select Convert Frames to Layers.
-
To make the export completely for FreeHand, choose FreeHand Compatible.
-
Click OK.
-
Click Save to complete the export.
Exporting to CSS layers
You can export Fireworks object and images, layers, and/or frames as CSS layers. By using CSS layers in Dreamweaver you can overlap and stack layers on top of one another, make them visible or invisible, or even move them, which you can't do with normal Fireworks HTML output. To export to CSS layers, follow these steps:
-
Select the object or images you want to export and choose File ® Export.
-
In the Save As Type box, choose CSS Layers.
-
In the Source area, choose from the Fireworks options: Fireworks Slices, Fireworks Layers, or Fireworks Frames.
-
The Trim Images box, which trims any excess canvas around objects you are exporting, is checked by default.
-
If you want the exported images in a subfolder, check the Put Images in Subfolder option.
-
Click Save to export.
Export layers or frames as separate files
You can export all the layers or all the frames of a Fireworks document as separate files. To export layers or frames as separate images, follow these steps:
-
Open the image you want to export and choose File ® Export.
-
From the Save as Type box, choose Layers to Files or the Frames to Files.
-
Leave the Trim Images option checked if you want to automatically trim the images to fit the objects on each layer (or frame).
-
Click Save.
|
| < Day Day Up > |
|
EAN: 2147483647
Pages: 491