Optimizing JPEG Images
|
| < Day Day Up > |
|
There aren't many choices to make when optimizing JPEG images but there is still a lot of flexibility. Selective JPEG compression is a special feature available only for JPEG images. It's used to set higher optimization to selected areas of an image. Following is a brief explanation of each option for JPEG images. Figure 23-12 shows the Optimize panel for JPEG images.
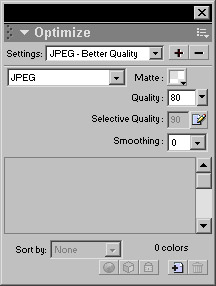
Figure 23-12: The Optimize panel with a File Format of JPEG chosen
| Caution | Don't JPEG a JPEG image; it looses information each time and gets considerably worse after the second time. JPEG is good for 24-bit color depth, no less. |
Quality
The quality setting determines how much compression is applied to the image. Be sure you check in the Preview mode. It's a good idea to zoom in a bit to see the artifact effect on your image. Go as low as you can and still have an acceptable-looking image.
Smoothing
When you lower the quality setting you may see visible artifacts depending on how low you went. The Smooth option adds a bit of blur to blend the image. You loose some image sharpness but it may be a compromise you are willing to make when a small file size is a must. The Smooth setting ranges from 0 to 8 with 8 being a higher degree of blur. You can then apply an Unsharp filter if you'd like, using either Effects menu or the Filters menu.
Sharpen JPEG edges
The JPEG compression works best on photographs, gradients, and drop shadows. But you may have incorporated areas of text or perhaps used some smoothing. To bring back the edge detail, open the Optimize Options pop-up menu and select Sharpen JPEG Edges. This, however, adds to the file size.
Progressive JPEG
The Progressive option is similar to GIF interlacing. The image appears "blockie" and gradually clears. The drawback is that it is not supported by older browsers (before Netscape 2 and IE 3) and shows a broken image.
Selective JPEG compression
You can optimize the background of a JPEG image at a lower-quality setting to emphasize the foreground image. Or you can use a lower setting for most of a document and select the areas that appear a bit block-like and blurry, which occurs when a JPEG image has been compressed too much and optimized at a different setting. To use selective JPEG compression, follow these steps:
-
Open
 selectivejpeg.png from the chapter23_exercise folder. This image doesn't need to be sliced but it could use some Selective JPEG compression.
 -
Click on the 2-Up preview tab and choose JPEG from the Export File Format pop-up menu. Zoom in to see the effects of the JPEG artifacts better.
-
Click the bitmap image to make it active. If you are in the habit of locking background layers be sure that you remember to unlock it. Click the Preview tab in the Document window so you can see the results of lowering the JPEG compression.
-
In the Optimize panel, lower the Quality setting all the way to 40. I know the text and shadow look horrible (Figure 23-13); you fix that in a moment, but the gradient still looks good.

Figure 23-13: The image with the JPEG quality lowered to 40 -
Click the Lasso tool (or you can use the Marquee tool) and draw around the area you want to compress at a higher quality setting. To use the Lasso tool, you have to return to the Original tab so you'll have to remember where you want to outline. If there is more than one area, press Shift and make your next selection.
Note If you have more than one area to use selective compression on, they must all be selected now or you will have to start over and make your selections again, including all the areas that need the Selective JPEG compression applied. These selections are going to become a JPG mask, and there can be only one per document.
-
Select Modify ® Selective JPEG ® Save Selection As JPEG Mask. As a default, the mask will be a pink color.
-
You can set the Selective settings from the menu bar by choosing one of these methods:
-
Modify ® Selective JPEG ® Settings
-
Click the pencil icon in the Optimize panel to the right of the Selective Quality field.
-
-
Check Enable Selective Quality and enter a quality value in the Selective Quality field. You can change the overlay color. Since there is text, I checked the Preserve Text Quality option (Figure 23-14).
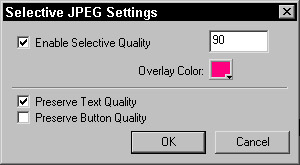
Figure 23-14: The Selective JPEG Settings dialog box -
A Quality of 90 looks about perfect (Figure 23-15). You could compromise and go to 80 or 85. You can't really see the JPEG artifacts when it is zoomed out. Only you can determine whether the trade off of quality and file size is worth it.

Figure 23-15: The image with the quality setting of 90% and zoomed in to 200%Note The figures you see here are zoomed in at 200%; even using a quality of 80, it looks good at 100%.
-
To edit the JPEG mask, you can delete and start over by choosing Modify ® Selective JPEG ® Remove JPEG Mask, or if you want to add to or subtract from the current mask, go to Modify ® Selective JPEG ® Restore JPEG Mask As Selection. With the selection active, you can use the Shift key and draw another area or add on. If you want to delete a portion, hold down the Alt (Option) key and draw around the area to remove.
-
Save the mask by choosing Modify ® Selective JPEG ® Save Selection As JPEG Mask.
Much of the optimization process is trial and error; choose your settings, preview, and repeat until you get an acceptable image.
|
| < Day Day Up > |
|
EAN: 2147483647
Pages: 491