Slicing Tools
|
| < Day Day Up > |
|
The slicing tools are the Rectangle and Polygon tools. The Rectangle Slice tool works the same way as the other Rectangle tools in Fireworks; click and drag over the area you want to define. The Polygon Slice tool also works the same way as the other Polygon tools in Fireworks; click a starting point and click to add points to define a shape.
You can define a polygonal shape with the Polygon Slice tool, but the polygonal shape cannot be exported as a polygon shape. All slices are rectangular, without exception. Fireworks automatically adds as many rectangles as necessary to maintain your defined polygon shape. These rectangles fit together with the polygon shape enclosed.
Using the guides
Before you actually begin to slice an image, you need to set up a few aids for yourself. Using guides is an efficient way of defining your slices. Before placing your guides, you need to know how you plan to use the images in your layout. For the Habitat Alert site I know I want the logo as a separate image, the buttons will be exported as a whole, the bird area as an image, the entire circle area as an image, the home button as an image, and the top-left corner of the curve as an image. The area behind the logo will be used as a tiling background.
Guides not only provide a visual aid, but also aid your selection if you have the Snap To Guides option checked, allowing selections within a set amount of pixels (determined by you) to snap to the guide automatically.
| Note | In the Dreamweaver section you will define a site and add folders for the sites structure. On the CD is a site folder you can use for the exercises in this chapter. Save the habitat_alert site to your hard drive, then continue. We've had to set up these different folders since this book is not necessarily read in a linear fashion. |
To set up guides, follow these steps:
-
Habitat Alert site Open
 ha6.png file from the habitat_alert\designfiles\Fireworks folder. To enable the guides, the rulers have to be visible. From the menu bar, choose View ® Rulers.
 -
Choose View ® Guides ® Snap To Guides.
Note You can set your own preferences regarding how the Snap To Guides function responds. Choose Edit ® Preferences and click the Editing tab. In the Snap Distance dialog box, enter the number of pixels from the guide your object needs to be before it snaps to the guide. To change the color of the guideline, choose View ® Guides ® Edit Guides, and change the color.
-
To place guides, click in the vertical ruler area and drag a guide into your document. The guide will not be visible until you begin to pull it onto your document, at which point you will see a green line, which is the default color. In this document you will also see red lines but disregard them for now. They are slicing guides generated because of the button slices made using the Button Editor.
Note If you pull a guide onto your canvas and you don't see it, it is probably because you pulled off the canvas. Be sure that you drag into the canvas area, not above or below it.
-
To set precise positioning of the horizontal guide, double-click it and type 74. Repeat for a second guide except change its position to 117. This places the guide at the top of the dark line and shadow of the header area.
-
Pull a vertical from the left side ruler. Double-click and set its position to 230. Repeat except position the second vertical guide at 498. Figure 23-1 shows the guides in place. They've been bolded for illustrative purposes to distinguish them from the red slice guides.
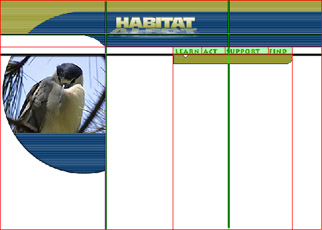
Figure 23-1: Four guides placed to aid in slicing the document -
Save. A copy is saved in the chapter23_exercise folder and is named
ha_guides.png.
Defining the slices
Slices are needed to export specific images or parts of images in a document. A slice (or hotspot) is also needed when you want to add a behavior. One of the biggest advantages of defining a slice is that you can individually optimize each slice. This means that you can have JPEG and GIF images in the same document. You can also use different compression settings for each image if desired.
To begin slicing the Habit Alert layout, follow these steps:
-
Habitat Alert site To begin slicing, select the Rectangle Slice tool (to the right of the Hotspot tool) from the Tools panel.
-
Place your cursor in the top-left corner and drag a rectangle to the first horizontal and first vertical guide.
Note A green overlay appears when a slice is drawn. You can toggle this view on and off by using the icons in the toolbar located at the bottom section, labeled, View.
-
In the Property inspector in the Slice field, replace the name that is automatically placed and use banner_left. The size should be 230 × 74.
Note Fireworks automatically names a slice according to the row and column that it's in. You can change the naming convention by choosing File ® HTML Setup, the Document Specific tag. Or you can give your slice unique names via the Property inspector.
-
Draw another slice below the one you just made. This one is 230 × 45. Name the slice location.
-
Draw a slice to cover the entire bird area to the bottom of the blue circle. The size is 230 × 265. Name the slice circle_btm. Do you notice that all the slices on the left have been 230 pixels wide? This is because they will all be placed in a column in Dreamweaver that is 230 pixels wide.
-
For the logo slice, draw from the top of the blue area to the second vertical guide but go below the horizontal guide to get the entire logo and blue area. The size should be 267 × 78 and the name should be logo.
-
Draw a new slice over the bird (which is also over the circle_btm slice) starting at the guide set at a position of 117. The size should be 230 × 170. Name it circlepic0.
-
Select the image just below the buttons and choose Insert ® Slice. Repeat for the image below it.
Every time you define a slice, Fireworks automatically places red lines where additional slices could be to slice the whole page. As you make additional slices the red lines change. You could stop slicing after a few slices and allow Fireworks to use its own guides (the red lines) to slice the rest of the image. In the Exporting section you see an option called Include Areas Without Slices, which slices your document according to the areas defined within the red lines.
Background image slice
Now you need to make a slice for the tiling background image behind the logo. I usually draw it a bit wide and adjust the width in the Property inspector. Follow these steps to make the slice for the background.
-
Draw a thin slice from the top of the banner to a bit below the dark line under the buttons.
-
In the Property inspector set the size to 10 × 27.
-
Name this slice banner_bg. Figure 23-2 shows all the slices you made.
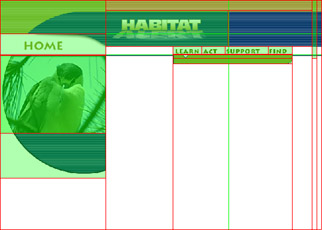
Figure 23-2: The Habitat Alert document with the slices visible
Exporting various images using one slice
The top slice under the buttons is the top of a menu that will be made in Dreamweaver. Each button has the white arrow below it. These images will be placed in a separate frame to be exported as separate images in the exporting section.
-
Select the sm_top_learn image (the one with the white arrow) and note its x and y coordinates.
-
Open the Frames panel and select Frame 2.
-
Choose File ® Import and navigate to the habitat_alert\ designfiles\Fireworks folder. Select the sm_top_act file and click Open.
-
To position the image exactly, enter the coordinates in the Property inspector (x: 377, y: 119).
-
From the Frames Option pop-up menu, select Add Frames. Enter 2 and use the After Current Frame option. Click OK.
-
Repeat Steps 3 and 4 for Frames 3 and 4, inserting the sm_top_support image in Frame 3 and the sm_top_find image in Frame 4.
-
Save your file. A copy of this file is saved as ha_sliced in the chapter23_exercise folder.
Adding URLs and Alt tags to sliced images
Many designers believe that every image with a link should contain an Alt tag. You should include alternate text on logo images with or without a link, so that while the image is loading, the users can see what is coming, or if they have images turned off, they can read a description of what is there. The text you put in the alternate text area is what the user sees before the image loads or when the mouse is placed over the image. This text might expedite browsing, because the users might find a link they want via the Alt tag and click it before the page is finished loading.
| Note | Alternate text also makes your site more user-friendly for those using text readers. Some search engines also place importance on the content of the Alt tag. |
To add alternative text or URLs to your images, follow these steps:
-
Habitat Alert site Open the ha_sliced document from the chapter23_exercise folder. Select the slice named logo.
-
In the Property inspector you will see the Link and Alt fields. Type www.habitat_alert.org for the link and Take me Home for the Alt (Figure 23-3).

Figure 23-3: The link and alt information added in the Property inspector for the location sliceNote You can add alternate text in the Alternate Image Description box (File®HTML Settings, Document Specific tab). This alternate text applies to the entire image, not just a slice. Use this option when there are no slices. To add alternate text to slices, or hotspots, enter it in the Property Inspector for the individual slices.
-
You use targets if you are developing a framed site. You can choose from the following targets choices:
-
_blank - Loads the linked document in a new, unnamed browser window.
-
_parent - Loads the lined document in the parent frameset or window of the frame that contains the link. If the frame containing the link is not nested, the linked document loads into the full browser window.
-
_self - Loads the linked document in the same frame or window as the link. This target is implied, so you usually don't need to specify it.
-
_top - Loads the linked document in the full browser window, thereby removing all frames.
-
-
None of the other slices need a link because the buttons will be linked in Dreamweaver. Save your file if you like. A copy is in the chapter23_exercise folder named
ha_sliced_done.png.
HTML text slices
When you have an image selected, a Type field Type in the Property inspector offers two choices: Image and HTML. The purpose of HTML slices (formerly called Text slices) is to have a slice area in which you can enter HTML text. You can type HTML text from within Fireworks or in your HTML editor. To define an HTML slice, follow these steps:
-
Select the slice you want to reserve for text.
-
In the Property inspector, choose HTML from the Type pop-up menu. If you want to add HTML text from within Fireworks, click the Edit button and the Edit HTML Slice dialog box will opens so you can type the text to enter.
You can also add the text in an HTML editor. That's all there is to it, the slice color turns a darker green and a label of HTML slice replaces the Slice label.
| Note | Text boxes have no borders, cell padding, or cell spacing, which places your text against the edge of the area. If there is a bordering image or background, it will be unsightly. To solve this spacing problem, insert blank text images before and after the text box, or insert slices before and after the text box. The extra text boxes or slices can then be filled with the background color or background image in Dreamweaver or the editor of your choice. |
|
| < Day Day Up > |
|
EAN: 2147483647
Pages: 491