Working with Frames
|
| < Day Day Up > |
|
The Frames panel is where most of the action is when producing animations. What is on each frame determines how the animation plays. By default, the Frames panel is docked with the History panel in the docked area. The Frames panel is the "control center" for your animation production. From the Frames panel you can add, delete, move, duplicate, use Onion Skinning, and set the looping options. Figure 22-4 shows the Frames panel.

Figure 22-4: The Frames panel with labeled icons
Adding and deleting frames
To add frames, you can add one at time or enter a specified number of frames. If you have too many frames or if you decide you don't like or need a particular frame, you can delete one.
To add one frame, click the New/Duplicate Frame icon. To add multiple layers, access the Frames Options pop-up menu (Figure 22-4) and choose Add Frames.
When deleting a frame you delete all its content, with the exception of a frame that has been distributed to Frames. The deleted frame containing a shared frame doesn't affect other frames that are using the shared frame. To delete a frame or frames, select it by clicking the frame or shift+clicking multiple frames and using any of the following options.
-
After the selection is made, click the trashcan icon to delete.
-
Click and drag the frame/frames on top of the trashcan icon.
-
Choose Delete Frame from the Frame Options pop-up menu by clicking the down-pointing arrow in the Frames panel.
Moving and duplicating frames
Moving frames works the same way as moving layers; you click and drag the frame to the desired position. If you double-click the frame name, you can rename it. In Fireworks MX, you can give your frames unique names. Moving the frames does not change the names or the numbers assigned.
Duplicating frames is a good way to save time by altering only the elements changing in each frame. To duplicate a frame, select the frame you want from the Frames Options pop-up menu; then choose Duplicate Frame. Figure 22-5 shows the positioning options. Choose where you want to place the duplicate frame.
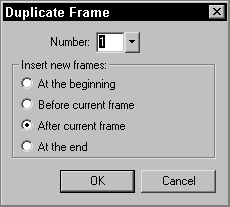
Figure 22-5: The Duplicate Frame dialog box
| Note | You can actually duplicate multiple frames by Shift+selecting then using the Duplicate Frame option from the Frames Options pop-up menu. This saves a lot of time when you want to reverse your animation. The only thing is, the last frame isn't duplicated, but duplicating that one extra frame when you've got a lot of frames is still a timesaver. |
Reversing the order of duplicated frames
If you have an animation that for instance moves to the right and you want it to slide back to the left you can reverse the order of frames. Make duplicate frames of the range of frames you want to reverse then choose Commands ® Document ® Reverse Frame Range. A dialog box opens asking for the first frame you want to reverse. Enter the number and click OK. Another window opens, and you enter the last frame you want to reverse and click OK.
Sharing layers across frames
The ability to share layers across frames is an important one. When you have a repeating element, such as a background image, it is very inefficient and time consuming to have to insert it into every frame. Sharing layers across frames automatically places the contents of the selected layer onto every frame present and to all frames added. There is one caveat though; it is an all or nothing proposition.
| Note | If you have an animation where at some point you don't want the layer shared, you'll need to draw a rectangle over the shared part to cover it and then add your new content. |
To share a layer across all frames, follow these steps:
-
In the Layers panel, select the layer you want to share.
-
Access the Frames Options pop-up menu and select Share This Layer.
-
Repeat for any other layer you want to share.
| Tip | You can also double-click on the layer name and check the "Share Across Frames" option. |
Distributing to frames
You can distribute multiple objects on one layer to individual frames. A good use of this command is to animate text. You can break your text apart then place each letter in a separate frame to animate. Shift+select all objects in the Frames Options pop-up menu and choose Distribute to Frames. Each object is placed on a separate frame.
Onion Skinning
The Onion Skinning option comes in handy when you need to place an object in one frame in alignment with an object on another frame, or if you need to add to or subtract from an object appearing on another frame. Using Onion Skinning is like placing tracing paper over the individual frames: you can see through to the other frames. One advantage of using the Onion Skinning feature is that you can select the faded objects on frames other than the selected one and edit them. To use Onion Skinning follow these steps:
-
Set up a quick file to use just to experiment with onion skinning.
Draw a shape in your document.
In the Frames Options pop-up menu, select "Add Frames" and type in 2 and select "At the End".
Select Frame 2 and add another shape.
Select Frame 3 and add another shape.
Select Frame 1 again.
-
Click the Onion Skinning icon, Figure 22-6 shows the Onion Skinning options.
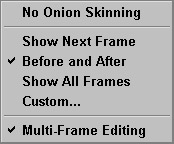
Figure 22-6: The Onion Skinning options -
Choose Before and After. In Figure 22-7 you see an icon that resembles an elongated hourglass, indicating which frames are using Onion Skinning. If the No Onion Skinning option was selected this icon is collapsed and looks closed on the selected frame. To try it, click the Onion Skinning icon and choose No Onion Skinning.
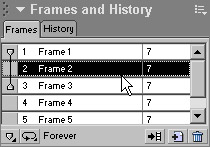
Figure 22-7: The elongated hourglass shows which frames are affected by onion skinning. -
If you tried the No Onion Skinning option, go back and change it to the Before and After option again. In the Frames panel click the gray square to the left of Frame 3. Notice how the icon expands to include this frame as well. If you click the Onion Skinning icon, the option automatically changes to Custom.
-
Click any of the objects. You can edit any of the frames, not just the object in the active frame. The frames made visible because of Onion Skinning are faded.
Looping
Looping sets the amount of times your animation will repeat. You can have it play over and over again indefinitely, choose a specific number of times to loop, or not to loop at all. No looping simply means the animation plays one time and stops. To set the looping options, click the GIF animation looping icon (Figure 22-4) next to the Onion Skinning icon, and select No Looping, a number, or Forever. No Looping is the default.
| Note | When you preview an animation in the browser, the looping you set doesn't take effect until you export the animation. |
Frame delay
The frame delay determines how long each frame is visible before the next frame appears. The delay settings are specified in hundredths of a second. A setting of 10 means 10 one-hundredths of a second. A setting of 100 means a one-second delay before the next frame appears. To set the delay settings, double-click the last column in the Frames panel where you see a number. Enter the delay time you want and click outside of the dialog box to close it. You can also Shift+select multiple frames and from the Options pop-up menu choose Properties to change the Delay time. Be sure to check the Include When Exporting option to have the delay change take effect.
| Tip | To avoid jittery animations, try setting the first frame a bit longer than normal, which allows extra time for the rest of the animation to load. The biggest drawback to this trick is that when the animation loops there is a longer delay than normal each time. This isn't a problem in some animations. |
|
| < Day Day Up > |
|
EAN: 2147483647
Pages: 491