Working with Symbols and Instances
|
| < Day Day Up > |
|
Understanding symbols and instances in Fireworks is the foundation of producing animations. Symbols represent an object, a group, or a text block. A symbol may contain many objects, layers, and frames. A symbol can be a graphic, an animation, or a button; each of these symbols is discussed in this section. When you convert an object into a symbol, you access the original symbol from the Library panel. Symbols are extremely useful when you want to reuse the same elements. In Fireworks symbols are necessary, not optional, for producing GIF animations. Symbols are similar to what other programs call "sprites." They animate independently and can be used multiple times throughout an animation.
Instances are copies of a symbol. After an object is converted into a symbol, the object in the document is replaced with an instance. The original symbol is stored in the library and accessible through the Library panel (Assets panel group). Wherever a symbol is used in the document it is a copy or an instance of the original symbol. If you edit the original symbol, every instance is automatically changed to the edited version, streamlining your workflow.
Types of symbols
There are three kinds of symbols:
-
Graphic - This option is used for objects that appear multiple times in your animation.
-
Animation - An animation symbol can play an animation independent of another animation.
-
Button - Button symbols contain different states such as Up, Over, Down, and Over While Down.
Creating a new symbol
To make a new symbol, follow these steps:
-
Choose Edit ® Insert ® New Symbol (Control+F8/Command+F8).
-
The Symbol Properties dialog box (Figure 22-1) opens. Type a name for your symbol, choose the type you want, and click OK.
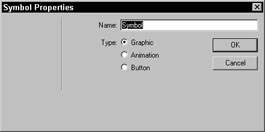
Figure 22-1: The Symbol Properties dialog box -
The Symbol Editor window opens. This is where you can draw (import or drag in) either a vector object or a bitmap object. Draw a rectangle of any color for use in the following exercises. Close the Symbol Editor when you are done.
You now have an instance of the rectangle on your document, which is indicated by the little arrow in the bottom-left corner. The actual symbol now resides in the library of this file.
Convert an existing object to a symbol
To convert an existing object to an animated symbol, follow these steps:
-
Select an object.
-
Choose Modify ® Symbol ® Convert to Symbol, or press the keyboard shortcut, F8.
-
The Symbol Properties dialog box opens. Name your symbol, choose the type, and click OK.
Add animation selections
Now that you have a symbol, you are ready to animate it. To do this, choose Modify ® Animation ® Animation Settings to open the Animate dialog box as shown in Figure 22-2.

Figure 22-2: The Animate dialog box
The following options are available:
-
Frames - Type in the number of frames you'd like in the animation. The slider only goes to 250 but you can type in any number you want; the default frame amount is 5.
-
Move - Move determines the amount of movement in pixels that each object will move. The value range is from 0 to 250 pixels; the default is 72.
-
Direction - The amount in degrees that the object will move. The value range is 0 to 360 degrees.
-
Scaling - The percent change from the beginning to the end of the animation. The default is 100 percent scaling, which keeps the animation at its original size up to 250 percent of the original size.
-
Opacity - The percentage of the opacity from the beginning of the animation to the ending opacity of the animation. Use this to do the fade in and out effects.
-
Rotation - The amount in degrees that the symbol rotates from the beginning to the end. The values range from 0 to 360 degrees; 0 is the default. You also have the option of having the animation rotate CW, clockwise or CCW, counter-clockwise.
Click OK and accept the default settings. Notice the motion path - the blue line with green, blue, and red dot - added to your animation. You see how to adjust that later in this chapter.
Editing symbol properties
After you add the animation properties, you have access to them in the Property inspector. You can also access the Animate dialog box by choosing Modify ® Animation ® Settings. If you want to edit the appearance of the symbol, double-click it and open the Symbol editor.
Editing symbol motion paths
An animated symbol when selected shows a bounding box and a motion path, which is attached to it. This path indicates the direction in which the symbol will move. The green dot indicates the starting point, and the red dot indicates the ending point. The blue dots in between represent the frames within the path. You can change the Move and Direction values by dragging the handles in the bounding box in your document. You can move the green handle to change the beginning point and the red one to change the ending point. To constrain the movement to 45-degree increments, hold down the Shift key as you drag. See Figure 22-3 to view a symbol with a motion path.
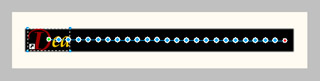
Figure 22-3: A motion path of a symbol
| Tip | You can preview an animation in the Fireworks workspace without having to open a browser. There are VCR-like controls on the bottom of the document window. Click the white right-pointing arrow to play. To preview an animation in preview mode, click the Preview tab in the document window, and then click the Play button. |
|
| < Day Day Up > |
|
EAN: 2147483647
Pages: 491