| In addition to formatting properties, each of the various sections has a variety of general properties that you can use to manipulate the behavior of each section within the overall report. For example, if you would like to suppress a particular section from the report display or just hide a section from the initial display but allow business users to still navigate to the underlying details, you can use the Section Expert to accomplish this. Using the report we created in the previous exercise, we will re-locate the Count summary field into the Group Header and hide the Details section to allow the viewer of the report to access this section only if he double-clicks on the Group Header summary values commonly known as drilling-down on report data. Let's take a closer look at how we can manipulate the behavior of report sections. -
First, we will re-position a couple of the report objects. Highlight the Text object in Group Header #1 (the combined Text and Country database field) and move it to the right so that its left margin is aligned under the left margin of the Contact First Name column title. -
Highlight the Summary field currently located in the Group Footer #1 section (Count of Contact Last Name) and drag it up in the Group Header #1 section so that it is positioned to the left margin of the Group Header #1 section (left justified), as shown in Figure 9.3. Figure 9.3. Report objects can be re-positioned into the various report sections to change the presentation of the report.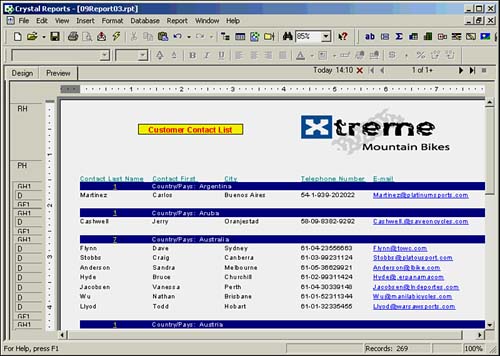
-
While the Summary count field is still highlighted, modify the font properties so that it is underlined and in a bold yellow color. -
Using what you have learned from the previous exercises, remove the background color of the Group Footer #1 section the background color property can be located on the Color tab of the Section Expert. Figure 9.3 displays what your report should now look like. -
To display the listing of customer contacts for each country on a separate and unique page, open the Section Expert and select Group Footer #1 from the section list on the left. As Figure 9.4 shows, the Common tab within the Section Expert provides access to a variety of properties unique to the section that you have selected from the list on the left. In this case, check the box next to the New Page After item and click OK to continue. Figure 9.4. The Section Expert provides access to a variety of section formatting properties, as well as specifying what happens before and after each section.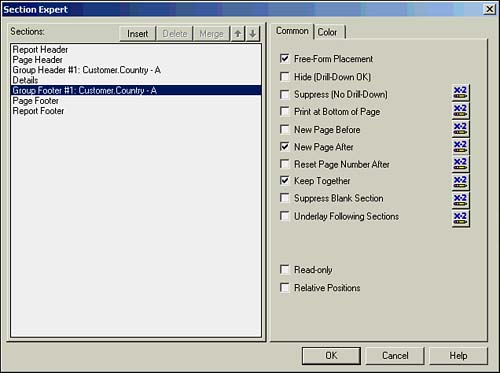
-
Looking at the preview of your report, you will now see each country's list of contacts on a separate page. Although this might be desirable for those countries with a considerable number of contacts, such as Canada, France, and the United States in this report, it is not necessarily the most visually pleasing presentation for the countries that have only one or two customer contacts. Perhaps the majority of the business users for this report are more interested in the total number of contacts for each country rather than the actual list itself. However, a few of the business users also want to be able to access the contact list on occasion. To accommodate both groups of users, we can manipulate the properties of the Details section. -
To accomplish this, first disable the New Page After property that was set for the Group Footer #1 section. The Section Expert can be used to remove this setting. Click OK to continue. -
From either the Design or Preview view of your report, right-click on the Details section title to the far left of the application area and select Hide (Drill-Down OK) from the pop-up menu.  | Drill-down functionality is designed to make report viewing easier. You can hide the details of your report and only have the group headers and summaries visible, and, when necessary, the business users of the report can then click on the group header or summary fields to view the report details. |
 | Common report section commands such as Hide, Suppress, Delete, Hide Section Names, and Select All Section Objects are accessible via the pop-up menu when you right-click on the applicable section's name. Some of these commands are also available within the Section Expert dialog, although unlike the Section Expert, the right-click pop-up menu pertains only to the specific section you have selected and does not allow you to quickly navigate from one section to another. |
As shown in Figure 9.5, you should now see a list of each country with only the total number of contacts displayed. However, upon double-clicking the count of contacts (displayed with the underlined, yellow number) the business user of the report can quickly drill-down into the Details section that presents the actual customer contact specifications. Figure 9.5. A manager can now see a summary list of customer contacts by country, but yet also access the customer contact details if desired.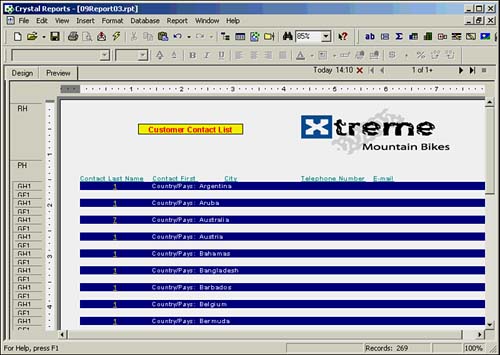
| To indicate to the business user of the report that more detailed information is available behind the summary group level, the mouse pointer will turn into a magnifying glass icon when it floats over the yellow count field of customer contacts, located in the Group Header #1 section. |
As you can see in Figure 9.6, after the business user chooses to drill-down into a particular group's detail listing (France in this example), that group listing is cached in the Crystal Reports application so that it can be easily accessed for future reference. This cached view of the group detail is presented via an additional tab within the application environment. However, when the business user of the report selects to refresh the report, all cached tabs are removed because the data being retrieved from the database might have changed since the previous cached page was last generated. Figure 9.6. The detailed list of customer contacts for France.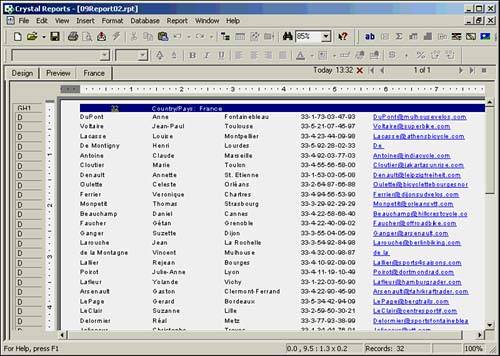
In addition to the Section Expert options that you have already used, the following Coffee Break provides an overview of the available settings presented on the Common tab of the Section Expert. Reviewing the Common Tab Settings of the Section Expert  Free-Form Placement Places objects anywhere within a section, ignoring all program alignment grids and guidelines. When this option is not selected, objects are placed at fixed points using an underlying grid. Hide (Drill-Down OK) Hides the respective section from the report's initial visual display, but still allows report users to access the section's content upon drill-down. Suppress (No Drill-Down) Hides the respective section from the report's visual display and disables any drill-down capabilities such that the section's content is not available to report users. Print at Bottom of Page Causes the current section to print at the bottom of the page. This setting is most useful for printing invoices and other reports where you want summary values to appear toward the bottom of the page. New Page Before Inserts a page break before it prints the section. This is applicable to the Group Header, Group Footer, and Details sections. New Page After Inserts a page break after it displays and prints the section. For example, you can use this setting in the Group Footer section to print each group on a separate page. By default, the Page Header and Page Footer sections will appear on each page. Reset Page Number After Resets the page number to one (1) for the following page after it prints a group total. When this option is used in conjunction with Print at Bottom of Page, a single group prints on a page, the group value is printed at the bottom of the page, and the page number is reset to 1 for the next page. This option is useful whenever you are printing multiple reports from a single file (such as customer invoices), and you want each report to be numbered beginning with Page 1. Keep Together Keeps a particular section together on one page without splitting the section between multiple pages. For example, in a customer list, data on a single customer might extend over several lines. If the standard page break falls within the data for a customer, the data will be split part on one page and the remainder on the next. You can use the Keep Together setting to insert the page break before the record begins so that all the data will be printed together on the following page. Suppress Blank Section Hides the report section if it is blank, and will only print it if it is not blank. Underlay Following Sections Permits the selected section to underlay the following section(s) when it prints, making the current section transparent. Format with Multiple Columns (Details section only) Presents the Layout tab (otherwise hidden from view) within the Section Expert and allows you to use multiple columns to display report data. Reserve Minimum Page Footer (Page Footer section only) Reserves space at the bottom of each page for your Page Footer sections (a default setting). This allows you to minimize the space reserved for your Page Footer sections, thus maximizing the space available for other report information on each page. This option only affects a Page Footer area with multiple sections. Read-only Locks the formatting and position of all report objects within the section so that they can't be formatted or re-positioned. The Read-only setting uses password protection to allow the report designer to return to the report to make future changes. Relative Positions Locks the relative position of a report object next to a grid object within a section. For example, if you place a text object one inch to the right of a database field object, during report generation the program will push the text object to the right so that the one inch of space is maintained regardless of the width of the database field object. |
|