| So far, the reports you have created have returned all the records from your database. Sometimes this is appropriate, but often reports need to filter the data based on a specified criteria. This is most apparent when working with large databases in which there can easily be hundreds of thousands of records returned from a query, especially when joins are applied. As with many features in Crystal Reports, there are multiple ways to filter data: Using the Select Expert This simple method provides a visual way to specify filtering. Using the Record Selection Formula This more granular, yet powerful, method involves creating a custom formula language expression to determine the filter criteria. Working with the Select Expert Let's work through an illustrative example of filtering using the Select Expert. Taking what you have learned so far about creating simple columnar reports, create a new report from the Xtreme Sample Database, adding the Customer Name and Last Year's Sales fields from the Customer table to the details section of the report. The following steps will walk you through adding a filter to this report: -
To invoke the Select Expert, click its button found on the Experts toolbar or, alternatively, select the Select Expert option from the Report menu. -
The first step in creating a filter is to choose which field the filter should be created on. Accordingly, the Choose Field dialog is displayed. Both fields that are present in the report and fields from the database are listed. A field does not need to be on the report in order to create a filter using it. At this point, if you forget which values are stored in any of the fields listed, click the Browse button to see a sample list of values. For this example, choose Last Year's Sales field and click OK. The Select Expert dialog appears, as shown in Figure 7.1. Figure 7.1. The Select Expert.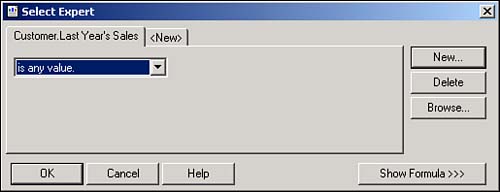
-
The Select Expert has a group of tabs one for each filter defined inside that report. In the case of your example report, there will only be one tab for the Last Year's Sales field and another called <New>, which is used to define an additional filter. By default, the filter setting on the Last Year's Sales tab is set to Is Any Value. This means that regardless of the value of the Last Year's Sales field, all records will be included in the report. To change the filter in a report, change the value of the drop-down list. For this example, change it to Is Equal To. -
When this option is selected, another drop-down list appears. If the exact value to filter the field on is known, it can be typed in to this list box. However, in this case, you might not know exactly what the values of the field are, so you are provided with the ability to browse that field's values by simply pulling down the drop-down list. Choose $300.00 and click OK.  | Often when modifying filters and selections in the report designer, Crystal Reports will display a message asking the user if she wants to use the saved data in the report or refresh the data from the database. Using the saved data in the report is usually a good option because it does not incur a new query to the database. However, especially when modifying filters, it can cause some confusing results because the set of saved data in the report might or might not consist of all the records in the database; that is, a filter might have already been applied. So when modifying filters, it's best to refresh the data whenever Crystal Reports asks you. |
-
When returning to the report, you should notice that the report now only displays a single record: the Has Been Bikes company that had sales of $300. A more useful filter would be to show all records that were above or below a threshold. To accomplish this, re-open the Select Expert. This time, change the Is Equal To criteria to Is Greater Than and type 100,000 in to the list box. When closing the Select Expert and returning to the report, a small collection of records should be returned. In just a few seconds, you've created a report showing your top customers. Let's look at a few more types of filters that can be applied to a report. The following steps will walk you through applying these various types of filters: -
Open the Select Expert again and change the criteria from Is Greater Than to Is Between. -
This time, two list boxes are presented, each corresponding to an upper and lower bound. Type in the values 2,000 and 3,000, respectively (as shown in Figure 7.2), and click OK. The report will display all customers with sales between two and three thousand dollars. Figure 7.2. Modifying the report to display customers with sales between two and three thousand.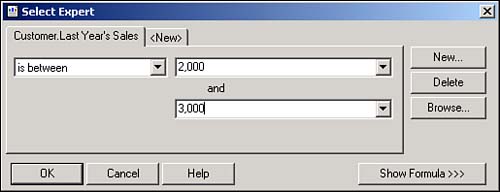
-
So far, only the Last Year's Sales field has been used as a filter. However, any field can be used as a filter, although there are slightly different options for various field types. Go back in to the Select Expert and, while on the Last Year's Sales tab, click the Delete button to remove that filter. -
Add a new filter on the Customer Name field by clicking the New button and selecting the Customer Name field from the subsequent dialog. -
To have the report only show a single customer's record, leave the criteria as Is Equal To and choose Alley Cat Cycles from the drop-down list. Applying this filter results in the report only showing a single record. -
Return to the Select Expert and change the criteria to Is One Of. This option allows you to choose multiple values. Each time a value is selected from the drop-down list, it is added to the bottom of the list box. Select Alley Cat Cycles, Bikes R Us, and Hikers and Bikers and notice how the report now reflects those three records. -
Next, remove the three values previously selected by highlighting them and clicking the Remove button. Now change the criteria to Is Like and type Wheel* in to the drop-down list. Click Add or press Enter to add this item to the list. Applying this filter results in the report showing all customers whose names begin with the word Wheel.  | When using the Is Like option, an * acts as a wildcard for any number of characters, whereas a ? acts as a wildcard for only a single character. This can be quite useful when searching through textual fields for a specific text pattern. |
The last thing this hour covers with respect to the Select Expert is applying multiple filters. To do so, perform the following steps: -
Start from scratch and delete any filters you have applied by clicking the Delete button on each tab. -
Click the New button and add a new filter using the Last Year's Sales field. -
Change the criteria to Is Less Than and the value to 5,000. This filter would result in showing all customers with sales of less than $5,000, but let's apply another condition. -
Click the New button and add a new filter based on the Country field. Note that this is slightly different from the previous filters that have been created not only because more than one filter is being applied at the same time, but also because the filter being created is based on a field that is not present on the report. -
Change the criteria for the Country filter to Is Equal To and choose Canada from the drop-down list. Clicking Ok will apply this filter will result in a report with multiple conditions: customers from Canada with sales below $5,000. See Figure 7.3 for the output of this report. Figure 7.3. A filter is applied to show all Canadian customers with sales less than 5,000.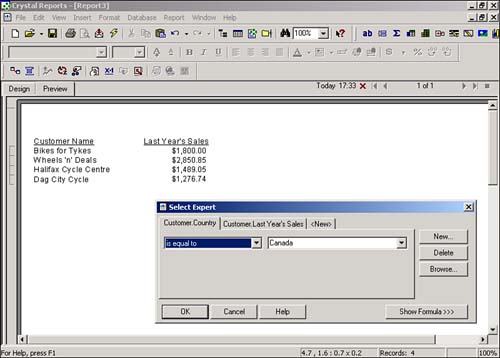
The Record Selection Formula Although the Select Expert is quite powerful, there are certain situations in which the report developer needs to define a filter that is more complex than the Select Expert allows. Fortunately, Crystal Reports has a built-in formula language that allows custom expressions to be defined as a filter. In fact, this is one of the strengths of the Crystal Reports product: being able to use the formula language to attain a high level of control in various aspects of report creation. Although you might not have realized it, even when you were using the Select Expert, a formula was being generated in the background that defined the filter. To see this in action, open the Select Expert and click the Show Formula button. This expands the Select Expert dialog to reveal the formula being generated. This formula is called the record selection formula. Notice that the formula's value is as follows: {Customer.Last Year's Sales} > $5000.00 The formula language is covered in detail in an hour later in this book, but the following are the key points to learn right now. In formulas, braces denote a field. For database fields, the table and field name are included and are separated by a period. The rest of the formula is a statement that tests if the sales value is more than five thousand dollars. Think of a record selection formula as an expression that evaluates to a true or false result. For each record in the database, Crystal Reports applies the record selection formula, plugging in the current field values in place of the fields in braces. If the result of the statement is True, the record is included in the report. If the result of the statement is False, the record is excluded from the report. Let's look at an example. The first record in the Customer's table is that of City Cyclists who had sales of $20,045.27. For this record, Crystal Reports evaluates the preceding formula, substituting $20,045.27 in place of {Customer.Last Year's Sales}. Because this value is larger than $5,000, this statement is True and the record is included in the report. To see what other formulas look like, change the filter using the Select Expert to a few different settings and observe how the formula changes. Working with the Formula Editor The formula shown at the bottom of the Select Expert is not just for informational purposes: It can be edited. However, a much better editor exists for formulas. It's called the Formula Editor (shown in Figure 7.4), and it can be invoked by clicking the Formula Editor button in the Select Expert or by selecting the Report menu, Selection Formulas, and then Record. Although the formula language doesn't change, the process of creating formulas becomes much simpler because of a focused user interface. Figure 7.4. The Formula Editor.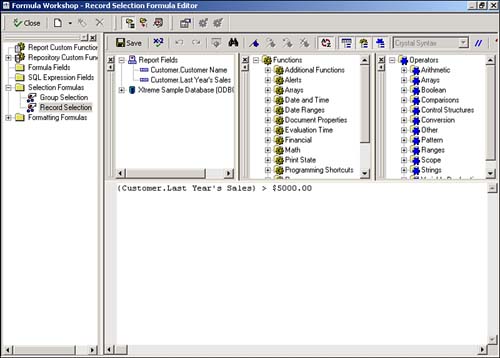
Let's work through creating a simple record selection formula. This formula will attempt to filter out any customers who owe more than $5,000 in tax. Tax owing will be defined as 2% of their sales figure. To implement this, work through the following steps: -
To begin, launch the Formula Editor as described previously. -
Next, create an expression that calculates the tax owing. To do this, enter the following expression: {Customer.Last Year's Sales} * 0.02 -
The previous expression now represents the tax owing. To complete the expression to filter out all customers who owe more than $5,000 in tax, modify the formula to look like this: ({Customer.Last Year's Sales} * 0.02) > 5000 -
To complete the formula and apply the filter, click the Close button at the top left corner of the Formula Editor window, then click OK to close the Select Expert. Focus will return back to the report, and when data is refreshed, only a handful of customers should be listed on the report. Both the formula language and the Formula Editor are topics unto themselves and will be discussed in more detail in a later hour. |