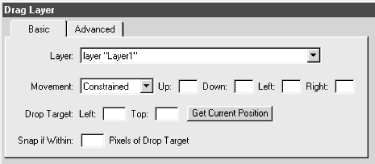
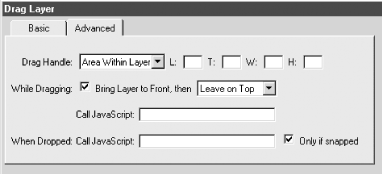
| Layers require 4.0+ versions of the major browsers. For maximum compatibility with Netscape Navigator and Internet Explorer, create layers using the <div> tag. For example, a layer implemented with a <div> tag using absolute positioning might look like this: <div id="Layer1" style="position:absolute; visibility:visible; left:67px; top:39px; width:161px; height:172px; z-index:1; overflow:scroll"> </div> Avoid <span> tags, which work in IE only, and avoid <layer> and <ilayer> tags, which work in NN4.x only. For more details, see Section 4.2 in Chapter 4. Layers are controlled using the attributes discussed in Table 4-5. These attributes can be set in the Property inspector, as shown in Figure 4-7. A script can reference a layer's id (in this case, Layer1 ) to modify its properties. By default, when you add a layer to your document, Dreamweaver adds the MM_reloadPage behavior to ensure that layers are properly updated when resizing the Netscape browser window. If your site does not support Netscape browsers, you can shut this option off under Edit  Preferences Preferences  Layers Layers  Netscape 4 Compatibility. You can add or remove this JavaScript manually in a document using Commands Netscape 4 Compatibility. You can add or remove this JavaScript manually in a document using Commands  Add/Remove Netscape Resize Fix. Add/Remove Netscape Resize Fix. 14.1.1 Dragging and Dropping Layers The Drag Layer behavior creates a moveable layer that the user can drag and drop. Use this behavior to create games or other interesting interfaces. For example, you might let a user move cards in a game of solitaire or drop a coin in a jukebox. To apply the Drag Layer behavior in the Behaviors panel, the document must contain a layer object. However, the behavior cannot be applied to the layer itself. Instead, you'll typically attach the behavior to the document's <body> tag, where it will be triggered by the onLoad event. To prevent a layer from being immediately draggable when the document loads, attach the Drag Layer behavior to an image and trigger it using the onMouseDown event; the layer won't be draggable until the user clicks on the image. Adding the Drag Layer behavior opens the Basic tab of the Drag Layer dialog box, shown in Figure 14-1. Figure 14-1. Basic Drag Layer behavior parameters  The Basic tab's contents differ slightly, depending on the value chosen for the Movement option. - Layer
-
The Layer option specifies the id of the layer that the user can drag and drop. To make multiple layers draggable, apply the behavior multiple times (nested layers move with their parent but aren't well supported in NN4.) - Movement
-
When Movement is set to Constrained, the Up, Down, Left, and Right fields are used to constrain movement. When Movement is Unconstrained, the user can drag the layer anywhere within the browser window. - Up, Down, Left, and Right
-
These coordinates limit the movement of the layer when Movement is set to Constrained. Set Up and Down to the same number to constrain the layer to horizontal movement only. Set Left and Right to the same number to constrain the layer to vertical movement only. - Drop Target, Left, Top, and Get Current Position
-
If Drop Target coordinates are not specified, the layer is dropped only when the user releases the mouse. If the Left and Top Drop Target coordinates are specified, the layer is dropped automatically when its upper-left corner is within range of the Drop Target position (as specified by the Snap if Within option). The Drop Target option is typically used for jigsaw puzzles or similar elements that must be dragged to a particular location. Click the Get Current Position button to automatically fill in the Left and Top fields with the layer's current position. - Snap if Within
-
This option specifies the tolerance within which the layer is snapped to the Drop Target coordinates. A typical value is 50 pixels (about half an inch). The Advanced tab of the Drag Layer dialog box, shown in Figure 14-2, provides finer control over draggable layers. Figure 14-2. Advanced Drag Layer behavior parameters  The Advanced tab's contents differ slightly, depending on the value chosen for the Drag Handle option. - Drag Handle
-
This option determines where the user must click to initiate the drag action (the entire layer is always dragged in unison ). If this option is set to Entire Layer, the user can click anywhere within the layer's bounding box to begin dragging it. If this option is set to Area Within Layer (as seen in Figure 14-2), the L (left), T (top), W (width), and H (height) fields define a hotspot area within which the user must click. For example, you might require a user to click on the handle of a coffee mug to drag it. The coordinates are relative to the upper-left corner of the layer itself. - While Dragging: Bring Layer to Front
-
Enabling this checkbox causes the selected layer to come to the foreground while being dragged. Bringing a layer to the foreground prevents it from disappearing behind other items while the user drags it. - Bring Layer to Front, then...
-
This option controls whether the dragged layer reverts to its original stacking order (Restore Z-Index) or remains in front of other layers (Leave on Top) once it is dropped. This option is relevant only if the Bring Layer To Front option is enabled. - Call JavaScript
-
This field specifies the JavaScript command or function call to execute when the drag operation begins. Use it to trigger an action when the user clicks on the draggable item. - When Dropped: Call JavaScript
-
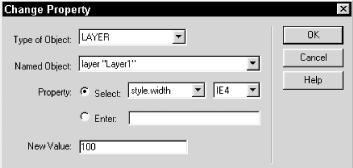
The field specifies the JavaScript command or function call to execute when the layer is dropped. If you enable the Only If Snapped checkbox, the JavaScript executes only when the layer is dropped at the correct location (as specified by the Drop Target coordinates on the Basic tab of the same dialog box). You might use this option to display a message when the user drags the layer to the correct location. 14.1.2 Resizing Layers You can use the Change Property behavior to alter the height and width of a layer. The behavior can be applied to another element, but not to the layer itself. To allow the user to change a layer's size, attach this behavior to a button and trigger it with an onClick event. Applying the behavior opens the Change Property dialog box, shown in Figure 14-3. Figure 14-3. Changing a layer's width in Internet Explorer  Section 14.1.2.1 adjusts the height or width of a layer in Internet Explorer. 14.1.2.1 Procedure 5 -
Add a layer object using Insert  Layer. Layer. -
Apply the Change Property behavior to an image that will act as a button. Applying the behavior opens the dialog box shown in Figure 14-3. -
In the dialog box, select LAYER from the Type of Object pop-up list. -
Pick the name of a layer from the Named Object pop-up list. -
Enable the Property Select radio button and choose IE4 from the browser version pop-up list on the far right. -
Choose style.width from the Property Select pop-up list. -
Specify a measurement, such as 50px or 75%, in the New Value field. -
To change the layer's height, repeat Steps 2 through 7, but choose style.height from the pop-up list in Step 5.  | To change the height and width of a layer dynamically in NN4, use the Resize Layer behavior by Massimo Foti, available from the Dreamweaver Exchange. | | See Table 16-1 for details on the properties that can be changed with the Change Property behavior. See Chapter 17 for details on animating layers using timelines .  |


