Copying Files Across the Internet
There are many reasons to copy files from one machine to another. The most common: downloading software so that you can install it, uploading Web pages you have created to the machine that will serve them, and copying files from one machine to another as a way of backing them up.
If security is a concern (which it should be, most of the time), you should always use one of the secure methods of file transfer, either scp (described next ) or sftp (described in the sidebar "Other Command-Line FTP Clients ," below).
The most widely available method for copying files across the Internet is FTP (File Transfer Protocol). FTP software (both client and server) is available for virtually every type of operating system, not only Unix. So you might find yourself using FTP from your Unix machine to transfer files to or from a Windows NT machine that is running an FTP server. The big advantage to FTP software is its widespread availability. The biggest down-side is that, like Telnet, it transfers everything "in the clear" (that is, unencrypted), including your user name and password.
Preserving ACLs and other Extended Attributes
Most of the command-line file-copy tools described in this chapter have one weakness: They will not transfer certain kinds of file metadata. That includes the "resource forks" created by preMac OS X versions of the Mac OS and the various extended attributes introduced in Mac OS X 10.4 for features such as Spotlight. They also don't work with the ACLs described in Chapter 8, "Working with Permissions and Ownership."
You can preserve the resource forks on files created in Mac OS 9 (Classic) by using Aladdin Systems' StuffIt application to compress the file, and then transferring the compressed file. The compressed file is not affected, and when the recipient uncompresses the file, its resource fork and other Mac metadata are preserved.
If both your machine and the remote machine are running Mac OS X 10.4 or later, you can use the -E option to the scp or rsync command (described below). Both Mac OS 9 resource forks and Mac OS X ACL information will be properly copied , as well as the other extended attributes used by Mac OS X features such as Spotlight.
Using scp
The scp ( secure copy ) command works very much like the cp command (review Chapter 5, "Using Files and Directories"). The basic syntax is
scp existingfile newfile
The key difference between scp and cp is that any of the files specified can be on another machine, so the proper syntax for scp is
scp user@host:file user@host:file
Furthermore, and this is a really important point : scp automatically uses SSH to make the connection to the remote machine, so the entire transaction is encrypted, including the file(s) being copied across the network.
To send a file from your machine to a remote machine using scp:
- scp localfile user@host:newfile
where localfile is a file pathname on the local machine, user is your user name on the remote machine, host is the domain name or IP address of the remote machine, and newfile is a file pathname on the remote machine. If the newfile path does not begin with a / , then it will be interpreted as a path relative to the home directory for user on the remote machine.
Here are some examples:
scp Report.doc files.mycompany.com:
copies the local file Report.doc to your home directory on the remote machine files.mycompany.com . The copied file will have the same name on the remote machine because we have only specified the remote hostname, and not the remote filename.
scp Report.doc puffball@host.com:
 NewReport.doc
copies the local file Report.doc to puffball's home directory on the remote machine and renames the copy NewReport.doc.
scp /etc/rc.common puffball@host.com:
files/
copies the local file /etc/rc.common into a directory called files in the home directory of user puffball on the remote machine.
scp /etc/rc.common host.com:/etc/
rc.common.save
copies the local file /etc/rc.common to /etc/rc.common.save on the remote machine. This assumes your user name is the same on both machines.
To get a file using scp:
| 1. | scp user @ hostname : path path Examples: scp well.com:myfile.txt . scp puffball@well.com:myfile.txt |
| 2. | Enter your password. See Figure 10.6 , and notice how scp provides a progress indicator. The series of asterisks fills up as the file is copied over the network. Figure 10.6. Using scp to copy a file from a remote machine to your local machine. localhost:~ vanilla$ scp puffball@well.com:myfile.txt copy.txt puffball@well.com's password: myfile.txt 100% ******************************************* 9939 00:00 localhost:~ vanilla$ |
Sometimes you want to copy an entire directory from one machine to another. scp handles this with the -r option (for recursive copy).
To copy an entire directory using scp:
- scp -r original copy
where either original or copy includes a remote-machine name. Examples:
scp -r images
puffball@well.com:new_images
copies the local directory called images to the remote machine, while
scp -r puffball@well.com:images
new_images
copies the remote directory ~puffball/images to the local current directory and names the copy new_images . But be carefulif there is already a local directory named new_images , that command line will put the copy inside the existing directory. You can avoid this by adding a trailing / to any path that is supposed to be a directory:
scp -r puffball@well.com:images
new_images/
There are a number of options for scp that you may find useful. You've seen one (the -r option) in the task above. Table 10.1 lists the most common options for scp , and, as always, you should read the man page for the complete list.
Table 10.1. Options for the scp Command
| O PTION | M EANING /U SE |
|---|---|
| -r | Recursive copy. Used to copy entire directories. |
| -q | Disables the progress meter (or quiets it). |
| -p | Preserves permissions and modification times. |
| -v | Causes lots of debugging information to be displayed (verbose). |
| -C | Uses compression to speed up copying. |
| -E | Preserves extended attributes, including ACLs and Mac OS 9 resource forks. Both machines must be running Mac OS X 10.4 or later. |
| -l number | Limits bandwidth used, where number is in Kbits/second. |
| See man scp for the complete list. | |
Using FTP
FTP is one of the oldest protocols on the Internet and is still widely used for downloading software as well as uploading and downloading files for Web sites and general file-transfer work.
As with virtually all Internet tools, you use FTP by running a client application on your machine that connects to a server application on the remote machine. Mac OS X comes with not one, not two, not three, but (at least!) four command-line FTP client applications. This chapter focuses on the most common FTP client application, which is called simply ftp . The others are curl , sftp , and ncftp (see the sidebar "Other Command-Line FTP Clients").
We are showing you the older and more basic ftp program here because we want you to be able to use other Unix machines besides your Mac OS X machine. Still, ncftp is a nicer and easier program to use, so as long as you are using Mac OS X, you should read the man page for ncftp and try using that instead of ftp .
The ftp client application has its own command prompt, at which you enter commands that are specific to the ftp program itself. You can think of it as a miniature shell that has several dozen of its own commands. Table 10.2 shows the most common FTP commands; see man ftp for the complete list.
Table 10.2. FTP Commands
| C OMMAND | M EANING /U SE |
|---|---|
| ascii | Sets file-transfer type to plain text. |
| binary | Sets file-transfer type to binary. |
| cd | cd directory Changes the current directory on the remote machine. |
| get | get remotefile [localfile] |
| hash | Toggles hash-mark printing (progress indicator during file transfer). |
| lcd | lcd [directory] Changes your current directory on the local machine. With no argument, it changes to your home directory. When you quit FTP, your current directory in the shell will be what it was when you started the FTP program. |
| ls | ls [directory] Like the regular ls command, lists the names of files and directories; usually uses the " long-form " listing. |
| mkdir | mkdir directory Creates a new directory on the remote machine. |
| mput | mput file1 file2 ... Uploads multiple files. |
| mget | mget file1 file2 . . . Downloads multiple files. |
| put | put localfile [ remotefile ] |
| pwd | Prints your current directory on the remote machine. |
| quit | Quits the ftp program. |
| Arguments in square brackets ([ ]) are optional. | |
Using the ftp program generally involves the following steps:
- Connecting to the remote machine.
- Logging in with a user name and password.
- Navigating around the directories on the remote machine and/or your local machine.
- Specifying options about how file transfers will be madefor example, specifying that transferred files should be treated as plain text as opposed to binary, or requesting that a progress indicator be displayed during file transfer.
- Giving the actual command to upload or download one or more files.
- Quitting the FTP program to get back to your shell prompt.
Other Command-Line FTP Clientscurl curl is a tool for copying files between machines using any one of several different protocols, including FTP, HTTP, and HTTPS. (See man curl for the full story.) There are so many options and features in curl that we prefer to install and use the wget program. It's less powerful but simpler. sftp sftp is actually an FTP-like interface that uses SSH to create a secure connection to the remote machine and then allows you to use commands similar to those of the FTP program to transfer files. If it's available, you should use sftp instead of FTP. The commands are mostly the same, but read the man page to see a few differences. For example, sftp has an lpwd command to show your (local) current directory, and a rename command that lets you rename remote files. ncftp ncftp is a more user-friendly program than the old ftp command. ncftp can be used to connect to any FTP server. ncftp has a really good man page, and you should read that and try using ncftp instead of ftp when scp or sftp isn't an option. |
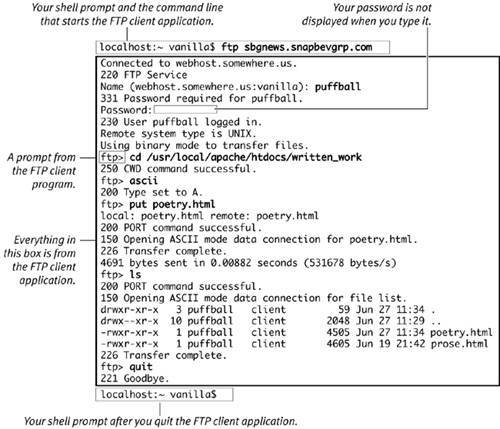
The following task assumes that you want to upload a file called poetry.html from the current directory on your local machine to a remote machine called webhost.somewhere.sf.ca.us , and that you want the file to end up in the directory /usr/local/apache/htdocs/written_work on the remote machine.
A key thing to keep in mind when using the FTP protocol is that you are using two machines simultaneously : your own machine (the "local" machine) and the remote machine.
Refer to Figure 10.7 throughout the following task.
Figure 10.7. Using FTP to upload a file.
To upload a file using ftp:
| 1. | ftp hostname In Figure 10.7, the hostname is webhost.somewhere.us, so the command line is ftp webhost.somewhere.us Throughout this process, the FTP remote server will send you messages about each action you take. When your client software first connects to the server, you get the message 220 FTP Service (The messages you see will vary slightly, depending on the server you connect to.) The remote machine's FTP server then prompts you for a user name. | |
| 2. | Enter a user name. You can simply press The server gives you a status message: 331 Password required for puffball. and prompts you for a password. | |
| 3. | Enter a password. The password is not displayed as you type it. (But the password is sent over the network without encryption, so it may be intercepted and read.) You are now logged in to the remote machine. The server responds with a series of messages: 230 User puffball logged in. Remote system type is UNIX. Using binary mode to transfer files. The last message tells you the default setting for file transfers and assumes that any file you send (or receive) is a binary file, as opposed to a plain-text file. (A plain-text file is one that contains only ASCII characters , so, for example, a file using Unicode is not a plain-text file.) The next thing you see is a prompt from the ftp clientthis is like a shell prompt in that the client waits for you to enter commands: ftp> While you are logged in using FTP, you have two current directories: one on the local machine and one on the remote machine. The FTP server on the remote machine keeps track of your current directory on the remote machine, and the FTP client software keeps track of which directory you are in on your local machine. When you first log in using FTP, your current directory on the remote machine is determined by how the remote FTP server is configured, and your local current directory starts off being whatever it was when you typed the ftp command to log in. In the example here, you are changing directories on the remote machine so that you may upload a file into a specific directory on the remote machine. | |
| 4. | cd directory The FTP program has a cd command that changes your current directory on the remote machine . In Figure 10.7 the example is cd /usr/local/apache/htdocs/ There is a different command to change your current directory on the local machine: lcd (local change directory) The server responds with a status message: 250 CWD command successful. | |
| 5. | ascii In this example, the file being uploaded is a plain-text file (that is, a file containing only ASCII characters), so you must tell the FTP server to change the file-transfer type from binary to ASCII (American Standard Code for Information Interchange, a long way of saying plain text). If you transfer a plain-text file as binary, the file may not have the correct end-of-line characters, and if you transfer a binary file (such as an image or compressed file archive) as plain text, it will almost certainly be damaged and unusable. The server responds with 200 Type set to A. and you are now ready to upload the file. | |
| 6. | put poetry.html This example assumes that the file you are uploading (poetry.html) is in your local directory. The server responds with a series of messages as shown in Figure 10.7. In particular, the line local: poetry.html remote: poetry.html tells you that the file will be copied to the remote machine and have the same name on the remote machine. You could upload the file and give the copy a different name: put poetry.html lyrics.html | |
| 7. | You can also list the contents of a directory on the remote machine: ls Just like the regular Unix ls command, the ftp ls command lists file and directory names. Most FTP servers use the long-style listing shown in Figure 10.7. You can see by its presence in the listing that the file was copied successfully. If you have more files to transfer, do so. | |
| 8. | quit This quits the FTP program, and you get a shell prompt from your local machine.
|
The FTP program has more than five dozen commands, all of which are described in the man page, and the more common ones are described in Table 10.2. Still, it is useful to get help while you are actually using the FTP program at the ftp> prompt.
To get help inside FTP:
| 1. | ? The ftp command ? (just a question mark), typed at the ftp> prompt, lists all the available FTP commands, as shown in Figure 10.8 . Figure 10.8. Using the ? command to get a list of all the available FTP commands. ftp> ? Commands may be abbreviated. Commands are: ! features mls prompt site $ fget mlsd proxy size account form mlst put sndbuf append ftp mode pwd status ascii gate modtime quit struct bell get more quote sunique binary glob mput rate system bye hash mreget rcvbuf tenex case help msend recv throttle cd idle newer reget trace cdup image nlist remopts type chmod lcd nmap rename umask close less ntrans reset unset cr lpage open restart usage debug lpwd page rhelp user delete ls passive rmdir verbose dir macdef pdir rstatus xferbuf disconnect mdelete pls runique ? edit mdir pmlsd send epsv4 mget preserve sendport exit mkdir progres set ftp> The message "Commands may be abbreviated" means that you only need to type enough of each command name to make it unique. So you can type as instead of ascii |
| 2. | You can also get a one-line description of any individual command: ? command For example, ? ascii Figure 10.9 shows several examples. Figure 10.9. Getting one-line descriptions of individual FTP commands.ftp> ? ascii ascii set ascii transfer type ftp> ? as ascii set ascii transfer type ftp> ? lcd lcd change local working directory ftp> ? pwd pwd print working directory on remote machine ftp> ? umask umask get (set) umask on remote side ftp> |
Besides uploading files, you will of course use FTP to download files.
You may be working on a Web site on a remote machine and need to download copies of HTML pages and graphics from that machine. Another common situation would be to use FTP to download the source code for software you want to install (see Chapter 13, "Installing Software from Source Code").
Software is available for download from many publicly accessible FTP servers. Public FTP servers differ from servers on which you have an account (with a user name and password) in that they allow you to log in using the special user name "anonymous" and to use your e-mail address as a password. Generally speaking, you cannot upload files to these "anonymous FTP servers," but you can download files from them.
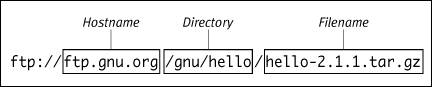
Often the easiest way to download files from anonymous FTP servers is to use a GUI tool such as a Web browser or the curl or wget command (covered later in this chapter). But it is also useful to know how to do it the old-school way with a command-line FTP client. You will often be given the location of a file to download as an FTP URLthat is, a URL that starts with ftp:// . Figure 10.10 shows how to extract the hostname, directory, and filename from an FTP URL like this:
ftp://ftp.gnu.org/gnu/hello/
Figure 10.10. Extracting the hostname, directory, and filename from an FTP URL.
Refer to Figure 10.11 throughout the following task. The steps are almost identical to those in the task of uploading a file.
Figure 10.11. Downloading a file with FTP.
localhost:~ vanilla$ ftp ftp.gnu.org Connected to ftp.gnu.org. 220 GNU FTP server ready. Name (ftp.gnu.org:vanilla): anonymous 230-Due to U.S. Export Regulations, all cryptographic software on this 230-site is subject to the following legal notice: 230- 230- This site includes publicly available encryption source code 230- which, together with object code resulting from the compiling of 230- publicly available source code, may be exported from the United 230- States under License Exception "TSU" pursuant to 15 C.F.R. Section 230- 740.13(e). 230- 230-This legal notice applies to cryptographic software only. Please see 230-the Bureau of Industry and Security (www.bxa.doc.gov) for more 230-information about current U.S. regulations. 230 Login successful. Remote system type is UNIX. Using binary mode to transfer files. ftp> cd /gnu/hello 250 Directory successfully changed. ftp> ls 229 Entering Extended Passive Mode (47977) 150 Here comes the directory listing. -rw-r--r-- 1 0 0 16452 Sep 17 1992 hello-1.0-1.1.diff.gz -rw-r--r-- 1 0 0 25676 May 22 1993 hello-1.1-1.2.diff.gz -rw-r--r-- 1 0 0 2919 May 23 1993 hello-1.2-1.3.diff.gz -rw-r--r-- 1 0 0 87942 May 23 1993 hello-1.3.tar.gz -rw-r--r-- 1 0 0 2020 Jun 09 2002 hello-2.1.0-2.1.1.diff.gz -rw-r--r-- 1 0 0 389049 Jun 09 2002 hello-2.1.0.tar.gz -rw-r--r-- 1 0 0 389363 Jun 09 2002 hello-2.1.1.tar.gz 226 Directory send OK. ftp> hash Hash mark printing on (1024 bytes/hash mark). ftp> get hello-2.1.1.tar.gz local: hello-2.1.1.tar.gz remote: hello-2.1.1.tar.gz 229 Entering Extended Passive Mode (9018) 150 Opening BINARY mode data connection for hello-2.1.1.tar.gz (389363 bytes). ########################################################################################################################################################################################################
To download a file using FTP:
| 1. | ftp hostname This step is exactly the same as in uploading. You are simply connecting to the remote machine. |
| 2. | Enter a user name. If you have an account on the remote machine, then use it. If your remote user name is the same as your local user name, just press If you are logging in to an anonymous FTP server, use the special user name "anonymous." For non-anonymous FTP servers, and for some anonymous FTP servers, you will be prompted for a password. |
| 3. | Enter your password, if asked. If you are logging in to a machine on which you have an account, enter the password. If you are logging in to an anonymous FTP server, enter your e-mail address. Some anonymous FTP servers will not bother asking for a password, as in our example in Figure 10.11. |
| 4. | You now change the directory to find the file you want to download: cd directory Using the example from Figures 10.10 and 10.11, the command would be cd /gnu/hello The server gives you a status message and another prompt. |
| 5. | ls Listing the contents of the current directory (on the remote machine) verifies that the file you want is really there. |
| 6. | You are now ready to download the file, but first you can tell the server to create a progress indicator during file transfers so that you can see something happening while transferring a large file: hash The hash command toggles the file-transfer progress indicator, which means that if it was off (the default), it is turned on, and if it was on, it is turned off. |
| 7. | Now you give the command to copy the file to your machine: get filename In the example, the filename is hello-2.1.1.tar.gz, so the command is get hello-2.1.1.tar.gz This copies the file to the current directory on the local machine and gives it the same name. If you want the copy to have a different name, you can type get remotename localnewname The file transfer takes place, and because you turned on the hash command earlier, you see a series of hash marks (#), one for each 1024 bytes transferred. When the transfer is complete, the server gives you a status message and the total number of bytes copied. You then get another prompt. If you have more files to transfer, you can do that, and when you are done, you quit the ftp program. |
| 8. | quit This quits the ftp program and takes you back to your shell. |
 Tips
Tips
-
Many anonymous FTP servers permit the shorter user name "ftp" instead of "anonymous."
-
You usually don't really need to enter an e-mail addressthese days the FTP servers rarely check that what you entered even looks like an e-mail address. But it is a courtesy to let the administrators know who is using the resources they are providing free of charge to the world.
Retrieving files using curl
Mac OS X includes the curl command, which allows you to retrieve (and in some cases send) files from servers using several of the common Internet protocols (for example, HTTP and FTP).
To retrieve a Web page using curl:
- curl url
For example:
curl http://www.matisse.net/files/
glossary.html
fetches the page and puts the result on the screen.
Tips
-
To save the output of curl to a file, use redirection:
curl url > file
For example:
curl gopher://gopher.well.com/00/WER/
forces.adrift > story.txt
-
The curl command has many options. It is designed to be used in scripts without any live human interaction. All of these capabilities make it a bit complex, but powerful. See man curl for the Unix man page.
Retrieving files using wget
Yet another useful command-line tool for retrieving files is the wget command. In our opinion, wget is much easier to use than the curl command described above, especially for retrieving Web pages complete with images and other pages linked into the page.
wget takes a URL as an argument and acts like a Web browser. It fetches the file indicated by the URL and saves it to disk. In addition, if the file is an HTML page with links, wget is smart enough to fetch all the associated pages and images and save them to disk as well, giving you a complete local copy of the Web site.
wget does not come with Mac OS X. It is pretty easy to install, though, using the Fink program described in Chapter 13. Table 10.3 lists some common options for the wget command.
Table 10.3. Options for the wget Command
| There are many more options. These are just a few to whet your appetite. | |
|---|---|
| O PTION | M EANING |
| -- recursive | Follows links in the URL and downloads the pages and images found. wget normally follows links five levels deep. It creates a directory on your machine that has the same name as the domain name in the URL, and the saved files will all be inside that directory. |
| -- level=depth | Used with -- recursive . For example, -- level=2 instructs wget to follow links for only two levels (the original page and its links), and links in the following pages). |
| -- convert-links | After downloading, converts links in documents for local viewing. This will mean converting all the links in the pages so that they work properly when you view the pages in a browser from your disk (as opposed to viewing them from the remote site). |
To fetch a file using wget:
- wget url
where url is any valid URL using the HTTP or FTP protocol. (The wget-ssl program supports HTTPS as well.) For example, both of the following are valid command lines:
wget http://www.matisse.net/files/
glossary.html wget ftp://ftp.gnu.org/gnu/hello/ hello-2.1.1.tar.gz
Either of those command lines saves the requested file in the current directory on your machine. The file will have the same name as the remote version (glossary.html or hello-2.1.1.tar.gz in the examples above). Figure 10.12 shows an example of retrieving an HTML page using wget .
Figure 10.12. Using wget to download an HTML page.
localhost:~ vanilla$ wget http://www.matisse.net/files/glossary.html 15:47:20 http://www.matisse.net/files/glossary.html => `glossary.html' Resolving www.matisse.net... done. Connecting to www.matisse.net[66.47.69.194]:80... connected. HTTP request sent, awaiting response... 200 OK Length: 77,217 [text/html] 100%[==================================================>] 77,217 9.20M/s ETA 00:00 15:47:20 (9.20 MB/s) - `glossary.html' saved [77217/77217] localhost:~ vanilla$
Tip
-
Be very careful using the --recursive option (see Table 10.3), because you can end up downloading hundreds of files.
Synchronizing directories using rsync
The rsync command is used to make a directory on one machine identical to a directory on another machine. A very sweet feature of rsync is that it is fastit sends only the differences between the directories across the network. So if you have already synchronized a directory and a few of the files have changed by the time you run rsync again on that directory, then only the new portions of the changed files get sent across the network. You can read about the algorithm used by rsync at http://rsync.samba.org.
As with scp , if both the local and remote machines are running Mac OS X 10.4 or later, you may use the -E option to rsync to preserve extended attributes such as ACLs.
Furthermore, rsync can use SSH to connect between machines, so the entire process uses an encrypted connection.
When you use rsync to synchronize directories, you give it a source directory and a destination directory. rsync compares the source and destination directories file by file and sends the files required to make sure the destination has all the files that are in the source directory. The following task refers to Figure 10.13 .
Figure 10.13. Using rsync with a local directory as the source directory.
localhost:~/Sites vanilla$ rsync-e ssh-avz images puffball@somewhere.us:webdocs puffball@somewhere.us password: building file list ... done images/ images/apache_pb.gif images/macosxlogo.gif images/web_share.gif sent 8406 bytes received 68 bytes 1540.73 bytes/sec total size is 8853 speedup is 1.04 localhost:~/Sites vanilla$ To synchronize using a local directory as the source:
| 1. | rsync -e ssh -avz source_dir user @ host : remote_dir For example, rsync -e ssh -avz images The -e ssh option tells rsync to use ssh to make an encrypted connection as user puffball to somewhere.us . The specification for the destination directory uses the same format as scp (described earlier in this chapter). (Note: Don't confuse the -e option with the -E option, which is for synchronizing between two machines both running Mac OS X 10.4 or later. See man rysnc. ) You are prompted for a password just as with ssh (because you are in fact using ssh ). | ||||||||||||||||||||||||||||||
| 2. | Enter your password. Your password is not displayed. Table 10.4 explains the -a , -v , and -z options, and a few others. Table 10.4. Some Options for rsync
The source directory will be the directory called images . It is important that you understand the difference between images and images/ Adding the / means "the contents of the images directory," while images without the / means "the images directory itself." Usually you will not put the / at the end of the source directory. rsync will use ssh to connect to the host somewhere.us as the user puffball. The destination directory is the webdocs directory inside puffball's home directory. rsync will copy the source directory into the destination directory. Figure 10.14 takes the example from Figure 10.13 further. If you were to add a file to the local images directory (for example, adding a file called dancer.jpg) and make a change to one other file (for example, changing web_share.gif), and were to repeat the rsync command, you would get something like Figure 10.14, in which rsync sends only the changed files across the network. Figure 10.14. Re-synchronizing a directory with rsync . Note that only two files are updated. [localhost:~/Sites] vanilla% rsync -e ssh -avz images puffball@somewhere.us:webdocs puffball@somewhere.us password: building file list ... done images/ images/dancer.jpg images/web_share.gif sent 75475 bytes received 88 bytes 13738.73 bytes/sec total size is 81380 speedup is 1.08 localhost:~/Sites vanilla$ | ||||||||||||||||||||||||||||||
The process of synchronizing works both waysyou can use a remote directory as the source.
To synchronize using a remote directory as the source:
| 1. | sync -e ssh -avz user @ host : remote_dir destination You are prompted for a password. |
| 2. | Enter your password. The positions of the source and destination directories are simply reversed . For example, rsync -e ssh -avz puffball@ That source directory is the webdocs/images directory inside puffball's home directory on the host somewhere.us, and the destination directory is the Sites directory in your current directory. Figure 10.15 shows what this looks like at the command line. Figure 10.15. Using rsync with a remote directory as the source directory. localhost:~ vanilla$ rsync -e ssh -avz puffball@somewhere.us:webdocs/images Sites puffball@somewhere.us password: receiving file list ... done images/ images/flower.gif wrote 32 bytes read 3077 bytes 6218.00 bytes/sec total size is 97294 speedup is 31.29 localhost:~ vanilla$ So the result transfers to Sites/images the same files as those in the remote webdocs/images directory. |
Tip
-
You can safely experiment with rsync by using the -n ( not really ) option. rsync will show you what it would have done, but will not actually transfer, delete, or overwrite any files.
Using Lynxa text-based Web browser
Why use a text-based Web browser, you ask? Well, it is faster than a GUI Web browser (no pictures!), and it provides a convenient way to view and download files from other machines while staying at the command line.
The Lynx Web browser handles HTTP, FTP, gopher, and other protocols. Lynx does not come with Mac OS X but is easily installed using the Fink program as described in Chapter 13.
Lynx is a full-screen command-line program, which means that, like the vi editor, it takes over the whole Terminal window.
To start Lynx:
- lynx URL
For example:
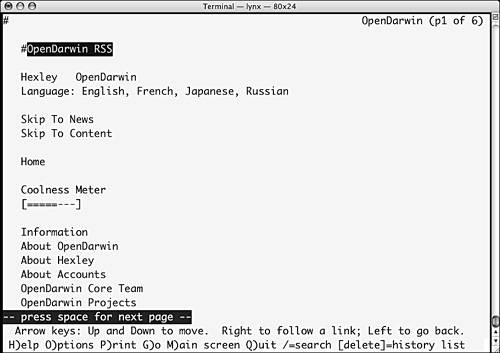
lynx http://www.opendarwin.org/
Figure 10.16 is a screen shot showing the Lynx display of www.opendarwin.org.
Figure 10.16. Browsing the opendarwin.org Web site with lynx .
To navigate in Lynx:
| 1. | Use the down arrow key to select the next link. |
| 2. | Use the up arrow key to select the previous link. |
| 3. | Press |
| 4. | Use the left arrow key to go back to a previous page (as with the back button in a GUI Web browser). |
| 5. | Use the right arrow key to go forward after having used the left arrow key to go back to a previous page (as with the forward button in a GUI Web browser). |
| 6. | Press |
| 7. | Press |
| 8. | Press Remember that you can use the left arrow key to go back to previously viewed pages. |
| 9. | Press |
To use lynx to fetch a URL and save the result to a file:
- lynx -dump url > file
For example,
lynx -dump http://www.matisse.
net/files/glossary.html > glossary
fetches the file glossary.html and saves it as glossary. The cool thing about the - dump option is that the HTML file is processed by lynx , so the resulting file can be read by humans . If you want to preserve the raw HTML codes, add the -source option:
lynx -dump -source http://www.
matisse.net/files/glossary.html > glossary
For comparison, you would get the same result from wget with
wget http://www.matisse.net/files/
glossary.html
You can also download non-HTML files using lynx :
lynx -dump ftp://ftp.gnu.org/gnu/
hello/hello-2.1.1.tar.gz > hello. tar.gz
fetches the file hello-2.1.1.tar.gz and saves it as hello.tar.gz.
The same result could be obtained with wget (if installed):
wget ftp://ftp.gnu.org/gnu/hello/
hello-2.1.1.tar.gz
EAN: 2147483647
Pages: 161