Using Fink to Install Software
Fink is an open -source system that automates the process of downloading, configuring, compiling, and installing hundreds of Darwin packages (remember, Darwin is the version of Unix at the core of Mac OS X). By "package," we simply mean a piece of software along with its associated documentation and configuration files. Rather than your having to follow all the steps outlined in the previous section, Fink downloads, compiles, and installs a package with a single command (the Fink Web site at http://fink. sourceforge .net/ offers a variety of packages, from games to graphics, available for download, as does the Webmin Web site [www.webmin.com]).
See the sidebar "More About Fink," for late-breaking news about the program.
To install Fink, start by downloading the software. Fink comes precompiled, so you don't have to compile it to use it.
To install Fink:
| 1. | From your Web browser, open the Fink download page: http://fink.sourceforge.net/download | |
| 2. | Click the link to download the latest version of the installer disk image (a file that, when mounted as a disk, contains the installation program for a particular piece of software). Figure 13.1 (showing how the Web page for downloading Fink appeared during production of this book) highlights the link to click. The Web page you get may be a bit different, but note that there is a list of different versions of Fink for different versions of Mac OS X. Figure 13.1. The Fink download page. The file you want to download is the "installer disk image." Note that there are different versions of Fink for different versions of Mac OS X.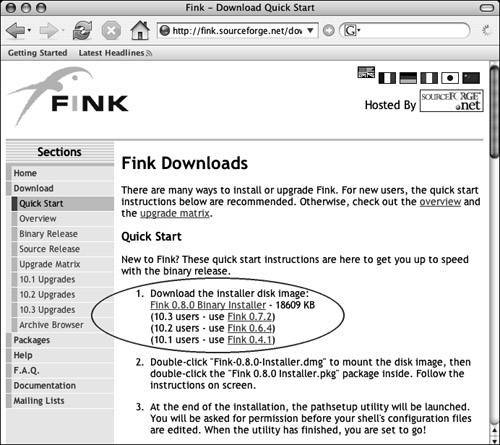
Follow the download instructions and save the file on your system's hard disk. Depending on your browser configuration, the disk image may be automatically mounted. If not, double-click the disk-image file in the Finder to mount it. You should end up with a Finder window that looks similar to Figure 13.2 . Figure 13.2. A Finder window showing the Fink Installer disk image, mounted as if it were a disk. You see the Fink installer package and associated files.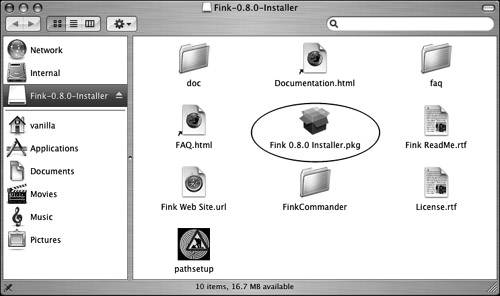 | |
| 3. | Double-click the Fink Installer.pkg file to launch the Fink installation program. In Figure 13.2, it's the icon labeled Fink 0.8.0 Installer.pkg. You get a standard Mac OS X software installer window ( Figure 13.3 ). Figure 13.3. Double-clicking the Fink Installer.pkg icon launches the installer program.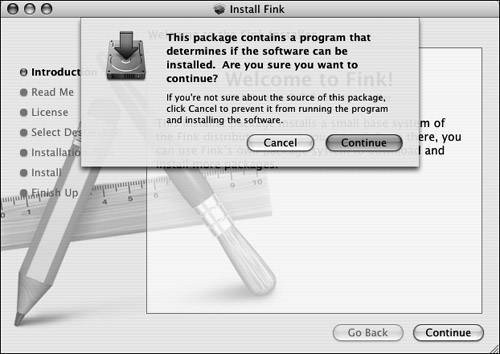 The dialog that drops down asks you about running a program to determine if the installation will work. | |
| 4. | Click the Continue button in the dialog. The dialog goes away. | |
| 5. | Click the Continue button in the lower right-hand corner of the window. You see the Read Me information for Fink ( Figure 13.4 ). Read it. It may have important information about the latest version. Figure 13.4. The Read Me pane of the Fink installer.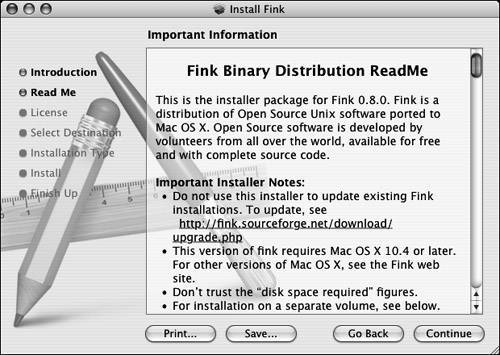 | |
| 6. | Click the Continue button. You see the Software License Agreement. Read it. Note that Fink is licensed under the GNU General Public License (GPL), which we mentioned in Chapter 1, "What Is Unix, and Why Is It Good?" The GPL says that you may use Fink without any cost or obligation. However, if you redistribute Fink, you are obligated to make the source code available to all those to whom you distribute it. | |
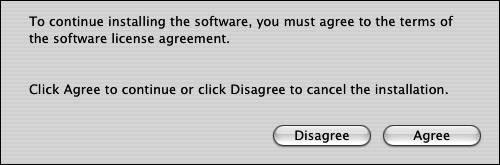
| 7. | Click the Continue button. You get a dialog asking if you agree with the software license agreement ( Figure 13.5) . Figure 13.5. A dialog appears, asking if you agree to the software license. | |
| 8. | Click Agree to accept the license terms. The installer switches to the Select a Destination pane, which asks you to select a disk on which to install Fink ( Figure 13.6 ). Figure 13.6. If you agree to the license terms, the Select a Destination pane opens; you choose the installation volume for Fink here.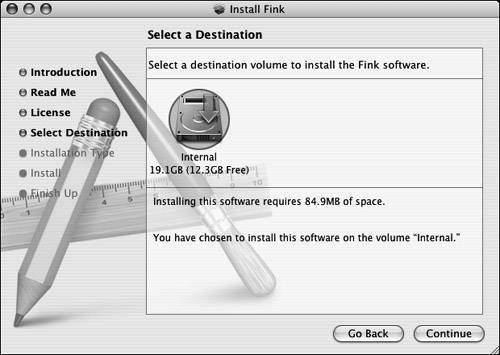 If you have more than one volume showing, click the one you want to use. We recommend installing Fink on the boot volume. If you do not agree to the license terms, you may not use the software. Click Disagree and quit the installer. | |
| 9. | Click the Continue button. You see the Installation Type pane ( Figure 13.7 ). This is here just to give you a chance to confirm before the installation proceeds. Figure 13.7. In the Installation Type pane, your choices are Install and Go Back.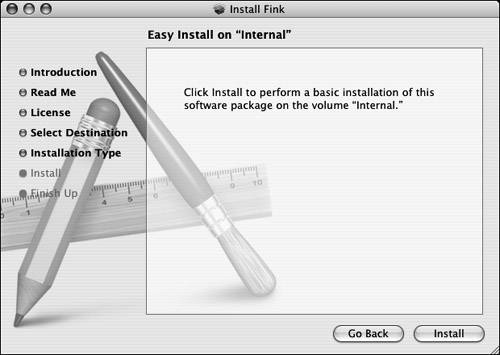 | |
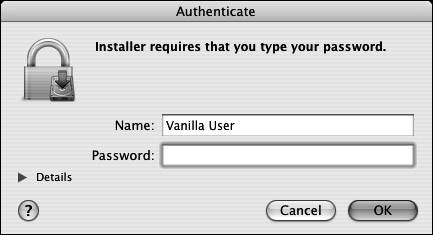
| 10. | Click the Install button. The Authenticate window opens, asking you to enter your password because the installer is going to run as root ( Figure 13.8 ). Figure 13.8. The Authenticate window, where your name is already filled in. | |
| 11. | Enter your password and click the OK button. Throughout this book we assume you are logged in as an admin user, if not, then you must use the name and password of an admin account, not your own. Click the Continue button in the lower right-hand corner of the Install pane; the installation begins ( Figure 13.9 ). Figure 13.9. The Fink installation in progress.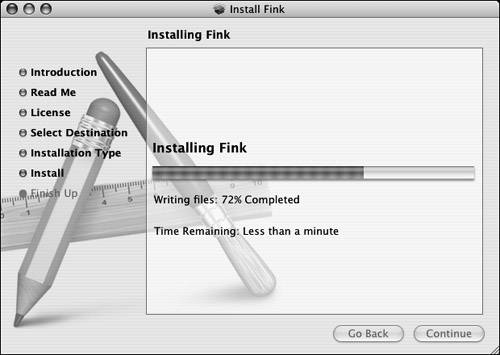 When the installer has finished, the progress bar is complete and the Close button is highlighted ( Figure 13.10 ). Figure 13.10. When the installation is done, the progress bar is filled; click Close to finish.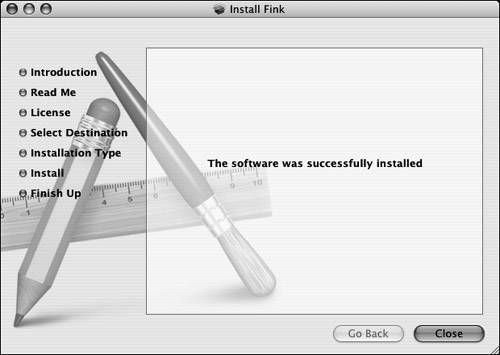 | |
| 12. | Click Close to finish the installation. The installer creates a new directory called sw on the volume you selected. If you selected the boot volume, Fink is installed in /sw (which is what we recommend). If you installed Fink on any volume other than your system-startup volume, you must make a symlink called /sw that points to the installed location. For example, if you installed Fink on a partition called Extra Disk, you will create the symlink at the command line with sudo ln -s "/Volumes/Extra (Review Chapter 5, "Using Files and Directories," for details on symlinks .) Fink is now installed. If you have the Terminal application open, we suggest quitting and restarting it to make sure your shells pick up the new Fink configuration (see the tip, next page). |
 Tip
Tip
-
The installer will have modified your shell configuration. If you are using the bash shell (the Mac OS X default), the .bash_profile in your home directory will have a new line:
test -r /sw/bin/init.sh &&
 . /sw/bin/init.sh
That line checks if /sw/bin/init.sh is readable and then runs it. The init.sh script modifies a number of environment variables by adding the Fink directories to them; in particular it modifies your PATH and MANPATH environment variables to include the directories used by Fink. Go ahead and read the scriptit won't bite. There is a similar script, /sw/bin/init.csh , for the tcsh and csh shells.
The Fink program itself is located in /sw/bin/fink , and software you install using Fink will also be installed in /sw/bin . The man pages for Fink and the software it installs are located in /sw/share/man .
The next step is to configure Fink as root from the command line. In order to automate the process of downloading, compiling, and installing software, Fink needs to know some things about how your computer is connected to the Internet.
To configure Fink:
| 1. | sudo fink configure Fink must be configured as root, so you use the sudo command to run fink configure (see Chapter 11). You are asked for your password ( Figure 13.11 ). Figure 13.11. You are asked for your password to enable the sudo command. localhost:~ vanilla$ sudo fink configure Password: |
| 2. | Enter your password, and press Fink asks a series of questions. The default answers will appear inside square brackets ( [ ] ), and in many cases the default will be nothingthat is, there will be nothing inside the square brackets. That's OK. Unless you know that the answer should be different from the default, press Figure 13.12 shows the questions asked by version 0.8.0 of Fink. In the example we have accepted all the defaults. Figure 13.12. Fink asks you a series of questions. In this example we are accepting the default for every questionso we pressed |
Tips
-
Notice how the configuration process ends with writing to the file /sw/etc/fink.conf . Figure 13.13 shows the contents. You can manually edit this file in the future if you wish, or rerun
sudo fink configuration
-
Of course, there is a man page: man fink will show it to you, and fink --help will give you a summary of available commands and options ( Figure 13.14 ).
-
If you have problems during the Fink installation, see the sidebar "More About Fink" for links to the Fink homepage and mailing lists.
Figure 13.13. The Fink configuration file, /sw/etc/fink.conf .
# Fink configuration, initially created by bootstrap.pl Basepath: /sw RootMethod: sudo Trees: local/main stable/main stable/crypto Distribution: 10.4-transitional Mirror-apt: http://bindist.finkmirrors.net/bindist Mirror-cpan: ftp://ftp.funet.fi/pub/languages/perl/CPAN/ Mirror-ctan: ftp://tug.ctan.org/tex-archive/ Mirror-debian: ftp.debian.org Mirror-gimp: ftp://ftp.gimp.org/pub/gimp/ Mirror-gnome: ftp://ftp.gnome.org/pub/GNOME/ Mirror-gnu: ftp://ftp.gnu.org/gnu Mirror-kde: ftp://ftp.kde.org/pub/kde/ Mirror-master: http://distfiles.master.finkmirrors.net/ Mirror-rsync: rsync://master.us.finkmirrors.net/finkinfo/ Mirror-sourceforge: http://west.dl.sourceforge.net/sourceforge/ MirrorContinent: nam MirrorCountry: nam-us MirrorOrder: MasterFirst ProxyPassiveFTP: true UseBinaryDist: true Verbose: 1
Figure 13.14. Using fink --help to get a summary of available commands and options.
localhost:~ vanilla$ fink --help Fink 0.23.10 Usage: fink [options] command [package...] fink install pkg1 [pkg2 ...] Common commands: install - install/update the named packages remove - remove the named packages purge - same as remove but also removes all configuration files update - update the named packages selfupdat - upgrade fink to the lastest release update-all - update all installed packages configur - rerun the configuration process list - list available packages, optionally filtering by name, see 'fink list help' for more options apropos - list packages matching a search keyword describe - display a detailed description of the named packages index - force rebuild of package cache validate - performs various checks on .info and .deb files scanpackages - rescans the list of binary packages on the system cleanup - removes obsolete package files if newer versions are available dumpinfo - show how fink parses parts of a package's .info file show-deps - list run-time and compile-time package dependencies Options: -h, --help - display this help text -q, --quiet - causes fink to be less verbose, opposite of verbose -V, --version - display version information -v, --verbose - causes fink to be more verbose, opposite of quiet -y, --yes - assume default answer for all interactive questions -b, --use-binary-dist - download pre-compiled packages from the binary distribution if available --no-use-binary-dist - don't use pre-compiled packages from the binary distribution (opposite of -b) See the fink(8) manual page for more commands and options. Visit http://fink.sourceforge.net/ for further information. More About FinkThe Fink Web site is at http://fink.sourceforge.net. Fink has an HTML user's guide, which is included in the installation disk image. You can open the file with a Web browser. The user's guide is also available online at http://fink.sourceforge.net/doc. You can find links to mailing lists about Fink at http://fink.sourceforge.net/lists. |
Now that you have Fink installed and configured, let's start using it.
Fink can show you all of the software packages available for installation. New software packages are added to the list frequently.
To list available packages:
- sudo fink list
brings up a list of all the available packages ( Figure 13.15 ). Packages that are already installed are marked with an i , such as the apt package.
Figure 13.15. Using the fink list command to show all available packages. Installed packages are marked with an i . The listing has been abbreviated. This figure is an abridged version of typical output, which will normally be over 1500 lines long.
localhost:~ vanilla$ sudo fink list Reading package info... Information about 1766 packages read in 16 seconds. abs 0.908-12 Opensource spreadsheet i apt 0.5.4-51 Advanced front-end for dpkg barcode 0.98-12 Barcode generation library and CLI front-end bluefish 1.0-20 Web-oriented text editor i bzip2 1.0.2-12 Block-sorting file compressor contacts 1.1-1 Little command line OS X address book viewer cssed 1:0.2.1-13 CSS editor darkstat 2.5-3 Smaller network traffic analyzer i darwin 8.1.0-1 [virtual package representing the kernel] dialog 0.9b-200208 Displays dialog boxes from shell scripts ethereal 0.10.9-11 Powerful network protocol analyzer i fink 0.23.10-21 The Fink package manager i fink-mirrors 0.24.4.1-1 Mirror infrastructure freehelix 98-11 Nucleic acid helix analysis program gimp 1.2.5-3 The GNU Image Manipulation Program gnupg 1.2.4-2 Gnu privacy guard - A Free PGP replacement i gzip 1.2.4a-6 The gzip file compressor ht2html 2.0-1 Python-based web page template processor keychain 2.0.3-1 User-friendly front-end to ssh-agent(1) launch 1.0.0-2 Replacement for OS X "open" command libjpeg 6b-16 JPEG image format handling library i macosx 10.4.1-1 [virtual package representing the system] mysql 4.1.10-1 Open Source SQL database openldap-ssl 2.1.22-25 LDAP directory services implementation pine 4.58-21 Text based tool for managing emails pstree 2.17-1 Shows the ps listing as a tree ruby18 1.8.1-1 Interpreted, object-oriented script language sitecopy 0.14.2-1 Web site uploader svn 1.1.4-11 Subversion - svnserve, tools i tar 1.14-1 GNU tar - tape archiver web2png 2.4.6-2 Batch-converts entire web-pages with gif2png wget 1.8.2-2 Automatic web site retreiver xcircuit 3.3.12-1 Circuit drawing app with schematic capture yorick 1.6.02-2 Interpreted language and scientific graphics zoinks 0.2.7-11 Programmer's editor and IDE ztools 981107-1 Set of Z-Machine tools localhost:~ vanilla$
Tips
-
The use of sudo in this case is not really required. You can run the fink list command without root privileges, but if fink detects that its cache of packages is out of date, it will be able to update the cache only if run as root.
-
The list of available packages is very longwell over 1500 packages. To be able to scroll back in the Terminal application and read it all, make sure the Terminal screen buffer is large enough: Check in the Terminal menu, under Window Settings in the Buffer controls. You also may want to redirect the output of fink list to a file for viewing with less or vi :
fink list > /tmp/finklist.txt
One of Fink's most useful features is that it keeps track of all the software it has installed, so upgrading and removing software is easy.
To list only installed packages:
- fink list -i
gets you a list of only the installed packages ( Figure 13.16 ).
Figure 13.16. Using fink list -i to list installed packages. Your output may differ .
localhost:~ vanilla$ fink list -i Information about 1766 packages read in 6 seconds. i apt 0.5.4-51 Advanced front-end for dpkg i apt-shlibs 0.5.4-51 Advanced front-end for dpkg i base-files 1.9.5-1 Directory infrastructure i bzip2 1.0.2-12 Block-sorting file compressor i bzip2-dev 1.0.2-12 Developer files for bzip2 package i bzip2-shlibs 1.0.2-12 Shared libraries for bzip2 package i cctools 576-1 [virtual package representing the develop... i cctools-extra 1:525-1 Extra software from cctools i cctools-sing... 1.0-1 [virtual package, your dev tools support ... i darwin 8.1.0-1 [virtual package representing the kernel] i debianutils 1.23-11 Misc. utilities specific to Debian (and F... i dpkg 1.10.21-204 The Debian package manager i fink 0.23.10-21 The Fink package manager i fink-mirrors 0.24.4.1-1 Mirror infrastructure i fink-prebinding 0.7.1-2 Tools for enabling prebinding in Fink i gcc3.3 3.3-1 [virtual package representing the gcc 3.3... i gcc4.0 4.0.0-1 [virtual package representing the gcc 4.0... i gettext 0.10.40-19 Message localization support i gettext-bin 0.10.40-19 Executables for gettext package i gettext-dev 0.10.40-19 Developer files for gettext package i gettext-tools 0.10.40-19 Developer executables for gettext package i gimp-print7-... 4.2.6-1 [virtual package representing Apple's ins... i gzip 1.2.4a-6 The gzip file compressor i libiconv 1.9.1-11 Character set conversion library i libiconv-bin 1.9.1-11 Executables for libiconv package i libiconv-dev 1.9.1-11 Developer files for libiconv package i libncurses5-... 5.4-2004102 Shared libraries for libncurses5 package i macosx 10.4.1-1 [virtual package representing the system] i ncurses 5.4-2004102 Executable files for ncurses i ncurses-dev 5.3-2003101 Development files for ncurses package i ncurses-shlibs 5.3-2003101 Shared libraries for ncurses package i system-java 1.4.2-1 [virtual package representing Java 1.4.2] i system-java-dev 1.4.2-1 [virtual package representing Java SDK 1.... i system-java13 1.3.1-1 [virtual package representing Java 1.3.1] i system-java1... 1.3.1-1 [virtual package representing Java 1.3.1 ... i system-java14 1.4.2-1 [virtual package representing Java 1.4.2] i system-java1... 1.4.2-1 [virtual package representing Java 1.4.2 ... i system-java3d 0-1 [virtual package representing Java3D] i system-javaai 0-1 [virtual package representing Java Advanc... i system-perl 5.8.6-1 [virtual package representing perl] i system-xfree86 2:4.4-2 [placeholder for user installed x11] i system-xfree... 2:4.4-2 [placeholder for user installed x11 devel... i system-xfree... 2:4.4-2 [placeholder for user installed x11 share... i tar 1.14-1 GNU tar - tape archiver i unzip 5.52-11 Decompression compatible with pkunzip localhost:~ vanilla$
Now the fun part: actually installing a package using Fink. We'll install the wget program as an example. wget is a command-line tool for retrieving files from Web sites and FTP sites. Mac OS X comes with a similar command, curl , but in our opinion wget is much easier to use.
To install a package using Fink:
| 1. | fink install wget You must be root to install software with Fink, so it will automatically invoke sudo behind the scenes and you will be prompted for your password. Fink automatically downloads, compiles, and installs the software. Figure 13.17 shows typical output for the entire process of Fink downloading and installing wget . Figure 13.17. Using Fink to download and install the wget program. localhost:~ vanilla$ fink install wget Password: Information about 1766 packages read in 2 seconds. The following package will be installed or updated: wget /sw/bin/apt-get -q --ignore-breakage --download-only install wget=1.8.2-2 Reading Package Lists... Building Dependency Tree... The following NEW packages will be installed: wget 0 packages upgraded, 1 newly installed, 0 to remove and 0 not upgraded. Need to get 346kB of archives. After unpacking 1249kB will be used. Get:1 http://bindist.finkmirrors.net 10.4-transitional/release/main wget 1.8.2-2 [346kB] Fetched 346kB in 3s (105kB/s) Download complete and in download only mode dpkg -i /sw/var/cache/apt/archives/wget_1.8.2-2_darwin-powerpc.deb Selecting previously deselected package wget. (Reading database ... 4090 files and directories currently installed.) Unpacking wget (from .../wget_1.8.2-2_darwin-powerpc.deb) ... Setting up wget (1.8.2-2) ... * Wget: (wget). The non-interactive network downloader. install-info(/sw/share/info/wget.info): creating new section `Net Utilities' localhost:~ vanilla$ The amount of time involved will depend on the speed of your Internet connection and of your computer. You will get a shell prompt when Fink is done. The software is now installed. |
| 2. | Try using the newly installed software: wget http://www.matisse.net/files/ This retrieves my Glossary of Internet terms and saves it in your current directory as glossary.html ( Figure 13.18 ). See man wget for details on wget . Figure 13.18. Using the newly installed wget command to retrieve and save a document. localhost:~ vanilla$ wget http://www.matisse.net/files/glossary.html --08:34:02 http://www.matisse.net/files/glossary.html => `glossary.html' Resolving www.matisse.net... done. Connecting to www.matisse.net[216.135.166.2]:80... connected. HTTP request sent, awaiting response... 200 OK Length: 115,145 [text/html] 100%[====================================>] 115,145 1.23M/s ETA 00:00 08:34:02 (1.23 MB/s) - `glossary.html' saved [115145/115145] localhost:~ vanilla$ |
Tips
-
To cause the output from wget to go to stdout instead of a file on disk, use the -O - option ( -O sets the output file, - is a special filename for stdout ):
wget -O - url
-
Fink installs some informational files for each package in /sw/share/doc . In particular, there should be a README file for each package in a subdirectory named after the package; for example:
/sw/share/doc/wget/README
-
If you are using the tcsh shell, run the rehash command after installing new software to update the shell's list of available commands.
The database that Fink uses for package information contains short descriptions of the available packages. You can see a package description with the fink describe command.
To show details about a package:
- fink describe package
For example, to see the package description for the launch program,
fink describe launch
produces the output shown in Figure 13.19 . Not all packages have a description, but most do.
Figure 13.19. Using fink describe package to provide a brief description of a package, even one not yet installed.
localhost:~ vanilla$ fink describe launch Information about 1766 packages read in 3 seconds. launch-1.0.0-2: Replacement for OS X "open" command launch is a replacement for "open" which: * Opens URLs, directly or in your preferred helper application. * Lets you specify applications by their four-char creator (e.g. 'ToyS') or Java-style bundle ID (e.g. com.apple.scripteditor), both of which allow you to move or rename an app. * Asks applications to print documents, something the OS X Finder is missing. * Launches applications in the background, or launches Carbon applications in Classic. * Shows info about any item on disk, including its file type, creator, data and resource fork sizes, dates and bundle ID. . Web site: http://web.sabi.net/nriley/software/ . Maintainer: Ben Hines <bhines@alumni.ucsd.edu> localhost:~ vanilla$
To search for packages by keyword:
- fink apropos package
To search for packages whose name or one-line description contains audio , use
fink apropos audio
which produces output like that shown in Figure 13.20 .
Figure 13.20. Using fink apropos keyword to search for available packages by keyword.
localhost:~ vanilla$ fink apropos audio Information about 1766 packages read in 3 seconds. audiofile 0.2.6-10 Audio File Library *Developement Files* audiofile-bin 0.2.6-10 Audio File Library *Binaries* audiofile-sh... 0.2.6-10 Audio File Library *Shared Libraries* flac 1.1.1-11 Free lossless audio codec flac-bin 1.1.1-11 Free lossless audio codec - encoder/decoder flac-nox 1.1.1-11 Free lossless audio codec - No X11 flac-nox-bin 1.1.1-11 Free lossless audio codec - encoder/decoder flac-nox-shlibs 1.1.1-11 Free lossless audio codec - shared libs flac-shlibs 1.1.1-11 Free lossless audio codec - shared libs flac-xmms 1.1.1-11 Free lossless audio codec - xmms plugin gnome-audio 1.4.0-3 Audio files for Gnome ladspa 1.12-12 Linux Audio Developer's Simple Plugin API libao2 0.8.4-10 Audio output library libao2-shlibs 0.8.4-10 Audio output library libmad 0.15.1b-1 MPEG audio decoder library libmad-shlibs 0.15.1b-1 MPEG audio decoder library libvorbis0 1.0.1-1 Vorbis audio codec development headers an... libvorbis0-s... 1.0.1-1 Vorbis audio codec shared libraries madplay 0.15.2b-3 MPEG audio decoder and player mpg123 pre0.59s-8 Real time MPEG Audio Player for Layer 1,2... mpgtx 1.1-13 Command line MPEG audio/video toolbox normalize 0.7.4-3 Audio file volume normalizer sdl-mixer 1.2.5-12 SDL multi-channel audio mixer library sdl-mixer-sh... 1.2.5-12 SDL multi-channel audio mixer library localhost:~ vanilla$
Updating and removing packages with Fink
One of the most excellent (dude!) features of Fink is the ease with which you can use it to update installed packages.
Updating a package in Fink is simply a matter of using the fink update command. You can update a single package by specifying a package name on the command line, but even cooler is the fact that you can update all installed packages with the fink update-all command.
Fink also makes it easy to have it update itself and to remove any package installed with it. Table 13.1 summarizes the commands for updating and removing packages installed with Fink.
Table 13.1. Updating and Removing Packages with Fink
| A CTION | C OMMAND |
|---|---|
| Update a specific package | fink update package |
| Update all installed packages | fink update-all |
| Update Fink itself | fink selfupdate |
| Remove a package | fink remove package |
EAN: 2147483647
Pages: 161