| There is another way to make buttons in Flash: by using movie clips. Movie clip buttons allow you to create buttons that are more complex than the standard button symbols you made earlier in this lesson. This doesn't mean you should change all your button symbols into movie clips, though! Remember that movie clips are slightly larger in file size than button symbols, and movie clip buttons usually take more time to create than regular buttons. It is beneficial to use movie clip buttons when you want to add extra states to the button, such as a visited state (after an area has been visited by the user, similar to HTML pages), or animate them in a unique way. For this next exercise, you will create a couple of movie clip buttons that will be used in the catalog section of the site. You will create a button used to download sample chapters of a book from the bookstore and a button that links to a site where you can purchase the book. The first parts of the movie clip button you need to create are the graphics and text for the button itself. 1. | Select the buttons layer on the Timeline and then select the Rectangle tool in the Tools panel. Set the fill color to #CCCCCC and the stroke color to black.
Click the Round Rectangle Radius button after selecting the Rectangle tool. Make sure that the corner radius is set to 0 before creating the rectangle. Then set the fill color to #CCCCCC and the stroke color to black (#000000).
| 2. | Create a rectangle and then convert it into a movie clip.
Create the rectangle after you have entered the settings in the Property inspector. Double-click the rectangle's fill to select both the rectangle's fill and stroke. Then change the width of the rectangle to 85 and the height of the rectangle to 15.
With the rectangle still selected, select Modify > Convert to Symbol to convert the rectangle into a movie clip. Name the movie clip mcSampleChapter, select the Movie clip radio button, and click OK when you finish.
| 3. | Open the movie clip, select the stroke, and place it on a new layer called fill.
Double-click mcSampleChapter to open the movie clip in symbol-editing mode. Once in symbol-editing mode, select Insert New Layer to add a new layer to the Timeline. Name this layer stroke, double-click Layer 1, and rename it to fill.
On the fill layer, select the rectangle's stroke outline by double-clicking the stroke itself. After it is selected, select Edit > Cut. Select Frame 1 of the stroke layer and select Edit > Paste in Place.
| 4. | Modify the stroke by selecting two of its segments and changing the color to #999999; then lock the stroke layer.
On the stroke layer, press Shift and click the top and left stroke segments. Change the stroke color to #999999 using the stroke color control in the Tools panel. Changing these two stroke segments creates the effect of depth around the button. When you finish modifying the stroke outline, lock the stroke layer.
 | 5. | Add the text sample chapter to the button on a new layer called text, and then lock the text layer.
So far, the button is not overly descriptive, so you need to add a label to the button using static text. Select the stroke layer, insert a new layer on the button's Timeline, and rename it text. Select the Text tool in the Tools panel and click on the Stage. Change the text properties to Static, Arial, 10 text size, black for the text fill color, and Anti-alias for readability. Type sample chapter into the text field on the Stage.
 When you finish, lock the text layer. When you finish, lock the text layer.
| 6. | Select the fill layer, select the shape's fill and convert it into a graphic symbol called grFill. Then lock this new layer.
This procedure nests a new graphic symbol within the movie clip button. The grFill symbol will be animated, which is why it was separated onto its own layer and converted into a graphic symbol (because the stroke doesn't need to be animated).
Tip Whenever possible, you should always turn a raw graphic into a symbol before animating it and put each animation on its own layer. Lock the fill layer when you're finished.
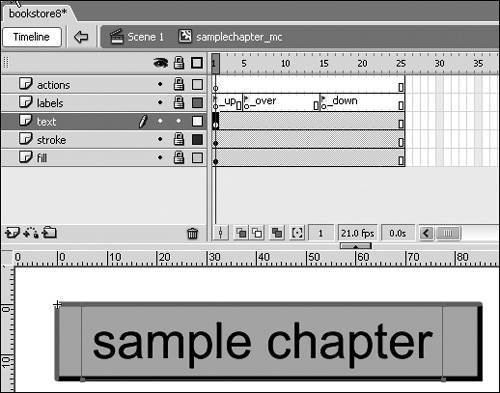
| 7. | Add a labels and actions layer to the Timeline.
Add two new layers to the Timeline and name them labels and actions. These two layers will hold frame labels and frame actions, respectively. It is good practice to keep actions and labels on their own layers so they do not interfere with other aspects of the SWF file.
| 8. | Click Frame 25 of each layer and press F5 to insert new frames. Then insert keyframes on the labels layer at Frames 5 and 15.
The movie clip button needs several states, which span across the Timeline. Flash understands the Up, Over, and Down states of a typical button by entering specific frame labels in a movie clip button, which will be added in the following step. Each of these states is treated the same way as in a button symbol's Up, Over, and Down frames. You can then add drawings, graphics, or text at each of these frame labels, just as you did in the button symbols created earlier.
Note The hit area is the movie clip itself, unless you define a different hit area manually. If you do, you use a separate movie clip symbol and then set it up as the hit area by using ActionScript. These buttons are solid, so it works just fine for the clickable area to be the visual area of the button. Because of this, you don't need to define a separate movie clip to be the hit area. Insert keyframes on the labels layer at Frames 5 and 15. Frame labels will be added to each of these keyframes in the next step.
| 9. | Add frame labels at each keyframe on the labels layer. Make sure that each layer is locked and the file is saved before moving on.
If you add frame labels at each keyframe, Flash recognizes each area as a button state. Maximize the Property inspector and select Frame 1 on the labels layer. Type _up into the <Frame Label> text field. Select Frame 5 and type _over into the <Frame Label> text field. Finally, select Frame 15 and type _down into the field.
|
 You will add the animation for these buttons in Lesson 5, in which you learn how to animate using motion tweens. You will use motion tweens to animate the button to create an interesting effect. The button won't work yet if you try to test the SWF file in Flash because Flash needs ActionScript or a behavior to recognize the movie clip as a button. You will add the ActionScript in Lesson 6. |