| You can import complex vector drawings into Flash, such as those from FreeHand (.FH7 to .FH11 files) and Adobe Illustrator (.AI files). You can maintain the layers in each kind of document, although you have more control when you import documents made with FreeHand. An advantage of using vector drawings is that when they are scaled, you do not lose quality as you do when scaling bitmap images: Vector drawings are made by math instead of pixels on a grid, so distortion doesn't occur when the image resizes. In this exercise, you import a file that was created using FreeHand MX. You select how and where the assets in this file are placed and then properly place them in the Flash document. 1. | Create a new Flash document and change the document properties.
The map area of the website is dynamically loaded into the main web pages SWF file at runtime. When a user visits the map of the site, the SWF file loads into the main Tech Bookstore SWF file. This means that you need to add the map to a new FLA file so you can export the SWF file that will be used to load into the main bookstore SWF file later.
Select File > New and then click Flash Document from the Type list. Click OK and a new FLA file opens in Flash with its own Document Tab, which makes it easy to switch between open documents when you need to do so.
Maximize the Property inspector. Change the dimensions of the Stage by pressing the button next to Size and entering new values into the W and H text fields in the Document Properties dialog box. Enter a width of 500 and a height of 355. Then change the frame rate to 21 fps, matching the frame rate you entered for the main bookstore SWF file in Lesson 1.
| 2. | Import a vector file that was made in FreeHand into a new Flash file.
One area of the website includes a vector drawing of a map. Inside the lesson02/assets folder on the CD-ROM is this file, which was created using FreeHand MX. FreeHand files can retain symbols, pages, layers, and text, so you can edit the file contents further using Flash.
Select Layer 1 and rename the layer to map. Make sure that it is selected before you import the FreeHand document. Select File > Import > Import to Stage and import map.FH11 from lesson02/assets. The FreeHand Import dialog box opens.
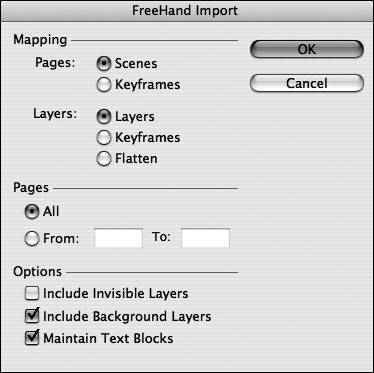 Select either Scenes or Keyframes for the Pages setting. This document does not contain multiple pages, so it doesn't matter which you select. If a document has multiple pages, each page is placed in a separate scene or ascending keyframes on the main Timeline.
Select Flatten for the Layers selection. You don't need to change the placement for the different sections of the map, except for one symbol that you will paste on a new layer.
| 3. | Align the symbols on the Stage.
When you import the file, it doesn't necessarily line up properly with the Stage. Select Edit > Select All to select all the symbols on the Stage, and enter 0, 0 for the x and y coordinates in the Property inspector to line things up properly.
Tip In the library, a FreeHand Objects folder has been added, which contains the assets that were imported with the FreeHand document. You can work with these symbols the same way as you work with those created in Flash. | 4. | Cut and paste a symbol onto a new layer.
With the map layer selected, click the Insert New Layer button. Rename the layer to map star.
Select the yellow star symbol on the map layer and select Edit > Cut. This process cuts the symbol to the Clipboard. It looks like as if it has been deleted, but it is being held in memory so you can paste it to a new location.
Select the map star layer and select Edit > Paste In Place, which pastes the graphic in the exact same x and y location it was cut from. You are moving the star to a new layer because in an upcoming lesson you will be manipulating it.
| 5. | Save the file as map.fla and publish it.
Select File > Save and save the file to the TechBookstore folder on your hard drive. Type map.fla into the File Name field and click OK. You need to publish an SWF file so you can load it into the main bookstore SWF file later. Select File > Publish Settings, and in the Formats section, deselect HTML because you don't need to produce an HTML file. Click the Publish button to create the SWF file.
You will import other media, such as sound and video, into FLA files for other lessons. For now, you should have a good grasp of the process of importing media. Importing is pretty much the same process, no matter what asset you are importing. There are small variations, such as when you are importing video for instance, but for the most part, nothing is radically different.
|
|