Elements to Consider before a CMS Installation
| The minimum hardware and software requirements vary, depending on the type of server you're planning to install. For instance, if you are planning to install CMS for your developers, then the following laundry list applies:
It is also recommended that you have installed the Data Access Components 2.7 RTM Refresh, and the Windows High Security Template and the CMS template for the IIS Lockdown Tool. For a production environment, you should ensure that your server meets these minimum hardware requirements:
For a production server, you should also ensure that you have this minimum software ready for the installation:
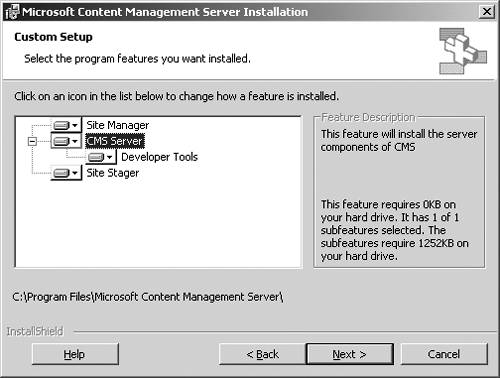
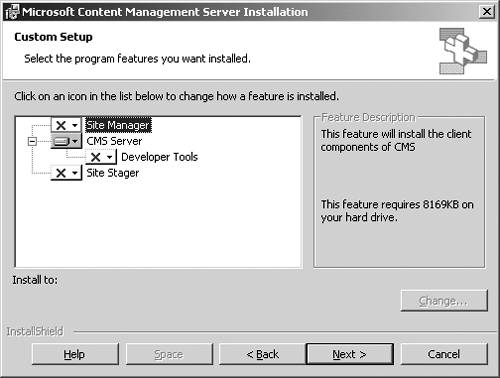
For a Site Manager box, you'll only need Windows 2000 Professional with Service Pack 2 or later. If you are running Windows 2003, you'll need to install CMS and then Service Pack 1 for CMS. With SP1 for CMS, you'll find that Windows 2003 domains are supported. There are some known issues surrounding a CMS/SP1 installation on Windows Server 2003. First, the CMS console may not run properly if your Internet Explorer zone is set to High Security. This setting will interfere with the downloading of the JavaScript file that supports the Switch to Edit Site link. To work around this problem, either lower your security setting or add the CMS site to your trusted sites in Internet Explorer. Second, if you stop the AESecurityService and then attempt to access your CMS console, the console will not appear and the AESecurity Service will not automatically restart. You'll need to start this service manually, and then the console should appear just fine. Third, Visual Studio.NET presents some problems when it is installed on Windows 2003 Server because of the way it stores .tmp files; IIS 6.0 blocks all file types that are not explicitly mapped, and the .tmp file type is not explicitly mapped by default. The workaround for this problem is to either use Visual Studio .NET 2003 when working with Windows 2003 or map the .tmp file extension as a text/plain file type in the MIME type box in IIS. Generally speaking, the process of installing CMS contains four steps: creating the Windows user accounts, creating the database, installing the CMS components, and configuring the database. Creating the Necessary Windows User AccountsCMS uses a system account to access resources on the network and to work with the Active Directory (AD) directory service. For example, the system account will need permissions to browse the AD in order to enumerate objects in the director. In addition, the account (essentially) performs impersonation for all users connecting to the Web site so that the administrator isn't forced to list each user account on each resource for permissions to access the resource. The system account will need read/write permissions on the SQL database. In addition, ensure that this account is not the same as the local administrator account and that it is not the IIS anonymous account. In reality, you'll need to create two accounts, not one. The first will be the CMS system account. The other will be the CMS administrator account. The system account will be used to read and write data to the database. The administrator account will need to be the first administrator to access the CMS Web application. This account can use Site Manager to add other users as needed. After you have created the necessary accounts in the local server's account database, you'll want to install the required software. The only software that we'll illustrate here is the CMS installation. One thing to note about the CMS setup routine is that it is context sensitive in the sense that it will evaluate the environment into which CMS is being installed and notify you with a pop-up box of any configuration problems. This type of self-checking of the server before running setup saves us from ourselves. Setup will not allow us to set up CMS in a poorly or wrongly configured environment. Hence, if you get a screen saying that you need a certain piece of software installed while you're running setup, then pay attention! You'll need to resolve that issue before setup will be able to continue past that point in the setup routine. Running the CMS Setup ProgramTo install CMS, place the CMS CD-ROM in your CD-ROM drive and allow autoplay to start the process. On the initial splash screen, select Install Components. On the next screen, select Install MCMS Components. Setup will then run through a series of internal checks while it displays a Preparing to Install screen to ensure your server meets the requirements for a CMS installation. If your server passes the tests, you'll be presented with the Welcome to the Installation for Microsoft Content Management Server screen. At this point, you'll want to click Next to continue. The ensuing screen will ask you to read and agree to the licensing agreement. After agreeing to the licensing agreement, you'll click Next and be presented with the Custom Setup screen (Figure 2-1). Notice that your screen may appear different from ours in this illustration if you have installed Visual Studio .NET on your server. Figure 2-1. Custom Setup screen in the CMS setup routine
After you have made your selections on the Custom Setup screen, click Next and enter the product key code on the Customer Information screen. Then click Next to bring up the Disk Cache Folder screen (Figure 2-2). The size selected here will default to 2GB (2,048MB). The minimum is 50MB and the maximum is 7,429MB. After making your selection, click Next. Figure 2-2. Disk Cache Folder configuration screen
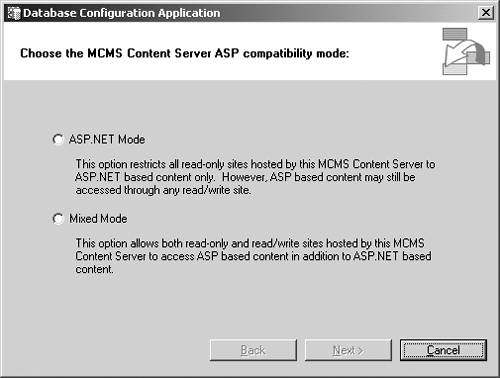
NOTE: At this juncture, you'll only need to install the developer tools if you are installing CMS on a server that already has Visual Studio .NET installed. The next screen will ask you to start the installation and will let you choose whether you want to launch the Database Configuration Application (DCA) after setup has completed. The DCA allows you to make configuration changes and modifications to your SQL databases. We'll discuss the DCA in more detail under the Creating the Database section in this chapter. After you click Next, the installation will start. You'll see a status bar indicating setup's progress. When setup ends, you'll be presented with a Finish screen if you didn't choose to start the DCA automatically or the DCA welcome screen if you did choose to start the DCA automatically. If you encounter installation problems, you can look at the CMSInstall log file, located (by default) in the program files\Microsoft Content Management Server\LogFiles directory. It will open with Notepad or any other text editor, and you can read the error messages in the log file and then troubleshoot as necessary. Creating the DatabaseAfter you have installed the required software, if you selected to have the DCA run, then the DCA will start automatically. There is an opening splash screen to this application, which you can just click through to the next screen. This screen will ask you if you want to operate in ASP.NET mode or mixed mode (Figure 2-3). The difference here is that ASP.NET mode will restrict CMS to hosting read-only sites in ASP.NET as opposed to earlier versions of Active Server Pages (ASP). In mixed mode, read-only sites can be hosted in either version of ASP code. Figure 2-3. Selecting the CMS mode
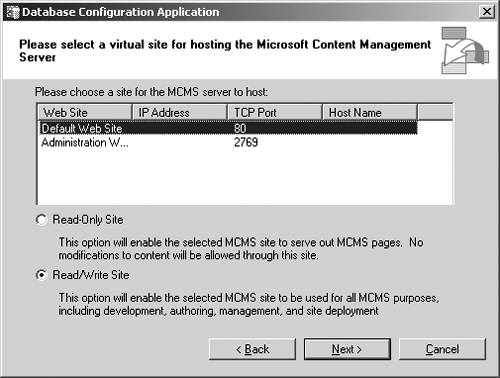
Once you've made your selection, you can click Next. The following screen will ask you which existing Web sites on your server should host the CMS server installation. In our running example here, we'll select the Default Web site (Figure 2-4). You can also choose whether the site will be read-only or read/write. Figure 2-4. Selecting a Web site to host the CMS server installation
The next screen will ask you which Web site should be the SCA Web entry point. Select the Administration Web Site at this point and click Next. Note that if you select the Default Web site or any Web site that is operating over port 80, you will receive a warning message that says, essentially, don't use this site. Then click Next. The following screen will ask you for a user name and password account that will be used for the CMS system account. Enter the correct user name and password, and then click Next. The DCA application will then stop all IIS services and present you with the screen from which you can select the database that you'd like CMS to use. If this screen comes up with a "[none]" selection, as illustrated in Figure 2-5, click the Select Database button, and you'll receive a list of all the SQL servers in your environment. From there, you can select which server and database you'd like this CMS installation to use. You'll want to use the Options button (which is dimmed in Figure 2-6 because we already selected it to illustrate the Options features) to select the exact database on that server, along with the language. Figure 2-5. Database selection screen
Figure 2-6. Options screen that allows us to select a SQL database on a different server
NOTE: Best practice is to create the empty SQL database before installing CMS on your server. If you wait until this point to create the SQL database, you'll need to bounce out of the installation program, create the database, and then come back and perform these actions again. If the database is empty, you'll be asked if you'd like CMS to populate the database. Click Yes on that pop-up, and the database population will begin. After the schema is built in the new database and the changes are committed, you'll be asked whether you'd like to restrict Site Stager access to the local machine. The default is to say Yes. Make your selection there and then click Next. You'll then receive a pop-up box indicating that SQL services need to be running on the remote SQL box. This DCA ends by defaulting to starting the SCA when you click Finish. If you choose to start the SCA, you'll be presented with the General tab in the Server Configuration Application. This application is discussed in detail in Chapter 18. The DCA is also discussed in Chapter 8. At this point, you'll have CMS installed and ready to build your Web site. There are some other installation issues that we'll discuss now in the following sections. These issues include installing CMS on multiple computers. Installing SQL and CMS on the Same ServerThe SQL server can reside on the same physical box as CMS. In our preceding example, we demonstrated how to install CMS on one server and place the SQL database on a different server. The reason this illustration was selected was that we felt in most environments the SQL server and the CMS server would be two different servers. However, this is not required. If you want to install CMS and SQL on the same server, you can. And, in fact, you can use the local SQL databases to host your CMS installation. So, the only difference in how CMS would be installed is that on the database selection screen (refer to Figure 2-5), you would select a local database instead of a remote database. After that, the installation should proceed as normal. Installing Site Manager and/or Site StagerThere is not much to installing either of these packages. Essentially, you'll want to run the CMS setup routine and then make your selections during this setup routine on the Custom Setup screen (Figure 2-7). Incidentally, this is where you can select to uninstall a package as well. Figure 2-7. Selecting Site Manager on the Custom Setup screen in the CMS setup routine
Installing the Authoring ConnectorThe Authoring Connector (AC) is used to allow users to publish information directly from Word. The Authoring Connector runs from within the Word application and is a wizard-based utility. The AC is installed on the client computer, not the server. Any user with rights to contribute to the content on a CMS site can install and use the AC. There are essentially two steps involved in installing the AC on a client machine:
In order to install the AC, you must meet these prerequisites:
To install the Authoring Connector, you'll need to first install Word 2002. Without this installed, the AC setup routine will not even begin. The first three screens in the setup wizard are the Welcoming screen, the Company Information screen, and the location screen where you can tell setup where you want the AC installed. These are generic screens that don't need to be illustrated here. The fourth screen will ask you which CMS server you'd like to connect to. Enter the CMS server name and click Next. Then click Next again and the installation will start. The installation is short, and you'll finish the wizard by clicking Finish on the Finish Setup screen. Enabling the AC in Word 2002 is not terribly intuitive. First, you'll need to navigate to the Tools menu and select Options. On the Security tab (Figure 2-8), you'll click the Macro Security button. This will bring up the Security dialog box. On the Trusted Sources tab, ensure that the "Trust all installed add-ins and templates" check box is selected (Figure 2-9). Figure 2-8. Security tab in the Options area of Word 2002
Figure 2-9. Trusted Sources tab in Word 2002
This series of steps will enable the AC in Word 2002. These options should already be selected for you because of the AC installation on your client computer. However, it is a good idea to go through these steps and ensure that you have the proper configurations assigned as we just described. What changes in Word 2002? Well, on the File menu, you'll find a Send to MCMS menu option that will allow you to send a document directly to CMS from Word 2002. This menu option is illustrated in Figure 2-10. Figure 2-10. Send to MCMS menu option
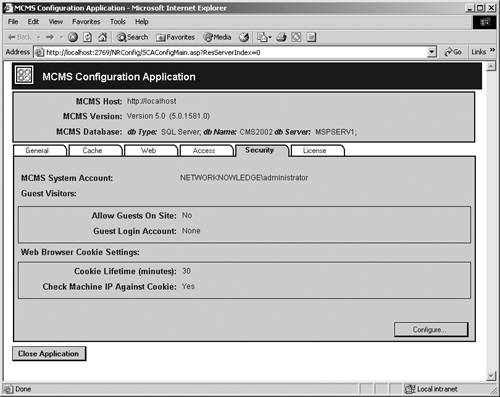
NOTE: You can learn how to create a page in Word 2002 and publish it to a CMS Web site by referencing Chapter 7. Enabling Guest Rights on Your CMS Web SiteIn order for guest users or subscribers to view your site, you'll need to enable this feature in CMS 2002. To do this, navigate to the Security tab in the MCMS Configuration Application (Figure 2-11). Figure 2-11. Security tab in the MCMS Configuration Application
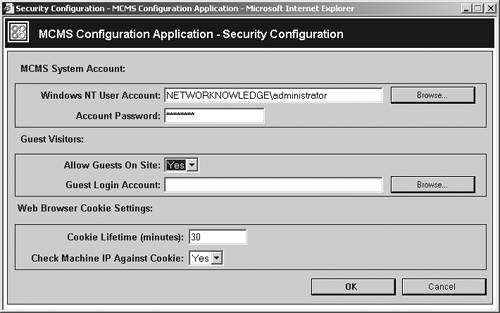
From the Security tab, click the Configure button and then select Yes from the Allow Guests on Site drop-down menu (Figure 2-12). Enter the account that guests will be automatically logged in as, and then click OK. Figure 2-12. Enabling guest account access in the Security Configuration area
Installing the CMS Documentation OnlyIf you need to install the CMS documentation that ships with CMS 2002, then you'll simply need to copy the .chm files from the installation CD to your local hard drive. There is no separate installation program for installing the CMS documentation by itself. The .chm file will run on its own without running any installation routine. The .chm files can be found in the documentation folder on the server CD-ROM. These documents are also available from Microsoft's Web site at http://www.microsoft.com/cmserver/default.aspx?url=/CMServer/techinfo/productdoc/. Uninstallng CMSMicrosoft has made uninstalling simple. If you ever need to uninstall CMS 2002, then you can use the Add/Remove Programs utility in the Control Panel. Alternatively, you can run the CMS setup program and select to run none of the features on your server. This too will uninstall CMS from your server. When you select to uninstall CMS, you will not affect the CMS database or the files on the file system. This procedure is the same for the AC and the Site Manager too. Upgrading from CMS 2001Please reference Chapter 37 on how to upgrade from CMS 2001 to CMS 2002. That chapter is devoted to this function. However, there are a couple of things to note here:
Installing CMS 2002 with SP1 on a Windows 2003 ServerTo install CMS 2002 with SP1 on a Windows 2003 Server, you'll need to perform the installation as we described earlier in this chapter. However, it is important to note that you should not launch the DCA until after you have installed SP1. Therefore, once CMS is installed, do not select the Launch Database Configuration Application check box. Let the installation finish, then install SP1 for CMS, and then run the DCA. Remember that Windows 2003 installs without IIS, so you'll need to install IIS 6.0 with the components ASP.NET, ASP, and server side includes before you install CMS or SP1. In Windows 2003, the maximum amount of allowed data upload is configurable in IIS. However, the default number is too low for CMS resources. You'll need to raise this limit to at least 50MB. For information on how to do this, please see the SP1 documentation. XML code will need to be added to the metabase.xml file, and then services will need to be restarted. |
EAN: 2147483647
Pages: 298