Working with Resource Galleries
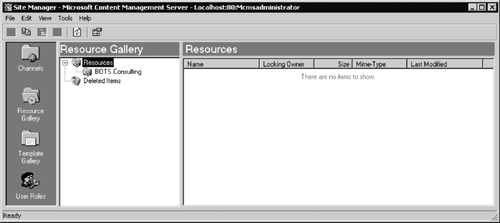
| A resource gallery is a virtual storage space that stores resources and other resource galleries. Resources are images, audio and video files, or any other files that can be used as file attachments. Resource galleries can store any Multipurpose Internet Mail Extensions (MIME) type files. Resources are either displayed inline in the browser or presented as a link to the resource file: If the resource is not one of the well-known image or video types, the file is displayed as a link (attachment) within a page. How the linked file is viewed is determined by a client's browser and the applications available on the client computer. Resources are mainly managed using the Resource Manager in the Web Author console. Resource galleries are managed using the Site Manager. Site managers, channel managers, template designers, and resource managers can create and administer resource galleries. To access the resource galleries tree, click the Resource Gallery icon in the left pane of the Site Manager window (Figure 16-23). Working with resource galleries using the Site Manager is similar to working with folders in Windows Explorer. Most of the tasks are exactly the same as for the template galleries. Figure 16-23. Resource gallery hierarchy
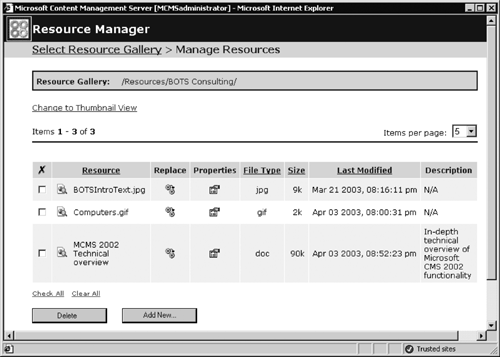
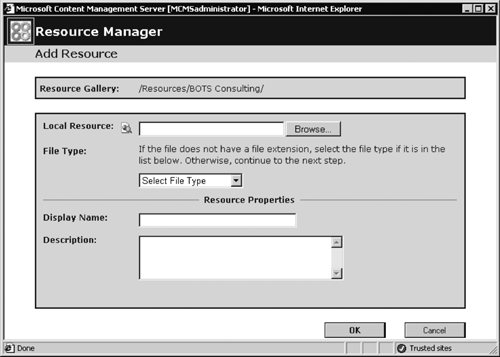
Adding Resources to a Resource GalleryResources can be added to a resource gallery in one of two ways: either using the Resource Manager or using the Site Manager. If you want to use the Resource Manager, then log on to the site, switch to Edit mode, and from the Web Author console select Resource Manager. In the Resource Manager dialog, navigate to the resource gallery you'd like to import your file into, and select it. In the Manage Resources dialog (Figure 16-24), click the Add New button (you might need to scroll down to find it). In the Add Resource dialog (Figure 16-25), browse to the file you'd like to add, and click Open. Figure 16-24. Manage Resources dialog
Figure 16-25. Add Resource in Resource Manager
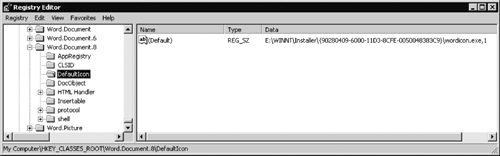
The next task is to assign the MIME type to the newly added resource. Any file in a resource gallery has a MIME type assigned to it. When a new resource is created, if a new file name has an extension, the MIME type is assigned from the extension using the MIME mapping from the registry of the CMS server computer. If there is no MIME type mapping for the extension, then usually the MIME type application/x-octetstring (a binary format) will be assigned to the new resource. If this is not suitable, you'll need to map the appropriate MIME type to the extension in the registry as follows:
If the name of the file that you are adding to a resource gallery doesn't have an extension, you can select the MIME type from the File Type list. The list is quite limited only well-known image, video, and document types are listed. If the type of a new file is not listed, carry on without selecting a type. In this case, usually the MIME type application/x-octetstring will be assigned to the new resource. If this is not suitable, rename the file to have an extension, and, if necessary, map the extension to the MIME type in the registry. A template designer may enable the UseGeneratedIcon property for a single attachment placeholder in a template. This means that an icon representing a resource type must be shown by CMS, together with the attachment's display name, as a link to a resource in the published pages that are based on this template. However, if an application identified by the attachment type is not installed on the CMS server machine, there is no icon available to be generated. To resolve this situation, you can either install the application in question on the CMS server for example, the Adobe Acrobat viewer for PDF files or you can define the default application icon in the registry using the path of a file that contains the icon. If you decide to follow the second route, you can obtain the file and the registry settings from the computer where the application is installed. For example, for Microsoft Word XP, you need to do the following:
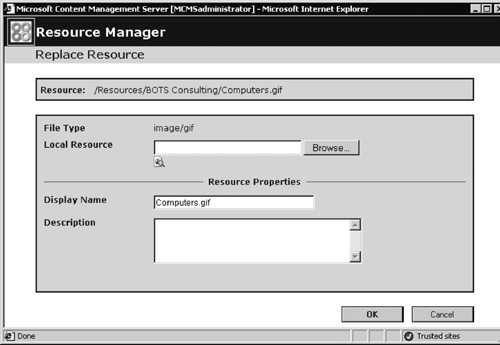
The last task is to define the display name and description for a resource. It is a good practice to provide both. The display name may be used programmatically to generate a link to a resource; it is a default display name that can be overwritten by the authors inserting the resource into their pages. The description appears in the Resource Manager in the resource record and could assist the content authors in selecting the appropriate file. The description is limited in length to 256 characters. The other method of adding a resource to a gallery is using the Site Manager. To do this, open the Site Manager and navigate to the resource gallery to which you want to add a resource. In Windows Explorer or on the Desktop, select the file you wish to add. Then drag and drop it on the appropriate resource gallery. Make sure you drop it in the resource gallery tree, not in the resources pane. This method makes the display name the same as the file name and leaves the Description property for the new resource empty. You can change these using the Resource Manager by navigating to the resource, selecting the Properties icon for this resource, and modifying the Display Name and Description properties. Replacing a Resource in a Resource GalleryReplacing a resource allows you to automatically change it in all pages and templates that reference this resource. A good example is updating a company's logo. The existing pages and templates that use the logo will automatically display the new one after it has been updated. Resources are replaced using the Resource Manager. To replace a resource, navigate to the resource and click the Replace icon for the resource (Figure 16-28). Figure 16-28. Replacing a resource
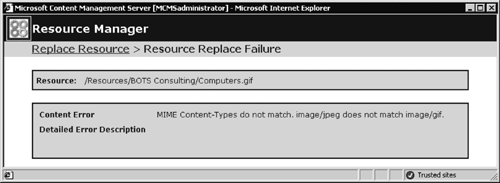
Click the Browse button to select the new resource file, and then click Open. The new resource file can have a different name but must have the same file extension as the old file. The original MIME content type for a resource is preserved. You can't, for example, replace a JPEG image with a GIF. If the extensions, and therefore the MIME types, don't match, an error message is displayed (Figure 16-29), and the replacement process is aborted. If necessary, you can change the display name and description for the replaced resource. Figure 16-29. MIME content mismatch error message
Renaming, Moving, and Copying a Resource GalleryTo rename a gallery, in the Site Manager right-click the resource gallery you'd like to rename, select Rename, and type the new name. If you want to change the gallery's description, right-click the gallery, select Properties, and then change the Description property from the Properties > General tab. The description is limited to 256 characters in length. To move or copy a resource gallery, in the Site Manager, right-click the gallery you'd like to move or copy and select either Cut or Copy; then right-click the gallery where you want it to be moved or copied, and click Paste. All links in pages and templates to the resources inside the moved resource gallery will be maintained. As with other CMS objects, galleries with the same name can be stored inside the parent gallery because they have different GUIDs. However, having two or more resource galleries with the same name is very confusing for content authors. It is a good practice to rename the resource gallery immediately after you've copied it. Deleting, Removing, and Restoring a Resource GalleryTo delete a resource gallery, right-click it in the Site Manager and click Delete. Deleted resource galleries are moved to the Deleted Items container in the resource galleries tree. From there, you can either remove the deleted gallery permanently by right-clicking it and selecting Delete, or restore the gallery by moving it back to the resource galleries tree. Moving, Copying, and Deleting Resources in a Resource GalleryTo move or copy a resource, right-click the file name in the right pane of the Site Manager window you'd like to move or copy, and select either Cut or Copy; then right-click the resource gallery where you want the resource to be moved or copied, and select Paste. You can also drag and drop the resource onto a resource gallery in the tree pane. Moving and reorganizing resources inside the Site Manager doesn't break links in any pages or templates referencing that resource.
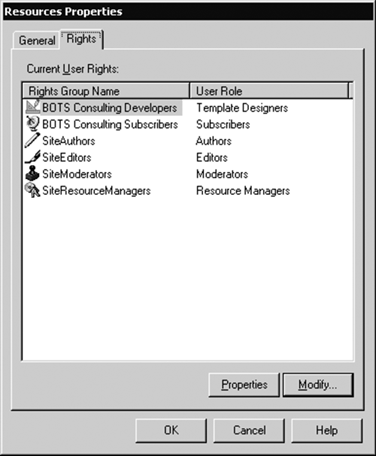
NOTE: It used to be possible to run resource-dependent reports in CMS 2001. This feature is no longer available in CMS 2002. Resources are identified by GUIDs in the same way as other CMS objects. This means that you can have, for example, two image files with the same name in the same resource gallery. This is better avoided because it could create problems for content authors. To delete a resource, right-click the file name and click Delete. Deleted resources are moved to the Deleted Items container in the resource galleries tree. From there, you can either restore the resource by moving it back into a resource gallery or remove it permanently by right-clicking it and selecting Delete. If you'd like to permanently remove all resources and resource galleries in the Deleted Items container, right-click it and select Clear Deleted Items. You can also delete resources using the Resource Manager in Web Author console. If using the Resource Manager, navigate to the resource you'd like to delete, select the resource by clicking the check box to the left of the resource name, and then click the Delete button. Resources deleted from the Resource manager can't be restored. Assigning Rights to a Resource GalleryRights to the existing gallery are assigned using the Properties > Rights tab (Figure 16-30). If you want your gallery to have the same rights group assignment as its parent gallery, click Modify and then click Add Parent's Rights. We will look into assigning rights in the next chapter. Figure 16-30. Resource gallery rights
|

EAN: 2147483647
Pages: 298