Installing and Configuring Knowledge Network for SharePoint Server 2007
You need to be aware of certain prerequisites before installing and configuring Knowledge Network. Before beginning the installation procedure, make sure that you have done the following:
-
Installed SharePoint Server 2007 in your environment. For more information, see the SharePoint Server 2007 setup and install procedure earlier in this book.
-
Configured the outgoing e-mail settings by using the Operations menu in Central Administration.
-
Configured SharePoint Server 2007 with a Shared Service Provider running a corporate intranet portal.
-
Completed the import of User Profiles from Active Directory or other data sources to SharePoint User Profile. For more information, see the SharePoint Server 2007 setup and install guide.
-
Configured Search Center Portal along with My Sites enabled on the Server Farm, and confirmed that People search is working. For more information, see the Office SharePoint Server 2007 setup and install guide.
-
You must set up a Microsoft Outlook e-mail account before installing and running Knowledge Network. To create your profile, Knowledge Network needs access to your Microsoft Outlook folders. Therefore, you must set up a Microsoft Outlook e-mail account with an Exchange mailbox configured prior to installing and running Knowledge Network.
There are also some issues of which to be aware. Before installing Knowledge Network for SharePoint Server 2007, take care to address the following issues:
-
When uninstalling the Knowledge Network Server, a few data entries are not cleaned up completely from the SSP databases. This issue can cause some warnings and minor exceptions to be raised in the SharePoint event log. To take care of this problem, you need to execute the following SQL script in each of the SSP databases where you provisioned Knowledge Network. This statement needs to be performed only once per SSP.
delete from MIPScheduledJob where [Assembly] like 'Microsoft.Office.Server. SocialNetwork%' delete from MIPObjects where Xml like '%spsDataPublishJobId%'
-
The Knowledge Network Client does not run on 64-bit Windows.
-
If your organization reuses e-mail aliases, unfamiliar contact names might appear in your Colleagues list. If your organization recycles e-mail aliases, you might find unfamiliar contact names in your list of colleagues. For example, an employee named Samuel Smith used an e-mail alias of SSmith. After Sam left the organization, a new employee named Sharon Smith assumed the alias of SSmith. If you had exchanged e-mail messages with Samuel Smith, Sharon Smith's name will now appear in your Colleagues list. You can delete Sharon Smith's name from your Colleagues list if she is not one of your colleagues.
Other issues can be found in the "known issues" readme text file.
Installing Knowledge Network
-
Start the installer by clicking KNServer.msi.
-
In the Knowledge Network window, click Start.
-
In the End-User License Agreement window, read the license agreement and then click I Accept.
-
In the Server Type window, click Install and allow the application to finish.
-
After installation is complete, click Close.
-
Repeat steps 1 through 3 on every server in the Office Server Farm.
Configuring Knowledge Network Server for Office SharePoint Server 2007
To configure the Knowledge Network Server, complete the following steps:
-
From the Windows Start menu, click SharePoint 3.0 Central Administration.
-
In the Farm Topology section, click the name of your Knowledge Network server.
-
For detailed information about the different types of topologies, see Suggested Topologies in the Microsoft Knowledge Network Deployment Guide.
-
On the Services on Server page, do the following:
-
If this server is a Web Front End server, start the Knowledge Network Application Service (if it isn't already started). Go to the SharePoint Services Administration Home Page for the Shared Service Provider, click the Data Management link in the Knowledge Network section, and make sure the Database Status says Database Successfully Created. It might take some time for this status to appear, and you won't be able to click into any of the text boxes until the database has been created successfully as displayed in Figure 8-46.
-
If this server is the intended Knowledge Network Application Server, start the Knowledge Network Search Service.
-
-
Perform step 4 for each server in the Office Server Farm. Note that the database verification in step 4a needs to be done only once. Also note that both the Knowledge Network Search Service and Knowledge Network Application Service need to be started on a farm (on any of the computers across the farm) in order for the product to function correctly.
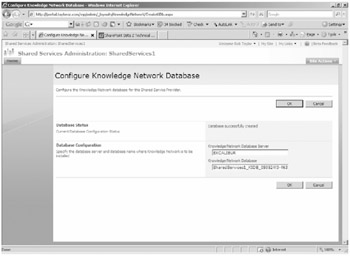
Figure 8-46: Illustration of the KN configuration
Knowledge Network defaults all of its configuration requirements out of the box and does not need any further administrative actions. Your Knowledge Network Installation is now complete.
If you want to configure Knowledge Network for a Shared Service Provider, follow these steps:
-
On the left navigation bar of the Central Administration Home page, click Shared Services Administration.
-
Click the link with the name of the Shared Service Provider on which you would like to configure Knowledge Network. This is the Shared Service Provider that you created as part of the SharePoint Server 2007 installation.
Knowledge Network Database Configuration
The good thing about the Knowledge Network application configuration is that it automatically configures its database server location so that it is the same as the default database server for the SharePoint Server 2007 Farm. There are good reasons to configure a separate database instance for this application, and if you want to change this location, you need to do the following:
-
In the SharePoint Services Administration Home page for the Shared Service Provider, in the Knowledge Network [prerelease] Version 1.0.0.0 section, click Data Management.
-
On the Configure Knowledge Network Database page, make sure that the Database Status says Database Successfully Created. It might take some time for this status to appear.
-
If you want to change the name or location of the Knowledge Network Database configuration from its default settings, you can edit the Knowledge Network Database Server and/or the Knowledge Network Database and click OK. Note that Integrated Authentication is assumed between the SSP administration account and the specified database server. The process of configuring the database takes a few minutes.
Knowledge Network Job Configuration
You will notice that Knowledge Network runs several background tasks as scheduled jobs through the Office Server Jobs infrastructure. The jobs have preset recommended schedules. If you want to change these settings, follow these steps.
-
In the SharePoint Services Administration Home page for the Shared Service Provider, in the Knowledge Network [prerelease] Version 1.0.0.0 section, click Timer Jobs. The Microsoft Knowledge Network Job Status page displays the various tasks and their schedules.
-
To change a task, click the corresponding job in the list. The jobs could be switched to Full or Incremental for the next run, or their schedules could be altered. The Schedule syntax is similar to the Office Server Jobs syntax.
Important Make sure that Knowledge Network Portal Upgrade says Succeeded. This is critical for completing the upgrade of your existing Search Center and Profile Center on the Shared Resource Provider.
Knowledge Network Manage Members Configuration
Now that we have Knowledge Network installed and configured for use, we need to configure it for the purpose of connecting Seekers to the Repositories.
In the SharePoint Services Administration Home page for the Shared Service Provider, in the Knowledge Network [prerelease] Version 1.0.0.0 section, click Manage Members, as shown in Figure 8-47.
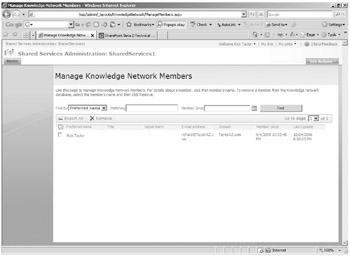
Figure 8-47: Illustration of the KN manage members configuration
From this interface, an administrator can configure a number of filters to be able to search for members (Repositories). For members who want to be removed as Repositories, an administrator can select the member and simply click Remove.
For Repositories that are external to your organization, the configuration is similar. In the SharePoint Services Administration Home Page for the SSP, in the Knowledge Network [prerelease] Version 1.0.0.0 section, click Manage External Contacts, as shown in Figure 8-48.
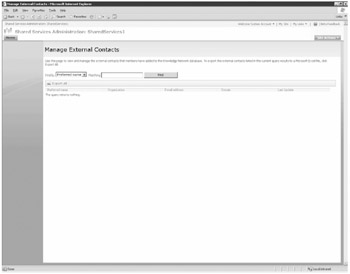
Figure 8-48: Illustration of the KN manage external contacts configuration
Knowledge Network Portal Feature
Even as powerful as the search feature is in SharePoint Server 2007, the Knowledge Network application enhances the features in the Search Center. By default, this enhancement is visible only on the Personal Site Provider and Preferred Search Center specified in the My Site Settings on the Shared Service Provider Home page. To activate or deactivate these features in other Search Centers or Personal Site Providers, or on the default Personal Site Provider or Preferred Search Center, follow these steps:
-
Navigate to the Personal Site Provider public site, and then on the Site Actions menu, point to Site Settings, and then click Modify All Site Settings.
-
On the Site Settings page, in the Site Administration List, click Site Features, as shown in Figure 8-49.
-
In the Site Features list, in the Knowledge Network Profile Center line, click either Activate or Deactivate as illustrated in Figure 8-50.
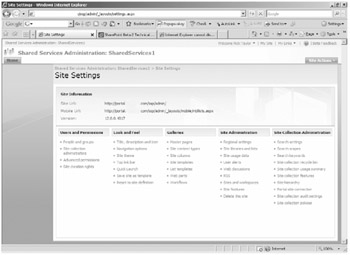
Figure 8-49: Illustration of the KN manage portal features
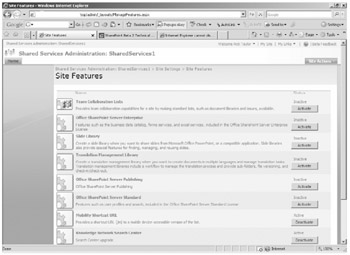
Figure 8-50: Activating features in the KN Profile Center
EAN: 2147483647
Pages: 299