SharePoint Site Management
On the Application Management page, the Site Management section gives the administrator the ability to manage all aspects of a site collection. You can remotely add new sites to existing Web applications that have been provisioned with a site template or configure a quota limit that applies to the content on a Web application's site collection. This remote management facility gives administrators an easy way of centrally configuring sites and site collections that exist on all available Web applications on the farm. It is therefore important to make sure you are making changes to the right Web application. You might, for example, inadvertently add a low quota limit to a Web application that hosts a site collection with content that already exceeds that quota limit and, therefore, prevent users from adding any new content to their document libraries or lists.
There are seven management options that can be configured under SharePoint Site Management on the Application Management page in Central Administration:
-
Create Site Collection
-
Delete Site Collection
-
Site Use Confirmation And Deletion
-
Quota Templates
-
Site Collection Quotas And Locks
-
Site Collection Administrators
-
Site Collection List
Create Site Collection
New top-level site collections can be created in two ways. One way is to create a site collection from an existing site, such as a corporate portal home page, and then create a new site collection using the Site Directory, as shown in Figure 7-15.
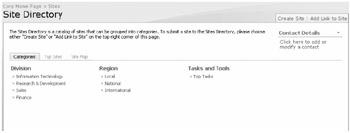
Figure 7-15: Creating a site through the site directory on a corporate portal
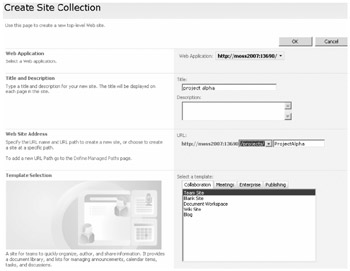
The second way to create a new top-level site for a Web application is to use the Create Site collection from this management screen. You can create a top-level site collection either by using the root URL of an unextended Web application or by using a managed path such as /sites, which is the default, or by adding your own managed site. (See the "Define Managed Paths" section for information about configuring a managed path.) To create a new site collection, you need to provide the following information:
-
Title
-
Web Site Address, using either the root of the Web application or a URL path
-
A Primary Site Collection Administrator and secondary administrator if required
-
A quota limit template if required
-
A site template for the new site collection to be created with, as mentioned in Table 7-1
| Planning | If you want to create a site hierarchy based on a URL mapping for projects, you could create a new managed path called "projects" for a Web application. Then create each new top-level site collection using the /projects URL path and add each new project as its own sub-URL of /projects, such as http:// servername:54635/projects/ProjectAlpha, as shown in Figure 7-16. |
Delete Site Collection
In the same way that you can create top-level site collections, you can also delete a site collection from here. By selecting a Web application, you are presented with all the available top-level site collections for all URL paths, as shown in Figure 7-17. By selecting one of the site collections, you have the option to delete it, as shown in Figure 7-18.
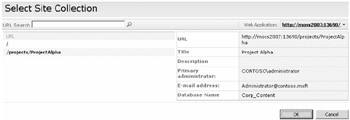
Figure 7-17: Selecting a site collection URL
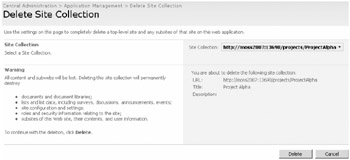
Figure 7-18: Confirming a site collection deletion
| Importanty | When you delete a site collection, all content is deleted with it. Therefore, you should make a backup of the site collection before performing the deletion. |
Site Use Confirmation And Deletion
By enabling site use confirmations, you can have an e-mail sent to all site collection owners of a Web application asking them whether they are still using their sites. There are two parts to configuring the site use confirmation e-mails. First, you need to enable the option for sending the notifications and provide the time frame for the first notification to be sent; the time frame is based on the time the site was created or first used. By default, the first e-mail notification will be sent 90 days after the site is created or first used. In order for the unused sites to be detected, you also need to configure the schedule to check for unused site collections. This schedule can be daily, weekly, or monthly.
The second part of the configuration is indicating if and when the site collection is automatically deleted. You can set an automatic deletion of a site collection based on a predetermined number of unanswered confirmation requests that are sent to the administrator of the site collection. If the administrator does not confirm the site collection is still in use, you can choose to automatically delete the site collection and all its content. By default, the configuration is to send four notifications to the administrator before the site collection is deleted. This means that by default every 90 days a notification will be sent out. After four attempts with no reply from the administrator of the site collection, the site collection will be deleted-this is a total of 360 days before actual deletion.
| Important | Ensure that your site collection administrators are aware of the consequences of not confirming the e-mail notifications they receive if you are going to enable the automatic site deletion option. |
Quota Templates
There is one quota template defined by default and that is for the user's personal sites (My Sites). This quota is set to a total of 100 MB of data for each user's My Site; a warning e-mail notification is set to be sent at 80 MB. You can change this quota or create additional quotas that are more specific to the needs of the site collection.
The site quota templates that you create are stored as a central pool and are available to all Web applications and all site collections. To create a new quota template, complete the following steps:
-
Select Create A New Quota Template, as shown in Figure 7-19.
-
Select a template from the Template To Start From list; the default is New Blank Template.
-
Type a name for your new quota template.
-
Select a maximum storage limit for the quota in megabytes.
-
Select a warning size limit to notify the site administrator when the storage reaches a certain size in megabytes.
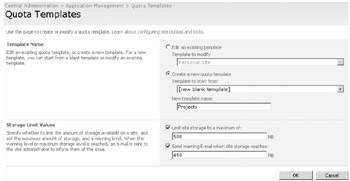
Figure 7-19: Creating a quota template
Site Collection Quotas And Locks
After you have created your quota templates, you are able to apply them to your site collections. Another option is to put a lock on the site collection to prevent certain types of use on the site. First, select a site collection that you want to configure. This can be on any Web application in the farm. Once the site collection is selected, you can choose to set a lock on the site collection or apply a quota template to it, or both.
Applying a Site Collection Lock
You can only lock a site collection; there is no option for choosing only a site. There are four choices for locking a site collection:
-
Not Locked is the default option, and it has no restrictions on the site collection.
-
Adding Content Prevented stops all contributors from saving or uploading content to the site collection.
-
Read Only prevents deletion of content and stops contributors from adding or editing content.
-
No Access stops all users from accessing the site collection.
Applying a Quota Template
After you create a new template, it is added to the Template To Start From list on the Quota Templates page. (See Figure 7-19). Now, on the Site Collection Quotas And Locks page, select the site collection to which you want to apply the template, and then select your chosen quota template. The predefined quota limits for the template are applied and appear dimmed, as shown in Figure 7-20.
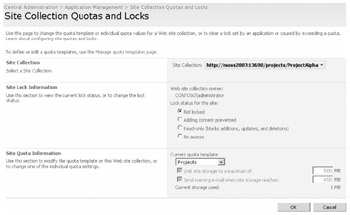
Figure 7-20: Applying a quota template to a site collection
Site Collection Administrators
When you first create a new site collection, you must identify a primary site collection administrator and, optionally, add a secondary administrator. The Site Collection Administrators page lets you define a new primary and secondary administrator if there is a need to change those settings.
Site Collection List
This management page allows you to view all sites that are hosted on a Web application. It includes the root of the site plus all sub sites. By clicking any of the sites, you are able to view information about that specifc site. This information includes:
-
The URL
-
Site Title
-
Site Description
-
Primary Administrator
-
E-Mail Address
-
Database Name
EAN: 2147483647
Pages: 299
