Creating and Modifying Web Part Pages
When a site is created in SharePoint Server 2007, the home page is automatically a Web Part page. Each site template contains a set of default Web Parts. The most commonly used Web Part page template comes with the team site. A Web Part page is a content layout page that is used in conjunction with a master page to create the Web page that is rendered by the client's browser.
Some possible functions of Web Parts on pages and sites are as follows:
-
To consolidate data
-
To display text and images
-
To promote collaboration and communication.
| Note | You can use Microsoft Office SharePoint Designer 2007 to create a Web Part page from scratch. |
To understand how Web Parts work, you will create a blank Web Part page. Later, you will add and modify Web Parts on that page. To create a blank Web Part page, follow these steps:
-
Starting from a site, on the Site Actions menu, click Create.
-
In the Web Pages section, choose Web Part Page.
-
In the Name box, type a name for the new Web Part Page. This will become the file name, with an .aspx extension.
-
Select a layout template. There are eight templates to choose from, all with different Web Part zone layouts.
More Info For more information about zones, see the "Arranging Web Parts on a Page" section later in this chapter.
-
In the Save Location section, choose a document library to save this new file in and click Create.
Note If a document library does not already exist on the site, you will be prompted to create one.
The new Web Part Page is generated and appears in edit mode, which was referred to as design mode in SharePoint Server 2003.
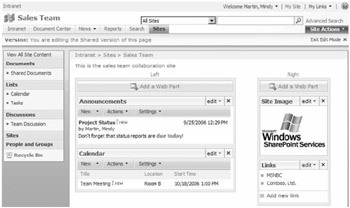
Figure 29-1 is a team site with four Web Parts. The Web Parts are inside two Web Part zones that are labeled Left and Right. There is also an Add A Web Part button at the top of each zone. Notice the text at the top of the page that lets you know that you are editing the Shared Version of the page.

Figure 29-1: A Web Part page
| More Info | For more information about shared and personal versions, see the "Customizing and Personalizing Web Parts" section later in this chapter. |
Adding Web Parts to a Page
A page must be in edit mode to add and modify Web Parts. You can enter edit mode by clicking Site Actions and then selecting Edit Page. Once you're in edit mode, there are two basic methods for adding Web Parts:
-
The Add Web Parts dialog box
-
Drag-and-drop from the Web Part tool pane
The following describes how to switch a page to edit mode and add a Web Part:
-
On the Site Actions menu, click Edit Page.
-
Edit mode is indicated by an Exit Edit Mode link under the Site Actions list.
-
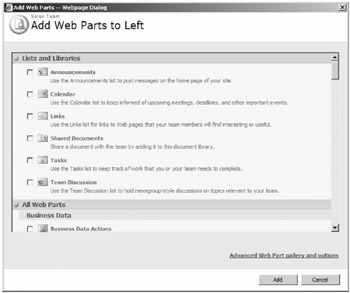
Click the Add A Web Part button and the Add Web Parts dialog box appears. This box displays all Web Parts, listed in groups, and is shown in Figure 29-2.
-
Select two Web Parts and click Add.

Figure 29-2: Add Web Parts dialog box
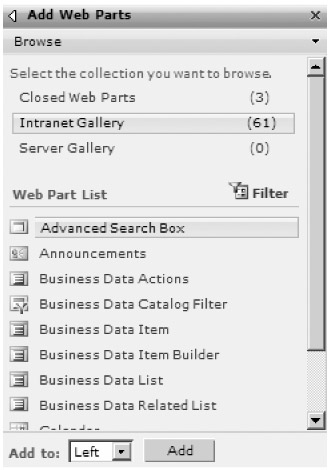
Figure 29-2 shows the Suggested Web Parts screen that automatically groups and filters the Web Parts the system interprets to be the most likely choices for the type of Web Part page with which you're working. Notice that you can get to the Web Part tool pane by clicking the Advanced Web Part Gallery And Options link. This Web Part tool pane is shown in Figure 29-3.

Figure 29-3: Web Part tool pane
The Web Part tool pane is the second way to add Web Parts to a Web Part page. In this tool pane, the Web Parts are listed alphabetically.
| Note | If the Add and Cancel buttons do not display at the bottom right of the Add Web Parts dialog box, collapse and expand the Lists And Libraries section. The Add button will appear at the bottom right of this screen. |
Using the Web Part Gallery and Advanced Options
Other than the basic way of browsing for them, there are several ways to obtain Web Parts to add them to the page. This section will cover the more advanced options of adding Web Parts from the Web Parts tool pane.
Browse, Search, and Import are the three methods for finding a Web Part. In the top toolbar of the Web Part tool pane, click the down arrow, and a menu box for Browse, Search, and Import will appear.
Browse
The Web Part tool pane shows an alphabetical list of all Web Parts for the site collection, ten at a time. You can see the next 10 Web Parts in the list by clicking the Next link at the bottom of the tool pane.
Search
Besides scrolling through a long list of Web Parts, one page at a time, another way to find a Web Part is to use the Search feature. The titles and descriptions of all Web Parts in the site collection will be searched, with results displayed.
Import
This feature is useful when you need a Web Part that does not exist in the site collection. You can use this feature to import an existing Web Part from a file share into the Web Part gallery. The file extensions for Web Parts are .webpart or .dwp. Web Parts can be imported into the gallery by performing the following steps:
-
Navigate to the home page of the site collection by clicking the link at the top left of the screen.
-
Click the Site Actions menu, click Site Settings, and choose Modify All Site Settings.
-
In the Galleries section, select Web Parts. This page lists detailed file information about every Web Part.
-
To upload Web Parts for the site collection, click Upload on the toolbar, browse to .dwp or .webpart files, and click OK.
The Web Part you wanted to import should now appear in the list of Web Parts for the site.
Web Part Galleries
Web Part galleries are groups of Web Parts that are helpful in locating a specific Web Part. Referring back to Figure 29-3, three galleries are shown: Closed Web Parts, Site Name Gallery, and Server Gallery. There is a fourth gallery called the Online Gallery, which can be turned on or off in the Web application's properties in Central Administration. This gallery is not illustrated in Figure 29-3.
-
Closed Web Parts This is a list of Web Parts that previously existed on the page but have been removed.
-
Site Name Gallery The default location for all Web Parts in the site collection. The name is based on the site collection's name.
-
Server Gallery This is a list of Web Parts available for all site collections in the Web application. Navigate to the virtual server in the SharePoint Server 2007 server's file system, create a new folder called "wpcatalog," and copy the .dwp and .webpart files to that folder.
-
Online Gallery This is a collection of Microsoft MSNBC Web Parts located on the Internet. By default, this feature is enabled for each virtual server, but it can be turned off. To turn this feature off, go to SharePoint Central Administration and access the Application Management tab. Under Application Security, choose Security For Web Part Pages. In the Online Web Part Gallery section, choose the option to prevent access to it.
An enabled online gallery will cause a performance hit on the server, which might be obvious when navigating the Web Part tool pane. This is due to the server trying to access the MSNBC online Web Part gallery. When the server tries to access this Web Part gallery, there is usually a 10 to 20-second delay in the Web Part tool pane appearing while the server tries to build the Web Part list in the online Web Part gallery.
If you want the MSNBC Web Parts for your deployment, best practice is to download them to your server and offer them as part of another, local gallery. Then go into Central Administration and turn off the online Web Part gallery for each Web application. This will increase performance and still allow your users to use these free Web Parts from MSNBC.
Web Part List Filtering
To access the Web Part list filter, click the Filter button in the Web Part tool pane, which was shown in Figure 29-3. This will elicit a new drop-down box, listing the different types of Web Part groups for filtering.
Exporting Web Parts
Exporting Web Parts is very useful when there is a need to copy a Web Part to another location. Web Parts can be exported in a couple of ways:
| Note | List View Web Parts cannot be exported because they are specific to the site. |
-
Site-collection level In the site collection's Web Part gallery, find the Web Part to be exported and click the edit icon. Next, click Export in the toolbar, and save the file to your hard drive. Then copy the Web Part to a file share from where the other site administrators can import the Web Part into their galleries.
-
Site/Page level Exporting Web Parts at this level lets you retain Web Part settings or customizations. This allows an identical Web Part to be placed on another page. For example, this feature can be used in a case where a Content Editor Web Part has been customized with a lot of text and graphics and needs to be used "as is" on multiple pages. The following steps demonstrate how to export a Content Editor Web Part:
-
Add the Content Editor Web Part to a page, and customize it with text and a table or image.
-
On the Web Part menu, choose Export.
-
Save this .dwp file to your computer's file system.
-
| More Info | For information on importing, see the "Import" section earlier in this chapter. |
EAN: 2147483647
Pages: 299