Creating Features in Visual Studio 2005
Aside from the obvious development advantages, Visual Studio 2005 is the ideal environment for creating and developing Features. In creating the ![]() Feature.xml and element files, you can take advantage of the Visual Studio IntelliSense feature through associating the Windows SharePoint Services schema, as shown in Figure 26-3, or you can encompass your Feature in a Project Class Library and integrate other related files into your solution, such as a Feature event class.
Feature.xml and element files, you can take advantage of the Visual Studio IntelliSense feature through associating the Windows SharePoint Services schema, as shown in Figure 26-3, or you can encompass your Feature in a Project Class Library and integrate other related files into your solution, such as a Feature event class.
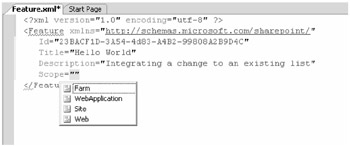
Figure 26-3: Visual Studio 2005 and IntelliSense association with Windows SharePoint Services schema
In this section, you'll learn how you can leverage the Visual Studio 2005 environment to create your Features, including adding the Windows SharePoint Services schema and uniquely defining your Feature using a GUID. You'll also include Feature elements to make changes to the SharePoint toolbar and menu items.
In the "Creating an Event Handler Feature" section of this chapter, you'll broaden your Visual Studio experience to include the SharePoint assembly reference and build an event handler using the SharePoint object model.
Creating the Project Class Library
To create your Feature, you create a Project Class Library, Visual Studio solution, where you can create your Feature folders hierarchy and later integrate some additional files and code into the same solution to add further functionality such as an event handler.
| On the CD | Throughout this chapter, coding examples other than XML are coded using C#. Coding examples, including Feature and element files, are included on the book's companion CD in the \Code\Chapter 26 folder. |
To create your Visual Studio environment, complete the following steps:
-
Launch Visual Studio 2005 and click File, New Project.
-
Select the Visual C# Windows Project And Class Library template, and give the project a name, such as SharePoint, and identify a location to which to save your project, such as [drive]\foldername. Click OK.
-
In the Solution Explorer window, in your Visual Studio environment, right-click the project name, point to Add on the shortcut menu, and then select New Folder. Rename the folder to Features.
-
Under the Features folder, create a new folder and name it LinkingExample.
This is where you add the
 Feature.xml and Feature element files you'll create as part of the examples in this section. Creating the Features folder hierarchy in Visual Studio categorizes your Features, allows you to add multiple Features to the one solution, and helps simplify the deployment process by having the Features and associated files already contained in folders that get copied to the Features directory on the Web front-end server.
Note SharePoint Server 2007 supports only low-order ASCII characters, and no spaces, for Feature folder and file names.
Creating the Feature.xml File
Create the ![]() Feature.xml file to define the scope of your Feature, and include references to the supporting Feature elements files. You will scope the Feature for Web, which means the Feature can be deployed and activated on all Web sites created on your server.
Feature.xml file to define the scope of your Feature, and include references to the supporting Feature elements files. You will scope the Feature for Web, which means the Feature can be deployed and activated on all Web sites created on your server.
To create the ![]() Feature.xml file, complete the following steps:
Feature.xml file, complete the following steps:
-
Right-click the new Feature folder named LinkingExample, click Add, and then click New Item to open the Add New Item dialog box.
-
Under Visual Studio Installed Templates, click XML File.
-
In the Name text box, type
 Feature.xml and click the Add button to add the
  Feature.xml file under your LinkingExample folder.
You have created the basis from which to build your Feature. Next, you'll associate the SharePoint schema XML with the ![]() Feature.xml file so that you can use the IntelliSense feature to define the attributes for the Feature.
Feature.xml file so that you can use the IntelliSense feature to define the attributes for the Feature.
Associating Schema to a Feature
Associating the SharePoint schema to the .xml file allows you to use the IntelliSense feature in Visual Studio to add the attributes to your ![]() Feature.xml file. This process eliminates the need to manually enter each attribute. To associate the schema to your XML file, complete the following steps:
Feature.xml file. This process eliminates the need to manually enter each attribute. To associate the schema to your XML file, complete the following steps:
-
Double-click the newly created
 Feature.xml file to open it. Position your cursor in the
  Feature.xml file to activate the Properties window in Visual Studio.
 -
In the Properties window of your Visual Studio solution, locate the Schemas field and click the Directory Path Expander to launch the XSD Schemas Locator dialog box.
-
In the XSD Schema dialog box, click the Add button.
-
In the Open XSD Schema dialog box, browse to the following path:
-
%SystemDrive%\Program Files\Common Files\Microsoft Shared\web server extensions\12\TEMPLATE\XML
-
-
Click the wss.xsd file and then click Open to include the wss.xsd file in your
 Feature.xml file, which should now look like Figure 26-4, where the wss.xsd file is highlighted and selected. Click the OK button.
 -
Verify that the schema file has been included in your
 Feature.xml file by ensuring that the path to the schema is included next to the Schemas option in the Properties window. Also verify that IntelliSense is active in your
  Feature.xml file.
 -
Position your cursor at the top of your
 Feature.xml file and, using your keyboard, click the < key. If the SharePoint schema has been successfully added, you see a drop-down list with several options, including Feature, as shown in Figure 26-5.
 -
In the drop-down list, double-click Feature to instantiate and declare the Feature namespace.
-
Press Enter to start a new line, and then press your space bar to activate the IntelliSense drop-down list and access the Feature attributes.
-
On the drop-down list, double-click Id to add it to the
 Feature.xml file. As shown in Figure 26-6, this is the Id attribute for the GUID that will uniquely identify the Feature for your SharePoint deployment.
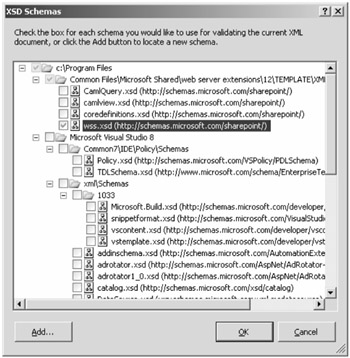
Figure 26-4: Adding the SharePoint schema to the Visual Studio .xml file
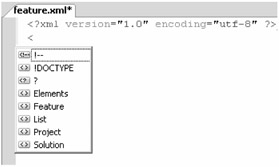
Figure 26-5: IntelliSense activated showing Feature selection
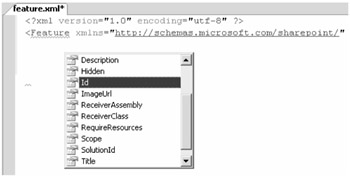
Figure 26-6: IntelliSense showing the Id attribute in a selection list
Generating the Feature GUID
Each ![]() Feature.xml file is uniquely identified using a globally unique identifier (GUID), formatted in Registry format. To add a GUID to your
Feature.xml file is uniquely identified using a globally unique identifier (GUID), formatted in Registry format. To add a GUID to your ![]() Feature.xml file, complete the following steps:
Feature.xml file, complete the following steps:
-
Open the Create GUID dialog box by using one of the following methods:
q
From the Visual Studio Tools menu, select Create GUID.
q
Browse to the Guidgen.exe file available in the Visual Studio Tools folder, and double-click the file. (This file is typically located in %SystemDrive%:\Program Files\Microsoft Visual Studio 8\Common7\Tools\guidgen.exe.)
-
Select the Registry Format option and then click the New GUID button to generate a GUID, as shown in Figure 26-7.
-
Still in the GUID dialog box, click the Copy button to copy the GUID and then paste it into your
 Feature.xml file next to the Feature Id attribute. Remove the braces from the GUID, and enclose the GUID in quotation marks, such as .
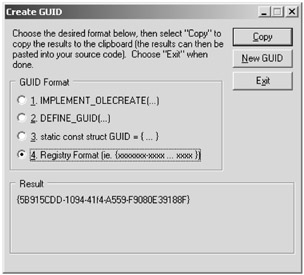
Figure 26-7: GUID generation
| Note | If the GUID Creation option does not appear on your Visual Studio 2005 Tools menu, you need to add the tool. Select External Tools from the Tools menu, type Create GUID in the Title box, and then browse to the Visual Studio tools location in the Command box. For example, browse to %SystemDrive%\Program Files\Microsoft Visual Studio 8\Common7\Tools\guidgen.exe Next, click Open, and then click OK. You should now have the Create GUID option available on your Tools menu. |
Defining the Feature Scope and Other Feature Attributes
Once you've created your ![]() Feature.xml file and assigned the GUID to the Feature Id attribute, as described in the previous section, you can now proceed to populate the remaining attributes of the
Feature.xml file and assigned the GUID to the Feature Id attribute, as described in the previous section, you can now proceed to populate the remaining attributes of the ![]() Feature.xml file, including the Feature scope. In this case, you will scope the Feature for Web, which means the Feature can be activated on all Web sites created on your server.
Feature.xml file, including the Feature scope. In this case, you will scope the Feature for Web, which means the Feature can be activated on all Web sites created on your server.
To add the Feature scope Web, position your cursor on a new line of your ![]() Feature.xml file and type the word Scope followed by the '=' sign. Following the '=' sign, you could either type in "Web" or select Web from the Visual Studio IntelliSense prompt. If you are not seeing IntelliSense prompts as you type, then go back to the section "Associating Schema to a Feature".
Feature.xml file and type the word Scope followed by the '=' sign. Following the '=' sign, you could either type in "Web" or select Web from the Visual Studio IntelliSense prompt. If you are not seeing IntelliSense prompts as you type, then go back to the section "Associating Schema to a Feature".
Populate the remaining attributes, including the Title for the Feature which will identify the Feature in the Site Features administrative page. This Feature will be entitled Toolbar and Menu Links. The Hidden attribute will be set to FALSE which means that when the Feature is installed, it will be visible on the Site Features administrative page. Your completed ![]() Feature.xml file should resemble that shown in Figure 26-8. Save the
Feature.xml file should resemble that shown in Figure 26-8. Save the ![]() Feature.xml file.
Feature.xml file.
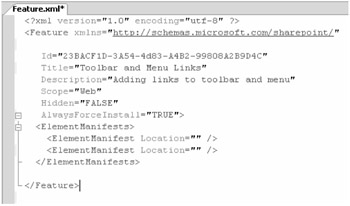
Figure 26-8: Feature.xml file
At this point, leave the <ElementManifests> attributes as null values-that is, <ElementManifest Location="">. This section explains how to create and configure two element files and then revisit the ![]() Feature.xml file to populate the ElementManifest Location with the location and names of the element files.
Feature.xml file to populate the ElementManifest Location with the location and names of the element files.
| Note | If the <AlwaysForceInstall> attribute is set to True, you do not need to add the -force parameter to the stsadm.exe command line each time the Feature is updated and re-installed on the SharePoint server. If you do not want the Feature to be forcibly re-installed in the background during redeployments, remove this attribute or set it to False. |
Creating Feature Element Files
With relative ease, you can add simple changes to your sites using Features and elements. In this section, you'll create two element files for your Feature in order to add custom toolbar and menu items to your site. The first element file, which we will name ![]() Toolbar.xml, will include a Site Help button on the edit toolbar of the document library forms page. The second file will demonstrate how to include an additional menu item in the SharePoint Site Action menu using an element file that we will name
Toolbar.xml, will include a Site Help button on the edit toolbar of the document library forms page. The second file will demonstrate how to include an additional menu item in the SharePoint Site Action menu using an element file that we will name ![]() Menu.xml.
Menu.xml.
Adding Toolbar Items
You can use the <CustomAction> element to add a button to the Edit toolbar on the Document Library Form page within your site. To create the ![]() Toolbar.xml file, complete the following steps:
Toolbar.xml file, complete the following steps:
-
Create the element file by right-clicking the Feature folder (in this example, LinkingExample), point to Add, and select New Item.
-
In the Add New Item dialog box under the Visual Studio installed templates, click XML File and, in the Name box, type
 Toolbar.xml.
 -
Click Add to add the
 Toolbar.xml file to your Feature and open the file ready for editing.
 -
Position your cursor at the top of the
 Toolbar.xml file to activate the Properties window in Visual Studio. Browse to the Schemas field, and click the Directory Path Expander to launch the XSD Schemas locator dialog box.
 -
In the XSD Schema dialog box, click the Add button.
-
In the Open XSD Schema dialog box, browse to the following path:
-
%SystemDrive%\Program Files\Common Files\Microsoft Shared\web server extensions\12\TEMPLATE\XML
Note If you previously added the schema to the
 Feature.xml file in the same project, the wss.xsd file is already included in the XSD Schemas dialog box. You do not need to click Add and browse to the path containing the file.
 -
-
Click the wss.xsd file, and then click Open to include the wss.xsd file in your
 Feature.xml file. Click the OK button.
 -
Add the Elements and Custom Action elements and the element attributes, as shown in Figure 26-9, and save the file. This example includes a URL reference to the Mysite.aspx page in the SharePoint _layouts directory so that when a user clicks the Custom button on the Edit toolbar the user is directed to his My Site. But you can include links to other locations here, including internal and external links.
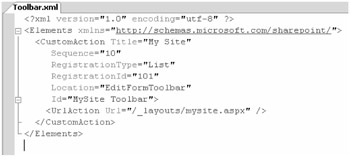
Figure 26-9: Toolbar.xml file
| Note | The Title attribute "Toolbar and Menu Links" is the name that will be displayed on the Site Features administrative page where you will be able to activate and deactivate the Feature. |
Adding a Menu Item
You can create an additional menu item on the SharePoint Site Actions menu that displays the menu item User Guide. We will use the <Module> element to include an .aspx file as part of our Feature, and we will use the <CustomAction> element to display the additional menu item in the Site Actions menu using the URL to the .aspx file.
Creating the Menu File
To create the ![]() Menu.xml file and associated .aspx file, complete the following steps:
Menu.xml file and associated .aspx file, complete the following steps:
-
Right-click the LinkingExample Feature folder, point to Add, and select New Item to open the Add New Item dialog box.
-
Under Visual Studio Installed Templates, click XML File, and type
 Menu.xml in the Name box.
 -
Click Add to add the
 Menu.xml file to your Feature folder, and open it ready for editing.
 -
Follow the steps in the previous example to add the SharePoint schema reference to
 Menu.xml. Then add the <Elements>, <Module>, and <CustomAction> elements, and populate the attributes for each element as shown in Figure 26-10. Save the
  Menu.xml file.
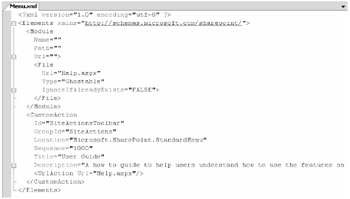
Figure 26-10: Menu.xml file
Linking to a New Menu Item
You need to create the .aspx file that you'll provision as part of your Feature. You will link to this file from the new User Guide link on the Site Actions drop-down menu.
-
Right-click the LinkingExample Feature folder, point to Add, and then select New Item to open the Add New Item dialog box.
-
Under Visual Studio Installed Templates, click Text File, and type
 Help.aspx in the Name box. (Make sure you include the .aspx extension as part of the file name.) Then click Add.
 -
In the open
 Help.aspx file, add some content. In keeping with ASP.NET 2.0 master pages, you could add a master page reference into the page to maintain consistency between your custom page and the default SharePoint pages. To do this, add the following directive to the top of the ASPX page, as shown in Figure 26-11:
<%@ Page Language ="C#" MasterPageFile="~masterurl\default.master" %>

Figure 26-11: Help.aspx page format
Adding Element Files to the Feature.xml File
Now that you've created the element files for the Feature, you'll go back and reference those files in the ![]() Feature.xml file, using the <ElementManifests> attribute as explained next.
Feature.xml file, using the <ElementManifests> attribute as explained next.
-
Open the
 Feature.xml file, and include the two element files you just created (Toolbar.xml and
  Menu.xml) in the <ElementManifest> Location attribute, for example:
<ElementManifests> <ElementManifest Location="Menu.xml" /> <ElementManifest Location="Toolbar.xml" /> <ElementManifests>
-
Save the
 Feature.xml file, and close the
  Toolbar.xml,
  Menu.xml, and
  Help.aspx files if they are still open.
Installing and Activating a Feature
You'll install and activate the LinkingExample Feature you created. For a comprehensive explanation of the Feature deployment options, see the "Deploying Features" section.
To install and activate a Feature, complete the following steps:
-
Using Windows Explorer, navigate to the LinkingExample folder containing the
 Feature.xml,
  Toolbar.xml,
  Menu.xml, and
  Help.aspx files. Copy the folder, and paste it in the Features directory:
-
%SystemDrive%\Program Files\Common Files\Microsoft Shared\web server extensions\12\TEMPLATE\FEATURES
-
-
Open your Windows command-line tool, and browse to the stsadm.exe command-line tool, which is located at
%SystemDrive%\Program Files\Common Files\Microsoft Shared\web server extensions\12\BIN
-
Type the following command:
stsadm.exe -o installfeature -name LinkingExample
-
Open your SharePoint Web site, and browse to the Site Settings page. (Remember that the Feature is scoped for "Web" so that it will be available for activation on your Web sites.)
-
On the Site Settings page, under Site Administration, click Site Features.
You'll see the Feature in the list as Toolbar And Menu links, which is determined by its Title attribute. By default, the Feature status is set to Inactive, as shown in Figure 26-12. Note that the order in which the Features are listed on the Site Features page is alphabetical, based on Feature Title.
-
Click the Activate button to activate the Toolbar And Menu Links (LinkingExample) Feature.
-
By activating the Feature, the custom toolbar button is included on the document library Edit toolbar and the custom menu item is included on the Site Actions menu. Figure 26-13 shows the My Site custom toolbar button; Figure 26-14 shows the User Guide custom menu item.
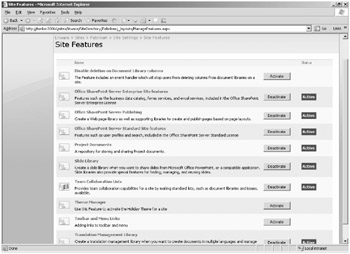
Figure 26-12: Site Features page showing the inactive Toolbar And Menu Links Feature
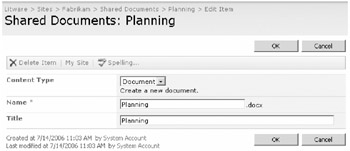
Figure 26-13: Toolbar button shown when the Tool And Menu Links Feature is activated
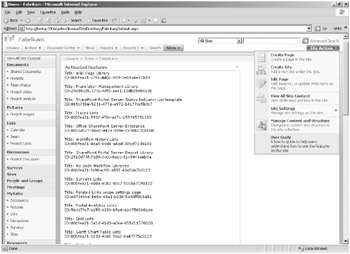
Figure 26-14: Menu item shown when the Tool And Menu Links Feature is activated
By using the <Module> element in the ![]() Menu.xml file, the Feature also includes the custom
Menu.xml file, the Feature also includes the custom ![]() Help.aspx file, shown in Figure 26-15. Clicking the custom menu item, User Guide, in the drop-down Site Actions menu will redirect the user to the
Help.aspx file, shown in Figure 26-15. Clicking the custom menu item, User Guide, in the drop-down Site Actions menu will redirect the user to the ![]() Help.aspx page. The redirection is a result of the <UrlAction> attribute of the <CustomAction> element in the
Help.aspx page. The redirection is a result of the <UrlAction> attribute of the <CustomAction> element in the ![]() Menu.xml file.
Menu.xml file.
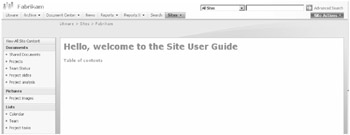
Figure 26-15: Help.aspx page shown in the user interface
EAN: 2147483647
Pages: 299