Configuring Document Retention and Disposal
When you create an expiration policy to apply to documents, you must choose what action SharePoint will take when the expiration date is reached. One of the options available is Delete, which moves the document to the Recycle Bin as a normal user delete action would. However, this option hides the file so that it is not visible to users. Administrators will still see the file listed in the Site Collection Recycle Bin and can restore it from there. When an expired file is restored, it is automatically marked as exempt from expiration policies to prevent it from being deleted again. Once the exemption is removed, it is once again subject to the expiration policy and will be deleted during the next expiration processing.
Although this option provides a safety net for documents that have been configured to expire, it might not meet the requirements of some regulations that specify that the content must be immediately and irretrievably purged from the online system. For this purpose, you can choose the Delete Record And Submission Information option, which deletes the document from the site and purges it from all recycle bins. This is a permanent delete action and cannot be undone.
Using the Disposition Approval Workflow
In many cases, your objective will be to permanently delete files that have expired, but records managers might be concerned about the unmonitored deletion of files. To alleviate this problem, you can configure the expiration policy with the option to start a workflow to invoke approval for the deletion instead of deleting the file directly. When a Disposition Approval workflow is used, the document is placed in an In Progress status when it expires and is held until a records manager reviews the event. The records manager can either confirm the deletion, at which point the document is permanently removed from the system, or elect to keep the file, at which point the document is marked as exempt from expiration policies.
To use the disposition approval workflow, begin by creating an instance of it as follows:
-
Browse to the document library where the expiration policy is applied.
-
Select Document Library Settings from the Settings menu, and click Workflow Settings.
-
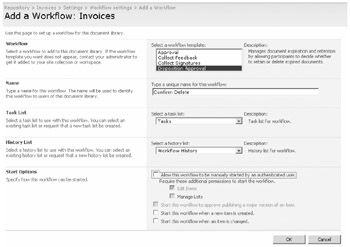
Click Add A Workflow, and the Add A Workflow page appears, as shown in Figure 10-18.
-
In the Select A Workflow Template list, select the Disposition Approval workflow template. In the Type A Unique Name For This Workflow text box, enter a unique name for the workflow. It is also a good idea to clear the Allow This Workflow To Be Manually Started By An Authenticated User option because it should be managed only by expiration policies. Click OK.
-
Click the Settings link to return to the Site Settings page.
-
Click Information Management Policy Settings, and then click Define Policy.
-
Under Expiration, select the Start This Workflow option and select the new workflow you just created. Click OK.

Figure 10-18: New disposition approval workflow
EAN: 2147483647
Pages: 299