Filters
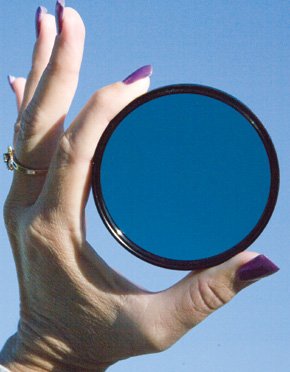
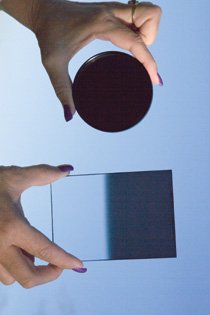
| It might surprise you to know that filters still have a very valuable place in the digital camera bag. Sure, you can simulate many of the effects of a filter in Photoshop after the fact, but not everything lends itself to software adjustments. In some cases, you'll have better results from the beginning by using the appropriate tools with your camera when you go out to photograph. UV FiltersI'll be very up front on this one. I am not a fan of UV (ultraviolet) filters. Most of them are sold with a lens by a salesperson in a camera store looking for a quick profit. This usually goes along with, "Do you want a UV filter to protect that lens?"the theory being that when you drop your expensive new lens or something pokes it, the filter will prevent the glass element of the lens from being damaged. This is probably trueit will likely prevent damage to the glass, but so will using the lens hood, which does do an even better job (trust me on this oneI've had enough practice to know that a lens hood does protect a lens when you drop it). But the biggest issue I have with the typical UV filter that is pushed on the unsuspecting buyer is quality. You've just spent a good amount of money to buy the best lens you could afford, and now the salesperson wants you to slap a cheap piece of glass in front of it? Does that really make sense? Tip If you're going to use a UV filter, I recommend getting a top-quality one from a company such as B+W, Nikon, Canon, or Tiffen. UV filters do help to reduce the ultraviolet light (hence the UV name) reaching your sensor, which is helpful when shooting at high elevations. So, it's more effective if you're shooting in the mountains than at a park in Los Angeles. There is one instance where I highly recommend having something like a UV filter on your camera. If you're shooting in windy conditions where there is sand blowing, by all means put a filter over your lens. Sand will pit the coatings on a lens faster than you think, potentially ruining the optical quality. PolarizersThere is one filter I never leave home without. My polarizer is by far the most used filter in my kit, and for good reason. A polarizing filter can make a world of difference to your images in many different situations. The first thing that comes to mind for most people is bluer skies, which is maximized when the sun is 90 degrees to the direction you're shooting (Figure 6.1), but that's really just the beginning of what these amazing filters can do for you. Figure 6.1. A polarizing filter is one of the most useful additions you can carry in your camera bag.
Along with enhancing the color of skies, which also helps clouds stand out in more detail, a polarizer is perfect for dealing with reflections in water and glass. Figure 6.2 shows a photo taken with no polarizer. Although you can see the fish through the glass, the image is ruined by the reflections. Figure 6.2. With no polarizer filter, the glass causes problems with reflections.
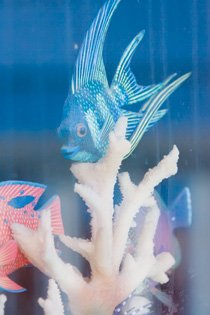
In Figure 6.3, I used a polarizer to remove the reflection, giving me much cleaner view of the fish through the glass. Figure 6.3. By using a polarizer, I've removed the reflection and made the fish easier to see.
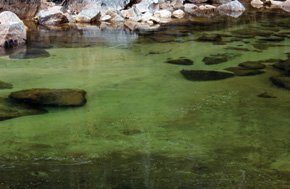
The same works with water when you want to reduce or remove reflections on the surface. By rotating the ring of the filter, you can control how strong the polarizing effect is on the subject. In Figure 6.4, I used the polarizer to remove the reflections and allow me to capture what's under the surface of the watersomething that would have been impossible without the filter. Figure 6.4. You can also use a polarizing filter to reduce reflections in water to see what's under the surface.
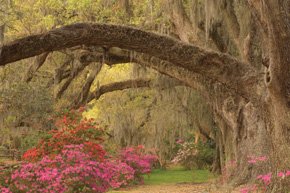
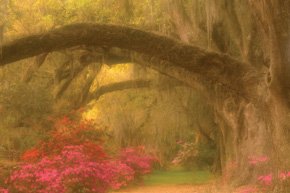
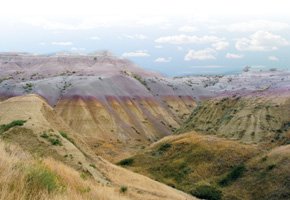
One disadvantage of using a polarizer is that you lose light. The amount depends on how the filter is adjusted, but it's typically a loss of one to two f-stops. If you recall from Chapter 2, where I cover exposure, this means that if your shutter speed is 1/125 at f/16, with a filter you would then be shooting 1/60 or 1/30 at f/16 to compensate for the polarizer. This can work to your advantage, though, especially when you have bright lighting and want to use a slower exposure than you are able to get with normal metering. In cases like this, the polarizer can be used like a neutral-density filter (see later in this chapter) to give you a couple of extra stops of lightperfect for those time that you want to capture a waterfall with blurred motion. Another great use for a polarizing filter that might not be obvious at first is in rainy conditions, particularly when photographing landscape details. The polarizer can pull color detail out in the image that would otherwise be lost (Figure 6.5). Figure 6.5. In this image, shot on a overcast day with flat light, the subject doesn't really stand out from the surroundings.
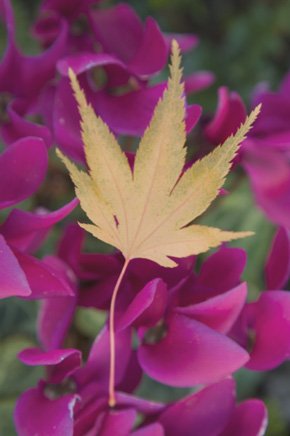
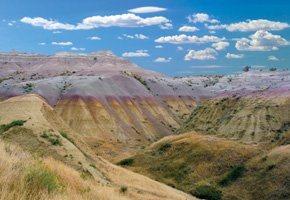
In the example shown in Figure 6.6, I used a polarizer to increase the saturation of the leaves. Even though there was no direct sunlight, the filter worked its magic to bring life to the subject. Compare this image to Figure 6.5 to see what you think. Figure 6.6. With a polarizing filter, the color saturation is much better.
You do need to be aware of how you are using your polarizer, though. Particularly for landscapes, it's easy to just set it for a maximum effect that often looks artificial (Figure 6.7). Figure 6.7. Be careful not to overuse the polarizing filter, though. You can end up with an image like this one that looks artificial.
This is even more problematic at higher elevations where too strong of a setting can make the sky go nearly black. Figures 6.8 through 6.10 are a set of images showing different polarization settings. Figure 6.8 uses no polarization, which leaves the sky washed out. Figure 6.8. With no filter, the sky is washed out with little color or contrast.
Going to the other extreme, Figure 6.9 has set the filter to the maximum strength. Although there is certainly more detail in the clouds, and the sky is much bluer, it just doesn't look naturalat least not for this planet. Figure 6.9. This image is captured with the polarizing filter set to the maximum effect.
Tip It's fine to enhance reality or even make your own, depending on what you're going for. But if you want realism, small enhancements are the best way to go. Adjusting the filter down from the maximum, I finally ended up with Figure 6.10, about a quarter turn back down from the maximum. This setting gave me what I felt was the most realistic version of the sky, with just a slight improvement in color and contrast over what my eye was able to see. Figure 6.10. Here's the final image with about 1/4 of the maximum strength.
Color EnhancersI don't consider a color enhancer a critical filter to have in your camera bag, but it's a nice addition that can make the difference between normal and exceptional. Figure 6.11 shows a scene with no filter attached. It's nice, but nothing really special. Adding a color-enhancing filter boosts the colors, especially the reds, as shown in Figure 6.12. Figure 6.11. Color-enhancing filters can turn a subject like this one, which looks washed out, into one like Figure 6.12.
Figure 6.12. With a color-enhancing filter this image looks much better, especially in the red tones.
You can accomplish much the same effect in Photoshop by adjusting saturation of the red channel. I will show you how to do that later in this chapter. IR FiltersIR, or infrared, filters are something you either love or hate. Personally, I'm in the love camp. I'm constantly fascinated at the results when shooting with an IR filter on my camera. Shooting with an IR filter is totally alien, though. To begin with, an IR filter cuts out all visible light. Yep, you don't see a thing when you have an IR filter attached to your lens. So how do you shoot with one of these on your camera? You use manual focus and metering. Focus on your subject without the filter attached. Then attach the filter and set your exposure to about three seconds to start (yes, you will be using a tripod). The great part about shooting IR with digital is that you can see the results on the LCD and make needed adjustments to the exposure based on the histogram. The image shown in Figure 6.13 was taken in midday, but because of the filter it required a five-second exposure. There was a bit of a breeze blowing, so there is some movement in the leaves, but I think this adds to the appeal of the image. Figure 6.13. An IR filter adds a very different look to your images. This one required a very long exposure (about 5 seconds).
Compare this to a similar image shot with no filter (Figure 6.14). As I said earlier, you either love IR or hate it. For me, seeing a hidden world is worth the effort. Foliage in IR is white, whereas nonliving things don't show any change in tone. Figure 6.14. This shot, taken within minutes of the one shown in Figure 6.13, shows what the scene looks like with no filter.
You can also simulate IR in software with filters that work in Photoshop (I will show you how a bit later in this chapter). The effect isn't quite the same, but you can do pretty well with it. Soft-focus FiltersNow why would you ever want to use a filter that intentionally softens your photo? Soft focus has been a portrait photography favorite for years, especially for glamour style images (Figure 6.15). More recently, it's become popular with other photography styles as well. As an example, the exceptional landscape photographer Tony Sweet uses a Soft Ray filter from Singh-Ray (www.singh-ray.com/sweet.html) that he helped design. To see what an amazing job this filter can do, take a look at Figures 6.16a and 16.b. Figure 6.15. Soft-focus lenses have been popular for decades, especially with portrait photographers.
Figure 6.16a. A new filter from Singh-Ray takes soft focus a step further. Here's the before image.Photo by Tony Sweet (www.tonysweet.com)
Figure 6.16b. And here's the after version with the Singh-Ray Soft Ray filter.Photo by Tony Sweet (www.tonysweet.com)
Soft-focus filters are often used in portrait and glamour photography to add an ethereal and dreamy style to the image. It is quite flattering to portraits because it hides blemishes and softens the skin. By dissipating the light beyond normal limits and boundaries, the Soft-Ray imparts a soft, mystical mood over the landscape. Neutral-density FiltersNeutral-density filters are used to reduce the amount of light reaching the sensor. These filters come in both graduated and solid styles (Figure 6.17) and can make the difference between getting a shot that has harsh lighting and contrast or missing out on the opportunity altogether. Figure 6.17. Neutral-density filters, available in both graduated and solid versions, allow you to correct for extreme ranges of light that would not be recorded by a sensor.
A graduated neutral density, or grad, is used to reduce the difference in light range between bright and shadow areas of a scene. In Figure 6.18, you can see that in order to capture detail in the ground, the sky details are blown out with very little detail. Figure 6.18. Without a filter, I've lost details in the sky in order to keep the ground from being too dark.
Using a two-stop grad, I've darkened the sky by two stops without affecting the foreground at all, letting me capture more sky detail (Figure 6.19). Figure 6.19. With a two-stop graduated neutral-density filter, I can capture detail in both the sky and the ground.
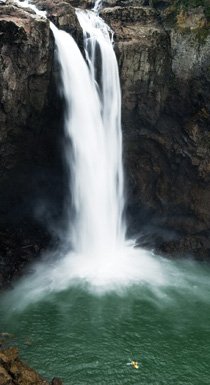
Tip You can use a polarizer as a neutral-density filter, too. Doing so gives you as much as two stops of exposure latitude when adjusted for maximum effect. The other type of neutral-density filter is solid and is used to extend the exposure for things like blurred water images (Figure 6.20). You can get these in different strengths. If you want to spend the money, the best one available is the Singh-Ray Vari-ND, which lets you adjust the strength like a polarizer filter. Figure 6.20. Using a solid neutral-density filter lets me slow the exposure down to get that soft, flowing look in the water.
|


EAN: 2147483647
Pages: 91