Using Audio Scrubbing
| Once you have adjusted the audio you will want to play it back to preview the changes. But sometimes an audio event, like the single click of a camera, is difficult to isolate when it is being played back at normal speed. To get around this, you can scrub the Timeline with the mouse by moving it backward and forward over the sound event until you have found the exact spot you need to change. However, audio scrubbing is turned off by default. This is set that way so that the majority of editing tasks can be performed while your machine is enjoying the full computer resources available to it. Once audio scrubbing is turned on, you will see a performance hit, so I recommend that you only turn it on when you need it and then turn it back off again once the audio job is done. Audio scrubbing in the Source ViewerThis is useful when you're placing makers or setting mark-in and mark-out points for your media clips. Both video and audio tracks can be scrubbed in the Source Viewer. To activate audio scrubbing in the Source Viewer
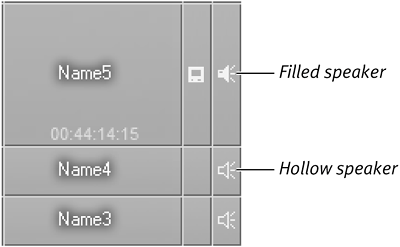
Audio scrubbing the TimelineThis type of scrubbing is a little more complex to activate, but it follows the same basic pathyou must press the Scroll Lock key to activate it. However, you then need to make sure the speaker icon on the track you want to hear is hollow, as shown in Figure 7.35. Here, the Name 4 and Name 3 tracks display a hollow speaker icon, and audio scrubbing will be heard on these tracks. Name 5 shows a solid speaker icon, and audio scrubbing will not be heard on this track. Figure 7.35. The track names showing both examples.
To set a Timeline track for audio scrubbing
|
 Tip
TipEAN: 2147483647
Pages: 245