| Once you've adjusted the mark-in and mark-out points of the media clip and added any markers, it's time to send the clip to the Timeline. In Chapter 5, I showed you how to send a Storyboard Sequence to the Timeline, but when you're using the Source Viewer to send the clips, you have several options open to you that involve using the Insert Source into Master button or drag and drop, or creating a three- or four-point edit. Sending to an empty Timeline Placing a clip on an empty Timeline or at the end of the current Sequence is relatively simple, and once you have trimmed your clip in the Source Viewer, you are ready to go. To send a clip to an unoccupied part of the Timeline 1. | Place the timeline cursor where you want the clip to land by either using the navigation keys or the mouse.
| 2. | Check that the correct clip is loaded into the Source Viewer and that the mark-in and mark-out points have been set as required.
| 3. | To send the clip to the Timeline, do one of the following:
- Click once on the Insert Source into Master arrow
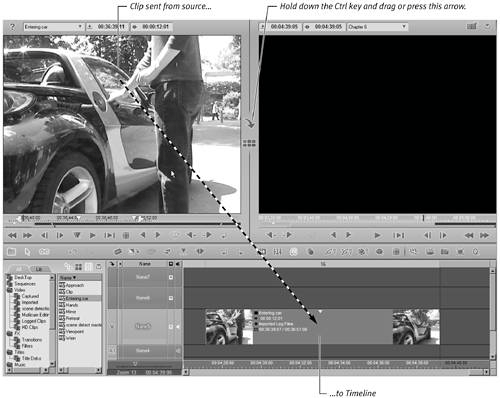
 The clip is now sent from the Source Viewer to the current Timeline position (Figure 6.49). The clip is now sent from the Source Viewer to the current Timeline position (Figure 6.49).
Figure 6.49. The media clip is sent from the Source Viewer or dragged with the mouse. 
- Hold down the Ctrl key and drag the clip from the Source Viewer to the Timeline by holding down the left mouse key.
|
 Tip Tip
Sending to an occupied Timeline Sending to a Timeline that already contains clips is basically the same process as sending to an unoccupied Timeline; however, here the Overwrite Style and Film Style rules need to be observed more carefully. As you will recall from the "Edit Styles" sidebar earlier in this chapter the basic difference between these two styles is that Film Style shuffles the already existing clips up to make room for any new clips you insert, while the Overwrite Style simply writes over the existing clips. Which one you use will depend on what exists on the Timeline.  Tip Tip
To insert a clip in Overwrite Style Do one of the following: - Place the timeline cursor on an empty part of the Timeline but with a clip directly to the right and click the Insert Source into Master button
 . .
Clicking this button places the clip at your chosen position; the clip on the right moves up to make room for the new clip (Figure 6.50).
Figure 6.50. Inserting a clip at the start of the Timeline. 
- Place the timeline cursor on a clip that is already on the Timeline and click the Insert Source into Master button
 . .
This action cuts the original clip at the cursor position and then places the Source Viewer clip there, thus overwriting the original clip and any other clips to the right for the duration of the newly inserted clip (Figure 6.51).
Figure 6.51. Inserting a clip into the another. 
To insert a clip in Film Style 1. | Check to make sure the appropriate audio and video tracks are active.
| 2. | Toggle Film Style on and then do one of the following:
- Place the timeline cursor on an empty part of the Timeline but with a clip directly to the right and click the Insert Source into Master button
 . .
- This places the clip at your chosen position while respecting both the mark-in and mark-out points of the clip. However, the clip on the right moves up to make room for the new clip. In all respects, this performs the same as when you use Overwrite Style.
- Place the timeline cursor on a clip that is already on the Timeline and press the Insert Source into Master button
 . .
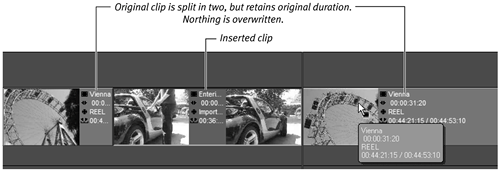
- This cuts the original clip at the cursor position, moves everything to the right, cuts up the Timeline, and then places the Source Viewer clip there. The original clip stays the same length and is not overwritten but is split on either side of the inserted clip (Figure 6.52).
Figure 6.52. Inserting a clip in Film Style. 
|
|

 Tip
Tip

