| The process of getting rid of unwanted material either at the beginning or end of a clip is called trimming. In Chapter 5, you accomplished this using the Clip Viewer, but it's also possible to trim a clip in the Source Viewer or on the Timeline using the Trim Editor. Trimming on the Timeline This is a quick and dirty method and is only really useful when you see a clip that you can quickly and simply adjust on the Timeline. This method lacks sophistication and can lead to alignment problems if you are using Film Style (see the "Edit Styles" sidebar for details on Film Style and Overwrite Style), but any errors you make are only an Undo key away from being fixed. To trim a clip on the Timeline 1. | Select the clip you want to trim by clicking once on its mark-in or mark- out point.
If you are in Overwrite Style, a red handle appears on the clip (Figure 6.24); a yellow one appears if you are in Film Style (Figure 6.25).
Figure 6.24. A red handle on the mark-out point of a media clip indicating Overwrite Style. 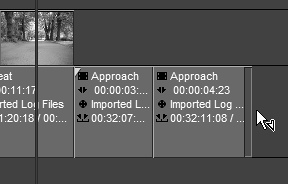
Figure 6.25. A yellow handle on the mark-out point indicating Film Style is toggled on. 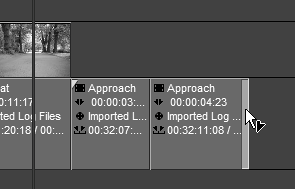
| 2. | While holding the left mouse button down, drag the clip to the left or to the right.
If you are in Overwrite Style, a gap appears (Figure 6.26).
Figure 6.26. In Overwrite Style, a gap is left when a mark-out point is dragged down the Timeline. 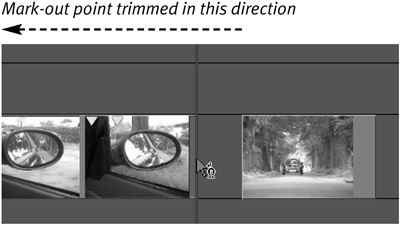
If you are in Film Style, any neighboring clips to the immediate right shuffle up or down the Timeline depending on which way you are dragging the mark-in or mark-out point (Figure 6.27).
Figure 6.27. In Film Style, no gap is left because the neighboring clips follow the trim down the Timeline. 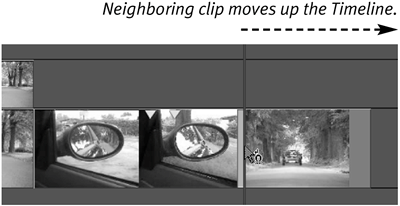
| 3. | You can now drag this clip in or out depending on whether you want to increase or decrease its length. However, you can only increase the clip to its clip-in point where the physical length of the media ends.
Unless there is a non-real-time filter on the clip, as you drag it, the result is displayed in realtime in the Master/Timeline Viewer.
| 4. | When you are happy with the result, release the mouse key.
|
 Tips Tips
If you hold down Ctrl and use the keyboard arrows, you will be able to trim the clip one frame at a time (Figure 6.28). Figure 6.28. The Trim tool activated by holding down the Ctrl key and pressing an arrow key. 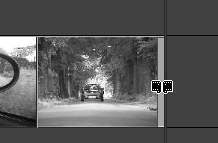
If you are seeing performance problems when trimming clips on the Timeline, see the sidebar, "Automatic Picon Update" later in this chapter for a possible solution.
Edit Styles Liquid Edition has two edit styles that affect the way clips behave on the Timeline: Overwrite Style and Film Style. You can change between these by clicking once on the toggle button that sits between the Source and Master/Timeline Viewers. Overwrite Style:  This is the default setting when Liquid Edition is launched. It does pretty much what it says on the boxany clip you send or drag to the Timeline will overwrite the clip(s) at the timeline cursor's position. This is the default setting when Liquid Edition is launched. It does pretty much what it says on the boxany clip you send or drag to the Timeline will overwrite the clip(s) at the timeline cursor's position. Figures 6.29 and 6.30 show a new clip, Entering car. It is brought into the Timeline and overwrites the first few seconds of the Approach clip. Figure 6.29. A new clip dragged onto and over the first clip on the Timeline. 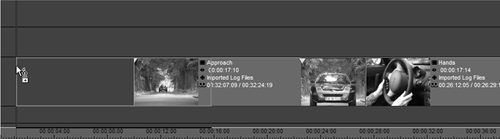
This is the default editing style. Clips sent to the Timeline do not affect the order or (more importantly) the audio synchronization of the other clips. Figure 6.30. Once the media clip is dropped, the beginning of the original Timeline media clip is overwritten. 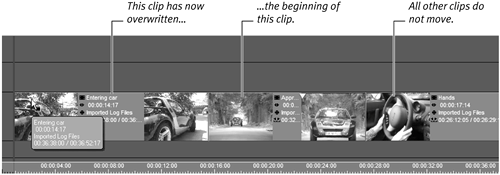
Film Style:  This mode is slightly more complex, and using it on a crowded Timeline is slightly risky. Primarily, you'll use Film Style to insert a clip without losing any footage from any clips already on the Timeline. However, because added clips will move any existing clips to the right (or "up" the Timeline), to make room for any new clips, you can lose audio sync if not all of the tracks are active (see the "Audio Sync Issues" sidebar for details). This mode is slightly more complex, and using it on a crowded Timeline is slightly risky. Primarily, you'll use Film Style to insert a clip without losing any footage from any clips already on the Timeline. However, because added clips will move any existing clips to the right (or "up" the Timeline), to make room for any new clips, you can lose audio sync if not all of the tracks are active (see the "Audio Sync Issues" sidebar for details). Figure 6.31 shows the Entering car clip dragged to the mark-in point of the Approach clip. Once it is placed here, all other clips to the right move up the Timeline. Figure 6.31. In Film Style, all other clips will move when a new clip is placed on the Timeline. 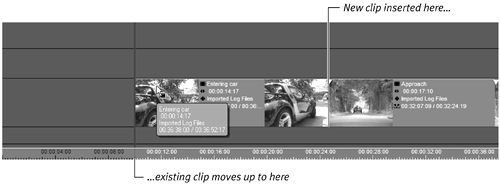
Figure 6.32 shows what happens if the same clip is sent to the start of the Timeline. When you release it, all the clips move up to make room for this new clip, but a gap is also created. This is because gaps are also included in the Timeline when you are using Film Style. Figure 6.32. Gaps are counted as Timeline elements when in Film Style. 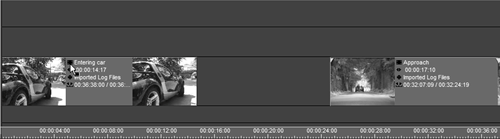
If you try to close this gap by dragging one clip toward the other, you will see a No Entry symbol (Figure 6.33) indicating that this is not allowed. In fact, you can only drag clips "down" the timeline when you're in Film Style. To move them the other way, you have to switch back to Overwrite Style. Figure 6.33. Dragging a clip up the Timeline toward other clips is not allowed in Film Style. 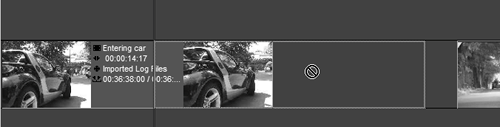
|
Audio Sync Issues As discussed earlier, all the examples in this chapter show clips that have embedded audioaudio that is included inside the video trackfor a very good reason. When clips have embedded audio, they are in the safest format for being trimmed and manipulated in Film Style. This is because a media clip with an embedded audio track will not be affected by a clip inserted in Film Style. It will always remain in sync. Figure 6.34 shows a clip dragged onto a part of the timeline containing a clip that has its audio track disbanded (the opposite of embedded). If you compare the marker on the Approach clip to the marker on the audio track, you can see that they are now badly out of sync because the new clip has pushed the old video clip up the Timeline while leaving the audio track untouched. Figure 6.34. When not embedded, audio can be sent out of sync when using Film Style. 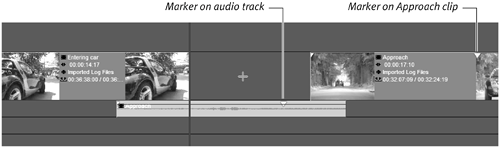
For more details on audio options when you are editing the Timeline, see Chapter 7. But at least for the rest of this chapter, I recommend that you work only with embedded audio. |
Trimming with the Trim Editor The Trim Editor is an area that some users find challenging, partly because of Liquid Edition's single-track Timeline, and partly because visualizing the final trim can cause some confusion. However, the problems only really occur once transitions are used; I deal with this problem more fully in Chapter 8. For the moment, we'll restrict this part of the tutorial to looking at trimming a hard cut. To use the Trim Editor 1. | Make sure the timeline cursor is approximately over the point where the two clips meet on the Timeline. The Trim Editor always opens to the nearest cut, and that might not always be the one you think it is, so check first.
| 2. | Open the Trim Editor by clicking the Trim Editor button  or by pressing F5. or by pressing F5.
The Trim Editor opens displaying the left clipthe outgoing clipin the left window and the right clipthe incoming clipin the right window (Figure 6.35).
Figure 6.35. The Trim Editor 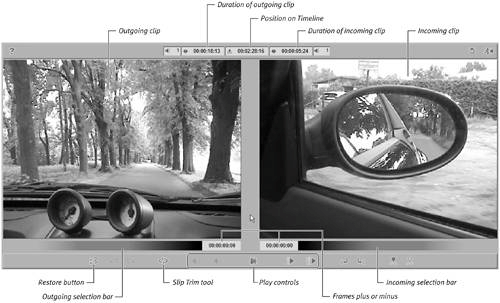
By default, both the left and right windows have a black selection bar directly underneath them. This means that both clips will be trimmed at the same time.
Preparing the Timeline for the Next Task In order to better understand the Trim Editor, prepare your Timeline by placing a short clip on the Timeline, and then by dragging the timeline cursor to about the half-way point of this clip. Insert a cut by pressing the Add Edit button  or by pressing the Period key (.) on the keyboard. or by pressing the Period key (.) on the keyboard. This needs to be done because clips cannot be trimmed beyond their own physical length; however, a clip that has been cut using the method above will not suffer this limitation and will help you to better understand how the Trim Editor functions. |
| 3. | Press the right arrow key.
Both clips advance one frame up the Timeline; the left one (the outgoing clip) will get longer if it can, the right one (the incoming clip) will get shorter.
| 4. | Press the left arrow and the opposite will happen.
In both cases, any neighboring clips to the immediate right are not affected by the changes made here (Figure 6.36).
Figure 6.36. A simple trim of both clips at the same time. 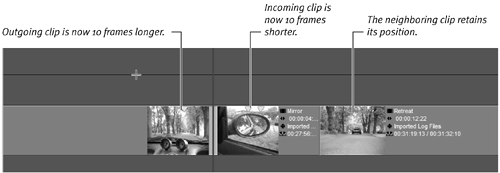
In both cases the Frames counter increases in the positive direction for each clip.
|
Trimming only one clip The previous example trims both clips together, but you may only want to make one of these clips longer or shorter. To do this, you simply activate either the Outgoing or the Incoming selection bar (see Figure 6.33). However, when you trim only one clip at a time, the neighboring clips to the right will shuffle up or down the Timeline, depending on which way you trim your clip. This is similar to the Film Style edit detailed in the "Edit Styles" Sidebar earlier in this chapter. To adjust just one clip using the Trim Editor 1. | Open the Trim Editor by pressing F5.
| 2. | Press the P key once to switch the black bar to the right window.
This selects the incoming clip to be trimmed (Figure 6.37).
Figure 6.37. The black bar on the right means only the incoming clip will be trimmed. 
| 3. | Press the P key twice to switch the black bar to the left window.
This selects the outgoing clip to be trimmed (Figure 6.38).
Figure 6.38. The black bar on the left means only the outgoing clip will be trimmed. 
| 4. | To decrease the size of the clip by one frame, press the right arrow now.
Any neighboring clips to the immediate right shuffle down the Timeline so that no gap is created.
Pressing the left arrow does the opposite.
|
Tips - Clicking the Play preview button
 in the center of the clip will play approximately 2 seconds of the incoming clip followed by 2 seconds of the outgoing clip in a continuous loop. in the center of the clip will play approximately 2 seconds of the incoming clip followed by 2 seconds of the outgoing clip in a continuous loop.
- Clicking the cursor in the middle of both windows will highlight both selection bars.
- The buttons
  will jump the trim 10 frames forward or backward. will jump the trim 10 frames forward or backward.
- You cannot trim beyond the physical length of a clip.
Editing with Slip Trim If you want to trim a clip on the Timeline but you don't want all the neighboring clips moving up or down, you must use the Slip Trim tool. This allows you to edit both the mark-in and mark-out points of a clip or clips at the same time. To edit with Slip Trim 1. | Open the Trim Editor by clicking the Trim Editor button  or by pressing F5. or by pressing F5.
| 2. | Select which clip you want to trim by pressing the P key to move the selection bar. By default, you will edit both clips at the same time (Figure 6.39).
Figure 6.39. Slip Trim for both clips. 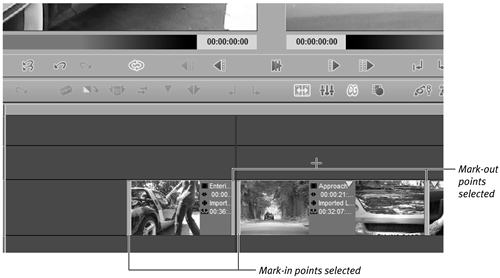
| 3. | Click the Slip Key button  . .
The mark-in and mark-out points for the selected clip(s) become highlighted.
| 4. | Press the left or right arrow key to adjust the clips down or up the Timeline respectively.
Because both mark-out points are being adjusted by an equal amount to the mark-in point, any neighboring clips to the immediate right are not affected by the changes made here.
|
Tips This procedure is identical when selecting just the incoming or just the outgoing clip and the results are the same. Only those clips being trimmed will be affected; the rest of the Timeline will remain intact. Again, you cannot trim beyond the maximum length of a clip.
Automatic Picon Update By default, Liquid Edition updates the heads and tails of each clip automatically. If you have a slightly slower system, this may cause you considerable performance problems when you're trimming a clip on a particularly crowded Timeline. To turn off the automatic updates, simply right-click anywhere in the Timeline and select Timeline Properties from the pop-up menu. Then, switch to the General tab and uncheck the Automatically update Timeline Picons box (Figure 6.40). Figure 6.40. Manually updating the heads and tails. 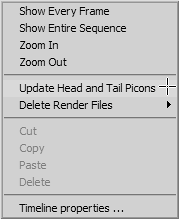
Once this has been set, you will need to manually update the Picons each time you trim a clip. To do this, simply right-click anywhere in the Timeline and select Update Head and Tail Picons from the pop-up menu (Figure 6.41). Figure 6.41. Automatic update of Timeline Picons is shown here as toggled on. 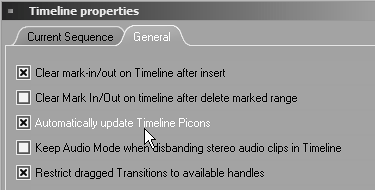
|
|