4.3.12 Miscellaneous forms
Miscellaneous forms
You'll find a number of forms in almost any application, such as login dialogs, message boxes, about dialogs, and so forth. If you are tired of designing those forms yourself, check out this foundation class category. You might find just what you are looking for.
About Dialog Box
| Class | _aboutbox |
| Base class | Form |
| Class library | _dialogs.vcx |
| Parent class | _form |
| Sample | ...\Samples\Vfp98\Solution\Ffc\dialogs.scx |
| Dependencies | _base.vcx, registry.vcx, dialogs.h |
This class is a simple but very useful About dialog. It displays the application name as well copyright and trademark information and the name of the application's licensed user. Figure 32 shows a slightly modified version of the About dialog box.
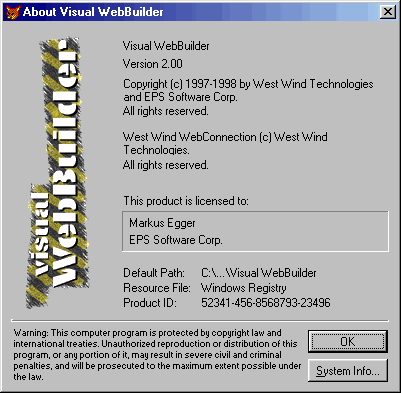
Figure 32
. A subclassed version of the About dialog box.One of the interesting aspects of this class is the System Info button. It uses the Registry object to display essential information about the user's system (see Figure 33).
You can pass a number of parameters to this class when instantiating it to set the most important display options. Here they are in sequential order: Application name, version (character), copyright, trademark and the name of the bitmap for the logo. The user information is retrieved by two methods GetRegisteredCompany() and GetRegisteredOwner(). Overwrite these methods to provide your own user information. Simply return the information from these methods. The class will automatically use these methods to retrieve the name. Note that you are not supposed to execute the default behavior of these methods.
Item Locator
| Class | _locateitem |
| Base class | Form |
| Class library | _dialogs.vcx |
| Parent class | _dialog |
| Sample | ...\Samples\Vfp98\Solution\Ffc\dialogs.scx |
| Dependencies | _base.vcx, dialogs.h |
Most business applications deal with files, but sometimes files can't be found when they are needed. In this case, we have to ask the user for his assistance to locate the file. The Locate Item dialog shown in Figure 34 provides a nice interface to do this quickly and easily.
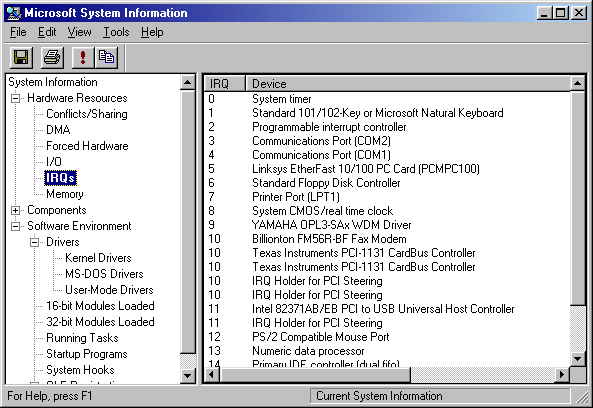
Figure 33
. The Microsoft System Information application.
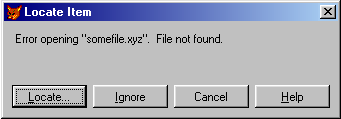
Figure 34
. The Locate Item dialog in action.When the user clicks the Locate button, a standard GetFile() dialog is displayed. The selected file is returned (see below). If the user clicks Ignore, the specified file name is returned. The Cancel button behaves quite differently it returns a NULL value. In order to make the Help button work, you have to set the HelpContextID property of the form.
The way you have to use this class might seem a little strange at first sight, but it demonstrates a great way to resolve the old problem of returning values from a class. You first have to create a dummy object, which will be used to store the return value. Next, you create the dialog and pass the dummy object as well as the file name you are looking for to the new object. Optionally, you can pass a third parameter a logical parameter that indicates whether a GetFile() dialog (.F.) or a GetPict() dialog (.T.) should be used. The latter allows the user to preview the image he selects.
Here's an example:
LOCAL loForm, loDummy
loDummy = Create("line")
loForm = NewObject("_locateitem","_dialogs","",loDummy,"somefile.xyz")
IF VarType(loForm) = "O"
loForm.Show()
? loDummy.cFileName
ELSE
RETURN
ENDIF
I use a line object as the dummy object because this is a lightweight class. I hate to waste resources! The last line checks for a property called cFileName, which has been automatically added to the dummy object. This property is used to return the selected file name. I now have to check whether the file really exists (the user could have fooled me!). If everything is fine, the application can go on with its own business.
Keywords Dialog Box
| Class | _keywords |
| Base class | Form |
| Class library | _dialogs.vcx |
| Parent class | _dialog |
| Sample | ...\Samples\Vfp98\Solution\Ffc\dialogs.scx |
| Dependencies | _base.vcx, dialogs.h, _movers.vcx |
If you allow the user to query data by keywords, you might be interested in this dialog (see Figure 35). It uses a Mover object (see below) to display and select a list of keywords that are defined in a table.
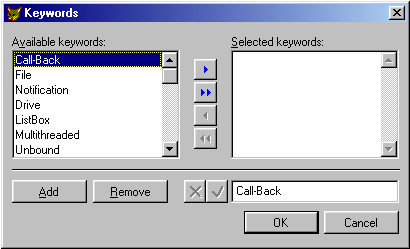
Figure 35
. The Keywords dialog using the standard Keywords table.By default, all keywords in the Keywords dialog box come from a default Keywords table called Keywords.dbf, which is located in the Visual FoxPro Component Gallery directory. You can specify a different table by setting the cDBFName property. The table structure is simple. There is only one character field called "keyword". It has a length of 30 characters, but you can make it longer if you want. As you can see in Figure 35, the user can add keywords on the fly. If you use a keywords table, the new items are automatically added and conserved for future use.
The use of the Keywords dialog box class is somewhat similar to the Item Locator class. It, too, needs a dummy object to receive the selected items. However, the implementation differs. Instead of passing the dummy object as a parameter, it must be assigned to a property once the dialog is created:
LOCAL loForm, loDummy
loForm = NewObject("_keywords","_dialogs")
IF VARTYPE(loForm) # "O"
RETURN
ENDIF
loDummy = CreateObject("line")
loForm.oKeywords = loDummy
loForm.Show()
? loDummy.cKeywords
As you can see, the dummy object is assigned after the dialog object is created but before it is displayed. The next steps are similar to the ones taken by the Item Locator class. A new property is added to the dummy object (in this case cKeywords) and the selected keywords are stored to this property. Multiple values are space-delimited. This also means that keywords can't have spaces.
Messagebox Handler
| Class | _msgbox |
| Base class | Custom |
| Class library | _dialogs.vcx |
| Parent class | _custom |
| Sample | None |
| Dependencies | _base.vcx |
The Messagebox Handler class is a simple wrapper for the cumbersome Visual FoxPro MessageBox() function. It allows setting properties such as cMessage and cTitle to specify the displayed text. You can also specify the messagebox type through the numeric nType property. The numeric value is identical to the second parameter of the MessageBox() function. Furthermore, you can specify whether a beep should sound every time a messagebox is displayed, by setting the lBeep property.
Once all these properties are set, you can display the messagebox using the object's Show() method. The return value of this method indicates the user's choice. It is identical to the return value of the MessageBox() function. You can also pass all the properties I listed above as parameters to the Show() method. I hardly ever pass any parameters other than the caption (parameter 1), because I think it defeats the purpose of this class.
The main advantage arises from the fact that you can redisplay a messagebox as often as you want. You can even change single parameters such as the title before you redisplay the messagebox. I usually end up instantiating the Messagebox Handler object once. The only property I usually have to change is the message. I created a subclass of the Messagebox Handler that has a couple of custom methods such as YesNo(), OK() and YesNoIgnore(). Their purpose is simple they temporarily set the nType property to display the proper dialog type. This helps tremendously because I can never remember the proper type values. Here's the YesNo() method's code.
LPARAMETERS lcCaption
LOCAL lnOldType, llRetVal
lnOldType = THIS.nType
THIS.nType = 36 && Yes/No buttons, question mark icon
llRetVal = IIF(THIS.Show(lcCaption)=6,.T.,.F.)
THIS.nType = lnOldType
RETURN llRetVal
As you can see, this method not only uses a default item type, but it also returns a simple .T. or .F. instead of a numeric code, because this is yet another code I can never remember.
The other methods are essentially similar.
Password Dialog Box
| Class | _login |
| Base class | Form |
| Class library | _dialogs.vcx |
| Parent class | _form |
| Sample | ...\Samples\Vfp98\Solution\Ffc\dialogs.scx |
| Dependencies | _base.vcx, dialogs.h |
The Password dialog box provides a simple login screen (see Figure 36). To use it, you must have a table with user names and passwords. The dialog will then tell you whether the user specified a name and a matching password. Obviously, you have to tell the dialog what table and what fields to use. You can do this by setting a couple of properties:
LOCAL loForm, loDummy
loForm = NewObject("_login","_dialogs")
IF VARTYPE(loForm) # "O"
RETURN
ENDIF
loDummy = CreateObject("line")
loForm.oPassword = loDummy
loForm.cDBFName = "..\..\data\employee.dbf"
loForm.cTable = "employee"
loForm.cFieldName = "last_name"
loForm.cPassword = "first_name"
loForm.Setup()
loForm.Show(1)
? loDummy.lValidPassword
In this example, I first create the Password Dialog object. I then create a dummy object that will be used to store the return value. This dummy object must be assigned to the oPassword property of the Dialog object. Next I specify the table name and its alias. This is done through the cDBFName and cTable properties (the documentation has these wrong!). I also specify the user name field (cFieldName) and the password field (cPassword). Finally, I have to call the Setup() method to decorate the object before I display it.
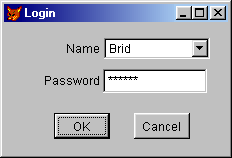
Figure 36
. A simple login screen.Once the dialog is closed, the dummy object has a new property that has been added on the fly. The property is called lValidPassword, and it's a logical property that indicates whether the user knew the matching password. It's up to the programmer to take appropriate action at this point.
Splash Screen
| Class | _splash |
| Base class | Form |
| Class library | _dialogs.vcx |
| Parent class | _form |
| Sample | ...\Samples\Vfp98\Solution\Ffc\dialogs.scx |
| Dependencies | _base.vcx |
The Splash Screen foundation class provides a form that can be displayed for a certain time when the application starts up. This form typically displays an image and the application name (see Figure 37). The duration the form is displayed can be specified through the nDuration property (in seconds). By default, the splash screen is displayed for three seconds. That's a good setting for most applications. It gives the user enough time to read everything but it doesn't bother him later on when he's already seen it. I recommend using this default setting.
You can set the background image and the application title in a subclass, or simply before the screen is set visible, like so:
LOCAL loForm
loForm = NewObject("_splash","_dialogs")
loForm.Picture = "myapp.bmp"
loForm.label1.Caption = "My Great Application 1.0"
loForm.nDuration = 5
loForm.Show()

Figure 37
. A sample splash screen.As you can see, this class is relatively simple. Unfortunately, it has a weakness: The delay from clicking an application icon until the splash screen comes up (if you display it right away) is relatively long, because it takes a while to instantiate Visual FoxPro (even in the runtime version). Fortunately, there is another way to display a simple splash screen. Visual FoxPro 6.0 allows you to specify a splash screen image as a startup parameter. This native Visual FoxPro 6.0 feature has nothing to do with the Fox Foundation Classes. However, I thought it was worth mentioning anyway. The startup parameter must be specified like so:
"C:\Program Files\My Application\MyAppp.exe" -bMyApp.bmp
This parameter would be specified in Start menu shortcuts. Typically, the Visual FoxPro Setup Wizard would create it. The special part is the "-b" parameter, followed by the name of the bitmap file name (no space between the "-b" parameter and the file name!).
EAN: 2147483647
Pages: 113