4.3.5 Data query
Data query
For all data-handling tasks that are beyond the capabilities of simple data navigation, there are the Data Query objects. In this category you will find filter objects as well as complex conflict catchers that help to resolve problems when updating data.
Conflict Catcher
| Class | _conflicts |
| Base class | Form |
| Class library | _dataquery.vcx |
| Parent class | _form |
| Sample | ...\Samples\Vfp98\Solution\Ffc\conflicts.scx |
| Dependencies | _base.vcx, _data.h |
The Conflict Catcher is a form class that represents a dialog, which can be displayed if a data conflict was found and had to be resolved by the user (see Figure 12).
Once the dialog is instantiated, the StartCheck() method initiates the conflict checking. This method is called automatically if the lAutoCheck property is set to .T. (which is the default). Once the user decides how to resolve a conflict, the class searches the next conflict until there are no more conflicts, or until the user clicks on the Close button.
By default, the selected alias is checked for conflicts. If a different alias should be checked, the CursorAlias property can be set to specify a different data source.

Figure 12
. The Conflict Catcher allows the user to choose which versionof the data to select.
You cannot change many things in subclasses. The most likely thing to change is the user interface. If you do this, make sure you use the original buttons, rather than calling methods in the parent object (form), because some of them have significant behavior attached to some of their methods.
If you want to change the way conflicts are identified, you can overwrite the NextConflict() method. This method accepts one parameter, which specifies the record number on which the method is supposed to start checking. In other words, all records before this number have already been checked. If this parameter isn't passed, you need to start checking at the current record. The rest is pretty much up to you.
Distinct Values Combo
| Class | _cbodistinctvalues |
| Base class | ComboBox |
| Class library | _dataquery |
| Parent class | _combobox |
| Sample | ...\Samples\Vfp98\Solution\Ffc\datalook2.scx |
| Dependencies | _base.vcx, _data.h |
The Distinct Values combobox is much like a regular combobox, but it automatically populates the combobox's drop-down menu with the different values that can be found in the field specified as the combobox control source. So if you have a table with a field that stores country information, you can use the Distinct Values combobox to let the user enter the country information, and the combobox will automatically show all the countries that have already been referenced. See Figure 13.
The combobox is automatically populated in the Init() method. It is hard to repopulate the combobox once it's instantiated.
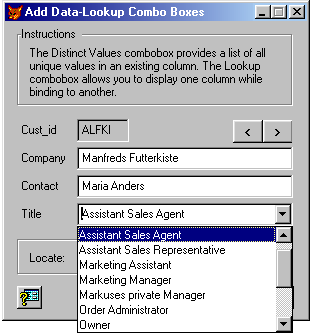
Figure 13. The combobox was automatically populated from the values
found in the active table.
Filter Dialog Box
| Class | _filterdialog |
| Base class | Form |
| Class library | _table.vcx |
| Parent class | _form |
| Sample | ...\Samples\Vfp98\Solution\Ffc\datasort.scx |
| Dependencies | _base.vcx, _table.h |
The Filter dialog box is a simple interface designed to create complex filter statements. To do so, the user doesn't have to know anything about SQL or dBASE syntax. Figure 14 shows the dialog in action. The easiest way to use the dialog is to drop the Filter Dialog Box button on a form. This button will automatically bring up the Filter dialog (see below). If you do not want to use the Filter Dialog Box button, you can simply instantiate the class and make it visible.
When the class is initialized, it automatically analyzes the active filter and displays it. The class also analyzes the current data session and allows access to all the available cursors and tables. Those tables and their fields are then displayed in the Filter dialog box interface. Fields that are indexed are marked with a leading asterisk (*).
When you click OK, the full filter expression is created by the SetupFilter() method. The expression is then stored in the cFilter property. Once this filter is created, the button checks whether the form or object that instantiated the Filter dialog box has a special way of setting filters. To do so, the object needs to have a SetFilter() method. The source object must be passed to the Filter dialog box when initialized. Of course you could pass references to different objects. Here are some examples:
oFilter = NewObject("_filterdialog","_table","",THIS)
oFilter = NewObject("_filterdialog","_table","",THISFORM)
oFilter = NewObject("_filterdialog","_table","",oCustomerForm)
The source object can be used only if the form has a SetFilter() method. If there is no source object or that object doesn't have a SetFilter() method, the Filter dialog box sets the filter itself by issuing a SET FILTER TO command.
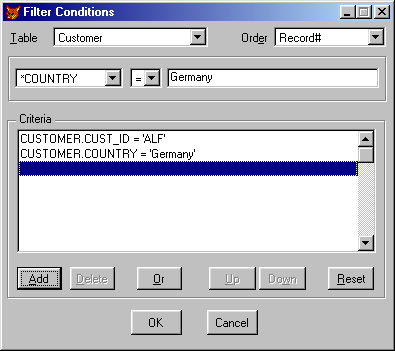
Figure 14
. The Filter Conditions dialog box constructing a filter for all German customers whose IDs start with "ALF".The Filter Conditions dialog box is quite complex, so I recommend using care when subclassing it. You can change the interface by moving things around, but it is hard to replace buttons and other interface components because most controls on this form have directly attached behavior.
I mostly stay away from customizing the behavior of this class. The only thing I do quite frequently is to limit the tables or fields displayed. Limiting the number of tables is relatively easy. Let's say we have two tables in our data environment, but we want only one to show up in the Filter dialog box. The table combobox is populated in the form's Activate() event. To change the displayed tables, you can overwrite this event in a subclass like so:
DoDefault()
DIME THIS.aDbfs[1]
THIS.aDbfs(1) = "Customer"
THIS.cboTables.Requery()
THIS.cboTables.Value = 1
Of course you can set the array dimension differently to set more than one table. You might also find a need to limit the available fields. This can be done by overwriting the SetTags() method:
DoDefault()
DIME THIS.aFlds[2]
THIS.aFlds[1] = THIS.OnTag("CUST_ID")
THIS.aFlds[2] = THIS.OnTag("COUNTRY")
When this method is called, the table those fields belong to is selected, so you can display different fields based on the selected work area, like so:
DoDefault()
DO CASE
CASE Alias() == "CUSTOMER"
DIME THIS.aFlds[2]
THIS.aFlds[1] = THIS.OnTag("CUST_ID")
THIS.aFlds[2] = THIS.OnTag("COUNTRY")
CASE Alias() == "EMPLOYEE"
DIME THIS.aFlds[3]
THIS.aFlds[1] = THIS.OnTag("EMP_ID")
THIS.aFlds[2] = THIS.OnTag("LAST_NAME")
THIS.aFlds[2] = THIS.OnTag("FIRST_NAME")
ENDCASE
The OnTag() method is a simple method that checks whether the referenced field is indexed. If so, an asterisk (*) is added to the field name.
Filter Dialog Box Button
| Class | _filterbutton |
| Base class | CommandButton |
| Class library | _table2.vcx |
| Parent class | _dialogbutton |
| Sample | ...\Samples\Vfp98\Solution\Ffc\datasort.scx |
| Dependencies | _base.vcx, _table.vcx, _table.h, _table2.h |
The only purpose of the Filter Dialog Box button is to bring up a filter interface. This can be the Filter dialog box, the Filter Expression dialog box or your own class. The lExprDialog property specifies whether to use the Filter Expression dialog box (.T.) or the regular Filter dialog box (.F.). In the case of the Filter Expression dialog box, the class name is specified in the cExprClass property; otherwise the cFilterClass property specifies the class to be used. Either way, the cClassLib property specifies the library where the referenced class is stored. If you want to invoke your own filter class, simple specify the class name in those properties.
Filter Expression Dialog Box
| Class | _filterexpr |
| Base class | Form |
| Class library | _table.vcx |
| Parent class | _form |
| Sample | ...\Samples\Vfp98\Solution\Ffc\datasort.scx |
| Dependencies | _base.vcx, _table.h |
The Filter Expression dialog box allows the user to set the filter; it's similar to the Filter dialog box. The major difference is that the user can directly enter the filter expression without using an expression builder interface. This form of filtering is more powerful than the Filter dialog box, but it also requires the user to be familiar with dBASE or SQL syntax. The Filter Expression dialog box interface (see Figure 15) also allows bringing up an expression builder. This expression builder can be either the Filter dialog box (see above) or the native FoxPro GETEXPR dialog. You can select between the two expression builders through the lAdvanced property. The default is .F., which brings up the Set Filter dialog box.
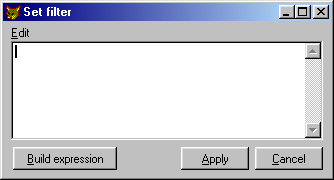
Figure 15
. The Filter Expression dialog box. The "Build expression" buttonbrings up an expression builder interface.
The cFilter property holds the current filter expression, which is essentially the same as the contents of the edit box in Figure 15. This property is not populated by the SetupFilter() method as incorrectly mentioned in the documentation. The method SetFilterOnTable() is responsible for applying the filter to the current table. This method simply issues a SET FILTER command. I often find myself replacing the Filter dialog box with the Filter Expression dialog box. In this case, I was first passing a reference to the Filter dialog box to apply a filter through my own SetFilter() method. The Filter Expression dialog box doesn't support this construction. Because I want to be able to use either one of the classes without changing the underlying source code, I overwrote the SetFilterOnTable() method to check for a calling object before executing the original behavior, like so:
IF VarType("THISFORM.oCaller") = "O"
IF PEMStatus(THISFORM.oCaller,"setfilter",5)
THISFORM.oCaller.SetFilter(THISFORM.cFilter)
ELSE
DoDefault()
ENDIF
ELSE
DoDefault()
ENDIF
I also added the oCaller property to my subclass and set this property in the Init() method if a caller object reference is passed.
The Filter Expression dialog box class also has a SetFilter() method. This method is used only when the Filter dialog box is brought up. The implementation of this method is rather simple. The passed filter expression is only stored to the cFilter property of the Filter Expression dialog box. The user can then make further modifications to the filter expression.
Find Button
| Class | _findbutton |
| Base class | Container |
| Class library | _table.vcx |
| Parent class | _container |
| Sample | ...\Samples\Vfp98\Solution\Ffc\dataqry.scx |
| Dependencies | _base.vcx, _table.h |
The Find button represents a full-blown search engine. The Find object provides the actual search behavior. Using the Find button class is rather easy. The class has a property called cFindString. In a typical scenario you would provide a textbox to allow the user to specify a search string. You write the contents of this textbox to the cFindString property of the Find button class. Now the user can click the Find button at any time to find the first record that matched the criteria.
You can specify the searched alias through the cAlias property. If you don't specify an alias, the currently selected data source is searched.
When searching for a certain string, many users expect the search to be case-insensitive, or vice versa. The Find button allows you to turn on case-sensitive searching through the lMatchCase property. By default, the entire table is searched. This can be slow. One of the easiest ways to speed up the search process is to skip the memo files. You can set this behavior using the lSkipMemos property. If you want to specify the fields to be searched in a less generic fashion, you can use the SkipField() method to identify individual fields, which are not supposed to be searched. You simply pass the name of the field you want to skip as a parameter.
By default, the first occurrence of the Find string is searched. If the search expression was found, the caption of the Find button changes to "Find next". The user can click the button again to find the next occurrence of the search expression. As soon as the cFindString property changes, the button's caption changes back to "Find" and the behavior switches back to finding the first occurrence.
After finding the last occurrence of the search string, the search usually stops. However, the search can continue at the beginning of the table if the lWrapAround property is set to .T.
As mentioned above, the Find button uses the Find object's search behavior. See below for more information about the Find object.
Find Dialog Box
| Class | _finddialog |
| Base class | Form |
| Class library | _table.vcx |
| Parent class | _form |
| Sample | ...\Samples\Vfp98\Solution\Ffc\dataqry.scx |
| Dependencies | _base.vcx, _table.h |
The Find dialog box provides the same functionality as the Find button, but it also provides an interface for all the provided functionality (see Figure 16). Just like the Find button, the Find dialog box uses the Find object to actually search data (see below for more information about the Find object). The Find dialog box features all the properties and methods of the Find button.
One of the few unique properties of the Find dialog box is lAdvanced. This property specifies whether the user interface allows selecting the scanned table. This property is set to .T. by default. If you set it to .F., the second combobox will be hidden and the dialog will shrink. You can set this property directly and the dialog will change instantly (this is accomplished by an assign method), or you can pass .T. or .F. to the class on Init(), which will automatically set the property.
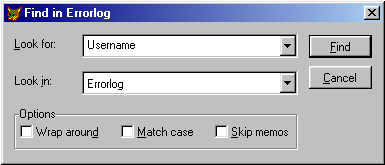
Figure 16
. The Find dialog box in advanced mode.Initially, the dialog has a Find and a Cancel button. Once an expression is searched and found, the caption of the Find button changes to "Find next". The user can press the button to repeat the search, or he can type a new value, which will reset the button's caption to "Find" and its behavior to finding the first occurrence of the specified expression.
When subclassing this class, I found myself changing only the interface. I imagine that some people might want to limit the tables available for searching. The easiest way to accomplish this is to set the cAlias property and disable the advanced mode so the user cannot select different data sources. If you want to show certain tables and hide others, you can do this in the Refresh() method of the Tables combobox. The combobox is automatically populated with all tables of the current data session. You can either execute the default behavior and remove certain tables afterwards, or you can overwrite the standard behavior altogether and replace it with your own code that populates the combobox. Note that the Refresh() method has to support one parameter, which is logical. It tells you whether or not the combobox should be repopulated. If the parameter is .F., don't repopulate the combobox. Here's some sample code that populates the combobox with two table names:
LPARAMETERS tlForceRefresh
IF THISFORM.lAdvanced
IF tlForceRefresh
THIS.Clear
THIS.AddItem("Customer")
THIS.AddItem("Employee")
THIS.AddItem(SPACE(8))
ENDIF
ENDIF
Note that an empty item was added at the end of the list. If the user selects this item, the currently selected work area will be searched.
This dialog is used as the default interface by the Locate button.
Find (Findnext) Buttons
| Class | _findnextbuttons |
| Base class | Container |
| Class library | _table.vcx |
| Parent class | _findbutton |
| Sample | ...\Samples\Vfp98\Solution\Ffc\dataqry.scx |
| Dependencies | _base.vcx, _table.h |
The Findnext Buttons class is a subclass of the Find button, so there aren't many differences between the two. In fact, the only difference is that there is a second button with the caption of "Find next". Instead of changing the caption of a single Find button, the Findnext button is enabled when the first occurrence of the search expression is located.
Find Object
| Class | _tablefind |
| Base class | Custom |
| Class library | _table.vcx |
| Parent class | _table |
| Sample | ...\Samples\Vfp98\Solution\Ffc\dataqry.scx |
| Dependencies | _base.vcx, _table.h |
The Find object is a behavioral object that provides functionality to locate records in a data source. The Find object is used by the other entire Find foundation classes described in this section. It can also be used by itself.
Searching for the occurrence of a certain expression is relatively easy. Here's a simple example:
oFind = NewObject("_tablefind","_Table.vcx")
oFind.cFindString = "quiz"
? oFind.DoFind()
The DoFind() method does all the actual work. It will return .T. when it finds the Find string, and .F. if the expression couldn't be located. Note that this example requires a data source to be in use. As you can see, the expression to be searched is specified in the cFindString property. You can set a couple of additional properties to influence the way the object searches the data source. LMatchCase allows specifying (you guessed it) whether the search should be case-sensitive. LSkipMemos specifies whether memo fields should be searched (.F.) or whether they should be skipped (.T.). By default all memo fields are searched. When searching large data sources, this can be very slow.
Once an occurrence of the search expression is found, the property lFindAgain is set to .T.. This sets the object in a different mode. From now on, the DoFind() method searches the rest of the cursor rather than starting the search at the very beginning. If this is not the desired behavior, you can reset this property to .F., and the next search will also start at the beginning of the table. This is done automatically whenever a new Find string is specified, so typically you don't have to worry about it. When doing continuous searching, the user will eventually reach the end of the table. In this case the search typically stops. However, you can specify that the search should continue at the beginning of the table after encountering the end-of-file. This can be done through the lWrapAround property.
In the example above, I didn't specify a data source, so the object searched the current work area. However, you could also specify a different alias using the cAlias property.
By default, all fields in a cursor are searched. To do so, the object converts all those fields to type character (internally only, of course). As mentioned above, you can specify that all memos should be skipped, which is important for performance reasons. You can also exclude specific fields from the search using the SkipField() method. The method requires one parameter, which is the name of the field to be skipped. The class internally remembers all the fields to be searched in the cFields property, which is populated by the SetFields() method. This method fires every time the data source changes or fields are excluded using either the lSkipMemos property or the SkipField() method. The contents of the cField property might seem strange at first sight. Here's an example:
[~]+ALLTRIM(STR(XREF_ID,12,4))+[~]+TEXT+[~]
This defines that two fields are included in the search (XREF_ID and TEXT). If you take a closer look, you'll see that this is a valid FoxPro expression. Depending on the values of each record, the string (it is always a string!) to which this expression evaluates will be different. Here's a possible example:
~8.0000~Visual FoxPro quiz ~
Note that the fields are separated by tildes (~). Considering the possible complexity of the expression in cFields, and considering the number of times this property gets repopulated, I recommend staying away from changing the contents of this property yourself!
When a search fails (the expression cannot be located), a beep sounds and a wait window is displayed, indicating that the Find string couldn't be located. You might prefer a different kind of interface; luckily it's easy to exchange the interface. A method called ShowMessageNotFound() is responsible for the displayed message. You can simply overwrite it (ignore the default behavior) to create your own interface.
Locate Button
| Class | _locatebutton |
| Base class | CommandButton |
| Class library | _table2.vcx |
| Parent class | _dialogbutton |
| Sample | ...\Samples\Vfp98\Solution\Ffc\dataqry.scx |
| Dependencies | _base.vcx, _table2.h, _table.vcx, _table.h |
The Locate button is used to instantiate a Find dialog. By default, the Locate button uses the Filter dialog box. You can specify the class you want to use through the cClass and cClassLib properties of the Locate button.
Using the Locate button is trivial. You can drop the button on any form or container. The only precondition is that the current data environment must have at least one cursor open.
Lookup Combobox
| Class | _cbolookup |
| Base class | ComboBox |
| Class library | _dataquery.vcx |
| Parent class | _combobox |
| Sample | ...\Samples\Vfp98\Solution\Ffc\datalook2.scx |
| Dependencies | _base.vcx, _data.h |
The Lookup combobox is automatically populated with values from a table in the order of a certain other table field. I like to use this combobox to navigate in a data source as long as there is only a small number of records.
The Lookup combobox can be used easily. The class has four properties that specify the values of the combobox. Display_Column specifies the name of the field with the values to be displayed. Lookup_Table specifies the table the field belongs to. Return_Column specifies the field name, which will be used for data binding. So you could display the CustomerName field from the Customer table and bind the combobox to the CustomerID field. Additionally, you can specify a certain display order through the Order_Column property. The contents will then automatically be sorted according to the values of the specified field.
Figure 17 shows the Lookup combobox in action.
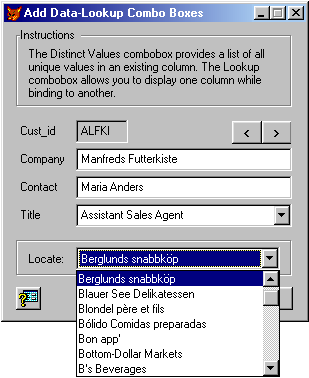
Figure 17
. A Lookup combobox is used to navigate within a small data source.As mentioned earlier, I like to use the Lookup combobox for navigation as long as the number of records is reasonably low (the actual number of records I consider "reasonably low" depends on field length and machine performance). However, navigational behavior is not native to the Lookup combobox. Fortunately, it is quite easy to add it in a subclass. The following code must be added to the InteractiveChange() event:
DODEFAULT()
LOCAL lcFieldName
lcFieldName = THIS.Return_Column
LOCATE FOR &lcFieldName = ALLTRIM(THIS.Value)
THISFORM.Refresh
However, I don't recommend using this class for large data sources, for simple performance and resource reasons.
QBF (query-by-form)
| Class | _qbf |
| Base class | Container |
| Class library | _dataquery |
| Parent class | _container |
| Sample | ...\Samples\Vfp98\Solution\Forms\qbf.scx |
| Dependencies | _base.vcx |
Querying by Form is a quick and easy way of providing an interface to locate data. In a query-by-form scenario, a regular data entry form is used to specify an example of the data one is looking for. This sounds more complicated than it is. Figure 18 shows an example of a typical data entry form displaying real data. To search for a certain record in this form, I can press the Enter QBF button to blank out all the fields. By doing so, I switch the form into query mode and I can now enter my search criteria. For instance, I could specify "Markus" as the first name and "Austria" as the country. To actually search for this data, I press the Query button. Then the QBF object not only locates the first record that matches my criteria, but it applies a filter based on the values I specified, so I can easily navigate all the records that match my example.
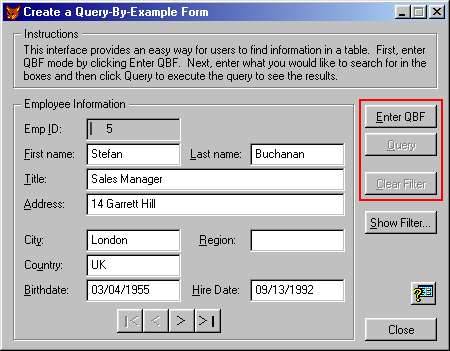
Figure 18
. A data entry form that uses the QBF object.It might sound as if the QBF object isn't generic, and that a lot of preconditions must be fulfilled in order to use it. Quite the opposite is true! When starting a QBF session, the object starts a transaction, appends a blank record to the current data source (which will then be used to specify the search values) and, when the Query button is pressed, a filter is automatically constructed from the specified values and applied. The transaction is then immediately rolled back to leave your data the way it was before. Because the object uses transactions, it can be used only for tables in a database. FoxPro does not support transactions for free tables.
Using the QBF object is trivial. You can drop it on any form or container containing data that is part of a FoxPro database. The object has only one property, which specifies the table name (QBF_Table). Setting this property is optional. If left blank, the selected work area is searched.
The object has only one custom method ParseCondition() which is reserved for internal use only.
Sort Dialog Box
| Class | _sortdialog |
| Base class | Form |
| Class library | _table2.vcx |
| Parent class | _form |
| Sample | ...\Samples\Vfp98\Solution\Ffc\datasort.scx |
| Dependencies | _base.vcx, _table2.h, _table.vcx, _table.h |
The Sort dialog box (see Figure 19) allows the user to sort data in ascending or descending order based on a certain field. The class automatically analyzes the current data environment and displays a list of indexed fields. Fields that don't have an index cannot be used for sorting.
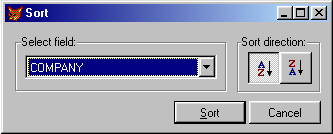
Figure 19
. The Sort dialog box being used to sort the Customer table.The class uses the Sort object (see below) to change the actual sort order. Therefore, the Sort dialog box class is rather simple. So far I haven't found many reasons to subclass this class. Making changes to the interface is trivial. Other than that, I found that I changed only the fields displayed in the Select Field combobox. This combobox is populated in the combobox's Init() event (not to be confused with the form's Init() event!). Here's an example of how the combobox can be populated with different fields:
IF DoDefault()
THIS.Clear
THIS.AddItem(C_NONE_LOC)
THIS.AddItem("CONTACT")
THIS.AddItem("COMPANY")
THIS.AddItem("COUNTRY")
ELSE
RETURN .f.
ENDIF
Note that I call the default behavior before I populate the combobox. This is important because there are a couple of additional settings that are initialized in the Init() event of the original combobox. Once the original behavior executes, I clear the contents of the combobox and add my own tag names. Note that the first item I add is a standard item, which allows the user to reset the sorting sequence (sorted by record number). The names I add must match the exact index tags.
The fact that the displayed index names must match the exact tag names in the database isn't very elegant. Index names might be rather cryptic, while we want to display a nice English name to the user. Changing this behavior is somewhat more difficult because you have to create a multi-column combobox like so:
IF DoDefault()
THIS.Clear
THIS.RowSourceType = 1
THIS.ColumnCount = 2
THIS.ColumnLines = .F.
THIS.BoundColumn = 2
THIS.ColumnWidths = Alltrim(Str(THIS.Width-10)) + ",0"
THIS.RowSource = C_NONE_LOC + "," + C_NONE_LOC +;
"," + "Contact Person" + "," + "CONTACT" +;
"," + "Company Name" + "," + "COMPANY" +;
"," + "Home Country" + "," + "COUNTRY"
ELSE
RETURN .F.
ENDIF
First of all, I change the row source type to 1, which allows me to specify the entire source for the combobox as a single string. I believe this makes it easier to handle small, multi-column comboboxes. If you prefer another kind of row source, feel free to use it. I then set the column count to 2, disable the column lines, bind data to the second column, and set the width of the first column to the width of the entire combobox and the width of the second column to 0 in order to hide it from the user. I can now use the first column to display a nice English description, while the second column holds the actual field name, which will be bound to the Value property of the combobox and that's what the class uses. Finally, all I have to do is set the row source to a string of comma-separated item values.
Sort Dialog Box Button
| Class | _sortbutton |
| Base class | CommandButton |
| Class library | _table2.vcx |
| Parent class | _dialogbutton |
| Sample | ...\Samples\Vfp98\Solution\Ffc\datasort.scx |
| Dependencies | _base.vcx, _table2.h, _table.vcx, _table.h |
The Sort Dialog Box button is yet another subclass of the abstract Dialog button. Its only purpose is to instantiate a Sort dialog box. By default, the Sort Dialog Box foundation class (see above) is instantiated, but you can specify a different class through the cClass and cClassLib properties.
Sort Object
| Class | _tablesort |
| Base class | Custom |
| Class library | _table.vcx |
| Parent class | _table |
| Sample | ...\Samples\Vfp98\Solution\Ffc\datasort.scx |
| Dependencies | _base.vcx, _table.h |
The Sort object provides the entire sort behavior utilized by the Sort foundation classes introduced in this section. However, you can also use it by itself.
You need only one method to sort a table in a certain way: DoSort(). This method accepts four parameters, most of which are optional. Here's an example that sorts the Customer table based on the Country field:
USE Customer
oSort = NewObject("_tablesort","_table.vcx")
oSort.DoSort("country")
Note that the first parameter is the actual field name, rather than the index tag name. The object is actually smart enough to use the appropriate index tag. If there is more than one index tag for this field, the object might have a hard time finding the correct one. In this case you should specify the index tag name through parameter 3, like so:
oSort.DoSort(,,"mycountry")
If neither a field nor a tag name is passed, the Sort object checks for the current control and uses its control source for sorting.
The second parameter specifies the table alias. You need to pass it only if the table you want to sort is not the selected one. Finally, parameter 4 can be used to specify whether you want to sort descending (.T.) or ascending (.F.). You can also specify this through the lDescending property, which might be easier when you provide a standard user interface that uses a control such as a checkbox to specify descending order.
If you want to reset the sort order to 0 (sorted by record number), you can use the RemoveSort() method. If you want to reset a table other than the currently selected one, you have to pass the alias as a parameter.
Sort Selector
| Class | _sortselect |
| Base class | Container |
| Class library | _table2.vcx |
| Parent class | _container |
| Sample | ...\Samples\Vfp98\Solution\Ffc\datasort.scx |
| Dependencies | _base.vcx, _table2.h, _table.vcx, _table.h |
The Sort Selector changes the sorting sequence from ascending to descending, and vice versa. The field to be sorted on is retrieved from the currently active control in the currently active form. The Sort Selector is typically used in toolbars (see Figure 20).

Figure 20
. The Sort Selector is typically used in toolbars.SQL Pass Through
| Class | _execsp |
| Base class | Custom |
| Class library | _dataquery.vcx |
| Parent class | _custom |
| Sample | None |
| Dependencies | _base.vcx, _data.h |
This class is used for SQL Pass Through and can execute stored procedures on the host database. The actual connection to the server must be handled by the user. Here's an example of how you can connect to a SQL Server database:
hConnect = SQLCONNECT ('pubs','sa','')
This opens the "pubs" database and returns a handle called "hConnect". Now you can use this handle in the SQL Pass Through class. You have to configure this class on Init(). Here's an example:
DIME aParams[3]
aParams[1] = "'172-32-1176'"
aParams[2] = "'S'"
aParams[3] = "'E'"
oSQL=NewObject('_ExecSP', '_dataquery.vcx', '',;
'UpdateAuthorName', hConnect, @aParams, 'tResult')
The first parameter that is passed to the Init() method (parameter 3 in the NewObject() function) specifies the stored procedure name. Parameter 2 is the connection handle we created before. Parameter 3 is an array of parameters that is passed to the stored procedure. This array must be passed by reference. Parameter 4 specifies the alias of the result cursor. This parameter is optional and defaults to "sqlresult".
Now that the object is configured, we can execute the stored procedure using the DoSQL() method:
oSQL.DoSQL()
Through the lUseSQLSyntax property, you can specify whether or not SQL Server Exec syntax should be used (default = .F.). This influences the construction of the command that is passed to SQL Server. You can also query the constructed command using the GetSQL() method. This method returns the SQL command as a string.
EAN: 2147483647
Pages: 113