15.4 From use cases to objects
From use cases to objects
So far, our development cycle hasn't produced any real challenges. We created the requirements matrix, and we made the relatively straightforward transition to the use cases. All of these steps were done in plain English, following some simple rules. Now we have to make the transition from written text to objects and classes. This step isn't quite as straightforward. Experience is a major factor, and you can't get experience by reading a book. However, note that this isn't a real modeling issue. Whether you create an object model or start implementation right away, you always have to somehow make the transition from requirements in plain English to source code (which typically involves objects and classes). So chances are, you already have quite a bit of experience and only need to know how to convert all your imaginary objects into the proper format.
Speaking of the way you think of objects: Don't change the way you think about applications. In the following sections, I'll present a three-tiered approach that closely matches my personal preferences. However, the purpose of this chapter isn't to teach you three-tiered development (see Chapter 9 if you are interested in this topic) or my way of doing things, but I want to demonstrate how an application is planned.
The ultimate goal of making an object model is to determine what objects we have, what classes they are created from, what methods and properties they have, when objects are instantiated, how they interact, how they depend on each other, and more. This is a lot of information, and the only sources of information we have are use cases written in non-object terms. The only real way to tackle this problem is to split up the task and start with small steps. The easiest thing to do is to identify objects without worrying about classes or any other issues.
As mentioned above, I like to develop my applications using a three-tiered architecture. This kind of architecture splits an application into three different layers the user interface, the business logic and the data storage. I started using this approach to get a more flexible and easier-to-maintain implementation. However, it turns out that this logical separation of object types works out great for modeling as well. In fact, it works out so well that I recommend splitting any application into these three groups (logical and organizational groups, that is), even if the final implementation won't be three-tiered. There is a simple reason for this recommendation: Identifying objects in some tiers is easier than identifying objects in others. Objects are extremely easy to identify in the interface layer, so this is the place to start.
Identifying interface objects
Interface objects are well defined in our use cases in several places. The most obvious examples of interface objects are the GUI sketches. All the forms we identify there can be assumed to be objects. We then have the scenarios where we can easily see all stimuli given by the actors. In order to give those stimuli, actors need some kind of interface. So identifying those objects isn't difficult. Sometimes, interface components are also described in the software reactions or other parts of the use case. However, this information is typically duplicated and can be found in the list of stimuli as well.
Let's have a look at the sample use case we created in the previous chapter. Here are the relevant parts that define interface objects:
Use Case 001: Purchase Tickets
Scenario:
Required GUI and GUI Sketches:
As you know by now, we would have more interface sketches and more descriptive text in a complete use case, but we don't need this for the current example. I highlighted all interface definitions in the use case using bold and italic type. The actual interface sketch is another interface definition, of course, but as you can see in this example, the information can already be found in the actual scenario.
By now, we have identified the following interface objects (I already removed the duplicates):
- Ticket purchasing form
- Movie selection combobox
- Ticket quantity display component
- Ticket quantity entry form
- Price display component
- Pay-by-cash button
- Pay-by-credit-card button
- Ticket printing component
- Receipt printing component
As you can see, this list is still somewhat disorganized. It includes entire forms as well as single controls, and screen-interface components as well as print components (after all, printing is also part of the interface). The list even includes some objects that might be one and the same object in real life, such as the "Ticket quantity display component" and the "Ticket quantity entry form." Our application most likely has one form that displays the number of available tickets and allows us to specify the number of tickets to be purchased.
However, none of these issues are of concern at this point. We have identified the most important objects, which was the main goal. At this point, we have some duplicate objects but we are also lacking detail. Having too many objects is never a problem. We can always merge objects later on. Lacking detail isn't a real problem, either. We do not yet know all the objects we will use in our form, but at this point we aren't concerned whether a form is closed with an OK button or a link on a Web page. That's what we call an "implementation detail" (see below). However, we do need to know that there is an interface component that allows us to see all scheduled movies and the number of available tickets. We also need to know that there is an easy way to differentiate between payment by credit card and payment by cash. (At this point we've identified these components as buttons, but we'll abstract that further in the next iteration.) This information is essential to our design. No matter how we finally implement it, we will always have those components.
Figure 1 shows the first object diagram that documents these basic findings. I organized the objects we've identified by putting them in a three-column layout. Column 1 shows everything that's supposed to be a form, column 2 shows everything that's some kind of important object on a form, such as buttons and comboboxes, and column 3 shows all objects related to printing.

Figure 1
. The beginning of an object diagram showing all interface objectsidentified so far.
Note: I manually created a package called "User Services" in my Rose model. However, Rose also supports three-tiered diagrams (the Visual Modeler uses them by default) that organize classes in various views automatically. This is nice for small projects and demos, but I don't like it for real-life modeling challenges because three-tiered diagrams do too many things automatically and it is hard to create proper packages. You can optionally switch Rose (and Visual Modeler) into three-tiered-diagram mode using the Diagram tab of the Options dialog.
Figure 2 shows the Rose browser and the current packages and classes. With the exception of the Use Case View node, this view would be very similar when using Visual Modeler or three-tiered diagrams.
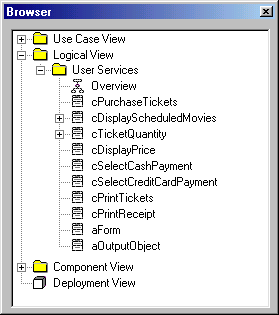
Figure 2
. The Rational Rose browser shows the current structure of our model.Note that all the objects identified so far have well-formatted class names, but this is not often the case. Initial class names typically are very relaxed and don't follow a lot of conventions or rules (like "Purchase Ticket Form"). This is fine at this point. In fact, for Rational Rose, "Purchase Ticket Form" is a valid class name. Keep in mind that Rose isn't a Visual FoxPro-specific tool, and after all, there could be a tool that allows spaces in the class name. It's up to you whether you want to use descriptive names or more Visual FoxPro-like names. At the beginning of the modeling stages, it might be more intuitive to use descriptive names, but this is only my personal preference. In the following examples, I will start to use proper class names according to our definitions in Chapter 6, mainly because it makes writing this book much easier (I'm not writing everything sequentially, you know).
Now that we have all the objects, we can start to work with them. We can already identify classes that have things in common (I already did that by grouping them properly) and we can merge some classes because we already decided that the two ticket-quantity forms should really be only one object. Figure 3 shows a more organized class diagram.
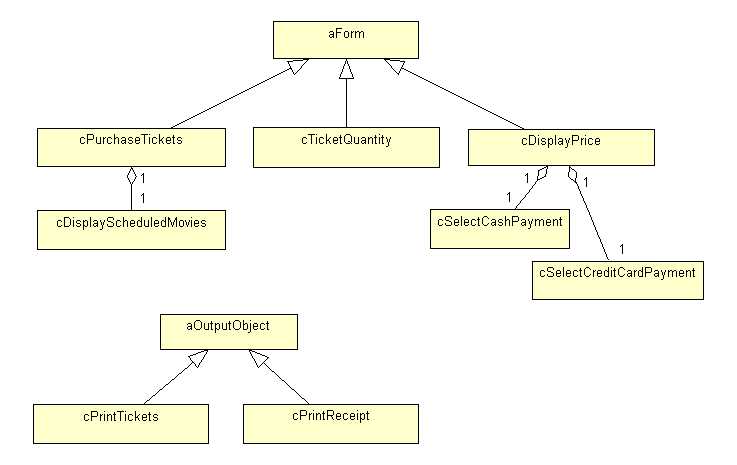
Figure 3
. Starting to organize our model, introducing generalization (subclassing)and aggregation (containership).
If you compare Figure 3 to Figure 1 you'll see some drastic changes. In fact, I'm sitting here trying to decide whether the transition was too rapid. However, I really didn't do very much. Let's have an in-depth look at the changes.
First of all, I introduced two new classes: aOutputObject and aForm. When I looked at Figure 3 it was rather obvious that all the forms were, well, forms. As you know by now, all Visual FoxPro forms should be subclassed from another form class rather than starting from scratch every time. For this reason I introduced an abstract form class that I use as a parent class for the forms I've identified so far. Later on, we will add more subclasses, and the inheritance structure will possibly grow more complex. For now, this level of detail is enough.
I also introduced a parent class for both print objects, because in all my projects I subclass a standard print object to implement the exact details. Even if I didn't use this object, I would still recommend using it. But then again, I'm just documenting my way of doing things. If you don't use a common print object and if you wouldn't have identified one, it would be fine.
Figure 1 also contains a third group of objects: the interface controls. You might now wonder why I didn't create a common parent class for these objects. Well, there is a very simple reason: Just step back for a moment and think of the diagram as classes you will actually implement in Visual FoxPro, rather than just a diagram. What base class would those classes be made of? Buttons? Well, what about the list of scheduled movies? This would hardly be a button. Comboboxes? Not the payment-selection components! The truth is, we don't know what classes they are going to be made of, and at this point we don't even care. This is yet another implementation issue that we don't need to solve immediately. It's just important to have a reminder that these objects are essential. For this reason I modified these classes slightly. I stopped calling them buttons or comboboxes to make them a little more abstract.
There's only one last detail to explain: the relationship between the interface controls and the actual forms. I introduced aggregation relationships (in Visual FoxPro we would call this "containership"). The diamond end of the line points to the container (or the object that owns the other object). Using aggregation, I defined that the cDisplayScheduledMovies object lives inside the cPurchaseTickets form. I even specified the multiplicity and defined that one form has exactly one instance of this list. (In Rose you can do this by simply right-clicking the end of the line and choosing "Multiplicity.") I did the same thing with the payment-selection objects.
Figure 3 provides quite a bit of information, including a number of classes, inheritance structures and other relationships. And all we did was to examine the stimuli we defined in our use cases. It's been a fairly smooth transition so far.
Identifying the data services
Now it gets a little harder: We need to identify the data that is involved in our actions. The use cases describe data in various places, which makes it a little harder to find. The software reaction column describes some data, but typically it provides too little detail and accuracy. Post-conditions often hold more information because they summarize what has been changed. Also, the precondition section will list data that must exist when we start our scenario. However, the sections that describe data aren't limited to the ones I just mentioned.
The next page shows our example use case with all references to data highlighted in bold and italic. As you can see, use cases typically describe data vaguely and coincidentally, UML doesn't provide a default notation for data. You can simply describe a record as an object, describe the fields as properties, and create your own stereotypes for data, but that doesn't get you too far. To do serious data modeling, I recommend using one of the specialized tools for this field. However, we still need to document the data part in our object model. We do this at a very simple level, identifying all data objects and dependencies.
Use Case 001: Purchase Tickets
Preconditions:
- A movie schedule has to be set up (as described by use case 021).
- The sales rep has to be logged into the system (see use case 018).
- The scenario described in this use case cannot be executed more than three hours
before the movie starts.
Scenario:
Post-Conditions:
- The number of purchased tickets has been subtracted from the ticket pool.
Here's a list of all data entities I found in the above use case:
- Movie Schedule
- Movies
- Ticket Pool per Theater
- Tickets Purchased
- Total Price
- Ticket Prices
During data modeling, we would identify a number of tables and relations, and we would see that some of those items are simply fields in another table (such as the number of tickets purchased and the total price). Again: Those things would be determined in a data-modeling step that I won't cover in this book (how convenient). Figure 4 shows an object diagram that documents the existence of data and some basic relations that have been discovered in the data-modeling step.
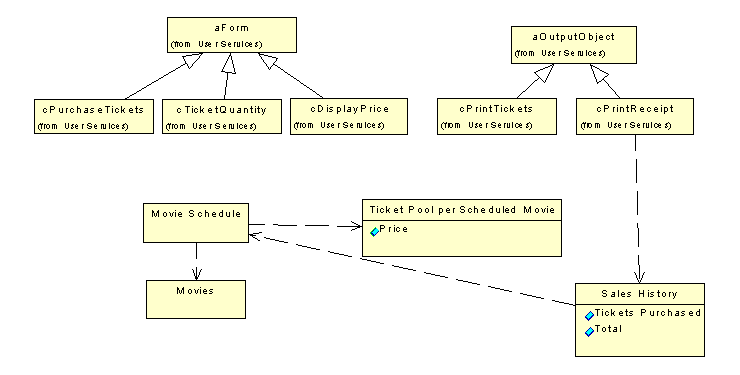
Figure 4
. We create another scenario to document some of the data issues, but we leave further details to specialized data-modeling tools.Note that Figure 4 isn't a modified version of the first diagram, but a completely new diagram describing only this particular issue. In fact, I even created a new package called "Data Services" that I use to organize all data entities. If you look closely, you'll see that some of the items in Figure 4 have a remark because they are from a different package. Rose adds this remark automatically.
In this diagram, I left out some details such as the objects contained in the forms. I could have also left out the inheritance relationship to the abstract form and the abstract print object, but I thought it might help me to find my way around my own diagrams. (I'm not a good artist. Can you tell?)
When creating this new diagram, I reused the classes I already had. To do so, I simply dragged the classes from the Rose browser and dropped them on my diagram. Rose automatically knows about all relations previously set up, such as inheritance in this example. I then added new objects for the data items. Don't just add new objects to a diagram using the toolbar. In this case, Rose creates new classes that it manages internally. If you then update the previously created classes, those updates will not show up in your second diagram, which would defeat the purpose of modeling altogether. Figure 5 shows the Rose browser displaying the entire model structure so far. If your model (given that you follow the examples on your computer at home) shows more classes, you've done something wrong and your model won't work (see below how Rose handles classes)!
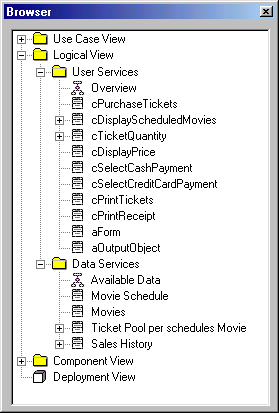
Figure 5
. The Rose browser displaying our model.Identifying the middle tier
So far the ride has been pretty smooth, but it's about to get bumpier. I've always found it more difficult to identify the middle-tier objects (the logic) and to put them in an order that makes sense. The basic idea is to identify all places where the application is required to do something by itself as a reaction to a stimulus. So in theory, we can simply look at the second column of our use case scenario to find all the behavioral objects. In real life, however, it's more difficult. If we investigate our use case closely, we see that some of the required information is scattered over the entire use case. For instance, we know we'll need to invoke the "Verify Credit Card" use case if the customer pays by credit card. Of course, the system should be smart enough to do this automatically. However, we didn't describe this particular requirement in the reaction column (column 2), but rather in the stimuli column (column 1). To find these logical steps, look for phrases such as "if then ", " checks for ", " calculates " and the like.
The next page shows our use case one more time, with all descriptions of middle-tier objects highlighted in bold and italic.
Use Case 001: Purchase Tickets
Preconditions:
- A movie schedule has to be set up (as described by use case 021).
- The sales rep has to be logged into the system (see use case 018).
- The scenario described in this use case cannot be executed more than
three hours before the movie starts.
Scenario:
Post-Conditions:
- The number of purchased tickets has been subtracted from the ticket pool.
Looking at this use case, we can identify the following objects:
- Check for Scheduled Movie Time object
- Retrieve Scheduled Movies object
- Retrieve Number of Available Tickets object
- Calculate Price object
- Calculate Change object
- Initiate Printing object
- Invoke Credit Card Processing object
As you might recognize immediately, many of these objects don't make sense. Why would we have two different objects to check for scheduled movie times and for scheduled movies? Most likely, this would be one object. Why would we have two objects to calculate the price and the change? On the other hand, would we really have only one object to initiate printing the tickets and the receipt? I'd say we need at least two different objects to take care of the job. But then again: Should those objects be defined in this scenario, or would they be defined by some other use case? The same is true for the credit card object.
This is where the ride gets bumpy and your experience needs to come in. A number of the questions I raised above can be answered right away by making some educated guesses. I can tell you right away that we only need one object to handle the movie schedule and another one to calculate prices and change. The answers about the print and credit card objects are harder to answer. I'm pretty sure those objects are defined elsewhere, but how could we know yet? For this reason, I would design them as separate objects at this point. Having too many objects is better than having too few. Consolidating objects later on is much easier than introducing new ones. So as a rule of thumb, always create separate objects if you are in doubt. In a later stage of design, you can identify objects with common behavior and consolidate them. Over time, you'll develop a pretty good feeling about such issues, and designing the middle tier will be much more straightforward.
Here's a list of all middle-tier objects I would identify using my experience:
- Movie Schedule object
- Ticket Pool object
- Price Calculation object
- Ticket Printing object
- Receipt Printing object
- Credit Card Processing object
This list is essentially different from the list above, but if you think about it, it makes more sense to have one object to maintain the movie schedule. This object can easily be capable of telling us what movies are scheduled, whether we are in the three-hour range and other things the current scenario doesn't require, such as setting up the schedule. This object might even be able to handle the ticket pool for those movies. However, we don't know that yet (and of course it depends on your personal preference). I designed a separate ticket pool object.
Figure 6 shows our new object model, including all middle-tier objects and a first indication of their dependencies. Unfortunately, it doesn't give an indication of the flow of events and the relation to the other objects we've already identified.

Figure 6
. Some business logic objects and a first indication of their dependencies.Now we need to figure out how these objects fit into our interface and data scenario. Figure 7 tells us more about that.
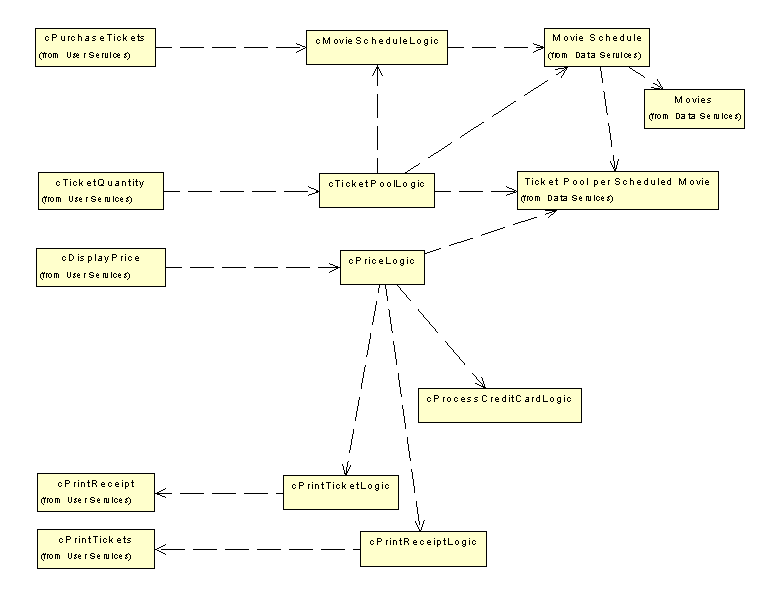
Figure 7
. An overview of the most important objects so far.This diagram might be somewhat confusing at first sight, but it really isn't. Here are some guidelines I used when drawing the diagram: First of all, I placed all the interface objects to the left. I didn't display all the details, such as the contained objects. These things were well documented in a previous diagram, so there is no need to repeat them here. In the middle, I placed all the middle-tier objects (as the name suggests), and to the right, all data objects. In this case, a three-tiered diagram would make this more obvious, but as I mentioned above, these diagrams have some serious restrictions, so I organize regular class diagrams as if they were three-tiered diagrams.
Figure 7 also gives us a rough overview of dependencies. Note that these dependencies are somewhat different than the ones shown in previous diagrams, because I changed them to invoke the new objects. Previously we had direct dependencies from the interface objects to the data objects. Now, all the dependencies go from the interface to the middle tier, from the middle tier to the data, or they stay within one tier. Every dependency that skips the middle tier would be a potential problem and defeat the purpose of three-tiered development (see Chapter 9).
Whenever I dropped existing objects on my diagram, the previously defined dependencies were automatically displayed. In Rational Rose, you can simply click on a dependency and press the Delete key, and it disappears. However, this doesn't mean that the dependency is deleted. It is only removed from the current diagram. If you really want to delete a dependency (as in this example), press Ctrl+D. This deletes the dependency from the model so you can create new and more appropriate dependencies. When you go back and look at the previously created diagrams, you'll notice that the dependencies have been removed from them as well. That's where the beauty of a modeling tool that adds meaning to the graphical diagrams comes in. The same is true for all items in Rational Rose.
Identifying methods and properties
By now we have a pretty good idea of all the objects we need. However, we know little about the sequence of events or the methods and properties we need. Properties are relatively easy to define because they are mentioned in the use cases as part of the data. When you discover data you want to attach to an object, simply add it by selecting "New Attribute" from the right-click menu. Note that all attributes are created as hidden by default, because this is how things work in most object-oriented environments.
Discovering methods is somewhat more difficult, but you still might be able to guess a fair amount of methods by reading through the use case. In the example above, we could easily guess that the movie-schedule object has a method to retrieve all scheduled movies within the next three hours.
However, there is a better way to discover this information: Sequence diagrams.
Sequence diagrams
Sequence diagrams define, in a very detailed manner, what objects are sending what messages to other objects (see Chapter 12). Because sending a message at the sender's end means calling a method at the receiver's end, we will automatically discover all the methods by simply thinking through the scenarios.
Creating sequence diagrams in Rose is trivial simply drop the existing objects (classes) onto the diagram. Note that sequence diagrams deal with object instances, while all our diagrams so far have dealt with classes (even though I called them objects because we haven't yet thought about our class structures and hierarchies). This means that a sequence diagram can show multiple instances of the same class. (I'm not using this capability in this scenario, but it's still important to know the difference.)
Figure 8 shows a simple sequence diagram. It doesn't describe the entire scenario as we've defined it in the use case, but only the first couple of steps.
Let's see what the diagram actually tells us. First of all, the user opens a form. We do not yet know how this happens. This information will be added in a later iteration. When the form gets created, it automatically updates an object that displays all movies scheduled for the next three hours. The object actually retrieves this information from yet another object by calling the GetMoviesForNext3Hours() method. Note the difference between the interaction initiated by the user and the methods that are called. The description "Opens" is simple text that I added. For the methods, I right-clicked on the arrow and chose "New Operation." This opens a dialog that allows defining a new operation (we'd call it a "method" in Visual FoxPro) and all details such as parameters. Once I've done that, I right-click the arrow again. Now, the shortcut menu shows the newly defined method and I can simply select it. The beauty of this is that I can now go back to my previously created class diagrams, and the new operation will show up there as well (given that I turned on the display of operations).
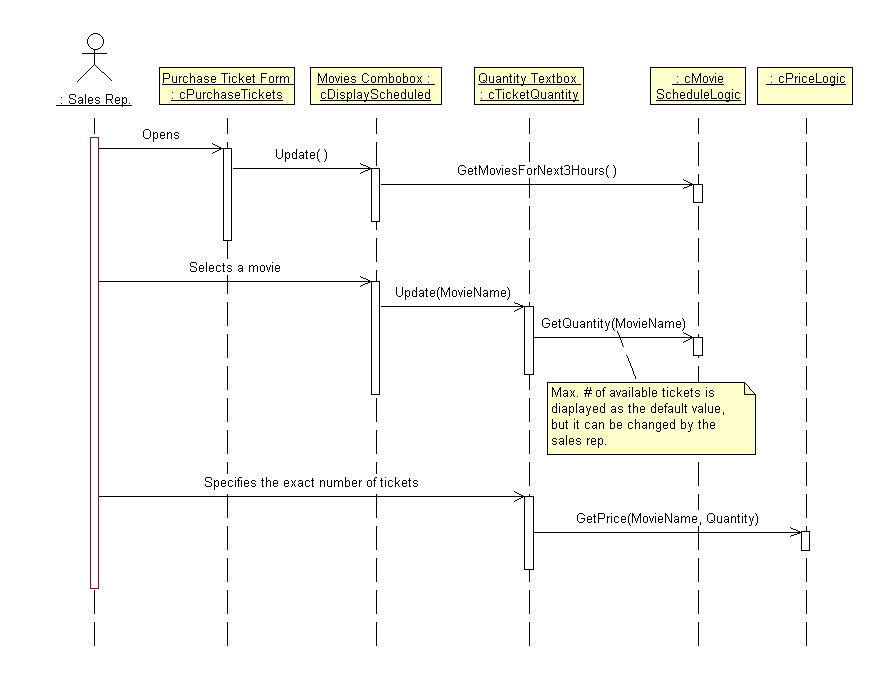
Figure 8
. A sequence diagram describing all messages that are sent.Going through the entire scenario step-by-step guides me to all the important methods and parameters quite naturally. That's why I like sequence diagrams so much. Unfortunately, they are supported only by Rational Rose and not by the Visual Modeler.
Identifying common scenarios
The steps described so far have to be repeated for every use case and every scenario. Eventually, you will end up with a detailed description of all objects and their methods. However, you can only program classes not objects. In fact, all the "objects" we have identified so far really are classes, but we treated them as if every class were instantiated only once. As you know, this isn't how object-oriented applications work. Quite the opposite is true! We want to reuse as much as possible and create class hierarchies.
To discover those hierarchies, you need to analyze the diagrams you've created so far and look for objects with common properties and methods, and for common scenarios. The easiest way to do this is to create diagrams that provide generic scenarios that are not directly related to the scenarios described in the use cases. A typical example would be to create a general scenario about how print operations work. Figure 9 documents such a scenario.
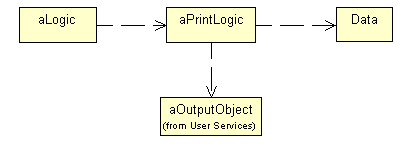
Figure 9
. A generic print process.In this scenario, some logic invokes special print logic that's responsible for gathering data, and finally an output object is invoked to print the result. Note that most of these classes haven't been introduced so far or have they? Well, in a way they have. Some classes we've created so far are specialized versions of the ones described in Figure 9. The cPrintTicketLogic and cPrintReceiptLogic classes are specialized versions of the print logic, for instance. This means that we can make them subclasses of the aPrintLogic class. Figure 10 shows this inheritance relation as well as some others we would discover if we followed the approach described above for other classes.
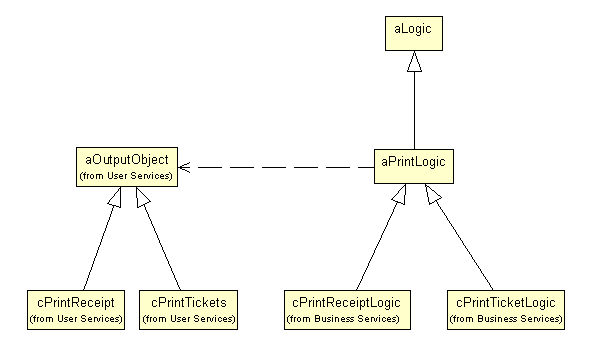
Figure 10
. Some inheritance trees we've just discovered.When discovering common parent classes, you need to go through all methods and properties and move the common ones to the parent class, rather than leaving them in the subclasses (after all, this is the idea of object-oriented programming, isn't it?). I recommend turning on the display of attributes and operations, so it is easy to see duplicates in the class diagrams.
Putting things together
The example above was the first step toward putting things together in the technical sense. You need to model scenarios that are not described in the use cases. Creating a generic print scenario was one example. How did I actually know I needed to model this scenario? Well, the need for that pretty much arose automatically. When creating sequence diagrams, for instance (which seems to be the most obvious place to discover missing information), you'll often discover that you have a good idea of what's supposed to happen, but you don't have a clue how to do it. This is a good time to start thinking about the missing information and to add scenarios that give a clear description.
After taking this step and the one described above, you'll manage to make the transition from single scenarios to an entire application or complex object system.
You don't want three-tiered models?
In the examples I've described so far, I've used a three-tiered approach because I like three-tiered applications. I recommend using this kind of architecture for all your business applications; however, if you don't like this approach, you can still do object modeling. This means that you may (or may not) take an entirely different approach to discovering your classes. You can still use the approach I described above to discover your objects in a three-tiered fashion, but you could then merge objects (typically the logic and the interface layer) to form an old-fashioned architecture.
Implementation details
Often you'll discover issues that are important but that shouldn't be included in the object model. Those issues are called "implementation details." We've already discovered a number of them. The question whether certain interface components should be buttons isn't relevant for the object model, for instance. Other typical implementation details would be properties and methods that have to be implemented because of some oddities of the used implementation tool. You wouldn't mention that an update method that gathers data to display it in fields has to call the form's Refresh() method, for example. If you used a different implementation tool (not Visual FoxPro), this would no longer be valid.
Identifying implementation details gets easier with more experience. However, it's not too hard to discover them if you keep questioning whether the objects, methods and properties you design would be the same if you'd used an entirely different implementation tool.
Nevertheless, implementation details shouldn't be forgotten, even if you are not quite at the implementation phase. The best thing to do is to add a comment to the item documentation or to stick a note in the diagrams. (Rose has special note items. See Figure 8.)
Keeping things language independent
In theory, the entire modeling step should be language independent. However, I've found this to be true only to a certain extent. The closer you get to completion of your model, the more language specific the model will become.
A number of different things influence the development environment or language in which a model can be implemented. Class naming is an obvious factor. Some languages are case sensitive, while others (such as Visual FoxPro) are not. Because Rational Rose has to work with all languages, it is case sensitive. This means that you can create two classes with identical names, but with different uppercase and lowercase settings. For Rose this is perfectly legal, but it would cause major problems in Visual FoxPro. And there is more to naming conventions some languages might support special characters, while others will not. Again, Rose supports them all.
Inheritance is another factor that makes models language specific. Of course, there are a number of object-based languages (such as Visual Basic) that don't support inheritance at all. A model that uses inheritance would be useless in those environments. Even if you intend to use a language that supports inheritance (as in the Visual FoxPro case) you need to be careful with your inheritance design. Some languages such as C++ support multiple inheritance, but others (such as Visual FoxPro) do not.
The number of issues continues. What about visibility? Visual FoxPro 6.0 supports hidden properties and methods, but Visual FoxPro 3.0 does not. So the idea of language-independent modeling doesn't work all the time. In the first iterations, you probably won't have trouble staying independent, but as soon as you start to consolidate classes and create inheritance structures, you'll need to make a decision. Fortunately, most people know which implementation tool they want to use. The only scenarios in which I've discovered that things must be kept language independent is when prototypes are created with a different implementation tool than the actual application.
How Rose handles items
At first sight, it appears that Rose is just a graphical tool that allows you to create diagrams. Once you start using Rose more regularly, you'll discover that there is more to it. Every item you put on a diagram is created internally as an actual class, inheritance relation, or whatever the item was. This item can then be reused in many different diagrams. Rose invokes items automatically when you add other items to a diagram. Let's assume you dropped two classes on a diagram, one of which was a subclass of the other. In this case, Rose automatically adds the inheritance relation to the diagram. You can then decide whether the diagram should display this relation or not. You can remove the relation (or every other item) from the diagram by selecting it and pressing the Delete key. Note that this removes the item from the diagram only! The inheritance relation is not deleted from the model. Other diagrams that show the same classes might still document the relationship. If you want to delete an item from the model, you have to press Ctrl+D. This will also remove the item from all other diagrams.
When you drop an item onto a diagram, Rose automatically creates this item internally. When creating multiple diagrams describing the same scenario (or at least showing an existing class), this holds the danger of creating the same class (or any other item) twice. To avoid this, you can double-click the item name to get a list of all previously defined items, and you can choose the one you want to keep. You can also drag and drop items from the Rose browser, rather than from the toolbar, which is my preferred method.
EAN: 2147483647
Pages: 113