Messaging
Series 60 features powerful capabilities for handling email, SMS and MMS messages. Messages may be created, sent, received, stored, manipulated and deleted. This feature is known as the messaging architecture, and this section shows you how you can make use of its features in your Series 60 applications. There are a number of useful things you may want to do with messages from within your own application, such as:
-
Create and send a message.
-
Perform some action when a new message is received.
-
Manipulate an existing message, or group of messages: for example, searching through the body text of all received messages.
Series 60 includes three key APIs for performing these kinds of tasks :
-
The Client MTM API.
-
The Send-As API.
-
The CSendAppUi class.
This section first provides an overview of the key concepts and terminology relating to the Series 60 messaging architecture and then goes on to discuss each of these APIs in detail.
Key Messaging Concepts
This subsection introduces some of the basic concepts of Series 60 messaging that underlie all three messaging APIs.
Messaging Server and Session
As mentioned earlier, the messaging architecture is built around a server, which manages all messaging resources on a phone. This is accessed from a client process through an instance of the session class CMsvSession . Any client process that uses messaging services must have at least one instance of this class. In almost all cases, one instance is all it needs, and this can usually be shared by reference between all classes that require access to the messaging server.
Messaging Entries
The data managed by the messaging server takes the form of a collection of entries . An entry can be one of four different types:
-
A folder.
-
A message.
-
An attachment.
-
A service.
An entry can have child entries and can itself be the child of another entry (its parent). In this way, a tree structure is built up which can be thought of as analogous to a file system with its folders, subfolders and files. At the root of the tree is the root index entry (to continue the file-system analogy, the root index entry plays a role like that of the root folder of a drive). This contains four standard folders: Inbox, Outbox, Drafts and Sent Items , which may in turn contain any number of messages and/or user -defined subfolders. Each subfolder itself may contain messages and/or further subfolders, and so on. A message may have attachments as child entries or, less typically, other messages.
The role of the fourth type of entry, the service entry, is less obvious. A service entry contains configuration data for an individual service, or account. Often you will find one service entry per MTM, but this is not necessarily so. For example, if a user has two MMS accounts set up on their phone, there will be two MMS service entries. Service entries are stored in the root index entry, alongside the standard folders.
MTMs: Message Type Modules
An MTM is a plug-in to the messaging architecture to provide support for a specific message type. It comprises a server-side DLL which interacts directly with the messaging server, and a suite of client-side DLLs which provide an API for client applications. Further details are provided below when the Client MTM API is discussed.
Generic Entry Handling/Unified Inbox
The messaging architecture is designed to allow all types of entry to be treated generically, as far as possible. Just as most filing systems allow you to, say, delete or rename a folder in exactly the same way as you would a file, the Series 60 messaging architecture allows you to use exactly the same APIs to perform most routine management tasks on any kind of entry. These tasks include deleting, moving, copying, navigating to parent and child entries, and finding details such as size and date. All of these tasks can be carried out without knowing (or caring) about the type of the entry.
The main classes used for this generic entry handling are CMsvEntry , TMsvEntry and CMsvStore .
Entry Storage
The Messaging Server is responsible for storing all types of entry and providing concurrent client processes with safe, shared access to them. The server MTM component interacts with the Messaging Server to handle sending and receiving of messages.
The Messaging Server can store information about each entry in three different locations: the messaging store , the messaging index and the file system. A basic understanding of the roles of these locations will help you to grasp other messaging concepts and APIs that you will see later in this chapter.
The Messaging Store
Each entry has a file store associated with it, used to persistently store its in-memory representation. The format of an entry's data in the Messaging Store depends on its type: note that there is no generic format for Messaging Store data. Message entries use it to store things like body text (where present) and headers (with the format dependent on the specific MTM). Service entries use it to store all their configuration information. Folder entries do not use the store (note they still have a store, but they leave it empty), and attachment entries may use it, based on the individual MTM implementation.
An entry's store is accessed using the CMsvStore class.
The Message Index
For every entry, regardless of its type, the Messaging Server maintains a generic set of summary information in the Messaging Index. The index is loaded into RAM when the Messaging Server starts, and it stays in memory until the server closes , so it provides a quick way to access information about an entry. Note that the index does not store all information about an entryonly some generic information. For example, it does not store the message body, but it does contain information about the size, date and type of the entry, its unique ID, and so on. The idea is that the index entry contains enough information about an entry to display a summary of it (for example, in an Inbox view) without opening a file store or needing to load an MTM. This enables summary views to display a list of messages quickly.
The index entry is represented by the TMsvEntry class.
The File System
Finally, each entry is assigned a specific folder in the file system, where it may choose to store further data. As with the store, this is optional and its usage is MTM-specific. Use of it tends to vary widely between MTM implementations , and the folder is typically only accessed directly by the Server MTM. As an application developer you will almost certainly never use it, but you will see APIs which refer to it (such as CMsvEntry::GetFilePath() ), so it just helps to be aware of it. Otherwise , its use is beyond the scope of this book.
Key Messaging Classes and Data Types
This section presents a quick reference guide to some of the most commonly used messaging types.
CMsvSession
Represents a client-side session to the messaging server. Note that it is a C- class, not an R -class as you may have expected. Normally one instance per client thread is enough.
TMsvId
Simply a typedef of a TInt32 . The messaging server assigns a unique TMsvId to each entry. In most cases this is performed dynamically, but there are a few fixed IDsfor example, for the standard folders ( Inbox, Outbox, Drafts and Sent ). Once you have an entry's ID you can use it to obtain any other information about the entry, including its index entry and store data.
TMsvEntry
Represents an individual index entry. As mentioned above, the index entry contains a restricted, generic set of summary information for an entry.
CMsvEntry
This is perhaps the most commonly misunderstood class in the messaging architecture. Perhaps because of its name (which looks misleadingly like TMsvEntry ), it is often assumed that an instance of this class contains all the data belonging to an individual entry (such as its headers, body text, and such like). This is not the case, as you will see as soon as you look at its API. CMsvEntry is not an in-memory representation of an entrylikewise, calling CMsvEntry::NewL() does not create a new entry in the messaging server.
Instead, CMsvEntry is better thought of as an entry handle or entry context . CMsvEntry provides you with an interface onto a specific entry, through which you can obtain other objects which contain the entry's data. As such, a CMsvEntry can be reassigned to "point to" a different entry, simply by providing the new entry's ID. In fact, this is how a CMsvEntry object should be usedit is an expensive class to instantiate, so it is recommended that you "recycle" CMsvEntry objects wherever possible and avoid needlessly creating new ones.
CMsvStore
CMsvStore represents a store for an individual entry. Its API can be used to store and retrieve the body text of a message (provided it has one) and other data (such as headers).
CMsvEntrySelection
This is just an array of TMsvId s, and as such provides a common way for passing around information about groups of entries. For example, methods such as ChildrenL() in CMsvEntry (used to enumerate an entry's child entries) return a CMsvEntrySelection pointer.
CMsvOperation
Many long-running activities in messaging, such as sending all items from the Outbox , or checking for email on a POP3 server, require more than an active object to handle them. As well as being notified that the request has completed, applications frequently need to be able to get progress information while the request is still running (for example, in order to update a progress dialog of the form " Downloading message x of y "). As a result, most asynchronous functions in messaging, as well as taking a trequestStatus& parameter identifying an active object which will handle their completion, also return a CMsvOperation object which can be used to obtain progress information before the request completes.
The Messaging APIs
The rest of this chapter covers the three messaging APIs: the Client MTM API, SendAs API and CSendAppUi API. Each is discussed in detail with the help of example application code, but first the three APIs are briefly introduced and the particular role performed by each of them is outlined.
Client MTM API
At the most basic level, the structure of the messaging architecture is similar to that seen in the previous chapter for the Serial Communications and Sockets subsystems. Most importantly, it shares with them the following key factors:
-
A server provides shared, generic access to messaging resources.
-
A client-side API is used to access the server from an application.
-
Plug-ins are used to provide actual implementations of specific technologies.
A crucial difference between the messaging architecture and those covered earlier in this chapter is in the nature of the plug-ins. A plug-in to the messaging architecture is known as an Message Type Module ( MTM ) , and rather than a single DLL it comprises a suite of DLLs which work together to provide an implementation of a specific message type. As opposed to the other communications technologies in Series 60, where the plug-in is entirely server-side, an MTM consists of both server-side and client-side components . The reason is that messaging protocols vary so widely in their capabilities that it is impossible to write a "one shape fits all" client-side API to cover all of them completely. So the client-side MTM is used to implement and extend the basic messaging API for a given message type.
Fortunately, however, it is rare to use the specific client MTMs directly, and the messaging architecture is designed in such a way that client code can usually be written in a generic, extensible way. Each client-side MTM DLL implements a class derived from CBaseMtm , and many messaging tasks (including all the examples listed above) can be performed using just this base class interface. This chapter will show you how to write code that uses this polymorphic API to perform quite sophisticated manipulation of messaging resources in a generic way.
| | The abbreviation MTM can be used with a number of slightly different meanings, which can cause some confusion. Fortunately, the context will usually clarify which meaning is intended. First, an MTM refers to the suite of DLLs that make up the plug-in as a whole ("the SMS MTM," "the POP3 MTM," and so on). Second, MTM is also used to refer to each DLL in the suite (for example, "the MMS server MTM," "the client MTM"). Finally, MTM can be used to refer to (an instance of) the polymorphic class exported by an MTM DLL (for example, "once you have created an MTM registry, you are ready to construct an MTM object"). |
Send-As API
The Client MTM API is extremely powerful and flexible, but it is also quite complex. Many applications require only a limited subset of this functionality, most commonly just the ability to create and send a new message. The Send-As API provides a simple class ( CSendAs ) that offers precisely this capability. The obvious advantage over the Client MTM API is its simplicity, but this is also its disadvantage : Send-As is not as powerful or flexible as the Client MTM API, and it can only be used to address a very specific (but common) need.
CSendAppUi class
A shortcoming identified in the Send-As API is that it requires a message to be built up "programmatically"the developer has to write code to set various attributes of a message. If, however, you want to allow the user to create message content interactively for example, in an editorthen you have to write the editor yourself, or find a suitable one to reuse. This inevitably involves a lot of work that most developers would like to avoid.
Series 60 addresses this common complaint by providing the CSendAppUi class. This provides a number of facilities for developers to enable interactive message creation from their code, including APIs to access the standard message editors. Now, obviously, the pros and cons are reversed : CSendAppUi cannot be used to programmatically construct a message. So neither Send-As nor CSendAppUi is a complete solution, but between them the APIs address two distinct requirements of third-party messaging developers.
Using the Client MTM API
As mentioned earlier, the Client MTM API can be used generically up to a point, by making polymorphic use of the common client MTM base class CBaseMtm . However, if a client wishes to make particular use of a specific MTM, it will usually need to cast a CBaseMtm instance up into an instance of the actual MTM being used (for example, CSmsClientMtm for SMS). There is nothing wrong with doing thisit is the correct way to access a specific MTM's specialized API. You just need to be aware that once this is done, your code becomes nongeneric and will not be usable with other MTMs without (often substantial) modification.
This section documents the example application MtmsExample , which uses the SMS and MMS MTMs to create and send messages of those types. Shown below is the member data of the CMtmsExampleAppUi class which is used throughout the chapter:
CMsvOperation* iOp; CMsvEntrySelection* iEntrySelection; CMsvSession* iSession; CClientMtmRegistry* iMtmReg; CSmsClientMtm* iSmsMtm; CMmsClientMtm* iMmsMtm; TBool iReady; TMsvId iSmsId;
The only type here that has not already been documented is CClientMtmRegistry this is used for loading MTMs and obtaining handles to them.
Connecting a Session to the Messaging Server
Before you can do anything useful in this (or any other) messaging application, you will need to connect a session to the messaging server. In order to do this, you need to have a class which implements the mixin interface MMsvSessionObserver an instance of this class will be passed by reference to the session, and will then be notified of events that occur in the server. In this case, the class in question is CMtmsExampleEngine :
class CMtmsExampleEngine : public CActive, public MMsvSessionObserver { ... private: // from MMsvSessionObserver void HandleSessionEventL(TMsvSessionEvent aEvent, TAny* aArg1, TAny* aArg2, TAny* aArg3); ... } Notification of server events will be performed by means of a call to HandleSessionEventL() , passing parameters as described in the SDK documentation.
Connection to the server can be either synchronous or asynchronous. It is recommended that a UI process connects asynchronously, to prevent blocking the responsiveness of the UI with a potentially long synchronous call.
The following line connects the session asynchronously:
// Connect the session iSession = CMsvSession::OpenAsyncL(*this);
The parameter ( *this ) is a reference to an MMsvSessionObserver in this case, the CMtmsExampleEngine object. You are notified of successful connection by a call to this object's HandleSessionEventL() method. You must wait until this event is received before constructing any other messaging objects (for example, the client MTM registry, or a CMsvEntry object). In the MtmsExample example, this second-phase messaging construction is performed in the CMtmsExampleEngine::CompleteConstructL() function. The following code shows how this is called in response to the session connection notification.
[View full width]void CMtmsExampleEngine::HandleSessionEventL(TMsvSessionEvent aEvent, TAny* /*aArg1*/,TAny* /*aArg2*/, TAny* /*aArg3*/) { switch (aEvent) { // This event tells us that the session has been opened case EMsvServerReady: CompleteConstructL(); break; ... } }
If the session fails to connect, HandleSessionEventL() will be called with an event code of EMsvServerFailedToStart . In this case, the aArg1 argument will point to a standard TInt error code indicating the reason for failure.
As mentioned, you can also connect the session synchronously, although this is strongly discouraged in UI applications. Nevertheless, you may find this useful if you are writing something like a rough command-line test harness, where simplicity is more important than responsiveness. Here you would use code like this:
Table 10-1. MTM UIDs
| MTM | UID Name | Defined In |
|---|---|---|
| SMS | KUidMsgTypeSMS | SMUT.H |
| MMS | KUidMsgTypeMultimedia | MMSCONST.H |
| POP3 | KUidMsgTypePOP3 | MIUTSET.H |
| IMAP4 | KUidMsgTypeIMAP4 | MIUTSET.H |
| SMTP | KUidMsgTypeSMTP | MIUTSET.H |
| Infrared | KUidMsgTypeIr | IRCMTM.H |
| Bluetooth | KUidMsgTypeBt | BTMSGTYPEUID.H |
// Connect the sessionusing OpenSyncL() // instead of OpenAsyncL() iSession = CMsvSession::OpenSyncL(*this); // Now continue immediately with other messaging code.
In this case, the session is ready to use when OpenSyncL() returns. OpenSyncL() will leave if any error occurs when trying to connect.
Constructing the MTMs
After successfully connecting your session to the messaging server, you are ready to construct the MTM objects. In order to do so, you first need to construct a client MTM registry. This is achieved as follows :
// Create a client MTM registry iMtmReg = CClientMtmRegistry::NewL(*iSession);
Once the client MTM registry is constructed , you can use it to obtain handles onto client MTMs. To do this, you need to call CClientMtmRegistry::NewMtmL() , passing the type of MTM you require. The individual MTM UIDs are listed in Table 10-1. The header files that the UIDs are defined in can be found in the directory \epoc32\include , relative to the root of your SDK.
In each case, NewMtmL() returns a CBaseMtm pointer, which is then cast into the appropriate MTM class.
Table 10-2. File Changes Required Before Using the SMS MTM
| File | Replace | With |
|---|---|---|
| smutset.h | #include <etelgprs.h> | class RGprs { public: enum TSmsBearer{}; }; |
| smsuaddr.h | #if !defined(__ETELBGSM_H__) #include <etelbgsm.h> #endif | const TUint KGsmMax TelNumberSize = 100; |
| gsmumsg.h | #if !defined (__ETELBGSM_H__) #include <etelbgsm.h> #endif | class RSmsStorage { public enum TStatus {}; }; |
// Obtain MTMs from the MTM registry iSmsMtm = static_cast<CSmsClientMtm*>(iMtmReg->NewMtmL(KUidMsgTypeSMS)); iMmsMtm = static_cast<CMmsClientMtm*>(iMtmReg->NewMtmL(KUidMsgTypeMultimedia));
This concludes the initialization phase: the client MTMs are now correctly constructed and ready for use.
Using the SMS MTM
This section shows you how to create and send an SMS message using the SMS MTM. Most of the methods of CSmsClientMtm used in this section are inherited from CBaseMtm , and as such this section comes close to describing generic MTM usage. In the one or two cases where SMS-specific APIs are used, these will be highlighted.
Using the SMS MTM in Series 60
Unfortunately, some system header files are missing from the public Series 60 SDKs, which can cause problems when you try to compile SMS MTM code. The problem occurs if you need to use the class CSmsSettings directly. The file that declares this class ( smutset.h ) is dependent on two files which are missing ( etelgprs.h and etelbgsm.h ). Fortunately, though, you do not have any direct dependency on the missing files (this means you do not need to use any objects or types they define), so you can remove the lines that include them and replace them with simple forward declarations.
The replacements you need to make are detailed in Table 10-2. All files referred to are found in the \epoc32\include folder relative to the root of your SDK.
Creating an Entry
The first step required to create a new message is to create a local index entry object. This is represented by the TMsvEntry class. The object you create here will eventually be copied into the messaging index, at which point you can discard your local copy. You use the index entry to define a number of key attributes of the entry you want to create, including:
-
Its type (for example, a message, as opposed to a folder, service or attachment).
-
Its MTM (SMS).
-
The ID of the service entry it is associated with.
-
Its creation date.
This is seen in the following code:
// Set attributes on index entry TMsvEntry indexEntry; indexEntry.SetInPreparation(ETrue); indexEntry.iMtm = KUidMsgTypeSMS; indexEntry.iType = KUidMsvMessageEntry; indexEntry.iServiceId = iSmsMtm->ServiceId(); indexEntry.iDate.HomeTime();
The next step is to create an entry in the messaging server. This will cause the following to happen:
-
The TMsvEntry object you have specified will be copied to the messaging index.
-
It will be assigned a unique ID, which can subsequently be used to identify this entry.
-
A messaging store will be assigned for this entry.
-
A folder will be created in the file system for any files this entry wishes to store.
The entry is created using CMsvEntry::CreateL() , and so you need to create or obtain an instance of CMsvEntry . Remember that CMsvEntry is a context (or handle) on an entry, rather than the entry data itself.
In this case, as you already have an instance of the SMS MTM, you can use its CMsvEntry object to avoid creating your own. First you set its context to the Drafts folder (where you want your new message to be created), then you call CreateL() to create a new child entry based on the attributes you set in your local index entry:
// Create entry from this index entry iSmsMtm->SwitchCurrentEntryL(KMsvDraftEntryId); iSmsMtm->Entry().CreateL(indexEntry);
Note that indexEntry was passed by reference to CreateL() and (provided CreateL() did not leave) will now have been updated with the ID of the newly created message entry. The next step is to set the MTM's CMsvEntry context to this new entry so that you can go about modifying it:
// Set the MTM's active context to the new message iSmsId = indexEntry.Id(); iSmsMtm->SwitchCurrentEntryL(iSmsId);
The first modification to make to the message is to add some body text. In this case, a constant string, defined in the source file, is added:
// Add body CRichText& body = iSmsMtm->Body(); body.Reset(); body.InsertL(0, KSMSBody); indexEntry.iDescription.Set(KSMSBody);
The Client MTM API treats the message body as a rich text object, although clearly in the case of SMS only plain text is supported. This is not a problem: just insert plain text into the CRichText object, without specifying any format layer information, and it will work fine.
| | Note that the body text is being set twice: once in the entry and again in the index entry's iDescription field. Why? The reason is that in summary views (such as the Drafts or Sent Items views), the data that is displayed is from the index entry, not the full stored entry. As mentioned earlier, the index entry keeps a copy of some summary information about the entry. Unfortunately the index entry is not automatically updated by the MTM, so it is your responsibility to make sure the two are in sync. |
The TMsvEntry class has two descriptor public data members , iDescription and iDetails . These are typically used for subject and sender/recipient information, respectively. In the case of SMS there is no subject field, so it is usual to store the body (or the first few characters of it) here.
The next step is to set a recipient for the message. This was passed in as a descriptor parameter ( aAddress ) obtained by a dialog at the UI.
// Add addressee iSmsMtm->AddAddresseeL(aAddress); indexEntry.iDetails.Set(aAddress);
That is all the data you need to set for this message. Again, note that the addressee value is copied into the index entry. However, as indexEntry is only a local variable, you now need to save it in order to commit your changes to the messaging index. This is performed through the CMsvEntry API:
// Update index entry iSmsMtm->Entry().ChangeL(indexEntry);
Finally, all that remains is to save the full message data to the store:
// Update store entry iSmsMtm->SaveMessageL();
Validating the Entry
Before you send the message you have created, you should validate it to check that the data you have added is compliant with the message type. This is achieved using the CBaseMtm function ValidateMessage() , which is implemented by each MTM to provide type-specific validation. The parameter sent to ValidateMessage() is a bit-set which indicates the parts of the message to check. The return value is an equivalent bit-set indicating which parts of the message were invalid. Here this has been encapsulated in the CMtmsExampleEngine::ValidateSMS() function:
TBool CMtmsExampleEngine::ValidateSMS() { TMsvPartList msgCheckParts = KMsvMessagePartBody KMsvMessagePartRecipient KMsvMessagePartOriginator KMsvMessagePartDate; TMsvPartList msgFailParts = iSmsMtm->ValidateMessage(msgCheckParts); return msgFailParts == KMsvMessagePartNone; } Validation is not mandatory, but it can help you to catch errors early that could otherwise cause problems during sending, which is more difficult to debug.
Sending the Entry
Once the message has been composed and validated , you are almost ready to send it. There are just a couple of steps that need to be completed beforehand.
First, you need to set the SMS service center number in the message headers. (You could have performed this earlier, but it has been left until the last moment in case the user alters their service center settings between creating and sending the message. This way you are guaranteed to pick up the settings that are valid at send time.) The service center number is obtained from the SMS service entry and set in the message headers as follows:
// Set context to the SMS message iSmsMtm->SwitchCurrentEntryL(iSmsId); // Load the message iSmsMtm->LoadMessageL(); // Set the SMS service center address CSmsSettings& settings = iSmsMtm->ServiceSettings(); const TInt numSCAddresses = settings.NumSCAddresses(); if (numSCAddresses > 0) { CSmsNumber* serviceCentreNumber = NULL; // Get the default SC address, if valid, // Otherwise just get the first from the list. if ((settings.DefaultSC() >= 0) && (settings.DefaultSC() < numSCAddresses)) { serviceCentreNumber = &(settings.SCAddress(settings.DefaultSC())); } else { serviceCentreNumber = &(settings.SCAddress(0)); } iSmsMtm->SmsHeader().SetServiceCenterAddressL(serviceCentreNumber->Address()); } else { // Panic // there should never be a missing service number } // Save the message iSmsMtm->SaveMessageL(); You should be able to see what is going on here without too much trouble. The current SMS settings are obtained from the SMS MTM, and from this the number of service centers currently configured (typically just one). If there is a valid default defined, then this is used; otherwise the first service center in the list is chosen . Finally, the message is saved to commit the changes just made.
| | This is the first (and last) use that is made of an API from CSmsClientMtm . If it were not for this segment, iSmsMtm could have been just a CBaseMtm pointer. |
The final step required before sending is to update the index entry: you need to set the "in preparation" flag to false and set an appropriate sending state:
// Update the index entry TMsvEntry indexEntry = iSmsMtm->Entry().Entry(); indexEntry.SetInPreparation(EFalse); indexEntry.SetSendingState(KMsvSendStateWaiting); iSmsMtm->Entry().ChangeL(indexEntry);
Finally you are ready to send the message. This is achieved as follows, with the code explained below:
[View full width]// Now send Cancel(); // prepare iOp for use iEntrySelection->Reset(); iEntrySelection->AppendL(iSmsId); TBuf8<1> dummyParams; iOp = iSmsMtm->InvokeAsyncFunctionL(ESmsMtmCommandScheduleCopy, *iEntrySelection,
Examining this code line by line:
-
The code is within a member function of CMtmsExampleEngine , which is an active object. As it will later involve issuing an asynchronous request, the first step is to cancel the active object to ensure that it is not still waiting on a previously issued request.
-
iEntySelection is a CMsvEntySelection in other words, an array of entry IDs. This is reset to remove any existing contents, and then the ID of the SMS message added as its only element.
-
An empty descriptor is declared. This is required as a parameter to InvokeAsyncFunctionL() , but as you do not make any use of it, an empty one will do.
-
Now the asynchronous function is called. CBaseMtm defines two generic functions intended for use by derived classes to add MTM-specific extensions: InvokeSyncFunctionL() and InvokeAsyncFunctionL() . Each MTM defines a list of IDs (known as opcodes ) which can be passed in by the client and handled in the server MTM. The opcode defined by the SMS MTM for sending is ESmsMtmCommandScheduleCopy . Along with this you pass the ID array specifying the messages you want to send (in this case, just one), the " dummy " descriptor parameter, and this object's iStatus .
-
Note that InvokeAsyncFunctionL() returns a CMsvOperation object by pointer. While you are waiting for your active object to complete (that is, before the RunL() is called), you can use this object to obtain progress information about the send operation.
-
Finally, the active object is set active to ensure that the active scheduler will schedule it when its request completes.
Now all you need to do is check the value of your iStatus in your RunL() to ensure that sending succeeded. You should also call iOp->FinalProgress() to check the final progress information stored in the operation object.
Using the MMS MTM
Use of the MMS MTM in Series 60 is very similar to the code you have seen above to make use of the SMS MTM. This section will just highlight the differences between the two message types.
A Brief Introduction to MMS
A Multimedia Messaging Service ( MMS ) message can contain a number of multimedia parts, such as images, sounds and videos . These, along with text parts, are usually packaged up into a presentation to display them to the user. A presentation might consist of just a single image with a text caption below it, or at a more advance level it can contain a number of slides , each containing several multimedia objects, and timing information to control transition between those slides.
The presentation part of the message, which defines the layout and sequence of the slides, usually takes the form of a document written in an XML language called SMIL (Synchronized Multimedia Integration Language, pronounced "smile"). This is often referred to as the "SMIL part." When you use the MMS MTM in Series 60, you do not need to add your own SMIL part explicitlyif you do not, a simple one will be generated for you.
Creating the Message
The process of creating and sending an MMS message begins, as it did for SMS, with setting the MTM's context to the Drafts folder, as this is where new message entries should be created until editing is complete. After this, call CreateMessageL() , passing the ID of your MMS service entry, to create a new message. The service entry ID is easily obtained from the MTM:
// Create a new message using the default service, // and store its ID for later reference iMmsMtm->CreateMessageL(iMmsMtm->DefaultSettingsL()); iMmsId = iMmsMtm->Entry().EntryId();
After this, you just need to set the various parts of your message, then save it. In most cases this can be performed directly with an API from CMmsClientMtm :
// Add any phone number and email addressees iMmsMtm->AddAddresseeL(aAddress); // Add attachments (also known as "media objects") AddMMSAttachmentsL(); // Set subject iMmsMtm->SetSubjectL(KMMSSubject); // Finally, save the message to commit changes to store iMmsMtm->SaveMessageL();
Adding Attachments
As you can see, a bespoke function has been written for this class to add the attachments (or media objects) to the MMS message. The MMS MTM adds some MMS-specific functions for adding attachments to a message, and use of the function CBaseMtm::CreateAttachmentL() is discouraged. The AddMMSAttachmentsL() function used in this example looks like this:
// System includes #include <aknutils.h> // CompleteWithAppPath() ... // String constants _LIT(KMMSText, "Look! Some penguins!"); // Filenames _LIT(KMMSImageFilename, "image.jpg"); ... void CMtmsExampleEngine::AddMMSAttachmentsL() { TMsvId attachmentId = KMsvNullIndexEntryId; // Add a JPEG attachment TFileName attachmentName(KMMSImageFilename); User::LeaveIfError(CompleteWithAppPath(attachmentName)); iMmsMtm->CreateAttachment2L(attachmentId, attachmentName); // Add the text attachment iMmsMtm->CreateTextAttachmentL(attachmentId, KMMSText, KMMSTextFilename); } Using CreateAttachment2L() ensures that the image will be referenced in the message's SMIL part, and included as a visible part of the presentation received by the addressee. Using CreateAttachmentL() will result in a binary attachment which is not referenced by the SMIL part.
Here a SMIL part has not been added explicitly. SMIL is a fairly complicated language, and it is easy to write a SMIL document which is incorrect, resulting in a corrupt message. However, if you do wish to add a SMIL part explicitly, it is added in the same way as an image, but make sure you then set it as the "root" part of the message:
// System includes #include <aknutils.h> // CompleteWithAppPath() ... // String constants ... _LIT(KMMSTextFilename, "hello.txt"); // Filenames _LIT(KMMSImageFilename, "image.jpg"); _LIT(KMMSSmilFilename, "simple.smil"); ... void CMtmsExampleEngine::AddMMSAttachmentsL() { TMsvId attachmentId = KMsvNullIndexEntryId; // Add a JPEG attachment TFileName attachmentName(KMMSImageFilename); User::LeaveIfError(CompleteWithAppPath(attachmentName)); iMmsMtm->CreateAttachment2L(attachmentId, attachmentName); // Add the text attachment iMmsMtm->CreateTextAttachmentL(attachmentId, KMMSText, KMMSTextFilename); // Add the SMIL part attachmentName = KMMSSmilFilename; User::LeaveIfError(CompleteWithAppPath(attachmentName)); iMmsMtm->CreateAttachment2L(attachmentId, attachmentName); iMmsMtm->SetMessageRootL(attachmentId); } Note the difference here in adding the text part: namely, that you pass a third parameter which specifies a filename. This is because the SMIL part references the other parts by filename, and since you are providing a static SMIL file (rather than getting the MTM to create one for you), you need to ensure that the filename of the text part matches what is in the SMIL.
For your interest, here is the SMIL part being added for this message:
<smil xmlns="http://www.w3.org/2000/SMIL20/CR/Language"> <head> <layout> <root-layout width="160" height="140"/> <region id="Image" width="160" height="120" left="0" top="0"/> <region id = "Text" width="160" height="20" left="0" top="120"/> </layout> </head> <body> <par dur="5s"> <img src="image.jpg" region="Image"/> <text src="hello.txt" region="Text"/> </par> </body> </smil>
Validating the Entry
After saving the new message, you validate it in exactly the same way as was shown for SMS.
Sending the Entry
Sending an MMS looks slightly different from the way it did for an SMS. This is primarily because the MMS MTM implements sending by means of a SendL() command, rather than using the base class's InvokeAsyncFunctionL() as the SMS MTM did. This notwithstanding, the steps needed to send your MMS message are pretty similar to those used for SMS:
void CMtmsExampleEngine::SendMMSL() { iMmsMtm->SwitchCurrentEntryL(iMmsId); // Mark the message as complete TMsvEntry indexEntry = iMmsMtm->Entry().Entry(); indexEntry.SetInPreparation(EFalse); indexEntry.SetVisible(ETrue); // Commit changes to index entry iMmsMtm->Entry().ChangeL(indexEntry); // Now send Cancel(); // prepare iOp for use iOp = iMmsMtm->SendL(iStatus); SetActive(); } Using the Send-As API
The Send-As API offers a far simpler interface than the Client MTM API that you saw in the previous section, but it is also far less powerful. It allows you to create a message, add simple details to it, such as recipients, body text and attachments, and save it to the Drafts folder. Ironically, given its name, Send-As does not have an API for sending the messages it creates! This is seen as one of its major limitations.
The Send-As API is provided through the class CSendAs . This owns a whole host of messaging objects (including instances of CMsvSession , CMsvEntry and CBaseMtm ) and takes care of constructing and initializing them.
The code you see in this section is taken from the SendAsExample example application. Much of it is from the CSendAsExampleEngine class. The member data of this class is extremely basic: just a CSendAs object ( iSendAs ) and a reference to an observer ( MSendAsExampleEngineObserver& iObserver ) which has been implemented to pass information back up to the AppUI.
Creating a Send-As Object
The first step the engine needs to carry out is to construct its CSendAs object. This is a one-linerjust a call to CSendAs::NewL() . This requires only one parameter, a reference to an MSendAsObserver object. The engine implements this mixin, so it just passes a reference to itself.
It is interesting to note that once a CSendAs object has been used to create and save a message, most further calls to it will result in a leave. Therefore, if you wish to create a second message, the object has to be destroyed and a new one constructed. For this reason, destruction and construction of iSendAs has been encapsulated in a utility function called ResetL() :
void CSendAsExampleEngine::ResetL() { delete iSendAs; iSendAs = NULL; iSendAs = CSendAs::NewL(*this); ... } This is the function called from ConstructL() to construct iSendAs when the application starts up.
Setting Capabilities
One line was omitted from the previous code snippet (indicated by the line): ResetL() also calls iSendAs->AddMtmCapabilityL() . CSendAs maintains an array of available MTMs, which at construction is initialized to list all MTMs installed on the device. If your code requires certain capabilities which may not be supported by all MTMs, this API is used to specify them. As the SendAsExample example goes on to send an image as a message attachment, this function is called with KUidMtmQuerySupportAttachments (defined in mtmuids.h ). Here is the fully implemented ResetL() function:
void CSendAsExampleEngine::ResetL() { delete iSendAs; iSendAs = NULL; iSendAs = CSendAs::NewL(*this); iSendAs->AddMtmCapabilityL(KUidMtmQuerySupportAttachments); } On a device with email, MMS, SMS, infrared and Bluetooth MTMs installed, this will filter out the SMS MTM.
| | The value KUidMtmQuerySupportedBody can be passed to AddMtmCapabilityL() to filter out MTMs which don't support body text (for example, MMS). However, beware: the Bluetooth and infrared MTMs will be left in the list, and yet both will leave if you attempt to save a message that has body text. |
Choosing an MTM
At some stage, you will need to select the MTM you wish to use to create your Send-As message. A common way of doing this is to prompt the user to choose. CSendAs has a function, AvailableMtms() , which returns a descriptor array containing human-readable names for the MTMs in the list. This can be used to populate a menu or listbox from which the user can choose their preferred MTM.
In the SendAsExample example application, these strings are put into a pop-up menu for the user to choose from. CSendAsExampleEngine defines an inline AvailableMtms() method which just calls the same function on iSendAs . The AppUi then implements its pop-up menu with the following code:
void CSendAsExampleAppUi::DynInitMenuPaneL(TInt aResourceId, CEikMenuPane* aMenuPane) { if (aResourceId == R_SENDASEXAMPLE_SEND_SUBMENU) { const CDesCArray& mtms = iEngine->AvailableMtms(); const TInt count = mtms.Count(); if (count == 0) { return; } aMenuPane->SetItemDimmed(ESendAsExampleCmdDummy, ETrue); TInt commandId = ESendAsExampleCmdMtmBase; CEikMenuPaneItem::SData data; data.iCascadeId = 0; data.iFlags = 0; for (TInt i = 0; i < count; i++) { data.iCommandId = ++commandId; data.iText = mtms[i]; aMenuPane->AddMenuItemL(data); } iMaxMtmCmdId = commandId; } } Note that the menu, by default, contains a single item associated with the command ID ESendAsExampleCmdDummy , which is ignored in HandleCommandL() . The text of this item is set in resource to "Unavailable." So, if no MTMs are found, the user will see "Unavailable" on the menu, with no command attached to it. If MTMs are present, the above code removes this menu item before adding the MTM strings.
Note also that the command IDs used for the MTMs are dynamically allocated, starting at a defined base ID. HandleCommandL() is implemented to recognize these dynamic IDs and act appropriately:
[View full width]void CSendAsExampleAppUi::HandleCommandL(TInt aCommand) { switch (aCommand) { case EAknSoftkeyBack: case EEikCmdExit: { Exit(); break; } // Handle dynamic command IDs allocated to MTM list default: if (aCommand > ESendAsExampleCmdMtmBase && aCommand <= iMaxMtmCmdId) { const TInt index = (aCommand - ESendAsExampleCmdMtmBase) - 1; // Get an address TBuf<ESendAsExampleMaxAddressLength> address; CAknTextQueryDialog* dlg = new (ELeave) CAknTextQueryDialog(address,
Creating and Saving the Message
Once the user has chosen an MTM, you can create a message, validate it and save it to the Drafts folder. All the code in this section is taken from CSendAsExampleEngine::CreateMessageL() .
First, you need to set the MTM you wish to use. You can do this using an index calculated from the MTM chosen by the user from the pop-up menu (see above):
void CSendAsExampleEngine::CreateMessageL(TInt aMtmIndex, const TDesC& aAddress) { // Set the MTM iSendAs->SetMtmL(aMtmIndex); You also need to create a message and set parameters on it. In this case a recipient and an attachment are set. Note that the API to CSendAs is similar to that of CBaseMtm .
// Create the message iSendAs->CreateMessageL(); iSendAs->AddRecipientL(aAddress); // Add an attachment TMsvId attachmentId; TFileName filename(KAttachmentFilename); User::LeaveIfError(CompleteWithAppPath(filename)); iSendAs->CreateAttachmentL(attachmentId, filename);
Finally, as with the Client MTM API, you can validate a message before saving it. If validation fails, the message is abandoned and an error reported to the observer (the AppUI ):
// Validate the message TMsvPartList msgFailParts = iSendAs->ValidateMessage(); if (msgFailParts == KMsvMessagePartNone) { iSendAs->SaveMessageL(iStatus); SetActive(); } else { iObserver.HandleSaveMessageCompleteL(KErrCorrupt); iSendAs->AbandonMessage(); ResetL(); } Using the CSendAppUi Class
The previous section showed you Send-As, an API that is present on all Symbian OS platforms for making simple use of the messaging architecture. However, it was noted that Send-As is not well suited to interactive use of messaging, where you want the user to edit the message as they would in the phone's Messages application.
To address this shortcoming, Series 60 introduces the CSendAppUi class to provide interactive messaging capabilities to applications. CSendAppUi is a class containing functions used to invoke messaging UI capabilities. Specifically, it allows you to do the following:
-
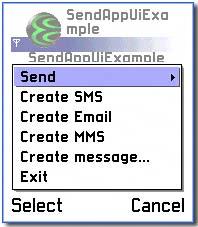
Invoke a message editor for a specific message type, optionally passing in data such as body text, addressees and attachments, as shown in Figure 10-3.
Figure 10-3. Main application menu of SendAppUiExample.
-
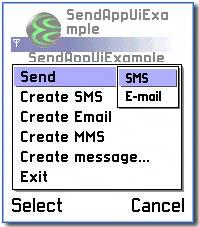
Add a "Send" item to your application menu, to invoke a cascading menu which dynamically lists available message types, optionally filtered by capability, as shown in Figure 10-4. Selecting a message type invokes the appropriate editor.
Figure 10-4. Cascading menu.
-
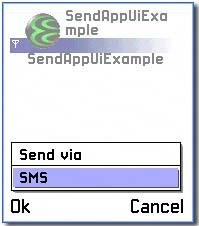
Implement a context-sensitive menu listing available message typesagain, dynamically generated and optionally filtered by capability, as shown in Figure 10-5. Selecting a message type invokes the appropriate editor.
Figure 10-5. Context-sensitive menu invoked by the "Create Message" menu item.
This section shows you how to use these features in your own application.
Note that it is not usual for an application to implement all the options available in this application. In particular (as you will see), the "Send" and "Create Message" commands do more or less the same thing, and usually only the "Send" command would be included on the application's main menu. Just be aware that this is an example application, and some of its functionality is intentionally duplicated to illustrate different ways of achieving the same thing.
| | The name of the CSendAppUi class is misleadingit is not, in fact, an App UI! You might have expected that it would be a specialization of CAknAppUi , and that applications wishing to use its API should derive their own App UI class from it. Unfortunately, this is incorrect. In fact, CSendAppUi derives from CBase and has no special significance within the application architecture. (You would not get very far if you did try to derive your own App UI from it!) Common practice is for an application's App UI class to own an instance of CSendAppUi . |
Getting Started
The code in this section is taken from the CSendAppUiExampleAppUi class in the SendAppUiExample example. Here is the relevant member data for that class:
private: // Data CSendAppUi* iSendAppUi; TSendingCapabilities iSendAppUiCapabilities; CRichText* iRichText;
iSendAppUi is the object you will use to provide the capabilities mentioned above. iSendAppUiCapabilities will be used throughout to specify a consistent set of capabilities which you wish to support in your user's messages. Both members are initialized in the CSendAppUiExampleAppUi::ConstructL() method:
iSendAppUi = CSendAppUi::NewL(ECmdSendAppUiBaseCmdId); iSendAppUiCapabilities.iFlags = TSendingCapabilities::ESupportsBodyText;
The value passed to CSendAppUi::NewL() is used as the starting value for the dynamic menu IDs which CSendAppUi createsthe dynamic values are assigned by incrementing this value. You should therefore ensure that you have no other command IDs with values higher than this, as they could clash with the dynamic IDs. The easiest way to do this is to define this value at the end of your command ID enum, as in SendAppUiExample.hrh :
// Command ids enum { ECmdCreateSMS = 0x6000, ECmdCreateEmail, ECmdCreateMMS, ECmdCreateGeneralMessage, ECmdSendAppUiBaseCmdId }; iSendAppUiCapabilities is initialized to indicate that, for the purposes of this example, all messages should support body text.
Dynamic Menus
As well as the initialization performed at construction, you also need to put code in place to enable the dynamic menus that CSendAppUi will populate. Figure 10-6 shows which menu items in the application's main menu are specified in the resource file.
Figure 10-6. Dynamic and static menus in SendAppUiExample.
As you can see, just the Send menu item is added dynamically. This is performed in CSendAppUiExampleAppUi::DynInitMenuPaneL() :
void CSendAppUiExampleAppUi::DynInitMenuPaneL(TInt aMenuId, CEikMenuPane* aMenuPane) { // specify the sending capabilities that the message // types displayed must satisfy switch (aMenuId) { case R_SEND_EXAMPLE_MENU_PANE: iSendAppUi->DisplaySendMenuItemL(*aMenuPane, 0, iSendAppUiCapabilities); break; case R_SENDUI_MENU: iSendAppUi->DisplaySendCascadeMenuL(*aMenuPane, NULL); break; } } DynInitMenuPaneL() is a standard App UI function used to dynamically alter a menu just before it appears. aMenuId gives the ID of the menu about to be shown. In this case, you are interested in modifying two menus:
-
R_SEND_EXAMPLE_MENU_PANE identifies the application's main menu and is defined in this application's .rsg file. The subsequent call to DisplaySendMenuItemL() adds the "Send" item to it. The second parameter ( ) indicates the position at which the item should appear on the menu. represents the top of the menu, with subsequent menu items numbered sequentially ( 1 , 2 , 3 ). So in this case, it is added as the top item.
-
R_SENDUI_MENU identifies a dynamic, cascading menu which CSendAppUi creates for you and associates with the "Send" menu item. The call to DisplaySendCascadeMenuL() will populate the cascading menu with the list of available, filtered message types. The value of R_SENDUI_MENU is defined in the system header file SendNorm.rsg , so you will need to system include this in your own .cpp file.
Handling Commands
Now that you have implemented your dynamic menu code, you are ready to handle the commands that your application's menu will generate. As you would expect, this is performed in the framework function HandleCommandL() . In the case of the three "hard-coded" message types on the main menu, each is implemented by an appropriately named function in CSendAppUiExampleAppUi :
case ECmdCreateSMS: CreateSMSL(); break; case ECmdCreateEmail: CreateEmailL(); break; case ECmdCreateMMS: CreateMMSL(); break;
These three functions are very similar, and each results in a call to the same function on CSendAppUi . CreateEmailL() is covered in detail later in this section.
The handler for the "Create message" command looks very similar:
case ECmdCreateGeneralMessage: CreateGeneralMessageL(); break;
CreateGeneralMessageL() will also be covered in detail later in this sectionit assembles a body part, then calls a different API on CSendAppUi to show the menu listing available message types, as shown in Figure 10-5.
Finally, the command handler for the dynamic command IDs generated by CSendAppUi looks somewhat different:
default: // It should be a dynamic command ID // generated by SendAppUi. // If not, panic in debug. if (!HandleSendAppUiCommandL(aCommand)) __ASSERT_DEBUG(EFalse, Panic(EBadCommandId)); break;
Note that, unlike the previous handlers, this is not handled in response to a fixed command ID. Instead, any unhandled command ID is passed to the HandleSendAppUiCommandL() function, which returns EFalse if it is not one of the dynamic IDs generated by CSendAppUi , and otherwise handles it appropriately. This, too, is covered in detail later in this section.
Creating a Message
CreateEmailL() , CreateSMSL() and CreateMMSL() all follow the same basic sequence of steps:
- Construct some data representing parts of a message (for example, body text, addressees or attachments).
- Invoke CSendAppUi to create a new message, passing the data constructed in the previous step.
| | The message parts passed into CSendAppUi are optionalyou do not need to pass any at all. You will remember that CSendAppUi is predominantly for interactive message creation: if you had to specify all the message parts in your code, it would be no great improvement over Send-As. However, this functionality exists because it is so commonly desired to prepopulate certain fields before letting the user take over. |
The three functions differ only in the kind of data they preconstruct and in the message type ID passed to CSendAppUi . As they are so similar, only CreateEmailL() is detailed here.
The first step of this function is to create an array of addressees. As this is an example application, these are loaded from resource file:
// create an array for addresses and add two to it CDesCArrayFlat* addressArray = new (ELeave) CDesCArrayFlat(KDefaultGranularity); CleanupStack::PushL(addressArray); HBufC* string = StringLoader::LoadLC(R_EMAIL_ADDRESS1); addressArray->AppendL(*string); CleanupStack::PopAndDestroy(string); string = NULL; string = StringLoader::LoadLC(R_EMAIL_ADDRESS2); addressArray->AppendL(*string); CleanupStack::PopAndDestroy(string);
Once the descriptor array is populated with a couple of addresses, you are ready to get CSendAppUi to create a message. This is achieved using the function CreateAndSendMessageL() :
[View full width]// Display the email editor with addresses // already inserted iSendAppUi->CreateAndSendMessageL(KUidMsgTypeSMTP, NULL, NULL, KNullUid, addressArray,
This switches into the standard Series 60 message editor for the specified message type (in this case, email). All the familiar functionality is available, such as pulling in addressees from the Contacts application and adding attachments from the phone's file system. Once the user has finished editing their message they have the same options as in the native Messages application: they can send the message, save it to Drafts or delete it.
A look at the declaration of CSendAppUi::CreateAndSendMessageL() (in sendui.h ) reveals the purpose of its many parameters:
IMPORT_C virtual void CreateAndSendMessageL(const TUid aMtmUid, const CRichText* aBodyText = NULL, MDesC16Array* aAttachments = NULL, const TUid aBioTypeUid = KNullUid, MDesC16Array* aRealAddresses = NULL, MDesC16Array* aAliases = NULL, TBool aLaunchEmbedded = ETrue);
The only mandatory parameter is the MTM UID, to specify the type of message you wish to create. The subsequent parameters can all be used to specify optional message data, as you saw above with the addressee array. The final parameter ( aLaunchEmbedded ) specifies whether the editor should appear embedded in your application (that is, with your application's icon still present in the title bar), or exactly as it would when invoked from the Messages application (nonembedded). The most typical case is to specify Etrue here, but CSendAppUiExampleAppUi::CreateSMSL() passes EFalse so you can see what it looks like.
Note that CSendAppUi does not take ownership of any of the data passed to ityou are still responsible for deleting it.
CreateGeneralMessageL()
This function is called when you invoke the Create Message menu item, and it results in a second menu listing the available message types, filtered by your criteria, as shown in Figure 10-5. The code is very similar to the CreateEmailL() code seen in the previous subsection. The main difference is in the call made to CSendAppUi . Here is the function in its entirety:
[View full width]void CSendAppUiExampleAppUi::CreateGeneralMessageL() { __ASSERT_DEBUG(iRichText && iRichText->DocumentLength() == 0, Panic(ERichTextNotReady)); // insert text into the message body HBufC* string = StringLoader::LoadLC(R_GENERAL_BODY_TEXT); iRichText->InsertL(0, *string); CleanupStack::PopAndDestroy(string); string = NULL; // set the title of the box which displays // the message types string = StringLoader::LoadLC(R_GENERAL_MESSAGE_POPUP_TITLE); // display a list of the message types which // satisfy the specified // sending capabilities iSendAppUi->CreateAndSendMessagePopupQueryL(*string, iSendAppUiCapabilities, iRichText,
There are only a few significant differences to note between this and the previous example:
-
Instead of CreateAndSendMessageL() , the function calls CreateAndSendMessagePopupQueryL() . This adds the step of showing the pop-up list of message types before switching to the editor.
-
Because you are not specifying the message type yourself, you pass a capabilities object to filter the list of message types you want to display. You will remember that this was initialized in ConstructL() to display only message types which support body text. (This is why MMS does not appear in the listMMS does not technically support body text, although it may have a text attachment.)
-
You also pass a descriptor as the first parameter to specify the title of the pop-up menu that appears.
Here is the declaration of CreateAndSendMessagePopupQueryL() from sendui.h :
IMPORT_C virtual void CreateAndSendMessagePopupQueryL(const TDesC& aTitleText, TSendingCapabilities aRequiredCapabilities, const CRichText* aBodyText = NULL, MDesC16Array* aAttachments = NULL, const TUid aBioTypeUid = KNullUid, MDesC16Array* aRealAddresses = NULL, MDesC16Array* aAliases = NULL, CArrayFix<TUid>* aMtmsToDim = NULL, TBool aLaunchEmbedded = ETrue);
Note that you can also optionally specify a list of MTMs which you wish to dim in the pop-up menu.
Once the user had chosen from the menu, the editor is displayed exactly as before.
HandleSendAppUiCommandL()
HandleSendAppUiCommandL() is the last of the functions called in HandleCommandL() , and it handles dynamic IDs generated by CSendAppUi for the items in the Send cascading menu, as shown in Figure 10-4. This function has a TBool return type, returning EFalse if the command ID passed to it is not recognized as a valid ID from the cascading menu. This check is made by calling CSendAppUi::CommandIsValidL() :
TBool CSendAppUiExampleAppUi::HandleSendAppUiCommandL(TInt aCommand) { // First check that this is a valid command if (!iSendAppUi->CommandIsValidL(aCommand, iSendAppUiCapabilities)) { return EFalse; } After this, you can proceed to invoke the message editor in much the same way as before. You may choose to specify body text, as before. You should be careful to only set data which you have specified in your capabilities filter, otherwise you could try to add data to a message type that does not support it (such as trying to add attachments to an SMS).
// insert text into the message body HBufC* bodyText = StringLoader::LoadLC(R_SMS_BODY_TEXT); iRichText->InsertL(0, *bodyText); CleanupStack::PopAndDestroy(bodyText); // display the editor associated with aCommand. // The displayed message will have some // text already inserted. iSendAppUi->CreateAndSendMessageL(aCommand, iRichText, NULL, KNullUid, NULL, NULL, ETrue); iRichText->Reset(); return ETrue;
As in CreateEmailL() , this calls CSendAppUi::CreateAndSendMessageL() , although here you are calling an overloaded version which takes a dynamic menu ID instead of an MTM. Since CSendAppUi constructed the dynamic menu, it is able to map the command ID onto an MTM itself. All other parameters to this overload of CreateAndSendMessageL() are identical to those seen earlier.
Watching for Incoming Messages
The previous sections have looked at various ways to create and send messages on a Series 60 device. This final section looks at the other side of the picture: how to receive notification when a new message arrives on the phone and obtain a handle on that message.
The code samples in this section are taken from the MsgObserver example application.
The APIs
The main classes involved in receiving message notification are CMsvSession and MMsvSessionObserver . In fact, these have already been introduced earlier in this chapter (see the subsection Using the Client MTM API ). In that earlier subsection, you were more concerned with CMsvSession here the observer API is of most interest.
MMsvSessionObserver is used to receive notification of events that occur in the messaging server. Some of the most commonly used of these events are:
-
Successful completion of a call to CMsvSession::OpenAsyncL() .
-
Creation of a new entry in the server.
-
Changes to an existing entry in the server.
Notification of these events arrives through a call to MMsvSessionObserver::HandleSessionEventL() , which you need to implement in your own class. The whole API can be understood quite easily by looking at the declaration of MMsvSessionObserver , from msvapi.h :
[View full width]class MMsvSessionObserver { public: enum TMsvSessionEvent { EMsvEntriesCreated, EMsvEntriesChanged, EMsvEntriesDeleted, EMsvEntriesMoved, EMsvMtmGroupInstalled, EMsvMtmGroupDeInstalled, EMsvGeneralError, EMsvCloseSession, EMsvServerReady, EMsvServerFailedToStart, EMsvCorruptedIndexRebuilt, EMsvServerTerminated, EMsvMediaChanged, EMsvMediaUnavailable, EMsvMediaAvailable, EMsvMediaIncorrect, EMsvCorruptedIndexRebuilding }; public: virtual void HandleSessionEventL(TMsvSessionEvent aEvent, TAny* aArg1, TAny* aArg2,
Watching the Inbox
The MsgObserver example application watches for new messages in the Inbox and gets their body text when they arrive . Watching the Inbox is a common use of MMsvSessionObserver .
The first step required is to derive one of your classes from MMsvSessionObserver and open a session on the messaging server. In MsgObserver , this is performed by the AppUi class:
class CMsgObserverAppUi : public CAknAppUi, public MMsvSessionObserver { ... private: //Data CMsgObserverContainer* iAppContainer; CMsvSession* iMsvSession; CMsvEntry* iMsvEntry; TMsvId iNewMessageId; }; The session is opened asynchronously in the ConstructL() , and construction of iMsvEntry is performed once this completes:
[View full width]void CMsgObserverAppUi::ConstructL() { ... iMsvSession = CMsvSession::OpenAsyncL(*this); } ... void CMsgObserverAppUi::HandleSessionEventL(TMsvSessionEvent aEvent, TAny* aArg1, TAny*
You are now ready to receive notifications from the messaging server. You just need to be aware of a feature that you may not have expectedwhen a new message arrives, you receive not one event but two. You receive first an EMsvEntriesCreated event and then an EMsvEntriesChanged event. This reflects the two distinct operations carried out by the messaging server on receipt of a message:
| 1. | Create a new, empty entry of type "message." (Generates an EMsvEntriesCreated event.) |
| 2. | Use the storage locations associated with this entry (index entry, store and/or file folder) to store the message's data. (Generates an EMsvEntriesChanged event on completion.) |
It is important that you understand the sequence of these two steps, becauseas you can now seeit is no good just watching for EMsvEntriesCreated events. At the point when this event arrives, you cannot read any data from the entry, because it has not been stored yet. Likewise, you cannot just look out for EMsvEntriesChanged events in the Inbox , because you will have no way of distinguishing the arrival of a new message from a change to an existing message. So, instead, you need to do the following:
- Handle the EMsvEntriesCreated event and store the ID of the new entry. (The aArg1 parameter points to an array of IDs, typically containing just one element.)
- Handle the EMsvEntriesChanged event and compare the ID of the changed entry (again, available via aArg1 ) with the ID you stored previously. If the two are equal, you now have a handle to the newly created and stored message.
This sequence of steps is shown in this abridged section of CMsgObserverAppUi::HandleSessionEventL() . Note that in both of these events aArg2 identifies the ID of the entry's parent folder. You can use this to filter events to a specific folderin this case, the Inbox .
case EMsvEntriesCreated: // Only look for changes in the Inbox if (*(static_cast<TMsvId*>(aArg2)) == KObservedFolderId) { CMsvEntrySelection* entries = static_cast<CMsvEntrySelection*>(aArg1); iNewMessageId = entries->At(0); } break; case EMsvEntriesChanged: // Only look for changes in the Inbox if (*(static_cast<TMsvId*>(aArg2)) == KObservedFolderId) { CMsvEntrySelection* entries = static_cast<CMsvEntrySelection*>(aArg1); if (iNewMessageId == entries->At(0)) { // It's the same message we received the // EMsvEntriesCreated event for ... } } break; Finally, here is the code used in the MsgObserver example to handle the message. It uses the CMsvStore::RestoreBodyTextL() function to restore the message's body text to a rich text object, then passes it to the UI for display.
// Set entry context to the new message iMsvEntry->SetEntryL(iNewMessageId); // Open the store, read-only CMsvStore* store = iMsvEntry->ReadStoreL(); CleanupStack::PushL(store); // Get body text and send it to the container if (store->HasBodyTextL()) { CRichText* richText = CRichText::NewL(iEikonEnv->SystemParaFormatLayerL(), iEikonEnv->SystemCharFormatLayerL()); CleanupStack::PushL(richText); store->RestoreBodyTextL(*richText); const TInt length = richText->DocumentLength(); iAppContainer->SetTextL(richText->Read(0, length)); CleanupStack::PopAndDestroy(richText); } else { iAppContainer->SetTextL(KNoBodyText); } CleanupStack::PopAndDestroy(store); EAN: 2147483647
Pages: 139