Showing Hierarchies with Block Diagram Shapes
3 4
In a block diagram, you can graphically represent many types of systems. The components of the system are represented by blocks, which are often labeled, as shown in Figure 11-2. You can add arrows to show the direction in which a process flows or to depict system inputs and outputs. Most people create block diagrams with the goal of including them within a presentation, report, Web site, or other document. Manufacturers of equipment, such as electronic and computer equipment, often create block diagrams and add links from each component to another page that describes the component in detail.
For details about linking Visio pages, see "Linking Visio Shapes and Pages."
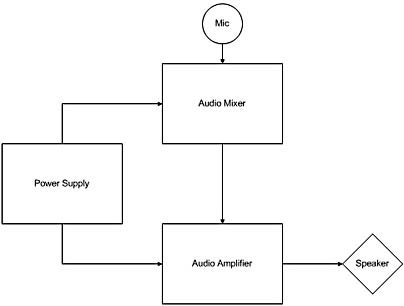
Figure 11-2. This block diagram represents an audio system.
Creating Block Diagrams
When you create a block diagram, you start by dragging out the shapes you want to create, and then you go back and type the text. Finally, you arrange the shapes where you want them on the drawing page. Visio contains a number of alignment tools that can help you position the shapes. For example, display the Action toolbar (choose View, Toolbars, Action) to put the alignment, rotation, and other useful tools close at hand.
Follow these steps to create a block diagram:
- Choose File, New, Block Diagram, Block Diagram.
- From the Blocks stencil, drag shapes onto the drawing page.
Tip
Select the Connector tool before you drag a shape so that the shape automatically connects to the previous shape you dropped. - To add text to a shape, select the shape, and then type. Visio automatically zooms in so you can read the text more easily.
- To change the order of overlapping shapes, select a shape, and then choose Shape, Order, Bring Forward or Send Backward.
- To nudge a shape a tiny amount in any direction, select the shape, and then press an arrow key.
- To add arrows to your drawing, drag shapes from the Blocks or Blocks Raised stencil.
Tip
To add shapes, such as triangles, squares, and other geometric shapes, open the Basic Shapes stencil by choosing File, Stencils, Block Diagram, Basic Shapes. - To align shapes more precisely, use the Align Shapes and Distribute Shapes tools on the Action toolbar.
For details about aligning shapes, see "Positioning Shapes Precisely."
Modifying Block Diagram Shapes
With block diagram shapes, you can safely use the generic Visio editing techniques described elsewhere in this book. For example:
- Drag a green selection handle to resize a shape.
- Use the Pencil tool to add vertices and reshape shapes.
- Glue 1-D arrows to 2-D blocks at the blue connection points.
A few shapes include shortcut menu options and control handles that you use for reshaping and editing, as Figure 11-3 shows. A control handle is the yellow, diamond-shaped handle that appears when you select a shape. You can drag a control handle to change the shape's appearance. Table 11-2 includes the names of common block diagram shapes with descriptions of how you modify them.
Table 11-2. Shortcuts for Editing Block Shapes
| Shape Name | Editing Shortcut |
|---|---|
3-D Box | Use the control handles to adjust depth and orientation of the shape's shadow. |
Arrow Box | Use the control handles to adjust the size and position of the arrow with respect to the rectangle. |
1-D Single, 2-D Single | Right-click the shape, and then choose Open Tail to remove the ending line. |
1-D Single Open, D Single Open | Right-click the shape, and then choose Close Tail to add an ending line. |
Curved Arrow | Use the control handles to adjust the curvature and arrowhead location. |
There are many ways to modify block diagram shapes. The best advice is to play around, have fun, and realize that whatever you do to a shape can be undone when you choose Edit, Undo (or press Ctrl+Z).
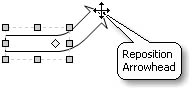
Figure 11-3. Pause the pointer over a control handle to display a ScreenTip.
Creating Tree Diagrams
Tree diagrams show hierarchical relationships, which cover everything from hardware connections to tournament playoffs, as Figure 11-4 shows. Use a tree diagram for the following:
- To show the relationship between a central idea and its subsidiary concepts
- To show the connection between one component and others within a process or system
- To indicate descendants and ancestors
- To represent taxonomy
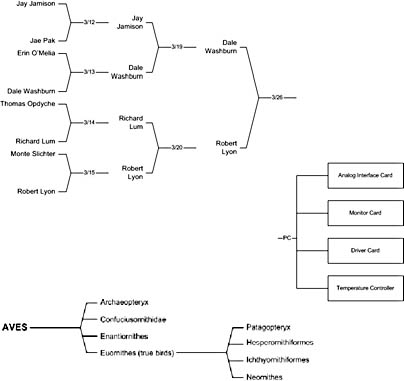
Figure 11-4. With a tree diagram, you can document many types of hierarchical structures.
Starting a New Tree Diagram
To create a tree diagram, begin by dragging as many boxes as there are components in your tree structure. Then, drag a tree shape and connect the branch ends to the connection points of the boxes. Finally, position your boxes on the page. If you glue the boxes to the tree structure, they stay attached as you rearrange shapes.
Follow these steps to create a tree diagram:
- Choose File, New, Block Diagram, Block Diagram.
- Drag box shapes or other shapes from the Blocks stencil onto the drawing page to represent the components in your structure.
- Drag one of the four tree shapes from the Blocks stencil onto the drawing page (Double Tree Sloped, Double Tree Square, Multi-Tree Sloped, or Multi-Tree Square).
Tip
If you want two branches, use a Double-Tree shape. If you want more than two branches, use a Multi-Tree shape. - Drag a control handle on the branch of a tree shape to a connection point on a block shape. The endpoints turn red when they are connected.

Tip
If a tree shape doesn't point in the right direction, select the shape, and then press Ctrl+H to flip the shape horizontally or Ctrl+L to rotate it 90 degrees to the left. - To add branches to a Multi-Tree shape, drag the control handle on the trunk away from the shape to create up to six more branches. Drag the control handle at the end of a branch (horizontally or vertically) to change the branch length or position.
- Drag arrows and other shapes to emphasize your main idea.
- To add text to a shape, select the shape, and then type.
- To move a main branch up or down the tree trunk, select the tree shape, and then press an arrow key.
Modifying Tree Diagram Shapes
The tree shapes on the Blocks stencil look pretty simple but include some clever behavior. For example, when you select a tree shape that's glued to box shapes on the drawing page, you can use the arrow keys to move the branches without moving the entire structure. Table 11-3 describes other shortcuts for working with tree shapes.
Table 11-3. Shortcuts for Editing Tree Shapes
| Task | Editing Shortcut |
|---|---|
Adjust the position of a branch | Drag the control handle on the end of a tree shape to a new position. |
Move the trunk of a tree shape | If the tree is glued to other shapes, select the tree, and then press an arrow key. |
Add up to six branches to a Multi- Tree | Drag the control handle on the trunk of a Multi- Tree shape away from the shape. |
Adjust the distance between branches in a connected tree structure | Drag the box to which the tree is connected to a new location. |
Remove a branch from a tree shape | Drag the control handle for the branch you want to remove until it's directly over the trunk or another branch, and then release the mouse button. |
Troubleshooting
When moving a tree branch, the entire tree structure moves instead.
Tree shapes, as specialized as they are, can be challenging to modify. Your best option when shapes move unexpectedly is to immediately press Ctrl+Z to reverse the effect. If you have performed several actions since the inadvertent move, press Ctrl+Z several times to back up and undo them all. For better success when moving branches, zoom to the tree shape before dragging it (or its control handle) to a new position. To zoom in quickly, press Shift+Ctrl+click with the mouse.
EAN: 2147483647
Pages: 211