Understanding Shape Geometry
3 4
You can create most Visio diagrams successfully without a detailed understanding of how shapes work. However, if you want to create your own shapes or revise an existing shape, your task is easier if you know what you're dealing with. This section breaks down shapes into their geometric parts, explains shape vocabulary and why shape geometry is useful to understand. If you remember your high school geometry, you have an advantage, but even if you don't know a vertex from a vortex, you'll learn some practical techniques for getting shapes to look and act the way you want.
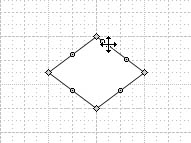
Visio includes many terms for describing the vector-based geometry that underlies shapes. If you reduce any shape to its simplest, constituent parts—what's left after you remove the colors, styles, and other formatting attributes—you have line segments and arc segments. It's easiest to see them when you select shapes with the Pencil tool, as Figure 22-1 shows. Where these segments join, a diamond-shaped vertex appears. In the middle of a line segment, a control point appears, which looks like a circle with a dot in it. To reshape any shape, you can add, move, and delete vertices using the Pencil tool. You can also change the curvature of a line segment by dragging its control point.
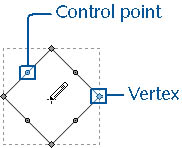
Figure 22-1. When you select a shape with the Pencil tool, its vertices and control points are displayed so that you can control shape geometry.
Using the Drawing Tools
Visio tucks a number of drawing tools into drop-down toolbars. Often, you end up displaying them all before you find the tool you want. The last tool used becomes the one shown on the toolbar. Figure 22-2 shows the drawing tools, which are part of the Standard toolbar.
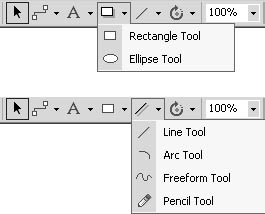
Figure 22-2. To draw new shapes, use the drawing tools on the Standard toolbar.
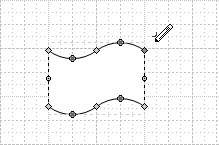
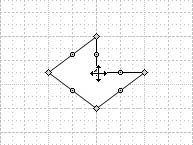
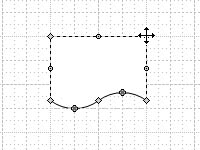
Despite the number of drawing tools in Visio, you can really create only the following types of shape geometry, as Figure 22-3 shows:
- Lines. To create lines, use either the Line or Pencil tool. The Rectangle tool merely draws four contiguous line segments (sometimes called polygonal lines).
- Elliptical arcs. To create elliptical arcs, use the Arc tool or the Ellipse tool. A circle in Visio is really two contiguous elliptical arc segments (created by pressing Shift while using the Ellipse tool).
- Circular arcs. To create circular arcs, use the Pencil tool. Because these arcs are a portion of a circle, they behave differently from elliptical arcs when stretched. Circular arcs bulge like a cloverleaf, whereas elliptical arcs resize smoothly.
- Splines. To create a spline, use the Freeform tool or convert lines. Technically, Visio creates non-uniform rational B-splines (or NURBS for short), but you can also think of a spline as a curve that passes through specific points.

Figure 22-3. All shapes are made up of line segments, arc segments, or splines.
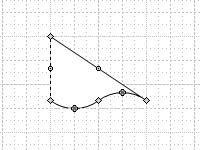
Editing Shapes with the Pencil Tool
To change the look of a shape—that is, to edit its geometry—use the Pencil tool. By selecting, moving, and deleting vertices and control points, you can radically alter shape geometry, turning squares into stars or triangles, flat lines into mountains or valleys, and so on.
Follow these steps to select a vertex:
- Click the Pencil tool, and then select a shape to display its vertices.
- Click a vertex, which turns magenta to show it's selected.
Follow these steps to move a shape vertex:
- Click the Pencil tool, and then select a shape to display its vertices.
- Drag a vertex to reposition the line segment.
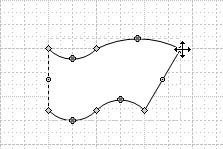
Follow these steps to add a vertex and reshape a shape:
- Click the Pencil tool, and then select a shape to display its vertices.
- Hold the Ctrl key, and then click on a line segment where you want to add a vertex.
- Drag the new vertex to reposition the line segment.
Follow these steps to delete a line segment:
- Select a vertex on the line segment you want to remove.
- Press Delete.
EAN: 2147483647
Pages: 211