Chapter 11: Inheritance
![]() Download CD Content
Download CD Content
Chapter 9 introduced you to object orientation and explored the concepts of abstraction and encapsulation in some depth. However, you have still not seen the most powerful and intriguing aspect of object-oriented programming, that of inheritance. Inheritance is a process whereby one class can inherit, or receive, the public and protected members of another class. Via inheritance you can create several similar classes without having to repeat the code that they have in common. You will see, in this chapter, that C++ brings you the full power in inheritance. This is important because some programming languages only give partial support for inheritance.
Fundamentals of Inheritance
Inheritance allows you to avoid replicating code unnecessarily. If you have some function or variable that is shared by more than one class, then you can declare that function or variable in one class, then have the others inherit that class. For example, if you needed to create a program that tracked animals in the zoo, you would have to create classes for all the animals that might be in the zoo. However, all animals have at least some things in common. Properties such as height and methods such as eat and procreate are common to all animals. So would it not make sense for you to create a class that has these methods and properties, then have the classes for the other animals inherit from this class? This is clearly demonstrated in Figure 11.1.
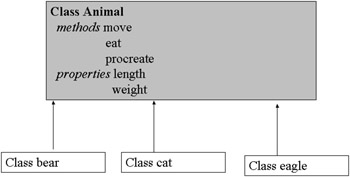
Figure 11.1: Inheritance hierarchy.
This concept is really not that complicated. You simply create a class that has the properties and methods that will be shared by multiple classes, then the other classes inherit from this class. As with all things in programming, there is a specific set of terminology for inheritance. The class that is inherited from can be referred to by a number of terms, the most common being parent class or base class. The class that does the inheriting is referred to as the child class or the derived class. The way you inherit from a class in C++ is to list the name of your class and then use the scope resolution operator (a single colon : ) followed by the name of the class you wish to inherit from. The following example will show you how this works.
Example 11.1
Step 1: Enter the following code into your favorite text editor and save it as 11-1.h.
class bankaccount { protected: float balance; public: float withdraw(float); float deposit(float); void displaybalance(); bankaccount(); }; bankaccount::bankaccount() { balance = 1100; } float bankaccount::withdraw(float amount) { balance -= amount; return balance; } float bankaccount::deposit(float amount) { balance += amount; return balance; } void bankaccount::displaybalance() { cout << "Your balance is " << balance << endl; } class checking:public bankaccount { }; class savings:public bankaccount { }; Step 2: Enter the following code into your favorite text editor and save it as 11-1.cpp.
#include "test.h" #include <iostream> using namespace std; // function prototypes void menu(); // declare an instance of the checking class checking mychecking; int main() { menu(); return 0; } void menu() { // declare other variables int menuchoice; float amount, balance; // display choices cout << "****** Acme Bank Checking Account*******"<< endl; cout << endl; cout << "1. Check Balance "<< endl; cout << "2. Make Deposit "<< endl; cout << "3. Make withdrawal " << endl; cout << "4. Exit " << endl; cout << "Please enter your choice " << endl; // input selection cin >> menuchoice; // do a switch based on selection switch(menuchoice) { case 1: mychecking.displaybalance(); cout << endl; menu(); break; case 2: cout << "Please enter the amount to deposit \n"; cin>> amount; balance = mychecking.deposit(amount); cout << "New balance is " << balance << endl; cout << endl; menu(); break; case 3: cout << "Please enter the amount to withdraw \n"; cin >> amount; balance = mychecking.withdraw(amount); cout << "New balance is " << balance << endl; cout << endl; menu(); break; case 4: return; break; default: cout << "Your choice was invalid \n"; menu(); // re display the menu }// end of switch } Step 3: Compile this code. When you run the code, you should see something like what is depicted in Figure 11.2.
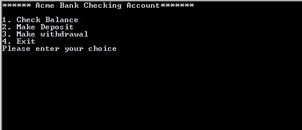
Figure 11.2: Inheritance.
You can now see how you can inherit methods and properties from the parent class. This example also has practical value because it provides a good base for creating an actual banking program. What is of particular importance in this example is the fact that you can clearly see how the public methods that were inherited by the child class are now available to the child class, as if they were part of that class. This is the entire purpose for using inheritance. The definition of inheritance given earlier mentioned that it was when one class received a copy of another class’s public and protected methods. You may be wondering what this means. Public and protected are both access modifiers. They determine how items outside of a class can access a method or property in a class. Table 11.1 shows the three basic access modifiers.
| Access Modifier | Purpose |
|---|---|
| Private | Items that are designated private cannot be accessed from outside the class they are in. They also cannot be inherited. |
| Public | Items that are public can be accessed from outside the class, and they can be inherited. |
| Protected | Items that are protected cannot be accessed from outside the class, but they can be inherited. |
When you instantiate a derived class, its base class constructor will be called automatically. This is actually a good thing for you because constructors hold code that must be executed in order for the class to function properly. The following example illustrates this.
Example 11.2
Step 1: Enter the following code into a text editor and save it as 11-02.h.
class baseclass { public: baseclass(); }; baseclass::baseclass() { cout << "Base class constructor is executing \n"; } class derivedclass:public baseclass { public: derivedclass(); }; derivedclass::derivedclass() { cout << "Derived class constructor is executing \n"; } Step 2: Enter this code into a text editor and save it as ![]() 11-02.cpp.
11-02.cpp.
#include "test.h" #include <iostream> using namespace std; int main() { derivedclass myclass; return 0; } Step 3: Compile and execute the code. You should see an image much like what is shown in Figure 11.3.
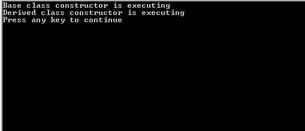
Figure 11.3: Calling the base classes, constructor.
This program should give you a simple understanding of the order in which constructors are called. It should also show you that the constructor is executed as soon as you instantiate the class.
An issue arises when your base class has multiple constructors and you wish your derived class to call one of the other constructors (i.e., not the default no arguments constructor). The way to do this is to modify the definition of your child class’s constructor so that it will in turn call the appropriate base class constructor. You do this by following the derived class’s constructor definition with a colon, and a call to the parent class constructor you wish to call. The following is an example of this.
checking::checking(float num):bankaccount(num) { } Now if you pass a float number to the constructor of the checking account class, it will in turn call the constructor of the parent class that takes a float, and pass that along. The following example is a modification of the previous program that uses overloaded base class constructors.
Example 11.3
Step 1: Enter the following code into your favorite text editor and save it as 11-3.h.
class bankaccount { protected: float balance; public: float withdraw(float); float deposit(float); void displaybalance(); bankaccount(float); bankaccount(); }; bankaccount::bankaccount(float num) { balance = num; } bankaccount::bankaccount() { balance = 1100; } float bankaccount::withdraw(float amount) { balance -= amount; return balance; } float bankaccount::deposit(float amount) { balance += amount; return balance; } void bankaccount::displaybalance() { cout << "Your balance is " << balance << endl; } class checking:public bankaccount { public: checking(float); }; checking::checking(float num):bankaccount(num) { } class savings:public bankaccount { }; Step 2: Enter the following code into your favorite text editor and save it as 11-3.cpp.
#include "test.h" #include <iostream> using namespace std; // function prototypes void menu(); // declare an instance of the checking class checking mychecking(1200); int main() { menu(); return 0; } void menu() { // declare other variables int menuchoice; float amount, balance; // display choices cout << "****** Acme Bank Checking Account*******"<< endl; cout << endl; cout << "1. Check Balance "<< endl; cout << "2. Make Deposit "<< endl; cout << "3. Make withdrawal " << endl; cout << "4. Exit " << endl; cout << "Please enter your choice " << endl; // input selection cin >> menuchoice; // do a switch based on selection switch(menuchoice) { case 1: mychecking.displaybalance(); cout << endl; menu(); break; case 2: cout << "Please enter the amount to deposit \n"; cin>> amount; balance = mychecking.deposit(amount); cout << "New balance is " << balance << endl; cout << endl; menu(); break; case 3: cout << "Please enter the amount to withdraw \n"; cin >> amount; balance = mychecking.withdraw(amount); cout << "New balance is " << balance << endl; cout << endl; menu(); break; case 4: return; break; default: cout << "Your choice was invalid \n"; menu(); // re display the menu }// end of switch } Step 3: Compile your code.
Step 4: Execute the code.
In short, what you are doing is telling the base class which constructor you wish to use. This can be done regardless of how many constructors the base class might have. All you need to do is specify which base class constructor to use when you define the constructors for the derived class. You may also encounter situations where the base class has multiple constructors. You can have any of the child class constructors call any of the base class constructors; however, the logical course usually involves matching the parameters of the child classes constructor with the base class constructor it will call. In other words, if your base class has a constructor that takes a float, then you will probably call that from a derived class constructor that takes a float and pass the float from the child class constructor to the parent class constructor.
EAN: 2147483647
Pages: 197