Chapter 3: Arrays, Strings, and Bitwise Operations
![]() Download CD Content
Download CD Content
In Chapter 1 you were introduced to variables. In Chapter 2 you used these variables in different ways, and the concept of an array was introduced. This chapter explores arrays in greater detail. This chapter also explores strings. Strings and arrays are closely related topics. Also included in this chapter is an introduction to bitwise operations.
Arrays and Strings
Now you have seen the basic data types you can work with in C++. These will be adequate for most situations. However, they will not be the ideal solution for all situations. In some situations, you have closely related data that should logically be grouped under a single name. For example, if you wished to hold the temperature for 20 consecutive days, all the values could logically be called “temperature,” but how do you have one variable hold 20 different values at the same time? The answer is an array. An array is basically a variable that can hold multiple values. A more formal definition would be an array is a series of variables of the same type, referred to by the same name, and contiguous in memory. Each variable in the array has the same name, and is differentiated by a number that indicates which element in the array it is. The following example declares an array.
float temperature[20];
What happens with this statement is that a variable named temperature is created, but rather than just the space for a single float value being allocated, space is allocated for 20 different floats. They are loaded into memory right next to each other in order starting with zero as the first element: temperature[0], temperature [1], temperature[2], and so on. Those floating point values can be accessed using a number to designate the element in the array you wish to address, like the following example.
temperature[0], temperature[1], temperature[2]….temperature[19]
Note that the temperature array stops at 19. It begins at 0 and has 20 elements, thus stopping at 19. All arrays begin with zero. If you define an array, the number you put in the brackets is the number of elements the array will have, beginning with zero.
Another way to define arrays is to say that they are simply a series of elements of the same type placed consecutively in memory. These elements can be individually referenced by adding an index to a unique name. In practical terms, this means that if we declare an integer array with five elements, then we can store five values of type int without having to declare five separate variables, each one with a different identifier. Instead, we can use an array to store the five different values of the same type.
You can access an element of an array the same way you would access any other variable; you simply have to provide the index that identifies which element of the array you wish to access.
temperature[5] = 89.5;
| Watchout! | If you attempt to access an element of the array that is beyond the bounds that you declared the array, most C++ compilers will let you try. . . . Unfortunately, this can lead to serious problems. The following example uses a value that is beyond the actual range of the array. |
Example 3.1
Step 1: Enter the following code into your favorite text editor.
#include <iostream> using namespace std; int main() { int myarray[5]; myarray[10] = 99; cout << myarray[10] << endl; return 0; } Step 2: Compile and run the code. You should see something similar to what is depicted in Figure 3.1.
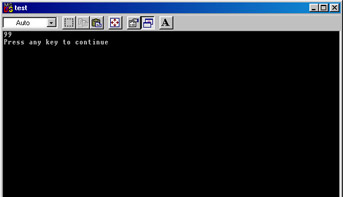
Figure 3.1: Overflowing arrays.
When you write values beyond where you defined the array, there is no way to know where that variable was stored. Basically it is stored at some spot in memory. Because we tried to access an element that was six elements beyond an array of integers, what happens is that the next space in memory that is 24 bytes (six elements multiplied by four bytes per integer) is overwritten with the number 99. This could be memory that contains data that is necessary for some other program. Writing beyond the limit of your array is called overflowing the buffer. This can lead to serious problems because you might be overwriting some other program’s data. You should always be careful in your code to avoid attempting to access any element beyond the limits that you declared when you created your variable.
Before moving on, it is important that you fully understand what an array is. Many beginning programmers make this more difficult than it really is. An array is just another variable. However, instead of holding a single value, it holds a series of values. This is useful when you have data that is related. You can store each item in an element of the array. Therefore, an array is simply a series of variables with the same name and type, each designated by an index number, which identifies which element of the array we are addressing. You will notice that the past few paragraphs have given you a few different but similar definitions of an array. This is intentional. It is hoped that at least one of these definitions will help you to understand the concept. To illustrate how to access each element in an array, consider the following code fragment.
istudentsage[5]; studentsage [0] = 14; studentsage [1] = 17; studentsage [2] = 15; studentsage [3] = 14; studentsage [4] = 16;
You can see that an array named studentage is created. It is five elements long, ranging from mystudent[0] to mystudent[5]. We then place a value in each of the elements of this array. You could, of course, have made five different int variables, each with a different name. However, because they all contain the same kind of information, an array makes better sense. Let’s look at the following example.
Example 3.2
Step 1: Write the following code into your favorite text editor. Save it as 03_02.cpp.
#include <iostream> using namespace std; int main() { float temp[5]; cout << "Please enter the temperature for day one \n"; cin >> temp[0]; cout << "Please enter the temperature for day one \n"; cin >> temp[1]; cout << "Please enter the temperature for day one \n"; cin >> temp[2]; cout << "Please enter the temperature for day one \n"; cin >> temp[3]; cout << "Please enter the temperature for day one \n"; cin >> temp[4]; cout << " The temperatures for the first five days is "; cout << temp[0] << ", " << temp[1] << ", "<< temp[2] << ", "<< temp[3] << ", "; cout << temp[4] << endl; return 0; } Step 2: Compile and run the code.
You should see an image, much like the one shown in Figure 3.2.
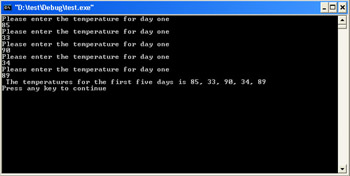
Figure 3.2: Using arrays.
This example is pretty simple but it does show you the basics of declaring an array, filling an array, and printing an array.
It is also important to initialize arrays to some default value. A default value is simply some starting point value. It is commonplace to give all numeric variables a value of zero. When declaring an array that has local scope (local scope refers to anything that is declared within a function), if you don’t specify otherwise, it will not be initialized. This means that its content is undetermined until we store some values in it.
If we declare a global array (a global variable is one which is declared outside of any individual function), its content will be initialized with all its elements filled with zeros (if it’s a numeric data type). What this means in practical terms is that arrays declared within a function must be initialized to some default value. Those declared outside of function don’t have to be initialized, but may be if you wish. If you want to play it safe, initialize all arrays to some default value, regardless of where they are declared. This initialization can take place in several ways. The most common way is done when you first create the array.
int myarray [5] = { 10, 5, 10, 20, 15 }; The other way to initialize an array is to use a loop and loop through each element, giving it a value. Chapter 5 discusses loops in greater detail. For now you can simply use the first method for initializing arrays. It is, by far, the most common method.
The arrays you have seen are called one-dimensional arrays, because they only have one dimension. However, you can have more dimensions to your array. Let us examine the two-dimensional array. When you declare a two-dimensional array you must declare two different indexes, as you see in the following example.
int myarray[4][4];
This expression creates an array of integers that is four integers by four integers, thus holding a total of 16 integers. You access each element of a two-dimensional array by specifying two numbers. For example, the first element of this array would be myarray[0],[0]. The following table (Table 3.1) clarifies the positioning of elements in a two-dimensional array.
| 0,0 | 0,1 | 0,2 | 0,3 |
| 1,0 | 1,1 | 1,2 | 1,3 |
| 2,0 | 2,1 | 2,2 | 2,3 |
| 3,0 | 3,1 | 3,2 | 3,3 |
It is possible to create arrays with any number of dimensions that you see fit. However, it is rare to see arrays of more than two dimensions. There are several reasons for this. The first reason is that such multidimensional arrays quickly become very unwieldy for the programmer. Secondly, they quickly tax a system’s resources. Consider that a single dimensional array of four integers has 4 elements and takes up 16 bytes (4 bytes per integer multiplied by 4 integers). A two-dimensional array of 4 integers by 4 integers has 16 elements and uses 64 bytes (16 bytes per row by 4 rows). But a three-dimensional array of 4 x 4 x 4 integers would have 64 elements and would take up 256 bytes. In most cases you will encounter single arrays, and occasionally you will see two-dimensional arrays. It would be rare for you to need to work with arrays of higher dimensions. Perhaps it would be useful for you to see an actual two-dimensional array in action. This example will use a 4 by 7 float. This represents 4 weeks, at 7 days per week, and the temperatures recorded on each day. This single, two-dimensional array can store the temperatures measured for 28 consecutive days.
Example 3.3
Step 1: Enter the following code into your favorite text editor and save it as ![]() 03-03.cpp.
03-03.cpp.
#include <iostream> using namespace std; int main() { int monthlytemps[4][7]; cout << "Enter the temp for week 1 day 1"; cin >> monthlytemps[0][0]; cout << "Enter the temp for week 1 day 2"; cin >> monthlytemps[0][1]; cout << "Enter the temp for week 1 day 3"; cin >> monthlytemps[0][2]; cout << "Enter the temp for week 1 day 4"; cin >> monthlytemps[0][3]; cout << "Enter the temp for week 1 day 5"; cin >> monthlytemps[0][4]; cout << "Enter the temp for week 1 day 6"; cin >> monthlytemps[0][5]; cout << "Enter the temp for week 1 day 7"; cin >> monthlytemps[0][6]; cout << "Enter the temp for week 2 day 1"; cin >> monthlytemps[1][0]; cout << "Enter the temp for week 2 day 2"; cin >> monthlytemps[1][1]; cout << "Enter the temp for week 2 day 3"; cin >> monthlytemps[1][2]; cout << "Enter the temp for week 2 day 4"; cin >> monthlytemps[1][3]; cout << "Enter the temp for week 2 day 5"; cin >> monthlytemps[1][4]; cout << "Enter the temp for week 2 day 6"; cin >> monthlytemps[1][5]; cout << "Enter the temp for week 2 day 7"; cin >> monthlytemps[1][6]; cout << "Enter the temp for week 3 day 1"; cin >> monthlytemps[3][0]; cout << "Enter the temp for week 3 day 2"; cin >> monthlytemps[3][1]; cout << "Enter the temp for week 3 day 3"; cin >> monthlytemps[3][2]; cout << "Enter the temp for week 3 day 4"; cin >> monthlytemps[3][3]; cout << "Enter the temp for week 3 day 5"; cin >> monthlytemps[3][4]; cout << "Enter the temp for week 3 day 6"; cin >> monthlytemps[3][5]; cout << "Enter the temp for week 3 day 7"; cin >> monthlytemps[3][6]; cout << "Enter the temp for week 4 day 1"; cin >> monthlytemps[4][0]; cout << "Enter the temp for week 4 day 2"; cin >> monthlytemps[4][1]; cout << "Enter the temp for week 4 day 3"; cin >> monthlytemps[4][2]; cout << "Enter the temp for week 4 day 4"; cin >> monthlytemps[4][3]; cout << "Enter the temp for week 4 day 5"; cin >> monthlytemps[4][4]; cout << "Enter the temp for week 4 day 6"; cin >> monthlytemps[4][5]; cout << "Enter the temp for week 4 day 7"; cin >> monthlytemps[4][6]; return 0; }// end of main Step 2: Compile and run the program.
You should notice several things about this little piece of code. The first thing you should notice is the way in which the array is being filled. This is actually a rather inelegant way to fill the array. When you encounter loops in Chapter 5, you will see more efficient ways to fill an array, and to access its elements. The important thing for you to notice now is that 28 temperature values are stored in a single array.
EAN: 2147483647
Pages: 197