| Both URL parameters and form parameters can be used to send form data from a user's browser to the server. Once you create URL and/or form parameters, you can define variables to store the values of the parameters, and then use the variables later to insert dynamic content in your pages. URL parameters use the HTTP GET method to send information to the server by adding the information to the end of a URL. When the server receives a page request with URL parameters added to the request, it passes those parameters to the requested page before the page is sent to the browser. URL parameters can be used with a form or with a hyperlink. Form parameters, on the other hand, use the HTTP POST method to send information in the body of the HTTP pagerequest message. In general, you use URL parameters when you need to send only a small amount of information to the server, and form parameters when you need to send a larger amount of data. URL parameters The format for a URL parameter is a question mark followed by a name-value pair, with an equals sign (=) between the name and the value. If there is more than one name-value pair, they are separated by an ampersand (&). Search pages commonly add URL parameters to a requested URL. A Google search for Dreamweaver 8, for example, generates the following URL: http://www.google.com/search?hl=en&q=  Dreamweaver+8 Dreamweaver+8
URL parameters can't be used for unlimited amounts of data transfer. Each browser sets a maximum URL size. In Microsoft Internet Explorer, the maximum is 2,083 characters. URL parameters are also not useful for data where security is a concern. For example, using the GET method to send a password value isn't a good idea because the value displays in the URL. URL parameters are useful when you want to send a small amount of data to the server. For example, you could use a URL parameter to send a user's name to the server and then display the data (the user's name) on another page. Form parameters Like URL parameters, form parameters also use name-value pairs. The name used in the parameter is the name of the form object. For example, the following code is HTML code for a text field: <input type="text" name="city">
The name of the form object is city, and the value is the user input in the city text field. When the form data is submitted to the server, the name (city) and value (whatever the user enters in the city text field) are sent to the server as a form parameter. Forms with several fields generally use form parameters and the POST method to submit the data to the server. If you would prefer to download the files for the next four tasks and follow along, rather than creating the files yourself, go to the Web site for this book, at www.peachpit.com/dw.vqpdownload, and download the URLparam.php, response.php, Formparam.php and response_form.php files. Processing Forms You can use URL variables and form variables to collect user input and display it dynamically on a page. The data is available at the time the page is displayed, but it's not stored after that pointinstead, it's created again every time a user clicks the hyperlinks or enters information in a text field. You can also store the information that users input. You can use input from users to add, edit, or delete information stored in database records (see Chapters 12), and you can collect and store user names and passwords to restrict access to your site to authorized users (see Chapter 13). User input often undergoes further processing by a server-side script using programming constructs, such as conditional statements (if/else), functions, and loops. The script may also perform mathematical calculations on the input. These operations require server-side code that is not automatically provided by Dreamweaver but can be added to your Dreamweaver pages if you know the code language. Some code blocks are also available in Dreamweaver's Snippets panel (see Chapter 3 for more details on using code snippets). |
To create a URL parameter using a link: 1. | From the File menu, select New > Dynamic page > PHP to create a new PHP page. Save the page as URLparam.php.
To this page we're going to add two hyperlinks that include URL parameters. You'll add a URL variable in the next task so that you can access the data contained in the URL parameters.
| 2. | In Code view, add a hyperlink to the page that includes the URL of the page that will use the parameter, and the URL parameter itself:
<a href="response.php?answer=Yes">Yes, keep my name on the list</a>
The parameter name is answer, and the value is Yes.
You'll create the response.php page and a URL variable in the next task.
| 3. | Add a second hyperlink with a different value for the parameter:
<a href="response.php?answer=No">No, please remove my name from the list</a>
| 4. | Save the page and preview it in a browser.
The page displays with the two hyperlinks (Figure 8.37). Although you've already added URL parameters to the hyperlinks, you also need to add a URL variable so that you can access the data from the URL parameters. In the following task, you add a URL variable for the two URL parameters you created in this task.
Figure 8.37. These links contain URL parameters that are sent to the server when a link is clicked. 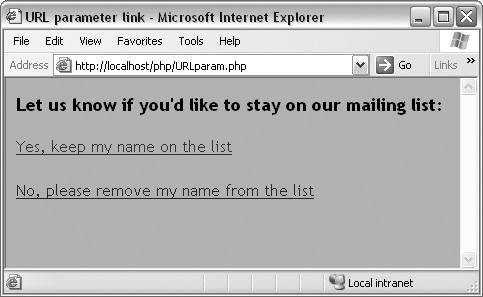
|
To define a URL variable: 1. | From the File menu, select New > Dynamic page > PHP to create a new PHP page. Save the page as response.php.
We'll add to this page a URL variable for the URL parameters you created in the preceding task so that you can use the data contained in the URL parameters.
| 2. | In the Application panel group, click the Bindings tab to access the Bindings panel.
| 3. | Click the plus button, and select URL Variable from the menu (Figure 8.38).
Figure 8.38. Click the plus button, and select URL Variable from the Bindings panel menu. 
The URL Variable dialog appears (Figure 8.39).
Figure 8.39. Enter a name for a URL variable in the URLVariable dialog. 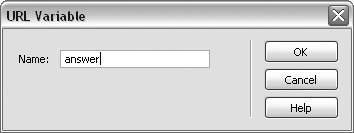
| 4. | Enter a name for the URL variable. For our purposes, we'll name the variable answer, because it's the same name we designated as the parameter name in the previous exercise. Click OK to close the dialog.
The URL variable name appears on the Bindings panel (Figure 8.40).
Figure 8.40. After you define a URL variable, the variable name is listed on the Bindings panel. 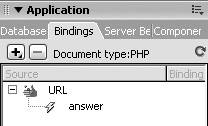
| 5. | Select the URL variable name, and drag it from the Bindings panel to the place in the Document window where you want to display the variable value.
You can drag the variable to the Code view window or the Design view window. The variable name displays as placeholder text in Design view (Figure 8.41).
Figure 8.41. The URL variable name displays as placeholder text in the Design view window. 
| 6. | Save the page. Open the URLparam.php page and click a link.
The response.php page displays the selected answer, and the URL parameter has been added to the URL that appears in the browser address bar (Figure 8.42).
Figure 8.42. The variable name is added dynamically when the page is opened in a browser. The URL variable is added to the end of the URL, as seen in the browser address field. 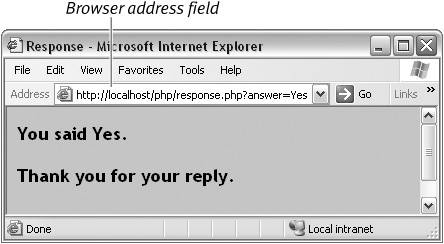
|
 Tip Tip
The name of the URL variable menu item on the Bindings panel depends on the server technology you're using to create the page. In PHP and ColdFusion, the menu item is URL Variable. If you're using ASP, on the Bindings panel select Request Variable > Request.QueryString to add a URL variable.
To create a form parameter: 1. | From the File menu, select New > Dynamic page > PHP to create a new PHP page. Save the page as Formparam.php.
We'll add a form and a form field to this page, and then create a form parameter. In the next task, you'll add form variables so that you can access the data in the form parameter.
| 2. | From the Insert menu, select Form > Form to add a form to your page.
| 3. | In the Design view window, select the form.
| 4. | In the Property inspector, in the Form Name field enter Param as the name for the form (Figure 8.43). In the Action field, enter response_form.php. From the Method drop-down list, select POST.
Figure 8.43. In the Property inspector, enter a name for the form (Param), enter an action for the page (response_form.php) that will process the data from the form, and then select the POST method from the drop-down list. 
You'll create the form response page (response_form.php) and form variables in the next task.
| 5. | From the Insert menu, select Form > Text Field to add a text field to your page.
| 6. | In the Design view window, select the text field. In the Property inspector, in the text field enter a name for the field. In our case, we'll enter Name, since we'll use this field as the place where the user will enter a name.
| 7. | Repeat Steps 5 and 6 to insert a second text field, named City.
| 8. | From the Insert menu, select Form > Button to add a button to your form.
| 9. | In the Design view window, select the button. In the Property inspector, in the Button Name field, enter submit as the name for the button (Figure 8.44). In the Label field, enter the text to display on the button. We'll enter Submit. In the Action field, select Submit Form.
Figure 8.44. In the Property inspector, enter a name for the button (submit), enter a value to display on the button (Submit), and then select the Submit Form radio button. 
| 10. | Save the page and preview it in a browser.
The page shows two text fields and a Submit button (Figure 8.45). In the following task, you'll add form variables so that you can use the data from the two form parameters you created in this task on another page.
Figure 8.45. The form includes two text fields and a Submit button, as shown in Internet Explorer. 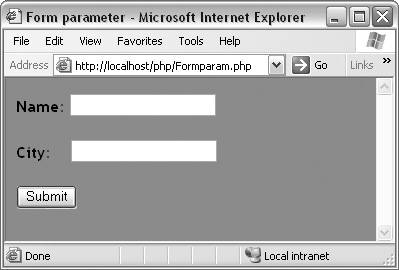
|
To define a form variable: 1. | From the File menu, select New > Dynamic page > PHP to create a new PHP page. Save the page as response_form.php.
You'll add two form variables for the two form parameters you created in the preceding task so that you can display the data from the form parameters in this page.
| 2. | In the Application panel group, click the Bindings tab to access the Bindings panel.
| 3. | Click the plus button, and select Form Variable from the menu (Figure 8.46).
Figure 8.46. Click the plus button, and select Form Variable from the Bindings panel menu. 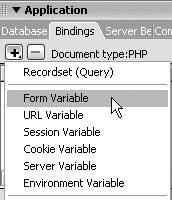
The Form Variable dialog appears (Figure 8.47).
Figure 8.47. Enter a name for a form variable in the Form Variable dialog. 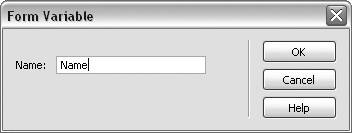
| 4. | Enter a name for the form variable. In our case, we'll name the variable Name, since this is the name of the text field we used in the previous task. Click OK to close the dialog.
| 5. | Repeat Steps 3 and 4 to create a second form variable, named City.
The form variable names appear on the Bindings panel (Figure 8.48).
Figure 8.48. After you define form variables, the variable names are listed on the Bindings panel. 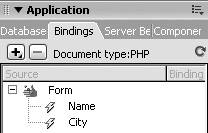
| 6. | Select the first form variable name, and drag it from the Bindings panel to the place in the Document window where you want to display the variable value. You can drag the variable to the Code view window or the Design view window. Repeat this for the second form variable name.
The variable names display as placeholder text in Design view (Figure 8.49).
Figure 8.49. The form variable names display as placeholder text in the Design view window. 
| 7. | Save the page. Open the Formparam.php page, and enter a name and city in the text fields. Click the Submit button.
The response_form.php page displays the values for the two form variables (Figure 8.50).
Figure 8.50. The variable names are added dynamically when the page is opened in a browser. 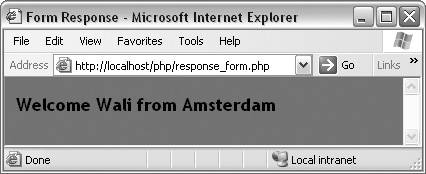
|
|