| You can also create more complex queries in Dreamweaver using the advanced Recordset dialog, where you enter SQL code directly or use the Database Items tree to automatically create a SQL statement. The Database Items tree is a section of the advanced Recordset dialog where you can select database table fields and click buttons to add SQL SELECT, ORDER BY, or WHERE clauses to create a SQL statement. Dreamweaver calls it a Database Items tree because it contains branches (database > table > fields), as you'll see in a moment. In the exercises in this section, you'll create an advanced ColdFusion recordset that associates the eventType field in two tables, the trips table and the eventtypes table, which are part of the CompassTravel database you used previously in this chapter. We'll then filter and sort the resulting records. In the first task you'll enter the SQL code directly in the SQL box on the advanced Recordset dialog to create the recordset. In the second task, you'll use Dreamweaver's Database Items tree to automate the process of creating the recordset. These exercises are based on ColdFusion, but the process of creating advanced recordsets is the same for ColdFusion, ASP, and PHP. To create an advanced recordset using ColdFusion: 1. | Open a new ColdFusion page in Dreamweaver.
| 2. | In the Application panel group, click the Bindings tab.
The Bindings panel appears.
| 3. | Click the plus button, and from the contextual menu, choose Recordset (Query).
The Recordset dialog appears.
| 4. | Click the Advanced button to open the advanced Recordset dialog.
| 5. | In the Name field, type Events (Figure 6.26).
Figure 6.26. You can create a complex query using the advanced Recordset dialog. 
Because we're creating a recordset from the CompassTravel data source that joins information about Compass Travel events, such as surfing, mountain biking, or fishing, we're naming the recordset Events.
| 6. | In the Data Source field, choose Compass Travel from the drop-down list.
(You should have already established a connection to the CompassTravel database in Chapter 4. This is the same database we used in the previous ColdFusion tasks in this chapter.)
| 7. | In the User Name and Password fields, enter a user name and password if required by your database administrator. Otherwise, leave these two fields blank.
In the next step, we'll create a SQL statement using SELECT, FROM, WHERE, and ORDER BY clauses to join the trips table, which includes data about Compass Travel trips, such as name, type, description, and location, with the eventtypes table, which contains data describing the different types of events in the trips, such as surfing, kayaking, and scuba diving. We'll also sort the results by event type.
| 8. | In the SQL box, type the following code (Figure 6.27):
Figure 6.27. Type the code needed to join and sort the tables in the SQL box. 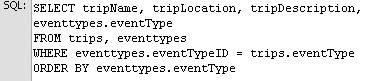
SELECT tripName, tripLocation, tripDescription, eventtypes.eventType FROM trips, eventtypes WHERE eventtypes.eventTypeID = trips.eventType ORDER BY eventtypes.eventType
| 9. | Click the Test button.
The Test SQL Statement window appears and displays the data from the joined tables, sorted by eventtypes.eventType (Figure 6.28).
Figure 6.28. The data from the trips and eventtypes tables is joined and sorted. 
| 10. | Click OK to close the Test SQL Statement window, then click OK in the Recordset dialog to save the new query and close the dialog.
|
 Tips Tips
Notice in the SQL statement you entered that some of the field names are preceded by the table name and a dot (.). This is because there is a field named eventType in both tables, so that field name has to be further qualified by including the table name. If you click the Simple button on the advanced Recordset dialog to return to the simple Recordset dialog after you've entered the SQL statement in Step 8, a window displays to tell you that the simple Recordset dialog can't be opened because the code is too complex (Figure 6.29). Figure 6.29. If you create a complex SQL statement in the advanced Recordset dialog, you won't be able to switch back to the simple Recordset dialog. 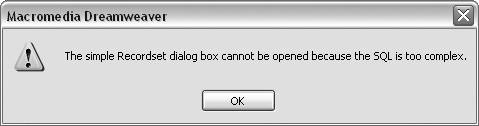
To create an advanced recordset using the Database Items tree: 1. | Follow Steps 1 through 7 in the previous task.
| 2. | In the Database Items section at the bottom of the Recordset dialog, click the plus button to the left of the Tables item to expand the Tables list, and then click the plus button to the left of the eventtypes and trips tables to expand them (Figure 6.30).
Figure 6.30. Expand the Tables item in the Database items section to display a list of all the tables in the database. 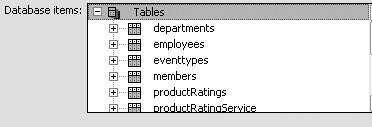
| 3. | From the list of fields in the trips table, choose the tripName field, and then click the SELECT button.
A SELECT statement appears in the SQL box (Figure 6.31), adding the tripName field from the trips table to the recordset we're creating.
Figure 6.31. Click a field name, and then click the SELECT button to add a SELECT statement to the SQL field. 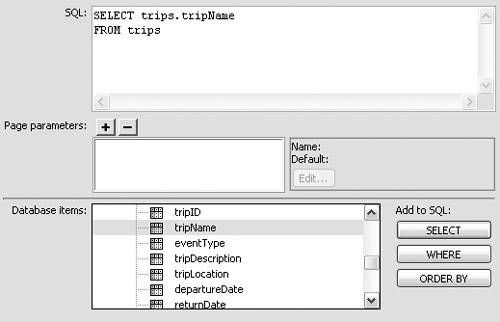
| 4. | Choose tripLocation from the list of fields in the trips table, and click the SELECT button again. Repeat for the tripDescription field.
You've now added the tripName, tripLocation, and tripDescription fields from the trips table to the recordset you're creating with the SQL statement. In the next step, you'll add a field from the eventtypes table.
| 5. | From the list of fields in the eventtypes table, choose eventType and click the SELECT button (Figure 6.32).
Figure 6.32. Expand the eventtypes table to access the eventType field. 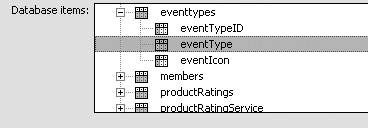
Dreamweaver automatically adds a FROM statement and updates it as items from additional tables are added to the SELECT statement. The FROM statement shows the table name for every table used in the SELECT statement.
| 6. | From the eventtypes table list, choose the eventTypeID field, and click the WHERE button.
A WHERE clause appears in the SQL field, which creates a filter for the recordset data by adding a condition to the SQL statement.
We'll complete the WHERE clause in Step 8. In the next step, we'll add the eventType field from the trips table.
| 7. | From the trips table list, choose the eventType field and click the WHERE button.
| 8. | Delete the AND in the WHERE statement and replace it with an equals sign (=).
Because the eventTypeID field in the eventtypes table contains the same data as the eventType field in the trips table, we're changing the AND part of the WHERE statement to an equals sign (=). The condition created by the WHERE statement and an equals sign (=) is that the two fields contain the same data. (The fact that these two tables are related via these two fields is what allows us to join them to create a recordset.)
| 9. | From the eventtypes table list, choose the eventType field and click the ORDER BY button.
The ORDER BY clause completes the SQL statement, sorting the records in the recordset by the eventType field from the eventtypes table (Figure 6.33). The records are sorted in ascending order unless you add DESC after the field name to sort them in descending order.
Figure 6.33. A complex SQL statement joining two tables and including a filter (WHERE) and a sort (ORDER BY) can be generated quickly with the database items tree. 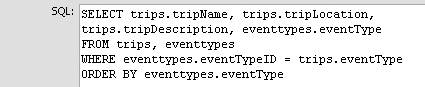
| 10. | Click the Test button.
The Test SQL Statement window appears, displaying the data from the joined tables (trips and eventtypes), and sorted by eventType (Figure 6.28).
| 11. | Click OK to close the Test SQL Statement window, and then click OK in the Recordset dialog to save the new query and close the dialog.
|
Tip
|