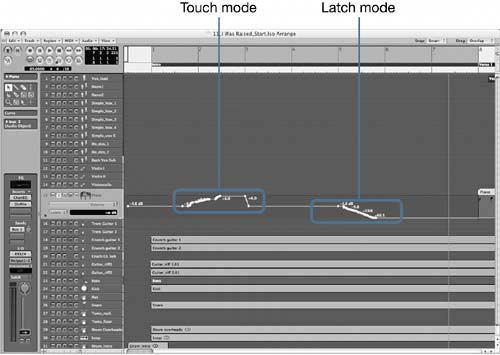
| Real-time automation allows you to create automation from your physical gestures, whether they involve dragging a mouse or manipulating a hardware control surface that sends control messages to Logic. Logic's automation is sample accurate, so it captures precise movements of channel controlsmovements that can be recalled during playback. There are three modes for writing real-time automation: Write, Touch, and Latch. They are available on any channel or Arrange window track. These modes are active whether or not Logic is in record mode, and they can write automation whenever Logic's Transport is running. Write mode is rarely used, because it deletes all previously recorded automation data under the song position as it moves forward. (There are times when this is useful, however.) Thus you should mostly use Touch or Latch mode when writing automation, as they both read the existing automation data, if any, until a channel control is "touched." This allows you to update existing data as well as overwrite it when needed. The difference between Touch and Latch modes is best illustrated by using them. To get a feel for the difference between them, let's try both modes while writing some real-time automation in the blank space before the Piano track enters. 1. | Use the Goto Next/Previous Marker key commands (the greater-than and less-than keys) to locate to the Intro section.
The cycle Region adapts to encompass the Intro section.
| 2. | Use the Zoom to fit Locators key command (Ctrl-Shift-Z) to zoom in to the Intro section.
| 3. | Select the Piano track (Track 15).
| 4. | Click the Track Solo button to solo the track.
| 5. | Click the Automation Parameter menu and choose Volume.
| 6. | Click the Automation Mode menu and choose Touch.

You will be using the mouse for data entry, dragging the Arrange channel strip fader to create the automation while Logic is playing. Don't worry if you aren't able to do everything in the first seven bars, because Cycle mode will be on, repeating the section as many times as you need to complete the steps.
| 7. | Play the song.
| 8. | While the song is playing, drag up the volume fader in the Arrange channel strip all the way and release the mouse button.
The fader returns to the state at which you started.
| 9. | While still playing the song, change the automation mode to Latch.
| 10. | Drag down the fader all the way and release the mouse button.
The level stays where you left the fader and is "latched" into place.
| 11. | Stop the song.
The main difference between these two modes is what happens after the mouse button is released. When you're in Touch mode, the automation returns to the value at which you started. When you're in Latch mode, the value remains where you left the control.
 Try recording an entire automation pass for the Piano track using Latch mode. The piano part could use a decrease in volume level of around 2dB for the Verse 2 through Bridge sections. Try recording an entire automation pass for the Piano track using Latch mode. The piano part could use a decrease in volume level of around 2dB for the Verse 2 through Bridge sections.
| 12. | Ctrl-click the background of the Arrange window to return to the original zoom level.
| 13. | Click the cycle Region to turn Cycle mode off.
| 14. | Locate to the beginning of the song by clicking Stop.
| 15. | Click the Track Solo button on the Piano track to disable Solo mode.
| 16. | Set the Arrange channel strip fader for the Piano to around 4.6dB.
This will be the level at which you will start recording automation.
TIP Because Touch and Latch modes only write when a control is active, you can overwrite any existing data by click-holding the fader as you pass over the automation. | 17. | Play the entire song, riding the Piano track's volume level by dragging the volume fader in the Arrange channel strip.
| 18. | Stop the song when finished.
You should have an entire pass of real-time automation recorded for the Piano track.
 If you are happy with this automation pass, it is a good idea to switch the automation mode to Read so that you won't inadvertently overwrite changes. If you are happy with this automation pass, it is a good idea to switch the automation mode to Read so that you won't inadvertently overwrite changes.
| 19. | Switch the automation mode to Read.
|
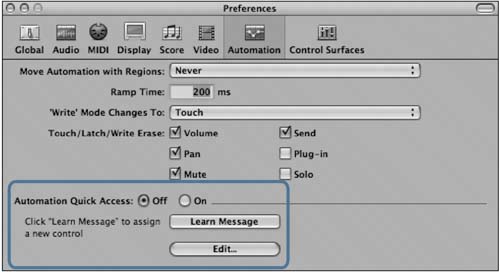
Using Automation Quick Access In order to truly benefit from using real-time automation, you need to control the channel with something other than the mouse. Ideally, a hardware control surface that is designed to integrate with Logic's Track Mixer would provide the best control for real-time automation, but any MIDI controller will do. Automation Quick Access allows you to assign any knob, fader, or wheel on your MIDI controller to the currently visible automation parameter on a track. While this lets you use your MIDI hardware to write real-time automation, it is limited to automating only one parameter at a time. While a fader control (available on many MIDI keyboards) is more appropriate for controlling volume level, in this exercise you will be assigning the modulation wheel on your MIDI keyboard, as this is more widely available on MIDI hardware. 1. | Choose Logic Pro > Preferences > Automation.
The automation preferences are displayed, with the Automation Quick Access settings located at the bottom of the window.
| 2. | Click the Learn Message button.
| 3. | Move the modulation wheel on your MIDI keyboard up and down.
A help tag appears, indicating that the assignment has been learned.
| 4. | Click the Done button, which now can be seen where the Learn Message button was located.
| 5. | Click the On radio button to make Automation Quick Access active.
| 6. | Close the Preferences window.
| 7. | Select the Kick track (Track 24).
| 8. | In the Automation Parameter menu, choose Pan.
The Pan setting is displayed in the automation track.
| 9. | Move your MIDI keyboard's modulation wheel.
The Pan setting changes with your movements.
| 10. | In the Arrange channel strip, Option-click the Pan knob to reset the value to 0.
| 11. | Click the Automation Parameter menu, this time choosing Volume.
The volume level is displayed in the automation track.
| 12. | Move your MIDI keyboard's modulation wheel again.
The volume level changes with your movements.
Notice how the modulation wheel changes function depending on which automation parameter is active. That is the nature of Automation Quick Access. It allows you to access whatever automation parameter is currently displayed on the selected track.
|
Automating Groups Now that you've assigned your controller using Automation Quick Access, let's use the modulation wheel to write real-time automation, riding the level of the drums throughout the song. To aid in doing this, the drum channels have been grouped to link the channel parameters. This enables you to record automation for all tracks in a Group at the same time by controlling a single channel. 1. | Bring up Screenset 2.
| 2. | In the Track Mixer, scroll to the far right to view the drum tracks.
Note that the drum tracks have been assigned to Group 8, named Drums.
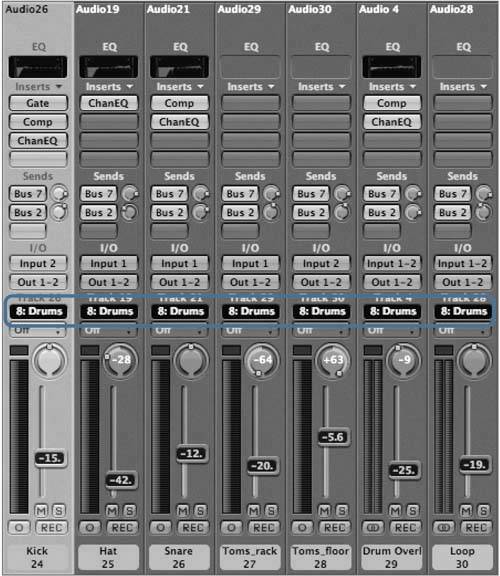 | 3. | With the Kick track still selected in the Arrange window, move your MIDI keyboard's modulation wheel.
All drum channel faders move in relation to the Kick channel.
NOTE While Automation Quick Access is used primarily in the Arrange window, the last selected automation parameter for the selected track (in this case, Volume) is remembered, enabling you to affect levels in the Track Mixer. In addition to linking controls such as Volume, Pan, and Sends, you can also link the automation mode for the Group. This lets you switch automation modes for all channels in a Group at once.
| 4. | Click the Group display on the Kick channel, and choose "Open Group Settings."
The Group Settings window opens.
| 5. | Check the box next to Automation Mode.
| 6. | Close the Group Settings window.
| 7. | Click the Automation Mode pop-up menu on the Kick channel, and choose Touch.
 All channels in the Drums Group change to Touch mode. All channels in the Drums Group change to Touch mode.
Now you are ready to record an automation pass for the entire Drums Group at once. Set the initial levels and locate to the beginning of the song in preparation for recording the real-time automation.
| 8. | Using your modulation wheel, set the level of the Kick channel to 15dB.
| 9. | Click Stop to locate to the beginning of the song.
| 10. | Play the song, using the modulation wheel to ride the volume levels for the Drums Group during playback.
| 11. | Stop the song when you're finished.
| 12. | On the Kick channel, click the Automation Mode pop-up menu and choose Read.
The automation mode for all channels in the Drums Group changes to Read.
Let's look in the Arrange window to see the automation data that you just wrote in.
| 13. | Bring up Screenset 1.
You can see the automation data written to the Kick track, but the other drum tracks are displayed too small for you to see their automation. You need to enlarge the track display.
| 14. | Shift-click Tracks 24 through 30 (Hat, Snare, Toms_rack, Toms_floor, Drum Overheads, and Loop) in the Track List.
The Regions on each selected track are highlighted.
| 15. | Use the Zoom to fit Selection key command (Shift-Z) to zoom in to the selected Regions (the Drums Group tracks).
Notice that the Automation Parameter selections for these tracks (other than the Kick track) all read Display Off. To view the automation, you need to select Volume from the Automation Parameter menu for each track.
| 16. | For Tracks 24 through 30, click the Automation Parameter menu and choose Volume.
You should now see the Volume automation displayed for every track.
|
 TIP You can delete the currently displayed automation data by choosing Options > Track Automation > Delete currently visible Automation Data of Current Track. You can also quickly delete all automation written to a track, regardless of what automation parameter is displayed, by choosing Options > Track Automation > Delete All Automation Data of Current Track. Both of these functions are assignable to key commands for easy access.
|