| Logic Pro organizes sessions by grouping related files within a project folder. At its most basic, a project folder contains two items: Often it also contains some or all of the following elements (depending on the song data, instrument choices, and plug-in choices): A Sampler Instruments folder, containing the sampler instruments used in the song A Samples folder, containing the audio files that are referenced by the sampler instruments used in the song An Impulse Responses folder, containing the impulse response files used by the song's instantiations of the Space Designer plug-in (convolution reverb)
Creating a Project Folder When dealing with multiple dependent files, it is absolutely necessary to keep everything in the right place for Logic's retrieval. Not to worry, however, as Logic automatically generates appropriate folders in their correct locations when creating a new song. This helps to keep your sessions organized from start to finish. NOTE If you didn't complete Lesson 1 and Lesson 2, a version of the template used in this lesson is included with the Lesson 3 files in the following folder: Advanced Logic 7_Song Files/Lesson 03 Project Files/Advanced Logic Template. In order to do the exercises in this lesson, you must copy the file to the following location on your hard drive: ~/Library/Application Support/Logic/Song Templates.
1. | Choose File > New.
You should be looking at the New song window that you explored in Lesson 1 (in the "Using Song Templates" section).
| 2. | If not already selected, check the "Use song template" box.
| 3. | Choose User > Advanced Logic Template from the Template pop-up menu.
This is the song file you have been working on for the last two lessons.
| 4. | Check the "Create project folder" box.
The window expands to show additional settings.
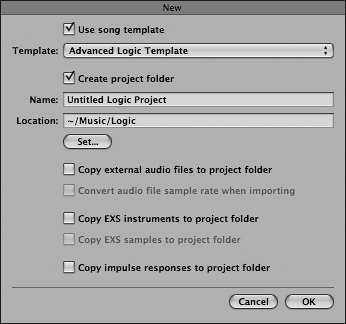
| 5. | In the Name field, type Lesson 3.
NOTE By default, the file path for projects is set to a folder named "Logic," which is created in your ~/Music directory. However, you might have a preferred location for your work (such as a separate location or external drive); you can type in a path for a location where you want new work to be saved. | 6. | Check the "Copy external audio files to project folder" box.
As you enable this, the "Convert audio file sample rate when importing" option becomes visible.
| 7. | Check the "Convert audio file sample rate when importing" box.
| 8. | Check the "Copy EXS instruments to project folder" box.
As you enable this, the "Copy EXS samples to project folder" option becomes visible.
| 9. | Check the "Copy EXS samples to project folder" box.
| 10. | Check the "Copy impulse responses to project folder" box.
| 11. | Click OK to create a new project folder.
NOTE If you started the lesson with a song already open, choose to close the previously opened song when prompted by the file dialog. To better understand what you just did, look in the Finder to locate the files and folders Logic created.
| 12. | Go to the location you specified in the New song window (~/Music/Logic).
| 13. | Open the Logic folder.
Within the Logic folder is your newly created folder, Lesson 3.
| 14. | Open the Lesson 3 folder.
It contains a new song file, also named Lesson 3, as well as a folder named Audio Files.
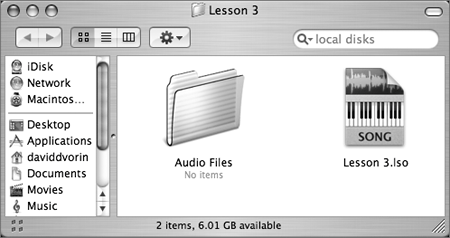
In effect, you have created a new project, "wrapped around" your template, that provides an organized location for all files related to that project. The Audio Files folder is created automatically to contain any audio tracks that will be associated with the song file, recorded or imported.
Keep this location open within the Finder so that you can refer back to it later.
| 15. | Switch back to Logic by using Cmd-Tab to select an active application.
|
|