Creating More Advanced Controls
As you have seen in the previous sections, ASP.NET makes it very easy to create useful controls by inheriting from an existing control and adding properties and methods to create a specialized version of that control by extending
its functionality. But the fun doesn’t stop there. You can override control methods to allow your control to participate in the postback process, and also create custom events for your control. In this section, you’ll learn about these techniques, including building a registration and login control that implements them.
Handling Postbacks
As discussed previously, a postback is the process by which a Web Forms page submits an HTTP POST request to itself in response to some user action, such as clicking a button. The postback itself is initiated by a control that causes the HTML form to be submitted, such as a client-side button element, the Button server control, or a server control that emits JavaScript code to submit the page, such as the DropDownList control. (Note that the DropDownList control emits JavaScript code for posting back the page only if its AutoPostBack property is set to True.) In this section we’ll be focusing on the processing of postbacks, which occurs on the server after the postback has been initiated by the user’s action. At some point, it is likely that you will want to develop a control that handles postback data and/or events. In this section, you’ll learn how to handle both.
You have the opportunity to work with postback information during three phases in the execution of an ASP.NET Web Forms page: the LoadPostData phase, the RaisePostDataChangedEvent phase, and the RaisePostBackEvent phase. To work with the associated data or events, you override the associated method for the desired phase. To override the methods, you need to implement the IPostBackDataHandler interface, the IPostBackEventHandler interface, or both. IPostBackDataHandler defines the LoadPostData method and the RaisePostDataChangedEvent method. IPostBackEventHandler defines the RaisePostBackEvent method.
| Note | You implement interfaces in the fashion specified by the language you’re using. As shown earlier, interfaces are implemented in Visual Basic .NET using the Implements keyword. Unlike inheritance, which allows inheriting only from a single base class, you can implement as many interfaces as you’d like. Separate each interface name with a comma, as follows: Inherits Control Implements IPostBackDataHandler, IpostBackEventHandler |
Table 10-1 summarizes what the postback methods are typically used for.
| Method | Purpose |
|---|---|
| LoadPostData | Loads data posted in form fields into local variables for later processing. Returns a Boolean indicating whether form values have changed since the last postback. |
| RaisePostBackDataChangedEvent | Called if LoadPostData returns True. Used to respond to changes in posted data. |
| RaisePostBackEvent | Used to process data posted back from form fields, and raise any related events from the control. |
You’ll see examples of how to work with postback data in the registration and login control example that follows the next section.
Creating, Raising, and Handling Events
Another important aspect of creating a custom server control is dealing with events. While the event model in ASP.NET is designed to closely emulate event handling in a desktop application, such as a Visual Basic forms-based application, there are some significant differences in the models.
The most significant difference is that control events are raised and handled only on the server. Only after a Web Forms page has been posted back to the server can the state of each control be examined and appropriate events raised and handled.
Another difference is that custom ASP.NET server controls do not directly handle client events, such as clicks, mouseovers, and key presses, because these events occur on the client (although controls can emit client-side code to handle such events). To communicate an event that occurs on the client to the server, the page must be posted back to the server.
There are three parts to dealing with custom events in a custom server control: creating the event, raising the event, and handling the event. (Handling the event is typically done outside the control, but the plumbing to make it work is set up in the control.)
Creating and Raising Events
Events in ASP.NET use two important objects: EventHandler and EventArgs. EventHandler is a delegate used as the basis for creating a new event, while the EventArgs class is used to pass data with an event, or to signify that no event data was passed.
You create events using the Event keyword as follows:
Public Event EventName As EventHandler
EventName is the name of the event being created. Notice that the event is declared as type EventHandler.
| Note | The EventHandler delegate is the basis for all event handler delegates. A delegate defines the signature for the event—that is, it specifies the arguments that an event handler for that event must accept—and acts as a type- safe function pointer to link the event to its event handler routine. The signature for EventHandler is as follows:
Public Delegate Sub EventHandler(sender As Object, e As EventArgs) This means that any event defined using the EventHandler delegate must accept both an Object and an EventArgs argument: Sub Control_Event(sender As Object, e As EventArgs) 'event handling code End Sub You can create your own events that pass data to their event handlers by creating a custom class derived from EventArgs, then creating a new delegate for your event that specifies your custom class instead of EventArgs as one of its arguments. |
Next, you raise the event (based on the criteria you set up within your control to determine if the event should be called) using the RaiseEvents keyword as follows:
Public Overridable Sub RaisePostBackEvent(eventArgument As String) _ Implements IPostBackEventHandler.RaisePostBackEvent If SomeExpression = True Then RaiseEvent EventName(Me, EventArgs.Empty) End If End Sub
This code is executed when the RaisePostBackEvent method is called during page execution. It tests whether SomeExpression is True. If it is, it raises the EventName event, which is typically handled outside of the control.
Handling Custom Events
Once you’ve created the event and the code to raise the event, you (or the developer consuming the event) will need to write code to handle the event. This consists of two steps: creating an event handler and wiring the event to it. Although Chapter 7 covered event handlers, it’s worth reviewing those steps here.
An event handler is a page-level procedure that typically accepts two arguments: the source of the event and an EventArgs instance (or an instance of a class derived from EventArgs) representing any data passed with the event. An event handler for the EventName event would look like this:
Sub ControlName_EventName(Source As Object, e As EventArgs) 'Event handling code End Sub
In the preceding code, ControlName represents the name of the control in which the event is defined, and EventName represents the name of the event. This syntax is not required, but it’s the naming convention typically followed for event handlers. You can call your event handlers whatever you want, but following the ControlName_EventName naming standard will make your code easier to read and maintain. A good example of this is the Page_Load event handler found in the code-behind module for every new Web Form created in Visual Studio .NET. Since the Page class is derived from the Control base class, it exposes the Load event defined by the base class. Because Page_Load is the most common event for adding logic to a Web Form, the template for a Web Form in Visual Studio .NET creates the handler for you by default.
To wire the event handler to your control, you need to do one of two things, depending on whether you’re dealing with a declarative control or a control added programmatically. For declarative controls (those defined using a tag in the .aspx file), add an OnEventName attribute to the tag in which you declare the control, with the value set to the name of the event handler routine:
<ASPNETSBS:MyControl OnEventName="MC1_EventName" runat="server">
For programmatic controls, you need to declare the control instance using the WithEvents keyword, and then add a Handles clause to the event handler procedure for the control:
Protected WithEvents MyCtl As MyNamespace.MyControl
Sub MyCtl_MyEvent (ByVal Source As Object, ByVal e As EventArgs) _ Handles MyControl.MyEvent ' Event handling code End Sub
The good news is that Visual Studio provides support for handling and wiring up events, including custom events through the code editor and IntelliSense statement completion.
Overriding Inherited Events
In addition to creating custom events from scratch, you can also override events that are defined on the base control from which your control is derived. The following standard events are defined by the control class:
-
Init Initialize settings for the current request
-
Load Perform actions that need to be performed for each request once child controls have been created and initialized
-
DataBinding Perform actions needed to evaluate data-binding expressions associated with a control
-
PreRender Perform any modifications to the control or data necessary before rendering the control
-
UnLoad Perform cleanup tasks before the control is removed from memory
To override an event exposed by an inherited class, you override its associated OnEventName method. For example, to override the PreRender event, you would use the following code in your control. (Note that the OnPreRender method takes only one argument, of type EventArgs.)
Protected Overrides Sub OnPreRender(e As EventArgs) 'Event handling code MyBase.OnPreRender(e) End Sub
When you’re handling events, it’s important to understand that the standard control events and methods occur in a consistent order, including events and methods related to postbacks. This is important because if you write code in an event handler that occurs before the objects manipulated by that code have been created and initialized, the results will be unpredictable at best. One of the most common problems relating to event execution order occurs when you add controls to the page programmatically. If you add those controls in the Page_Load event handler, the controls will not maintain their ViewState during postbacks, because the LoadViewState event, which takes care of repopulating the state of controls on the page, occurs before the Load event. Because the controls have not yet been created when the LoadViewState event is fired, the state for controls created in Page_Load is discarded. If you want controls added programmatically to maintain ViewState, you should add those controls in the Page_Init event handler instead.
The following is the order of the standard events and methods for controls.
-
Initialize During this phase, the Init event is raised.
-
LoadViewState During this phase, controls that use ViewState are populated with data from the hidden __VIEWSTATE field submitted with the request. The LoadViewState method can be overridden to customize this process.
-
LoadPostData During this phase, data posted back with the request is evaluated and appropriate action is taken. Override the LoadPostData method to write code for this phase.
-
Load During this phase, the Load event is raised.
-
RaisePostDataChangedEvent During this phase, change events are raised in response to differences between the current state of a control’s members and the values submitted with the request. Override the RaisePostDataChangedEvent method to write code for this phase.
-
RaisePostBackEvent During this phase, event handlers for server- side events are called. Override the RaisePostBackEvent method to write code for this phase.
-
PreRender During this phase, any modifications necessary before rendering are made. Changes made after this phase will not be saved to ViewState.
-
SaveViewState During this phase, controls that use ViewState save their data to the hidden __VIEWSTATE field. The ViewState method can be overridden to customize this process.
-
Render During this phase, the control and its children are rendered to the browser.
-
Dispose During this phase, any cleanup of expensive resources— file handles, database connections, and so on—is performed. Override the Dispose method to write code for this phase.
When overriding methods for inherited events (Init, Load, PreRender, and so on), it’s usually a good idea to call the base implementation of the event’s method from within your overridden version. This ensures that any handlers associated with those events are called. The syntax for calling the base handler is as follows:
Protected Overrides Sub OnLoad(e As EventArgs) 'Event handling code MyBase.OnLoad(e) End Sub
A Registration and Login Control
To demonstrate event handling and postback handling, you’re going to build a control that can handle user registration and logins. This control will integrate with ASP.NET Forms authentication, and can be used to prevent content in your application from being viewed or downloaded by users who have not registered on your site. (Note that any content you want to protect must be registered to ASP.NET in the IIS App Mappings.)
The control will have two modes: Login and Register. In Login mode, the control will render two text boxes—one for the username and another for the password—a Submit button, and a reset button. In Register Mode, the control will render three text boxes—one for the username, one for the password, and one for the user to confirm a desired password. The control will expose four custom events—AuthSuccess, AuthFailure, RegSuccess, and RegFailure—that the client can use to determine whether the user entered the correct credentials, or whether there was a problem with the user’s registration information. To raise these events, you’ll use some of the postback methods that were described earlier. This example is more involved than others you’ve seen previously, so let’s break it up into sections to make it easier to follow.
Create the basic control
-
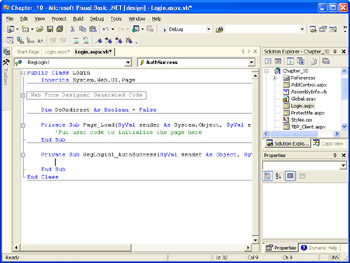
Open the Chapter_10_Controls solution and add a new Web Custom Control class to the Chapter_10_Controls project. Name the class RegLogin.vb.
-
Add the following Imports statement to the list of Imports at the top of the RegLogin.vb file.
Imports System.Web.Security
-
Change the class’s Inherits statement so that the control inherits from the System.Web.UI.Control class, rather than System.Web.UI.WebControl. (Attributes have been omitted for clarity.)
Public Class RegLogin Inherits System.Web.UI.Control
-
Delete the DefaultProperty(“Text”) attribute that precedes the class definition, since we won’t be using a Text property in the control:
<ToolboxData("<{0}:RegLogin runat=server></{0}:RegLogin>")> _ Public Class RegLogin -
Save RegLogin.vb.
| Note | In the preceding example, a Visual Basic line continuation character(_)was added to the end of the attribute in Step 4 to allow the class declaration to appear on the next line, enhancing readability. By default, the Visual Basic .NET IDE places both the attribute and class definition on the same line. |
Now that you’ve got the control class created, let’s continue by adding member variables for storing the username, password, and other important information for the control, including a Mode property that will use an Enumeration as its type.
Add member variables and properties
-
Just below the Inherits statement within the class definition, add private String variables for the username, password, password confirmation, and status message (which will contain read-only information about the status of the control). Note that variables declared at the class level with the Dim keyword are private to that class (equivalent to declaring with the Private keyword). You can delete the _text member variable that was created when you created the control class—we won’t be using it.
Dim _userName As String Dim _password As String Dim _passwordConfirm As String Dim _statusMessage As String
-
Add a Boolean member variable called _displayRegLink. This variable will be used to determine whether to display a hyperlink that will allow the user to switch the control to Register mode. The default is False.
Dim _displayRegLink As Boolean = False
-
Between the Imports statements and the class definition, add the following code, which creates an Enumeration for the _mode member variable:
Public Enum RegLoginMode Register Login End Enum
An Enumeration allows you to specify the valid values for a given property or argument that uses the enumeration as its type. The enumeration is also used by Visual Studio .NET to provide IntelliSense statement completion for members of that type. Enumerations can make working with variables and properties less error-prone by limiting input to only valid values.
-
Add a new member variable called _mode, with the type RegLoginMode. Set the value of the member to RegLoginMode.Login:
Dim _mode As RegLoginMode = RegLoginMode.Login
-
Modify the default Text property procedure (which was added automatically when the file was created) to look like this:
<Bindable(False), Browsable(False)> _ ReadOnly Property StatusMessage() As String Get Return _statusMessage End Get End Property
This exposes _statusMessage as a public property, so that the consuming page can read it. The property is marked as ReadOnly because it is used only to communicate information from the control to the page. Because the property value cannot be set, we add the Bindable and Browsable attributes to the property declaration and set the value of each to False. This prevents the property from being available for databinding, and from showing up in the property browser.
-
Save RegLogin.vb.
The next part of the process is displaying a UI for the control. As with the TextBoxPlus control, you’ll do this by overriding the Render method. But in this case, the actual rendering will be passed off to specialized methods for the two modes: Login and Register. Two different rendering techniques will be demonstrated.
The first rendering technique, which will be used for rendering the login UI, will make use of the methods and properties exposed by the HtmlTextWriter class, an instance of which is passed to the Render method by the ASP.NET runtime. These include the WriteLine, WriteBeginTag, WriteEndTag, and WriteAttribute methods, which allow you to construct HTML elements programmatically, piece by piece, as well as the DefaultTabString and SelfClosingTagEnd properties. Using these methods and properties allows you to render code that will be more readable (hence, easier to troubleshoot) on the client end of the request, without having to remember a language-specific escape character for tabs or linefeeds. The code produced using this technique is a little heftier than that produced using the second technique.
The second rendering technique, which will be used for rendering the registration UI, will make use of the StringBuilder utility class in the System.Text namespace. Use the StringBuilder class whenever you need to do a significant number (generally 5 or more) of string concatenations. Since string concatenation results in a new String object being created based on the string and/or literals being concatenated, it can carry significant performance overhead. Using a StringBuilder can significantly improve performance by allowing you to manipulate string data without having to create and allocate space for a new String object with each manipulation. With this technique, we create a StringBuilder instance and call its Append method to add to the output string. Unlike the technique using the HtmlTextWriter class, this technique requires using constants like vbTab and vbCrLf (or their literal equivalents) for formatting the rendered code.
Create the user interface
-
Since the default Web Custom Control code already has an override for the Render method of the Control class, simply modify the existing method to look like this:
Protected Overrides Sub Render(ByVal output As _ System.Web.UI.HtmlTextWriter) Select Case _mode Case RegLoginMode.Register DisplayRegUI(output) Case RegLoginMode.Login DisplayLoginUI(output) End Select End Sub
Note that you use the _mode member variable to decide which UI to display. If the control is in Login mode (the default), the login UI will be displayed. If the control is in Register mode, the registration UI will be displayed. Note also that both UI rendering functions (which you’ll add next) accept the HtmlTextWriter instance passed into the Render method as an argument. This will be used in these functions to render output to the browser.
-
Create two private Sub procedures, DisplayLoginUI, and DisplayRegUI:
Private Sub DisplayLoginUI(ByVal Writer As HtmlTextWriter) End Sub Private Sub DisplayRegUI(ByVal Writer As HtmlTextWriter) End Sub
-
Add the following code to DisplayLoginUI.
Writer.WriteLine(HtmlTextWriter.DefaultTabString & _ "<table>") Writer.WriteLine(HtmlTextWriter.DefaultTabString & _ HtmlTextWriter.DefaultTabString & "<tr>") Writer.WriteLine(HtmlTextWriter.DefaultTabString & _ HtmlTextWriter.DefaultTabString & _ HtmlTextWriter.DefaultTabString & "<td>") Writer.WriteLine(HtmlTextWriter.DefaultTabString & _ HtmlTextWriter.DefaultTabString & _ HtmlTextWriter.DefaultTabString & _ HtmlTextWriter.DefaultTabString & "Username: ") Writer.WriteLine(HtmlTextWriter.DefaultTabString & _ HtmlTextWriter.DefaultTabString & _ HtmlTextWriter.DefaultTabString & "</td>") Writer.WriteLine(HtmlTextWriter.DefaultTabString & _ HtmlTextWriter.DefaultTabString & _ HtmlTextWriter.DefaultTabString & "<td>") Writer.Write(HtmlTextWriter.DefaultTabString & _ HtmlTextWriter.DefaultTabString & _ HtmlTextWriter.DefaultTabString & _ HtmlTextWriter.DefaultTabString) Writer.WriteBeginTag("input") Writer.WriteAttribute("name", Me.UniqueID) Writer.WriteAttribute("type", "text") Writer.WriteAttribute("value", _userName) Writer.WriteLineNoTabs(HtmlTextWriter.SelfClosingTagEnd) Writer.WriteLine(HtmlTextWriter.DefaultTabString & _ HtmlTextWriter.DefaultTabString & _ HtmlTextWriter.DefaultTabString & "</td>") Writer.WriteLine(HtmlTextWriter.DefaultTabString & _ HtmlTextWriter.DefaultTabString & "</tr>") Writer.WriteLine(HtmlTextWriter.DefaultTabString & _ HtmlTextWriter.DefaultTabString & "<tr>") Writer.WriteLine(HtmlTextWriter.DefaultTabString & _ HtmlTextWriter.DefaultTabString & _ HtmlTextWriter.DefaultTabString & "<td>") Writer.WriteLine(HtmlTextWriter.DefaultTabString & _ HtmlTextWriter.DefaultTabString & _ HtmlTextWriter.DefaultTabString & _ HtmlTextWriter.DefaultTabString & "Password: ") Writer.WriteLine(HtmlTextWriter.DefaultTabString & _ HtmlTextWriter.DefaultTabString & _ HtmlTextWriter.DefaultTabString & "</td>") Writer.WriteLine(HtmlTextWriter.DefaultTabString & _ HtmlTextWriter.DefaultTabString & _ HtmlTextWriter.DefaultTabString & "<td>") Writer.Write(HtmlTextWriter.DefaultTabString & _ HtmlTextWriter.DefaultTabString & _ HtmlTextWriter.DefaultTabString & _ HtmlTextWriter.DefaultTabString) Writer.WriteBeginTag("input") Writer.WriteAttribute("name", Me.UniqueID) Writer.WriteAttribute("type", "password") Writer.WriteLineNoTabs(HtmlTextWriter.SelfClosingTagEnd) Writer.WriteLine(HtmlTextWriter.DefaultTabString & _ HtmlTextWriter.DefaultTabString & _ HtmlTextWriter.DefaultTabString & "</td>") Writer.WriteLine(HtmlTextWriter.DefaultTabString & _ HtmlTextWriter.DefaultTabString & "</tr>") Writer.WriteLine(HtmlTextWriter.DefaultTabString & _ HtmlTextWriter.DefaultTabString & "<tr>") Writer.WriteLine(HtmlTextWriter.DefaultTabString & _ HtmlTextWriter.DefaultTabString & _ HtmlTextWriter.DefaultTabString & "<td>") Writer.Write(HtmlTextWriter.DefaultTabString & _ HtmlTextWriter.DefaultTabString & _ HtmlTextWriter.DefaultTabString & _ HtmlTextWriter.DefaultTabString) Writer.WriteBeginTag("input") Writer.WriteAttribute("name", Me.UniqueID) Writer.WriteAttribute("type", "button") Writer.WriteAttribute("value", "Submit") Writer.WriteAttribute("OnClick", "javascript: " & _ Page.GetPostBackEventReference(Me, "Login")) Writer.WriteLineNoTabs(HtmlTextWriter.SelfClosingTagEnd) Writer.WriteLine(HtmlTextWriter.DefaultTabString & _ HtmlTextWriter.DefaultTabString & _ HtmlTextWriter.DefaultTabString & "</td>") Writer.WriteLine(HtmlTextWriter.DefaultTabString & _ HtmlTextWriter.DefaultTabString & _ HtmlTextWriter.DefaultTabString & "<td>") Writer.Write(HtmlTextWriter.DefaultTabString & _ HtmlTextWriter.DefaultTabString & _ HtmlTextWriter.DefaultTabString & _ HtmlTextWriter.DefaultTabString) Writer.WriteBeginTag("input") Writer.WriteAttribute("name", Me.UniqueID) Writer.WriteAttribute("type", "reset") Writer.WriteLineNoTabs(HtmlTextWriter.SelfClosingTagEnd) Writer.WriteLine(HtmlTextWriter.DefaultTabString & _ HtmlTextWriter.DefaultTabString & _ HtmlTextWriter.DefaultTabString & "</td>") Writer.WriteLine(HtmlTextWriter.DefaultTabString & _ HtmlTextWriter.DefaultTabString & "</tr>") If _displayRegLink = True Then Writer.WriteLine(HtmlTextWriter.DefaultTabString & _ HtmlTextWriter.DefaultTabString & "<tr>") Writer.WriteLine(HtmlTextWriter.DefaultTabString & _ HtmlTextWriter.DefaultTabString & _ HtmlTextWriter.DefaultTabString & "<td colspan='2'>") Writer.WriteBeginTag("a") Writer.WriteAttribute("name", "RegLink") Writer.WriteAttribute("href", "javascript: " & _ Page.GetPostBackEventReference(Me, "DisplayRegUI")) Writer.Write(HtmlTextWriter.TagRightChar) Writer.Write("Register") Writer.WriteEndTag("a") Writer.WriteLine(HtmlTextWriter.DefaultTabString & _ HtmlTextWriter.DefaultTabString & _ HtmlTextWriter.DefaultTabString & "</td>") Writer.WriteLine(HtmlTextWriter.DefaultTabString & _ HtmlTextWriter.DefaultTabString & "</tr>") End If Writer.WriteLine(HtmlTextWriter.DefaultTabString & _ "</table>")This code uses methods and properties exposed by the HtmlTextWriter class to write out the desired HTML output—in this case, an HTML table for formatting, with two text boxes for input, as well as an HTML button for posting back the control’s contents, and a reset button. The code also uses these methods and properties to write white space (tabs and carriage returns) to the control output. While this is not strictly necessary from a functional standpoint, adding white space can make the rendered code easier to read, which can help in troubleshooting when something isn’t working (not that that ever happens, right?).
Note the call to GetPostBackEventReference in the code for rendering the submit button. This allows a value (“Login”) to be passed when the page is posted back, so that the code that processes the postback knows which button was clicked. Note also the If statement that checks the value of the _displayRegUI member variable. If the value of this variable is True, a hyperlink will be rendered to allow the user to switch to registration mode.
-
Add the following code to DisplayRegUI. This code creates a StringBuilder object, concatenates the HTML output, and then writes the contents of the StringBuilder to the browser.
'Create StringBuilder for concatenating output string Dim SBOut As New System.Text.StringBuilder() SBOut.Append(vbTab & "<table>" & vbCrLf) SBOut.Append(vbTab & vbTab & "<tr>" & vbCrLf) SBOut.Append(vbTab & vbTab & vbTab & "<td>" & vbCrLf) SBOut.Append(vbTab & vbTab & vbTab & "Username: " & vbCrLf) SBOut.Append(vbTab & vbTab & vbTab & "</td>" & vbCrLf) SBOut.Append(vbTab & vbTab & vbTab & "<td>" & vbCrLf) SBOut.Append(vbTab & vbTab & vbTab & "<input type='text' " & _ "name='" & Me.UniqueID & "' value='" & _ Me._userName & " '/>" & vbCrLf) SBOut.Append(vbTab & vbTab & vbTab & "</td>" & vbCrLf) SBOut.Append(vbTab & vbTab & "</tr>" & vbCrLf) SBOut.Append(vbTab & vbTab & "<tr>" & vbCrLf) SBOut.Append(vbTab & vbTab & vbTab & "<td>" & vbCrLf) SBOut.Append(vbTab & vbTab & vbTab & "Password: " & vbCrLf) SBOut.Append(vbTab & vbTab & vbTab & "</td>" & vbCrLf) SBOut.Append(vbTab & vbTab & vbTab & "<td>" & vbCrLf) SBOut.Append(vbTab & vbTab & vbTab & _ "<input type='password' " & _ "name=' " & Me.UniqueID & "'/>" & vbCrLf) SBOut.Append(vbTab & vbTab & vbTab & "</td>" & vbCrLf) SBOut.Append(vbTab & vbTab & "</tr>" & vbCrLf) SBOut.Append(vbTab & vbTab & vbTab & "<td>" & vbCrLf) SBOut.Append(vbTab & vbTab & vbTab & _ "Confirm Password: " & vbCrLf) SBOut.Append(vbTab & vbTab & vbTab & "</td>" & vbCrLf) SBOut.Append(vbTab & vbTab & vbTab & "<td>" & vbCrLf) SBOut.Append(vbTab & vbTab & vbTab & _ "<input type='password' " & _ "name=' " & Me.UniqueID & "'/>" & vbCrLf) SBOut.Append(vbTab & vbTab & vbTab & "</td>" & vbCrLf) SBOut.Append(vbTab & vbTab & "</tr>" & vbCrLf) SBOut.Append(vbTab & vbTab & "<tr>" & vbCrLf) SBOut.Append(vbTab & vbTab & vbTab & "<td>" & vbCrLf) SBOut.Append(vbTab & vbTab & vbTab & "<input type='button' " & _ "value='Submit' OnClick=""jscript: " & _ Page.GetPostBackEventReference(Me, "Register") & _ """>" & vbCrLf) SBOut.Append(vbTab & vbTab & vbTab & "</td>" & vbCrLf) SBOut.Append(vbTab & vbTab & vbTab & "<td>" & vbCrLf) SBOut.Append(vbTab & vbTab & vbTab & _ "<input type='reset'/>" & vbCrLf) SBOut.Append(vbTab & vbTab & vbTab & "</td>" & vbCrLf) SBOut.Append(vbTab & vbTab & "</tr>" & vbCrLf) SBOut.Append(vbTab & "</table>" & vbCrLf) 'Send the output to the browser. Writer.Write(SBOut)
Note that as with the DisplayLoginUI method, a call to GetPostBackEventReference is used to generate the code necessary for initiating the postback, including indicating which button was clicked (in this case, “Register”).
-
Save RegLogin.vb.
At this point, if you were to build the Chapter_10_Controls project and add the control to a page, it would render the login UI and could postback the data in its form fields, but that’s about it. To take things further, you’ll need to add postback handling and custom event code.
Handle postbacks and events
-
Define events for success and failure of both authentication and registration, using the base EventHandler delegate as the basis for the events. Place the event declarations just below the member variable declarations you added earlier:
Public Event AuthSuccess As EventHandler Public Event AuthFailure As EventHandler Public Event RegSuccess As EventHandler Public Event RegFailure As EventHandler
-
Directly below the Inherits keyword, add an Implements statement to implement the IPostBackDataHandler and IPostBackEventHandler interfaces:
Public Class RegLogin Inherits Control Implements IPostBackDataHandler, IPostBackEventHandler
-
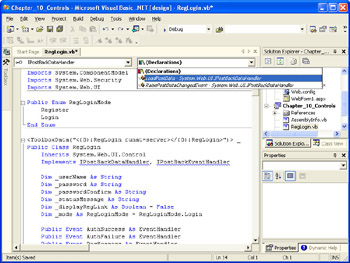
Implement the LoadPostData method defined in the IPostBackDataHandler interface to load the posted values into the local variables. Visual Studio .NET makes this pretty easy. Just select IPostBackDataHandler from the drop-down list at the top left corner of the code editor (Class Name), and then select LoadPostData from the drop-down list at the top right corner (Method Name), as shown in the following illustration. The definition of the method will be automatically inserted into the file. The return value of this function determines whether the RaisePostDataChangedEvent method is called on this control.
-
Add the following code to the LoadPostData method:
Dim newValues As String() = Split(postCollection(postDataKey), ",") Dim Result As Boolean = False Select Case Page.Request.Form("__EVENTARGUMENT") Case "DisplayRegUI" _mode = RegLoginMode.Register Case "Login" Result = LoadLoginPostData(newValues) Case "Register" _mode = RegLoginMode.Register Result = LoadRegisterPostData(newValues) End Select Return ResultThe code takes the collection of form field values posted from the form and places them into the string array newValues. It then declares a Boolean for the return value of the LoadPostData method. Next, it uses the __EVENTARGUMENT form field, which is automatically sent with each postback (thanks to our use of GetPostBackEventReference), to decide how to process the loaded data (or, in the case of the value DisplayRegUI, to display the registration UI and forego further processing).
-
After adding the code in Step 4, you’ll notice that two parts of the code are underlined with squiggly blue lines. This is because these are calls to two methods you haven’t added yet, LoadLoginPostData and LoadRegisterPostData. Add declarations for these methods below the LoadPostData method:
Private Function LoadLoginPostData(ByVal newValues As String()) _ As Boolean End Function Private Function LoadRegisterPostData(ByVal newValues As String()) _ As Boolean End Function
-
Add the following code to LoadLoginPostData:
Dim newUserName As String = "" Dim newPassword As String = "" 'get the UserName newUserName = (newValues(0)) ' get the Password newPassword = (newValues(1)) 'Return True if values have changed since last postback If ((Not newUserName = _userName) Or _ (Not newPassword = _password)) Then _userName = newUserName _password = newPassword Return True Else Return False End If
The preceding code retrieves the username and password entered by the user, checks to see if they’ve changed since the last postback, and then loads them into local variables for later processing. If the values have changed since the last postback, the code returns True, which will cause the PostBackDataChangedEvent method to be called later in the processing of the request.
-
Add the following code to LoadRegisterPostData:
'get the UserName _userName = (newValues(0)) ' get the Password _password = (newValues(1)) ' get the Password Confirmation _passwordConfirm = (newValues(2)) 'We don't expect the data to change from request ' to request here, so we'll just return False Return False
-
Using the same technique as you did for LoadPostData, implement the RaisePostDataChangedEvent method. Although this control does not make use of this method, you are still required to implement it because it is defined as part of the IPostBackDataHandler interface.
-
Implement the RaisePostBackEvent method by selecting IPostBackEventHandler from the Class Name drop-down list, and RaisePostBackEvent from the Method Name drop-down list.
Public Sub RaisePostBackEvent(ByVal eventArgument As String) _ Implements System.Web.UI.IPostBackEventHandler.RaisePostBackEvent End Sub
-
Add the following code to RaisePostBackEvent:
Select Case _mode Case RegLoginMode.Register If Not eventArgument = "DisplayRegUI" Then If Not SaveCredentials(_userName, _password, _ _passwordConfirm) Then RaiseEvent RegFailure(Me, EventArgs.Empty) _mode = RegLoginMode.Register Else RaiseEvent RegSuccess(Me, EventArgs.Empty) _mode = RegLoginMode.Login End If End If Case RegLoginMode.Login 'If login is not valid, raise the AuthFailed event ' and display the link for registration. If Not VerifyCredentials(_userName, _password) Then RaiseEvent AuthFailure(Me, EventArgs.Empty) Else RaiseEvent AuthSuccess(Me, EventArgs.Empty) FormsAuthentication.SetAuthCookie(_userName, False) End If End Select
The preceding code uses the _mode variable to decide how to process the data that was loaded in the LoadPostData method, calling either VerifyCredentials or SaveCredentials. You’ll add both of these methods in the next section. If the authentication or registration succeeds, the appropriate success event is raised. Likewise, if the authentication or registration processing fails, the appropriate failure event is raised. Note that if authentication succeeds, the code also calls the FormsAuthentication.SetAuthCookie method, passing in the username of the current user.
-
Save RegLogin.vb.
Now it’s time to get down to the nitty gritty: verifying and saving user credentials. The technique the control will use to store credentials is a simple XML file. The XML file, which will be automatically created by the control the first time the control is used, will contain the date a user registered, a username, and an MD5 hashed value representing a password. Saving new registration information will be performed by the SaveCredentials method. Verifying the user’s credentials against existing credentials will be performed by the VerifyCredentials method. Finally, the control will use a CreateBlankUsersFile utility method to create the initial XML file.
| Important | You should not use this control for restricting access to critical information. This control is designed only to limit anonymous browsing of content. Because the control will allow users to register on their own, it provides only a means of limiting who can access content on your site. Note that you could further restrict access to content by adding a field to the XML file for whether the user is approved or enabled. By setting this field to False by default, you could choose whether someone who registered could access content before he or she logged in. |
Save and validate user credentials as XML
-
Add the following code to RegLogin.vb after the RaisePostBackEvent method:
Private Function SaveCredentials(ByVal Username As String, _ ByVal Password As String, _ ByVal PasswordConfirm As String) As Boolean Dim LoginDS As DataSet = New DataSet() LoginDS.ReadXml(Page.Server.MapPath("Users.xml")) If Not LoginDS.Tables(0).Select("username=' " & _ Username & " '").Length > 0 Then If _password <> "" And _ _password = _passwordConfirm Then Dim NewLogin As DataRow = LoginDS.Tables(0).NewRow NewLogin("username") = _userName NewLogin("password") = _ FormsAuthentication. _ HashPasswordForStoringInConfigFile(_password, _ "MD5") NewLogin("registerDate") = _ DateTime.Today.ToShortDateString LoginDS.Tables(0).Rows.Add(NewLogin) LoginDS.WriteXml(Page.Server.MapPath("Users.xml")) _statusMessage = "Registration succeeded. " & _ "Please log in." Return True Else _statusMessage = "No password entered " & _ "or passwords do not match. Please re-enter. " Return False End If Else _statusMessage = "An identical username exists. " & _ "Please choose another. " Return False End If End FunctionThe SaveCredentials method uses the ReadXml method of the DataSet class to read the current Users.xml file, then checks to see if there’s already a user in the file with the same name as that entered by the user in the registration form. If not, the method then checks to make sure that both the password and confirmation password values are identical. If they are, the method creates a new row from the dataset, stores the username and a hashed version of the password, adds the row to the dataset, and then uses the DataSet’s WriteXml method to save the updated table to the file. Once all of this succeeds, the method sets the statusMessage property to indicate that registration succeeded, and returns True (which causes the RegSuccess event to be raised). If the username already exists, or if the passwords don’t match, the statusMessage property is set to an appropriate message, and the method returns False (causing the RegFailure event to be raised).
-
Add the following code to RegLogin.vb, after the SaveCredentials method:
Private Function VerifyCredentials(ByVal Username As String, _ ByVal Password As String) As Boolean Dim LoginDS As DataSet = New DataSet() Try LoginDS.ReadXml(Page.Server.MapPath("Users.xml")) Catch fnf As System.IO.FileNotFoundException CreateBlankUsersFile() LoginDS.ReadXml(Page.Server.MapPath("Users.xml")) End Try If LoginDS.Tables(0).Select("username=' " & _ Username & " '").Length > 0 Then Dim LoginRow() As DataRow = _ LoginDS.Tables(0).Select("username=' " & _ Username & " '") If LoginRow(0).Item("password").ToString = _ FormsAuthentication. _ HashPasswordForStoringInConfigFile(Password, _ "MD5") Then _statusMessage = "Credentials Validated. " Return True Else _statusMessage = "Invalid Password. " Return False End If Else _statusMessage = "Username not found. " & _ "Have you registered? " _displayRegLink = True Return False End If End FunctionThe VerifyCredentials method also uses the ReadXml method to fill the dataset from Users.xml. Unlike SaveCredentials, however, the code in VerifyCredentials is wrapped in a Try…Catch block. This is because VerifyCredentials will always be called first, and if a FileNotFoundException is thrown, the CreateBlankUsersFile method is called to create the Users.xml file. Once the dataset has been filled, the code selects the row that matches the provided username (if it exists) and checks the stored password hash against the hashed version of the password entered by the user. If the passwords match, the statusMessage property is set to indicate success, and the method returns True (which results in the AuthSuccess event being raised). If either the username does not exist in the XML file, or the passwords do not match, the statusMessage property is set to indicate these problems, and the method returns False (resulting in the AuthFailure method being raised).
-
Add the following code to RegLogin.vb, after the VerifyCredentials method:
Public Sub CreateBlankUsersFile() Dim NewXml As System.IO.StreamWriter = _ System.IO.File.CreateText(Page.Server.MapPath("Users.xml")) NewXml.WriteLine("<users>") 'user field describes a single user NewXml.WriteLine(" <user>") 'date field contains the Registration date NewXml.WriteLine(" <registerDate>" & _ DateTime.Today.ToShortDateString & "</registerDate>") 'username field NewXml.WriteLine(" <username>TempUser</username>") 'password field contains MD5 hash value NewXml.WriteLine(" <password>" & _ FormsAuthentication.HashPasswordForStoringInConfigFile("password", "MD5") & "</password>") NewXml.WriteLine(" </user>") NewXml.WriteLine("</users>") NewXml.Close() End SubThe CreateBlankUsersFile method allows the control to create its own storage file without requiring the intervention of the user. The method uses a StreamWriter to create and write to a text file. When finished writing the default elements, the method closes the StreamWriter.
Tip To create the Users.xml file, the ASPNET user account must have write access to the directory in which the page that uses the RegLogin control resides (in our case, the root of the Chapter_10 project). If, for security reasons, you do not wish to provide the ASPNET account with these permissions, you can create the file manually and provide the ASPNET account with write permissions to this file alone, rather than the entire directory. You can also provide the ASPNET account with write permissions to the directory temporarily, run a page containing the control, and then remove the write permissions. If you create the file manually, make sure the file extension is .xml, not .xml.txt (which can happen if you have file extensions hidden in Windows Explorer), or you will receive errors when the control attempts to write to the file.
If the file is created by the ASP.NET process, by default it will have full permissions granted to the ASPNET user account under which ASP.NET is run, as well as to the SYSTEM account and the Administrators group. However, the Users group will have only Read & Execute and Read permissions on the file. This means that unless you are logged on as an Administrator, you will not be able to manually edit the Users.xml file.
-
Save RegLogin.vb, and build the Chapter_10_Controls project. If you entered all of the code correctly, the project should build correctly, and the control will be ready to use. If you have any problems, you can check your code against the finished example that is available with the practice files for this chapter.
The last part of the process is using the control in a page. To use the control, you’ll need to create a new Web Forms page, create the control (either declaratively or programmatically), and set up handlers for its exposed events. You’ll also need to configure your application to use Forms Authentication, create a sample page to be protected by Forms Authentication, and configure your application to prevent browsing of the Users.xml file created by the control.
Configure for Forms Authentication
-
Open the Web.config file for the Chapter_10 project.
-
Modify the <authentication> configuration element to look like this:
<authentication mode="Forms"> <forms loginUrl="Login.aspx" protection="All"> </forms> </authentication>
This forces any requests for content that require authentication to be redirected to Login.aspx if an authentication cookie is not present. It also specifies that the cookie is both encrypted and subject to validation to protect its contents.
-
Add a <location> section with an <authorization> configuration element that looks like the following. This code should go between the opening <configuration> tag and the opening <system.web> tag:
<location path="ProtectMe.aspx"> <system.web> <authorization> <deny users="?"/> </authorization> </system.web> </location>
This section disallows any requests for the file ProtectMe.aspx (which you’ll add to the project shortly) by users who have not been authenticated. Thanks to the <authentication> section, such requests will be redirected to Login.aspx (which you’ll also add to the project shortly, and which will make use of the RegLogin control).
-
Save Web.config, but don’t close it yet.
The preceding steps will effectively protect the file ProtectMe.aspx from unauthorized access (once you’ve created it, anyway), but they leave out something very important: protecting the XML file that will contain the user information. By default, XML files are browsable from within a Web application. All someone needs to know is the name of the file to view its contents. While the RegLogin control does make use of MD5 hashing to protect passwords, it’s still a good idea to prevent browsing of the Users.xml file. The next set of steps will show you how to do this.
Secure Users.xml
-
Open the Web.config file for the Chapter_10 project if it’s not already open.
-
Add the following section between the <system.web> and </system.web> tags:
<httpHandlers> <add verb="*" path="Users.xml" type="System.Web.HttpForbiddenHandler"/> </httpHandlers>
This will prevent any requests for a file named Users.xml within the scope of the application from being fulfilled by passing the request to the HttpForbiddenHandler HttpHandler class. This is the same technique used by ASP.NET to protect the global.asax, web.config, and other non-browsable files.
-
Save Web.config.
-
Open the Internet Information Services administration tool (you must either be logged in as an administrator, or use the Run As feature to run the tool using an account with administrator rights), drill down to the Chapter_10 project application, right-click the application icon, and then select Properties. The properties dialog box for the Chapter_10 application will be displayed, as shown in the illustration on the next page.
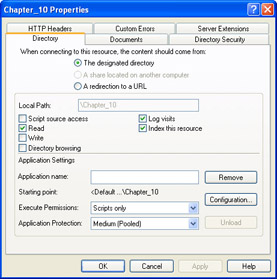
-
Click the Configuration button. The Application Configuration dialog box will be displayed, as shown in the following illustration.
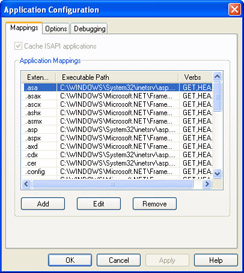
-
In the Mappings tab, which is selected by default, click the Add button. The Add/Edit Application Extension Mapping dialog box will be displayed, as shown in the following illustration.
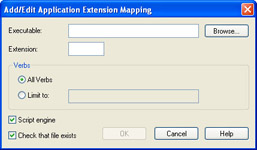
-
Click the Browse button, change the Files Of Type drop-down to Dynamic Link Libraries (*.dll), browse to the location of aspnet_isapi.dll (by default %windir%\Microsoft.NET\Framework\%version%), select it, and click the Open button.
-
When you are returned to the Add/Edit Application Extension Mapping dialog box, click in the Executable: text box. (This step is required in Microsoft Windows XP to enable the OK button, as described in Microsoft Knowledge Base article Q317948.)
-
In the Extension: text box, type .xml.
-
Click the OK button to add the mapping. Once the mapping has been added, the Application Configuration dialog box will look similar to the following illustration.
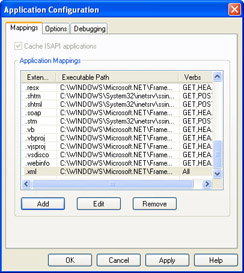
-
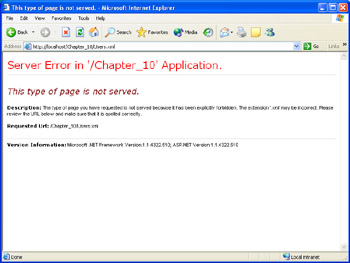
Click the OK button to close the Application Configuration dialog box, and then Click OK again to close the Properties dialog box. Now, anyone attempting to view Users.xml will see the message shown in the illustration on the next page.
Note that if you want to protect any file named Users.xml in any application on the machine, add the <add> element in Step 2 to the <httpHandlers> element in machine.config rather than to Web.config, and you should add the mapping of the .xml extension to the ASP.NET ISAPI process using the Master Properties in IIS, and apply the changes to all Web sites when prompted. Keep in mind that there is some overhead in having ASP.NET process all requests for .xml files, so you should only do this on a machine-wide basis if you intend to use the RegLogin control across many applications or sites on a machine.
| Important | It’s worth reiterating at this point that although this example uses hashed passwords, and you’ve added protection for the Users.xml file, this example should be used only for protecting content from casual anonymous browsing. If you have content for which security is critical, you should consider storing user credentials in a more secure location, such as a database, and implementing SSL encryption for the login page to ensure that usernames and passwords aren’t captured in transit. |
Create a page to protect
-
Add a new Web Form to the Chapter_10 project. Name the fileProtectMe.aspx.
-
Press F7 to view the code behind module and add the following Imports statement at the top of the ProtectMe.aspx.vb file.
Imports System.Web.Security
-
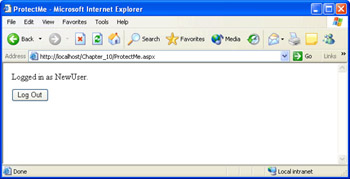
Switch back to ProtectMe.aspx and add a Label and a Button to the page, and set the button’s Text property to Log Out, as shown in the following illustration.
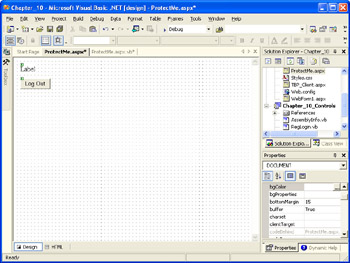
-
Double-click the button, and then add the following code to the Button1_Click event handler:
FormsAuthentication.SignOut() Response.Redirect(Request.RawUrl)
This code will remove the authentication cookie, and then redirect the request to the same page, which will result in the user being redirected to the login page.
-
Add the following code, which displays the username of the currently logged-in user, to the Page_Load event handler:
Label1.Text = "Logged in as " & User.Identity.Name & "."
-
Save and close both the code-behind module and the Web Form.
Now you’re finally ready to create your login page. In this next procedure, you’ll create a login page, add the RegLogin control to the Visual Studio .NET Toolbox, add the control to the page, and add the necessary event handlers to handle the control’s events.
Use the RegLogin control
-
Add a new Web Form to the Chapter_10 project. Name the file Login.aspx.
-
With Login.aspx open in Design View, expand the Toolbox, right- click in the Web Forms tab, and select Add/Remove Items.
-
In the Customize Toolbox dialog box, click the Browse button.
-
Browse to the location of the Chapter_10_Controls assembly (the/bin directory of the Chapter_10_Controls project), select the assembly, and then click the Open button.
-
Click the OK button to add the RegLogin control to the Toolbox.
-
Double-click the RegLogin control icon to add it to the page. At this point, the page should look similar to the following illustration.
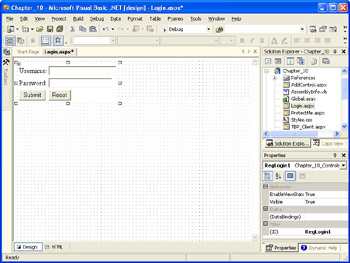
-
Add a Label control below the RegLogin control, and set its Visible property to False. Leave a little space vertically between the RegLogin control and the Label control.
-
Right-click in an empty area of the page and select View Code.
-
Just above the Page_Load declaration, add a declaration for a Boolean named DoRedirect. (You’ll use this later when handling the AuthSuccess event handler.)
Dim DoRedirect As Boolean = False
-
Select RegLogin1 from the Class Name drop-down list, and then select AuthSuccess from the Method Name drop-down list. This will add an event handler for the AuthSuccess event, as shown in the following illustration.
-
Add the following code to the AuthSuccess event handler:
If Not Request.QueryString("ReturnUrl") Is Nothing Then DoRedirect = True End IfThis will signal that the page should redirect users to the page they originally requested. (You’ll add the code for this in a few steps.) Because the RegLogin control automatically sets the Forms authentication cookie when authentication succeeds, this request will be allowed.
-
Using the same technique as in Step 10, add the AuthFailure event handler, and then add the following code to it:
Label1.ForeColor = System.Drawing.Color.Red Label1.Text = RegLogin1.StatusMessage Label1.Visible = True
-
Using the same technique as in Step 10, add the RegSuccess event handler, and then add the following code to it:
Label1.ForeColor = System.Drawing.Color.Green Label1.Text = RegLogin1.StatusMessage Label1.Visible = True
-
Using the same technique as in Step 10, add the RegFailure event handler, and then add the following code to it:
Label1.ForeColor = System.Drawing.Color.Red Label1.Text = RegLogin1.StatusMessage Label1.Visible = True
-
Select (Overrides) from the Class Name drop-down list, and then select OnPreRender from the Method Name drop-down list. Add the following code, which redirects the user if DoRedirect is True:
If DoRedirect Then _ Response.Redirect(Request.QueryString("ReturnUrl")) -
To prevent the Label1 text from being displayed when you switch to Register mode, add the following to the Page_Load event handler:
Label1.Visible = False
-
Save the Web Form and code-behind, and then build the Chapter_10 project.
Now that you’ve finished your login page, you’ll test it by attempting to access ProtectMe.aspx, which is protected from anonymous access by the <location> section you added to Web.config earlier.
Test the page
-
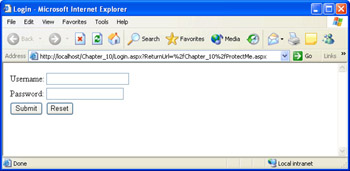
Browse ProtectMe.aspx with Internet Explorer by right-clicking it in Solution Explorer, selecting Browse With, and then selecting Internet Explorer and clicking Browse. The initial output should look like the following illustration.
-
Without entering a username or password, click the Submit button. The output shown should look like the following illustration.
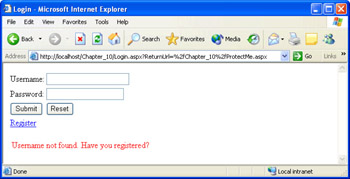
At this point, if it did not already exist, the Users.xml file has been created by the control.
-
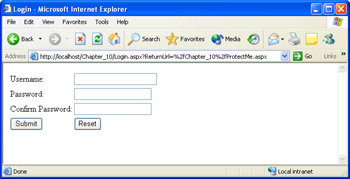
Click the Register link. The output shown should look like the following illustration.
-
Enter NewUser for the Username and password (case sensitive) for the Password and Confirm Password fields, and then click Submit. The output shown should look like the following illustration.
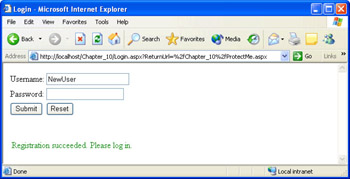
-
Enter password (case sensitive) for the Password field, and then click Submit. You will be redirected to ProtectMe.aspx, and the output shown should look like the illustration on the next page.
-
Click the Log Out button. You will be redirected to Login.aspx.
-
Experiment with the registration interface, such as entering an existing username or omitting the passwords, and see how the control responds.
Maintaining State
In the previous examples, data used by the controls has been stored in local variables. For many controls, this can work just fine. But unless you explicitly retrieve submitted values and repopulate the member controls with these values, as you did in the LoadPostData method of the previous example, the member controls will be blank when the page is posted back to the server and the results are returned. In many cases, you might want to maintain the state of the constituent controls of your custom server control, without explicitly having to write code to test for new values and repopulate the member controls with each postback.
To solve this problem, ASP.NET provides a state-management facility called ViewState. This is provided by an instance of the StateBag class of the System.Web.UI namespace. You store data in ViewState as key/value pairs, which makes working with it quite similar to working with session state. To add a value to ViewState or modify an existing value, you can simply specify the item’s key and assign a value as follows:
ViewState("MyKey") = MyValue | Important | For a control to use ViewState, it must be contained within a <form> block with the runat=“server” attribute set. |
Note that you can also add items to ViewState using the Add method of the StateBag class, and remove them using the Remove method. You can clear all ViewState values with the Clear method.
Retrieving values from ViewState is a bit more involved. Since the Item property of the StateBag class returns an object, you will need to cast the object to the proper type before performing any type-specific actions on it or passing it to another procedure that expects a particular type. The syntax for retrieving a string value is as follows:
Dim MyString As String MyString = CType(ViewState("MyKey"), String) The simplest way to automate the process of saving control state to ViewState is to substitute ViewState items for the local member variables for storing the values of properties of the control.
| Important | Using ViewState has both performance and security implications, because all of the information stored in ViewState is round-tripped to the client as a base64 encoded string. The size of the ViewState hidden field can become quite large with controls that contain a lot of data, which can have a negative impact on performance. You might want to disable ViewState for these controls by setting their EnableViewState property to False. Because the ViewState field is sent as a text string, you should never use ViewState to store information such as connection strings, server file paths, credit card information, or other sensitive data. Remember that once the ViewState has been sent to the client, it would be fairly simple for a hacker to decode the string and retrieve any data contained within. Don’t count on base64 encoding to protect sensitive data sent to the client. The designers of ASP.NET added a couple of features to help prevent a malicious user from capturing the ViewState of a page and attempting to use it to mount an attack by either modifying the ViewState on the client and resubmitting the page, or by attempting to replay a captured request (1-click attacks). The EnableViewStateMac attribute of the @ Page directive, which is set to True by default, runs a machine authentication check on the ViewState field when the page is resubmitted to ensure that its contents were not changed on the client. To prevent 1-click attacks, a new Page-level property has been introduced in version 1.1 of the .NET Framework called ViewStateUserKey. You can set the ViewStateUserKey property (during Page_Init, attempts to set this property later will result in an error) to a string value that uniquely identifies the user to prevent these types of attacks. This value can be checked when the page is posted back. If it does not match the value you set, you should not process the request. Finally, the ViewState of controls is saved between the firing of the PreRender and Render events, so any changes to control state that you want to save in ViewState must be made during the PreRender event. Changes made to control state after the PreRender event will not be saved to ViewState. |
Creating Custom Controls Through Composition
The previous examples in this chapter overrode the Render method of the Control class to render its custom output, and called the Render method of the base class to reuse its UI. This method works fine, but it’s difficult to make use of the functionality of more than one pre-existing control using this technique.
Compositional controls use a different technique to create the user interface for a custom control out of a number of preexisting or custom controls. A compositional control overrides the CreateChildControls method exposed by the Control class, and in that method, it programmatically instantiates and sets properties of the constituent controls that make up the user interface for the custom server control. Compositional controls should also implement the INamingContainer interface, which provides a new naming scope for the constituent controls, to ensure that their names are unique within the page.
Most often you’ll want to inherit from the Control class for custom controls that use composition, rather than from a more functional class. Most of the functionality in a compositional control is provided by its constituent controls, allowing you to expose a minimum of functionality from the base class. Exposing less functionality from the base class can help avoid unexpected behavior in your control from superfluous base class members. For example, a control that inherits from WebControl exposes a number of UI-related members, such as BackColor, BorderColor, Height, and Width—members that might not be desirable in your custom control.
Overriding CreateChildControls
The CreateChildControls method is substituted for the Render method in compositional controls. A sample CreateChildControls method looks like this:
Protected Overrides Sub CreateChildControls() Dim MyLabel As New Label() MyLabel.Text = "Label: " Me.Controls.Add(MyLabel) Dim MyText As New TextBox() Me.Controls.Add(MyText) Dim MyButton As New Button() MyButton.Text = "Submit" Me.Controls.Add(MyButton) End Sub
It is not necessary in a compositional server control to call the Render method, because all of the individual controls added to the Controls collection will take care of rendering themselves during the Render stage of page processing.
If you want to manipulate controls after they’ve been added to the Controls collection, you can access them either by numeric index, as shown in the following code snippet, or by calling the FindControl method of the Control class and passing in the ID of the control you want to manipulate.
Dim MyText As TextBox = Controls(1)
Implementing INamingContainer
Compositional controls should always implement the INamingContainer interface. This interface does not contain any property or method declarations. It simply creates a new naming scope for the current control to ensure that the names of child controls are unique within the page. As with any interface in Visual Basic .NET, inheriting the INamingContainer interface is done using the Implements keyword, which appears as part of the class definition, on the line immediately following the Inherits statement for the class. If you include an Imports statement for the System.Web.UI namespace, you can omit the namespace in the Inherits and Implements statements shown here:
Public Class CompControl Inherits System.Web.UI.Control Implements System.Web.UI.INamingContainer 'class code End Class
In the following code listing, which replicates the functionality of the TextBoxPlus control, you’ll see examples of both overriding the CreateChildControls method and implementing INamingContainer. The .vb file for this control—as well as a Web Form that uses the compositional version of the control—is available in the practice files for this chapter.
TextBoxPlus_Comp.vb
Imports System.ComponentModel Imports System.Web.UI <DefaultProperty("Text"), _ ToolboxData("<{0}:TextBoxPlus_Comp runat=server>" & _ "</{0}:TextBoxPlus_Comp>")> _ Public Class TextBoxPlus_Comp Inherits Control Implements InamingContainer Dim _textType As TextTypes Dim _label As Label Dim _textBox As TextBox <Bindable(True), Category("Appearance"), _ DefaultValue("Label")> _ Property LabelText() As String Get EnsureChildControls() Return _label.Text End Get Set(ByVal Value As String) EnsureChildControls() _label.Text = Value End Set End Property <Bindable(True), Category("Appearance"), _ DefaultValue("PlainText")> _ Property TextType() As TextTypes Get EnsureChildControls() Return _textType End Get Set(ByVal Value As TextTypes) EnsureChildControls() _textType = Value End Set End Property <Bindable(True), Category("Appearance"), DefaultValue(" ")> _ Property Text() As String Get EnsureChildControls() Return _textBox.Text End Get Set(ByVal Value As String) EnsureChildControls() _textBox.Text = Value End Set End Property Protected Overrides Sub CreateChildControls() _label = New Label() Me.Controls.Add(_label) _textBox = New TextBox() Me.Controls.Add(_textBox) End Sub Protected Overrides Sub OnPreRender(ByVal e As System.EventArgs) If Page.IsPostBack Then If _textType <> TextTypes.PlainText Then FormatText() End If End If End Sub Protected Sub FormatText() EnsureChildControls() Select Case _textType Case TextTypes.CurrencyText Me.Text = FormatCurrency(Me.Text) Case TextTypes.DecimalText Me.Text = Format(Convert.ToInt32(Me.Text), "F") End Select End Sub End Class EAN: 2147483647
Pages: 126
- Command Reference
- EIGRP PE-CE Routing Protocol Overview, Configuration, and Verification
- Implementing AToM for Like to Like Circuits
- VPLS Overview
- Case Study 2: Implementing Multi-VRF CE, VRF Selection Using Source IP Address, VRF Selection Using Policy-Based Routing, NAT and HSRP Support in MPLS VPN, and Multicast VPN Support over Multi-VRF CE