Data Binding
One exciting advance in the move from classic ASP to ASP.NET is the availability of server-side data binding, which is the process of declaratively tying elements (such as controls) of the UI for a page to data in an underlying datastore. Data binding on the client has been available in Internet Explorer for a number of years, but it requires all of your users to use the same browser, or else you need to do a massive amount of testing to ensure compatibility with different browser versions. Server-side data binding solves this problem by binding and rendering data on the server and returning cross-browser-compatible HTML.
ASP.NET allows you to bind against a variety of sources, including properties and method call results, arrays and collections, and DataReader and DataView objects. Typically, binding is done either declaratively, using the <%#expression%> syntax, or by programmatically setting the DataSource property of a control to the desired datasource. The data is bound by calling the DataBind method, either at the Page level (which binds all controls on the page) or on the control being bound (which binds the control and any child controls). The DataBind method causes the control and its children to evaluate any data- binding expression(s) associated with the control and assign the resulting values to the appropriate control attribute. Data binding allows controls such as the DataGrid control, which can handle multiple rows and columns, to iterate over and format the data specified by their DataSource property for display.
Simple Data Binding
The simplest type of data binding uses the <%#expression%> syntax to replace the <%#expression%> construct with the value represented by the expression. This is different than, for instance, the <%=expression%> syntax, which simply writes the result of the expression to the browser. With the <%#expression%> syntax the substitution takes place only when DataBind() is called. For example, the following listing shows a simple page that binds to a page-level property.
SimpleDataBinding.aspx
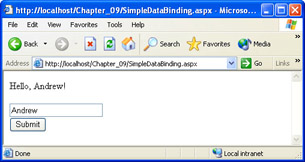
<%@ Page Language="vb" %> <html> <head> <script runat="server"> Dim Name As String Sub btnSubmit_Click(sender As Object, e As EventArgs) Name = txtHello.Text lblHello.Visible = True DataBind() End Sub </script> </head> <body> <asp:label visible="false" runat="server"> Hello, <%# Name %>! </asp:label> <form runat="server"> <asp:textbox text="" runat="server"/> <br> <asp:button text="Submit" OnClick="btnSubmit_Click" runat="server" /> </form> </body> </html>
The output of this listing after entering a value and clicking the button is shown in the following illustration.
Binding to Controls
You can use the same syntax to bind to controls. For example, you can bind the selected item of a DropDownList control to the Text property of an ASP.NET Label control, as shown in the following example.
Bind data to a Label control
-
Open Visual Studio, and then open the Chapter_09 project created earlier in the chapter.
-
Add a new Web Form to the project. Name the form ControlBinding.aspx.
-
Add a DropDownList, a Label, and a Button to the form.
-
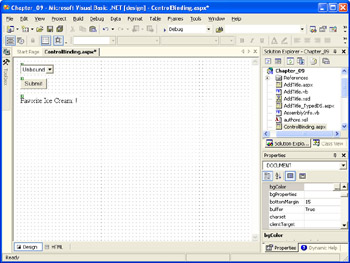
Change the ID property of the Label to Flavor, its Visible property to False, and its Text property to Favorite Ice Cream: <%# MyList.SelectedItem.Text %>!
-
Change the ID property of the DropDownList to MyList.
-
Change the ID property of the button to Submit and the Text property of the Button to Submit. The resulting screen should look similar to the illustration on the following page.
-
Switch to the code window by pressing F7, or by selecting View, then Code.
-
Add the following code to the Page_Load event handler:
If Not IsPostBack = True Then Dim MyArrayList As New ArrayList() MyArrayList.Add("Chocolate") MyArrayList.Add("Vanilla") MyArrayList.Add("Strawberry") MyList.DataSource = MyArrayList 'Bind the ArrayList to the DropDownList control MyList.DataBind() Else Flavor.Visible = True End If 'Call the Page's DataBind method 'This will evaluate the databinding expression in the Label's text property DataBind() -
Save the page and code-behind module.
-
Build the project.
-
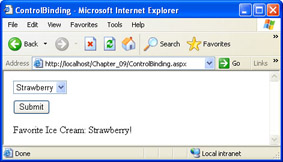
Test the page by right-clicking ControlBinding.aspx, selecting Browse With, and then selecting Microsoft Internet Explorer. After you select a flavor from the drop-down list and click Submit, the resulting screen should look like the following illustration.
Using DataBinder.Eval
DataBinder.Eval is a static method used to evaluate a data-binding expression at run time. This can simplify the process of casting various data types to be displayed as text. The basic syntax of DataBinder.Eval is
<%# DataBinder.Eval(Container, EvalExpression, FormatExpression) %>
Container is the object that contains the expression to be evaluated. (ForDataGrid, DataList, or Repeater controls, this expression is always Container.DataItem.) EvalExpression is the full name of the property or item to be evaluated. FormatExpression is a string formatting expression (such as {0:c}) to be used to format the string result. Note that if no format expression argument is passed, DataBinder.Eval will return an object instead of a string.
| Important | Because DataBinder.Eval uses late binding and reflection (which allows managed code to interrogate other managed code at runtime), it can be significantly slower than the other data-binding techniques. For this reason, you should use DataBinder.Eval only when you need to, such as for performing string formatting on numeric data. |
Using the Data-Bound Controls
Chapter 8 looked at the ASP.NET server controls and mentioned briefly one very important group of controls. The DataBound controls, which include the DataGrid control (and its constituent controls), the DataList control, and the Repeater control, allow you to set a data source programmatically. Then they iterate over that data source and display the data based on formatting that you define, either through properties of the control or by adding template definitions. The neat thing about this is that you define the formatting for a single row, the data-bound controls take care of applying that formatting to all rows of data.
Choosing which control to use rests largely on the format you want your data in and how much control you want over the formatting of the data. The DataGrid control is the simplest to use and displays data in a table format. The DataList control is a little more involved in terms of implementation, but it provides a greater degree of control over formatting through the use of templates. Finally, for the control freak in all of us, the Repeater control, which has no built-in formatting of its own, provides ultimate control over formatting through templates.
Using DataGrids
The DataGrid control presents bound data in a tabular format and provides a number of properties that you can use to format the data. This control can automatically generate all columns in the table from its DataSource property, or you can use specialized column controls to provide additional functionality or formatting for a given column or columns.
At its simplest, there are three basic steps to using a DataGrid control.
-
Add the DataGrid control to the page.
-
Set the DataSource property of the DataGrid to an appropriate data source. This data source can be defined in the page, or you can call a method in an external object to supply the data.
-
Call the DataBind method of the control to automatically bind the data to the control. You can also call the DataBind method of the Page object, which will bind (or rebind) all of the data-bound controls on the page by calling DataBind on each control in turn.
Let’s look at an example. In “HTML Controls” in Chapter 8, you saw an example that used a drop-down list box to list flavors of ice cream for a user to choose from. Suppose that you want to show similar information in a table format. The problem with this approach is that the data is explicitly added to the control in the code (or declaratively by adding items to the control in its tag declaration). Thus, any time the data changes you have to explicitly change the code that creates the control. Additionally, because the creation of the data and the creation of the control are tightly coupled, it’s not possible to reuse this data, either elsewhere on the page or elsewhere in the application.
So in this first example, you’ll create the data that you want to use in a custom procedure in a <script> block, and then call that procedure in order to populate the data source of your DataGrid control. Start with a very simple DataGrid that has no formatting whatsoever.
Bind an array to a DataGrid
-
Open Visual Studio, and then open the Chapter_09 project created earlier in the chapter.
-
Add a new Web Form to the project. Name the form DataGrid.aspx.
-
Add a Label control and a DataGrid control to the form.
-
Change the ID property of the datagrid to MyGrid, change the ID property of the label to Title, and then set the Text property of the label to DataGrid Example.
-
Switch to the code window by pressing F7, or by selecting View, and then Code.
-
Add the CreateData function inside the DataGrid class:
Private Function CreateData() As ICollection Dim DataArray As New ArrayList() DataArray.Add("Chocolate") DataArray.Add("Vanilla") DataArray.Add("Strawberry") DataArray.Add("Pistachio") DataArray.Add("Rocky Road") Return DataArray End FunctionThis function simply creates an ArrayList named DataArray, adds a few items, and then returns the ArrayList to the caller.
-
Add the following code to the Page_Load event handler:
MyGrid.DataSource = CreateData() MyGrid.DataBind()
Because CreateData returns an ArrayList (which implements the ICollection interface), you can actually use the function itself for the DataSource property of the DataGrid control.
-
Save the page and code-behind module.
-
Build the project.
-
Test the page by right-clicking DataGrid.aspx, selecting Browse With, and then selecting Microsoft Internet Explorer. The resulting screen should look like the illustration on the following page.

Although this is a very simple example, you used two lines of code (setting the DataSource and calling DataBind) to accomplish what would have taken considerably more code in classic ASP. Now let’s jazz things up a bit by binding to live data with multiple columns per row in a grid.
Bind live data to a DataGrid
-
Open Visual Studio, and then open the Chapter_09 project created earlier in the chapter.
-
Add a new Web Form to the project and name the formDataGridEdit.aspx.
-
Add a DataGrid control to the form and change the ID property of the datagrid to MyGrid.
-
Drag a SqlDataAdapter onto the page from the Data tab of the Toolbox, and use the techniques you learned in the typed dataset example earlier in the chapter to configure the data adapter to query the Publishers table of the Pubs database in the VSdotNET MSDE instance. (You can use “SELECT * FROM Publishers” as the SQL statement for the data adapter.) Change the name of the resulting data adapter to PubAdapter, and change the name of the SqlConnection to PubsConn.
-
Generate a DataSet based on PubAdapter by selecting it on the design surface, and then clicking the Generate DataSet link in the Properties window. Name the generated dataset PublisherDataSet.
-
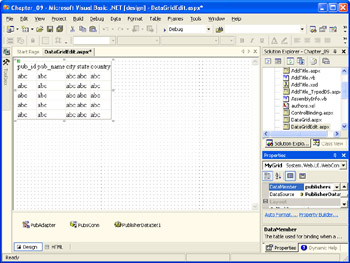
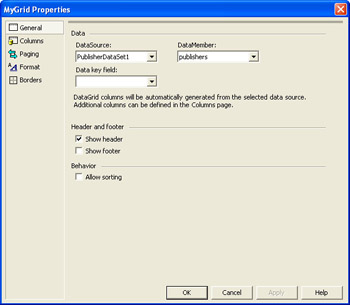
Select the DataGrid control, and set its DataSource property to PublisherDataSet1, and its DataMember property to publishers. At the end of this step, the IDE should look similar to the following illustration.
-
Switch to the code-behind module for the page and add the following code to the Page_Load event handler:
PubAdapter.Fill(PublisherDataSet1) MyGrid.DataBind()
-
Save the page and code-behind module.
-
Build the project.
-
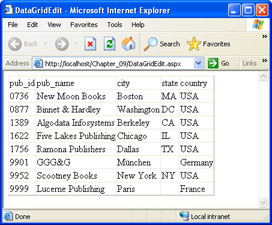
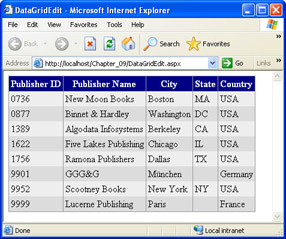
Test the page by right-clicking DataGridEdit.aspx, selecting Browse With, and then selecting Microsoft Internet Explorer. The resulting screen should look like the illustration on the following page. Leave DataGridEdit.aspx open in the IDE because you’ll be working on it again in the next example.
But wait! There’s more. In addition to autogenerating columns from the bound data, DataGrids also support creating columns declaratively. This gives you greater control over both the formatting and the behavior of individual columns. For example, you can use a BoundColumn control to provide customized header text for a column, or to apply special formatting to the bound text in each row. You can also use a ButtonColumn control to display a command button in each row of a column, an EditButtonColumn control to provide in-place editing for a row, or a HyperlinkColumn control to provide a hyperlink for each row of the grid, with the text caption, the URL, or both being data-bound. Finally, you use a TemplateColumn control to apply complex formatting to each row of a specific column. In addition to manually creating and modifying the various controls within the grid, you can also use Visual Studio .NET to control the behavior and look of the DataGrid. Let’s see how we can improve this example’s appearance using Visual Studio .NET.
Use Visual Studio .NET to format a DataGrid
-
Switch to DataGridEdit.aspx and then click on the DataGrid control. Look at the Properties window. Near the bottom of the Properties window you will see two links, AutoFormat and Property Builder, which invoke tools specially designed for working with the DataGrid control.
-
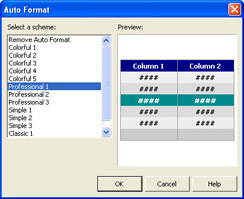
Click on AutoFormat. The Auto Format dialog box will appear. Select Professional 1 from the scheme list, as shown in the following illustration, and then click OK.
Simply by selecting the scheme from the Auto Format dialog, the HTML declaration for the DataGrid will change from a very simple declaration to something similar to the following code. Using schemes helps you quickly create a consistent look for all your datagrids.
<asp:DataGrid style="ZINDEX: 101; LEFT: 19px; POSITION: absolute; TOP: 22px" runat="server" BorderColor="#999999" BorderStyle="None" BorderWidth="1px" BackColor="White" CellPadding="3" GridLines="Vertical"> <SelectedItemStyle Font-Bold="True" ForeColor="White" BackColor="#008A8C"> </SelectedItemStyle> <AlternatingItemStyle BackColor="#DCDCDC"> </AlternatingItemStyle> <ItemStyle ForeColor="Black" BackColor="#EEEEEE"> </ItemStyle> <HeaderStyle Font-Bold="True" ForeColor="White" BackColor="#000084"> </HeaderStyle> <FooterStyle ForeColor="Black" BackColor="#CCCCCC"> </FooterStyle> <PagerStyle HorizontalAlign="Center" ForeColor="Black" BackColor="#999999" Mode="NumericPages"> </PagerStyle> </asp:DataGrid>
-
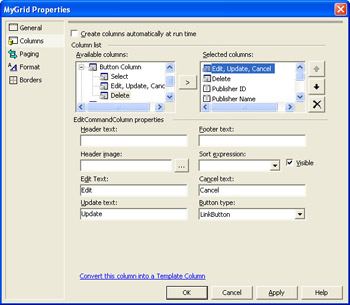
Click on the Property Builder link at the bottom of the Properties window. The Properties dialog box appears, as shown in the illustration on the next page.
-
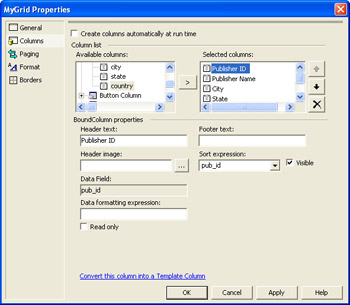
Click the Columns item in the left side of the dialog box. Uncheck Create Columns Automatically At Run Time. Use the Add (>) button to add a column to the Selected Columns list box for each data field in the Available Columns list box, changing the Header text to a friendlier name for each column, as shown in the following illustration.
-
Click the Format item on the left side of the dialog box, and then you can select several options from a tree view on the resulting dialog box. Click on Header and change the Horizontal Alignment to Center. When finished, the dialog box should look like the following illustration.

-
Click OK to apply the changes and close the dialog box.
-
Save the page. Because you didn’t change anything in the code- behind module, you don’t need to rebuild the project.
-
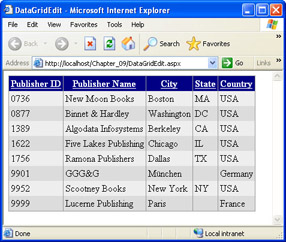
Test the page by right-clicking DataGridEdit.aspx, selecting Browse With, and then selecting Microsoft Internet Explorer. The resulting screen should look like the following illustration. Leave DataGridEdit.aspx open in the IDE because you’ll be working on it again in the next example.
This looks much better, but there is still more we can do to improve this example. We might want to add the ability to sort by one or more of the columns.
Sort a DataGrid
-
With the DataGrid control selected in DataGridEdit.aspx, click on the Property Builder link. The Property Builder dialog box will appear.
-
Click on Columns on the left side of the dialog box, and note that the Sort Expression for each column is set to the name of the field the column is based upon. This is because in the previous example, you used bound columns to create the columns for the grid, which automatically set a default Sort Expression based on the typed dataset to which the datagrid is bound.
-
To enable sorting, click the General item on the left side of the dialog box, and then check the Allow Sorting check box.
-
To make sorting work, you’ll also add code to perform the sort and re-bind the grid in a later step, so change the DataSource drop-down list from PublisherDataSet1 to (Unbound). Click OK to close the dialog box when you’re finished.
-
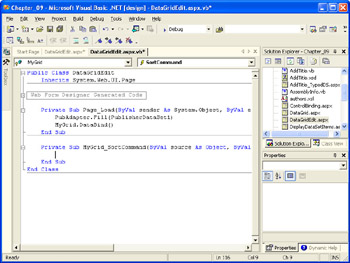
Switch to the code-behind module for the page, and in the left-hand drop- down list at the top of the page, select MyGrid. The right-hand drop- down list will now contain a list of the valid events for MyGrid. Select the SortCommand event from the list. This will insert an event handler for the event. The result should look similar to the following illustration.
-
Add the following code to the event handler:
Dim SortView As DataView = PublisherDataSet1.publishers.DefaultView SortView.Sort = e.SortExpression MyGrid.DataSource = SortView MyGrid.DataBind()
This code creates a new DataView based on the publishers table from the typed dataset, sets the sort expression of the dataview to the one passed from the column whose header is clicked at run time, and then re-binds the grid.
-
Since you removed the design-time binding of the datagrid in Step 2, you’ll also need to change the code in the Page_Load event handler to the following code:
PubAdapter.Fill(PublisherDataSet1) If Not IsPostBack Then MyGrid.DataSource = PublisherDataSet1.publishers.DefaultView MyGrid.DataBind() End If
This code fills the dataset and, if the request is not the result of a postback, sets the DataSource of the datagrid to the default dataview of the publishers table, and then databinds the grid.
-
Save the page and code-behind module.
-
Build the project.
-
Test the page by right-clicking DataGridEdit.aspx, selecting Browse With, and then selecting Microsoft Internet Explorer. The resulting screen should look like the following illustration. Leave DataGridEdit.aspx open in the IDE, as you’ll be working on it again in the next example.
You can click on any of the column headers to sort the data by the selected column. Because you can specify the exact sort expression, you can also choose to make the sort more complex, perhaps sorting by State and City when you click on the State header.
| Tip | The preceding example of sorting only implements sorting in one direction. That is, if you click a given heading more than once, the second (and subsequent) clicks have no effect. If you want to enable both ascending and descending sorts for a datagrid, you will need to track the current sort order. An easy way to do this is to save the current sort order to the ViewState field after setting the Sort property of the dataview, and then compare that value to the SortExpression property the next time the SortCommand event is fired, adding "DESC" to the Sort property if the same column is clicked twice in a row (and setting the Sort property to e.SortExpression normally otherwise). The code required to perform a two-way sort follows:
Sub MyGrid_SortCommand(ByVal source As Object, ByVal e As _ DataGridSortCommandEventArgs) Handles MyGrid.SortCommand Dim SortView As DataView = PublisherDataSet1.publishers.DefaultView Dim CurrentSort As String = "" If Not ViewState("Sort") Is Nothing Then CurrentSort = ViewState("Sort") End If If CurrentSort.StartsWith(e.SortExpression) Then If CurrentSort.EndsWith("DESC") Then SortView.Sort = e.SortExpression Else SortView.Sort = e.SortExpression & " DESC" End If Else SortView.Sort = e.SortExpression End If ViewState("Sort") = SortView.Sort MyGrid.DataSource = SortView MyGrid.DataBind() End Sub |
Now that you’ve seen how to sort data in a DataGrid, you might want to allow in-place editing, as shown in the following example.
Edit and delete data in a DataGrid
-
Click on the DataGrid and then click on the link to the Property Builder. Click on Columns on the left side and then click on Button Column label to expand the types of buttons. Using the Add (>) button, add an Edit, Update, Cancel button column, and a Delete button column. Rearrange the columns so that the Edit, Update, Cancel button is first in the list and Delete is second, as shown in the following illustration.
-
To keep the example simple, disable sorting for this example by clicking the General item and then unchecking the Allow Sorting check box. Click OK to apply the changes and close the dialog box.
-
Switch to the code-behind module, and add the following line to Page_Load, just before the call to DataBind(). The DataKeyField property controls which field is used as the primary key for editing, to allow you to identify the selected record:
MyGrid.DataKeyField = "pub_id"
-
Using the same techniques you used to add the SortCommand event handler in the last example, add an event handler for the EditCommand event. Add the following code to the event handler:
MyGrid.DataSource = PublisherDataSet1.publishers.DefaultView MyGrid.DataKeyField = "pub_id" MyGrid.EditItemIndex = e.Item.ItemIndex MyGrid.DataBind()
This code sets the EditItemIndex to the index passed in as a member of the DataGridCommandEventArgs object and re-binds the grid.
-
Add an event handler for the CancelCommand event, using the same techniques as in Step 4. Add the following code to the event handler:
MyGrid.DataSource = PublisherDataSet1.publishers.DefaultView MyGrid.DataKeyField = "pub_id" MyGrid.EditItemIndex = -1 MyGrid.DataBind()
This code sets the EditItemIndex to -1, indicating that no row should be selected as an edit row.
-
Add an event handler for the UpdateCommand event. Add the following code to the event handler:
Dim pubTable As PublisherDataSet.publishersDataTable pubTable = PublisherDataSet1.publishers Dim rowToUpdate As PublisherDataSet.publishers RowrowToUpdate = pubTable.Rows(e.Item.ItemIndex) rowToUpdate.pub_name = CType(e.Item.Cells(3).Controls(0), _ TextBox).Text rowToUpdate.city = CType(e.Item.Cells(4).Controls(0), _ TextBox).Text rowToUpdate.state = CType(e.Item.Cells(5).Controls(0), _ TextBox).Text rowToUpdate.country = CType(e.Item.Cells(6).Controls(0), _ TextBox).Text PubAdapter.Update(PublisherDataSet1) MyGrid.DataSource = PublisherDataSet1.publishers.DefaultView MyGrid.EditItemIndex = -1 MyGrid.DataBind()
This code updates the typed dataset with the values from the datagrid and then calls the SqlDataAdapter.Update method to update the back-end database. Because the code gets the values from the item passed in as part of the DataGridCommandEventArgs, you have to cast the control to the appropriate type (in this case, TextBox) to get its Text property, which contains the updated value.
-
Add an event handler for the DeleteCommand event. Add the following code to the event handler:
PublisherDataSet1.publishers.Rows.Item(e.Item.ItemIndex).Delete() PubAdapter.Update(PublisherDataSet1) MyGrid.DataSource = PublisherDataSet1.publishers.DefaultView MyGrid.EditItemIndex = -1 MyGrid.DataBind()
This code deletes the appropriate row from the dataset and then calls Update on the data adapter. Note that if, as in the Publishers table, foreign key relationships are associated with a given table, you might not be able to delete a row if a row in a related table is dependent on that row.
-
Save the page and code-behind module.
-
Build the project.
-
Test the page by right-clicking DataGridEdit.aspx, selecting Browse With, and then selecting Microsoft Internet Explorer. The resulting screen should look like the following illustration.
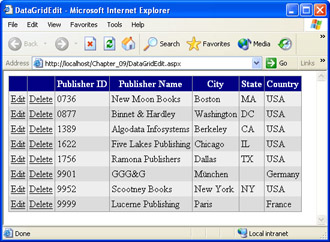
You should now be able to edit, update, and delete rows (assuming there are no foreign key constraints that would prevent deletion, as there are in the case of the Publishers table) from the table.
| Important | In-place editing in a DataGrid is not always the best solution to providing editing. Alternatively, especially when there are a number of columns, you could insert a link column to an edit form, or even use the EditCommand to link to a different view of the data for editing. |
Using DataLists
DataLists provide an excellent mix of built-in functionality and control over display formatting. Unlike the DataGrid control, in which the rows are displayed one after the other in a table format, the DataList can display its items in multiple columns and can display rows horizontally or vertically.
Bind to a DataList control
-
Open Visual Studio, and then open the Chapter_09 project created earlier in the chapter.
-
Add a new Web Form to the project. Name the form TitlesDataList1.aspx.
-
Add a Label and a DataList to the form. Change the Text property of the Label to Binding to a DataList control. Change the ID of the DataList to TitleList, RepeatColumns to 3, and GridLines to Both.
-
While Visual Studio .NET also has a Property Builder for DataList controls, sometimes it is useful to manually create the code to be displayed for each row in the DataList. In this case, you will start with a simple bit of code for the Item Template, but it will become more complex as the example becomes more complex. To do this, switch to HTML mode, and find the <asp:DataList> opening tag, and then insert the following code between the opening and closing <asp:DataList> tags:
<ItemTemplate> <h5><%# DataBinder.Eval(Container.DataItem,"title")%></h5> <br/> </ItemTemplate>
-
Switch to the code window by pressing F7, or by selecting View, then Code. Add the following Imports clauses at the top of the code file:
Imports System.Data Imports System.Data.SqlClient
-
Scroll down to the Page_Load event handler. In this example, you will use a DataAdapter and a DataSet to fill the DataList. Insert the following code:
Dim ConnStr As String Dim MyDS As New DataSet() ConnStr = "server=(local)\VSdotNET;database=pubs;" & _ "Trusted_Connection=yes" Dim SQL As String SQL = "SELECT * FROM Titles" Dim MySqlConn As New SqlConnection(ConnStr) Dim MySqlAdapter As New SqlDataAdapter(SQL,MySqlConn) MySqlConn.Open() Try MySqlAdapter.Fill(MyDS) TitleList.DataSource=MyDS.Tables(0).DefaultView TitleList.DataBind() Finally MySqlConn.Close() End Try
-
Save the page and code-behind module.
-
Build the project.
-
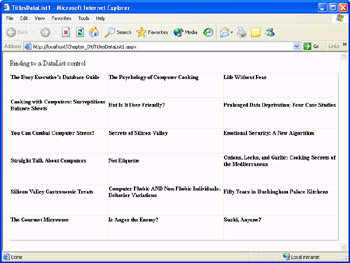
Test the page by right-clicking TitlesDataList1.aspx, selecting Browse With, and then selecting Microsoft Internet Explorer. The resulting screen should look like the following illustration.
The <ItemTemplate> is but one of the templates that you can use with the DataList control, but they all work similarly. Other templates that you can define include the following:
-
AlternatingItemTemplate Sets the formatting for alternating items.
-
EditItemTemplate Formats the fields used when an item in the DataList is switched to Edit mode.
-
FooterTemplate Sets formatting for the footer of the DataList.
-
HeaderTemplate Sets formatting for the header of the DataList.
-
SelectedItemTemplate Sets the formatting for the item in the DataList that has been selected by the user.
-
SeparatorTemplate Sets the format of the divider between items in the DataList.
Like a DataGrid, a DataList can be set up for in-place editing of values. This requires adding a LinkButton or Button control to the ItemTemplate with the CommandName set to “edit”; implementing an EditItemTemplate; setting up the event handlers for the EditCommand, DeleteCommand, CancelCommand, and UpdateCommand events; and mapping the event handlers to the events. When the Edit button for an item is clicked, the event handler should set the EditItemIndex to the number of the item that was clicked, which can be retrieved from the DataListCommandEventArgs passed to the event handler. The EditItemTemplate should include LinkButton or Button controls for the DeleteCommand, CancelCommand, and UpdateCommand, and event handlers should be added for each.
Using Repeaters
The Repeater control lets you go hog-wild with templates. If you can write it in HTML and/or server controls, you can put it into a template.
| Important | Because of the way that you add HTML code to a Repeater control, it is possible to create a perfectly valid page that will not display properly in the Visual Studio .NET Designer window. |
The following listing shows how you can update the previous example to work with a Repeater instead of a DataList. It adds a HeaderTemplate and a SeparatorTemplate to improve the look of the page.
Use a Repeater with headers and separators
-
Open Visual Studio, and then open the Chapter_09 project created earlier in the chapter.
-
Add a new Web Form to the project. Name the formTitlesRepeater.aspx.
-
When using a Repeater control, you will want to use flow layout rather than the default grid layout. The Repeater control does not allow for placement using the grid layout, and will move to the upper left of the page even in Grid Layout mode. Change to Flow Layout by right-clicking on the page, selecting Properties from the context menu, and then setting the page layout to Flow Layout.
-
Add a Label and a Repeater to the form. Change the Text property of the Label to Binding to a Repeater control. Change the ID of the Repeater to TitleRepeater.
-
Switch to HTML mode, find the <asp:Repeater> opening tag, and then insert the following code between the opening and closing <asp:Repeater> tags:
<ItemTemplate> <table> <tr> <td rowspan="4"> <img align="top" src='/books/2/321/1/html/2/<%# DataBinder.Eval(Container.DataItem, _ "title_id", "/quickstart/aspplus/images/title-{0}.gif") %>' > </td> </tr> <tr> <td> <em>Title: </em> </td> <td nowrap> <%# DataBinder.Eval(Container.DataItem, "title")%> <br/> </td> </tr> <tr> <td> <em>Price: </em> </td> <td nowrap> <%# DataBinder.Eval(Container.DataItem, "price", _ "{0:c}")%> <br/> </td> </tr> <tr> <td> <em>Category: </em> </td> <td nowrap> <%# DataBinder.Eval(Container.DataItem, "type")%> <br/> </td> </tr> </table> </ItemTemplate> <HeaderTemplate> <h4 style="background-color:silver;">Titles</h4> </HeaderTemplate> <SeparatorTemplate> <hr> </SeparatorTemplate> -
Switch to the code window by pressing F7, or by selecting View, and then Code. Add the following Imports clauses at the top of the code file:
Imports System.Data Imports System.Data.SqlClient
-
Scroll down to the Page_Load event handler. In this example, you will use a DataAdapter and a DataSet to fill the DataList. This code is identical to the code in the previous example, except that a Repeater is bound to a DataSet rather than a DataList. Insert the following code:
Dim ConnStr As String Dim MyDS As New DataSet() ConnStr = "server=(local)\VSdotNET;database=pubs;Trusted_Connection=yes" Dim SQL As StringSQL = "SELECT * FROM Titles" Dim MySqlConn As New SqlConnection(ConnStr) Dim MySqlAdapter As New SqlDataAdapter(SQL,MySqlConn) MySqlConn.Open() Try MySqlAdapter.Fill(MyDS) TitleRepeater.DataSource=MyDS.Tables(0).DefaultView TitleRepeater.DataBind() Finally MySqlConn.Close() End Try
-
Save the page and code-behind module.
-
Build the project.
-
Test the page by right-clicking TitlesRepeater.aspx, selecting Browse With, and then selecting Microsoft Internet Explorer. The resulting screen should look like the following illustration.
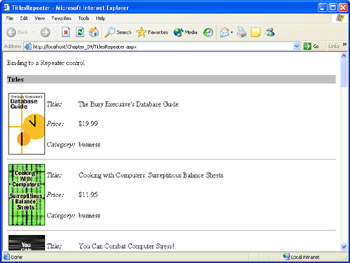
For the images in this example to be displayed, the ASP.NET QuickStart samples must be installed on the machine on which the example is run.
All templates available to the DataList control can be used with the Repeater control, and editing is handled the same with a Repeater as with a DataList.
EAN: 2147483647
Pages: 126