Interactively Adding SVG Elements
|
|
|
Dynamically Adding Multiple SVG rect Elements
Consider the overlapping white rectangles rendered in Figure 12.7.
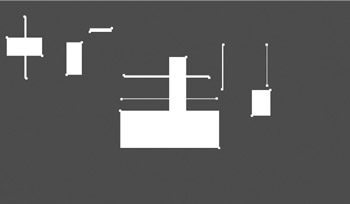
Figure 12.7: Overlaying a rectangle with dynamic rectangles.
The SVG document in Listing 12.7 demonstrates how to use the SVG onclick element in order to invoke an ECMAScript function that dynamically creates and renders an SVG rect element whose dimensions are based on the points on the screen that are associated with the user-initiated mouse clicks.
Listing 12.7 overlayWhiteRectangles1.svg
<?xml version="1.0" standalone="no"?> <!DOCTYPE svg PUBLIC "-//W3C//DTD SVG 20010904//EN" "http://www.w3.org/TR/2001/REC-SVG-20010904/DTD/svg10.dtd"> <svg width="100%" height="100%" xmlns="http://www.w3.org/2000/svg" xmlns:xlink="http://www.w3.org/1999/xlink"> <script type="text/ecmascript"> <![CDATA[ var pointCount = 0.; var width = 0.; var height = 0.; var xCoord = 0.; var yCoord = 0.; var xPosition = 0.; var yPosition = 0.; var xCoords = Array(2); var yCoords = Array(2); var cRadius = 2.; var rectNode = null; var circleNode = null; var rectangle = null; var parent = null; var svgDocument = null; // Capture mouse click function mouseClick1(event) { xCoord = event.getClientX(); yCoord = event.getClientY(); xCoords[pointCount] = xCoord; yCoords[pointCount] = yCoord; addPointCircle(event); ++pointCount; if( pointCount == 2 ) { addRectangle(event); pointCount = 0; } } // mouseClick1 function addPointCircle(event) { rectangle = event.target; parent = rectangle.parentNode; svgDocument = parent.getOwnerDocument(); // add a new circle... circleNode = svgDocument.createElement("circle"); circleNode.setAttribute("cx", xCoords[pointCount]); circleNode.setAttribute("cy", yCoords[pointCount]); circleNode.setAttribute("r", cRadius); circleNode.setAttribute("style", "fill:white"); parent.appendChild(circleNode); } // addPointCircle function addRectangle(event) { rectangle = event.target; parent = rectangle.parentNode; svgDocument = parent.getOwnerDocument(); computeDimensions(event); // add a new rectangle... rectNode = svgDocument.createElement("rect"); rectNode.setAttribute("x", xPosition); rectNode.setAttribute("y", yPosition); rectNode.setAttribute("width", width); rectNode.setAttribute("height", height); rectNode.setAttribute("style", "fill:white"); parent.appendChild(rectNode); } function computeDimensions(event) { width = Math.abs(xCoords[1]-xCoords[0]); height = Math.abs(yCoords[1]-yCoords[0]); xPosition = xCoords[0]-xCoords[1] <= 0 ? xCoords[0] : xCoords[1]; yPosition = yCoords[0]-yCoords[1] <= 0 ? yCoords[0] : yCoords[1]; } // computeDimensions ]]> </script> <!-- ==================================== --> <g transform="translate(0,0)"> <rect onclick="mouseClick1(evt)" fill="blue" stroke="red" stroke-width="2" x="0" y="0" width="800" height="400"/> <text x="50" y="450" font-size="24" font-color="red"> Click on two points inside the rectangle </text> </g> <g transform="translate(50,50)"> <text font-size="24" fill="white"> Click on two points: </text> </g> </svg>
Remarks
The logic of the ECMAScript code in Listing 12.7 is as follows: each time you click on a pair of points, a white rectangle is created with those two points as diagonal vertices of the rectangle, and then that rectangle is added to the existing graphics image. The logic that determines when (and where) to add a new rectangle is contained in the ECMAScript function mouseClick1(), which is invoked each time you click on your mouse. This function is supplied with the built-in variable evt, as listed below:
// Capture mouse click function mouseClick1(event) { xCoord = event.getClientX(); yCoord = event.getClientY(); xCoords[pointCount] = xCoord; yCoords[pointCount] = yCoord; addPointCircle(event); ++pointCount; if( pointCount == 2 ) { addRectangle(event); pointCount = 0; } } // mouseClick1 Each time you click your mouse, the ECMAScript function mouseClick1() determines the x-coordinate and the y-coordinate of the point where you clicked on your mouse, and these values are stored in an array, After you've clicked your mouse twice, the ECMAScript function addRectangle() is invoked in order to create an SVG rect element that is populated with appropriate values for the attributes x, y, width, height, and style, as seen in the following code fragment:
computeDimensions(event); // add a new rectangle... rectNode = svgDocument.createElement("rect"); rectNode.setAttribute("x", xPosition); rectNode.setAttribute("y", yPosition); rectNode.setAttribute("width", width); rectNode.setAttribute("height", height); rectNode.setAttribute("style", "fill:white"); parent.appendChild(rectNode); Before a new rectangle is created, the ECMAScript function addRectangle() invokes the ECMAScript function computeDimensions() in order to compute dimensions of the new rectangle:
function computeDimensions(event) { width = Math.abs(xCoords[1]-xCoords[0]); height = Math.abs(yCoords[1]-yCoords[0]); xPosition = xCoords[0]-xCoords[1] <= 0 ? xCoords[0] : xCoords[1]; yPosition = yCoords[0]-yCoords[1] <= 0 ? yCoords[0] : yCoords[1]; } // computeDimensions The width and the height of the new rectangle are computed as follows:
width = Math.abs(xCoords[1]-xCoords[0]); height = Math.abs(yCoords[1]-yCoords[0]);
The ECMAScript function Math.abs() ensures that the value of the width and height attributes are non-negative.
After the dimensions of the new rectangle have been computed, the SVG attributes of the new rectangle are assigned values in the ECMAScript function addRectangle(). This logic is executed each time you click on your mouse, and you'll see a new rectangle after an even number of mouse clicks.
|
|
|
EAN: 2147483647
Pages: 362
- ERP Systems Impact on Organizations
- Enterprise Application Integration: New Solutions for a Solved Problem or a Challenging Research Field?
- The Effects of an Enterprise Resource Planning System (ERP) Implementation on Job Characteristics – A Study using the Hackman and Oldham Job Characteristics Model
- Context Management of ERP Processes in Virtual Communities
- A Hybrid Clustering Technique to Improve Patient Data Quality