10.3. Adding and Configuring Printers Many printers, including those that are directly connected to your machine via USB or FireWire and those that are shared by other Macs, automatically appear in the list of printers in the Printer Setup Utility, making them ready to use almost immediately. However, if you want to use a network-based printer that isn't shared by a Mac or use a printer for which your Mac can't figure out the driver to use automatically, you'll have to add it yourself. To add a printer, click the Add Printer button (or use the Printers  Add Printer menu item). After a few moments, a window pops up that allows you to Browse for the printer youd like to add (as shown in Figure 10-4), or specify the details to add an IP Printer manually (shown in Figure 10-5). The pull-down menu at the top of the dialog has the following options to choose from: Add Printer menu item). After a few moments, a window pops up that allows you to Browse for the printer youd like to add (as shown in Figure 10-4), or specify the details to add an IP Printer manually (shown in Figure 10-5). The pull-down menu at the top of the dialog has the following options to choose from:
AppleTalk Lets you add and configure a printer using the legacy AppleTalk protocol. You can select from printers on the local AppleTalk zone and from any other zones that your computer knows about.
IP Printing Lets you add and configure a printer connected to a server (either a standalone machine or an embedded server inside the printer) using an IP-based protocol. These protocols include: LPD/LPR, a Unix-based printing protocol that has become a de facto industry standard; Internet Printing Protocol (IPP), a newer protocol based on HTTP that is intended to provide better interoperability over Internet-based networks; and HP's Jet Direct protocol, widely deployed in HP network-enabled printers. Since they are IP-based, these protocols can be used to communicate with printers beyond your local network.
 | The version of CUPS that ships with Mac OS X Tiger implements a change that causes some older LPD/LPR print servers to reject jobs. If you have this problem, you can find a solution at MacOSXHints.com (http://www.macosxhints.com/article.php?story=20031118180912371). |
|
Figure 10-4. Browsing for printers 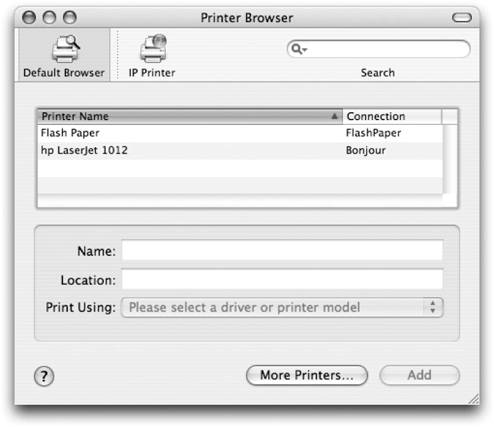
Open Directory Lets you add a printer defined in the various directory services that your computer has access to. For example, if your network administrator set up information about the computers on your network in an LDAP server that your machine connects to, that information shows up here.
Bonjour Lets you add Bonjour-enabled printers that don't automatically show up in your printer list but that exist on the network.
 | If you are using a USB printer attached to an AirPort Extreme base station, the printer will show up in the Bonjour section. |
|
USB Lets you add any USB printer that isn't already set up on your machine. Typically, only USB-based printers for which Mac OS X can't figure out the proper driver to use appear here instead of being automatically added to the list of printers. Figure 10-5. Adding a printer by address 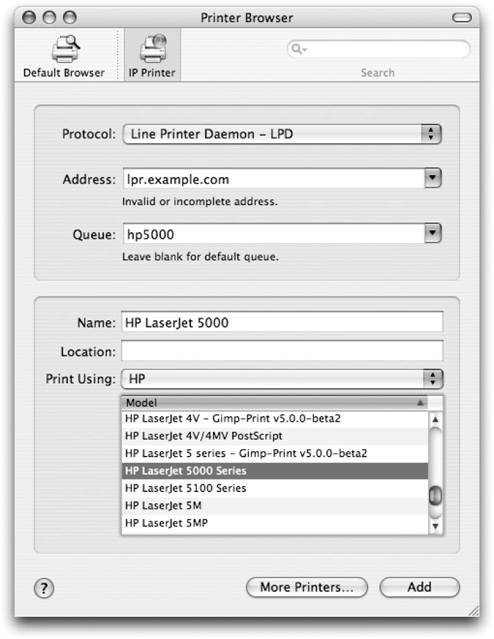
Windows Printing Lets you connect to any printer that is being shared by a Windows or Windows Server machine. The list of printers is organized by workgroup or domain; you can select the workgroup or domain to look for printers.
No matter which type of connection is used to connect to a printer, you'll need to select the printer model by using the Printer Model pull-down menu at the bottom of the Add Printer dialog. This sets the print system to use the correct driver for the printer. Mac OS X Tiger ships with drivers for printers from Apple, Brother, Canon, Managing Printers over the Web with CUPS The Printer Setup Utility isn't the only interface for managing the print system. You can access the CUPS layer of the print system directly by loading http://localhost:631 into a web browser. This presents a web-based interface that allows you to directly interact with the different parts of the CUPS system. The most useful part of the CUPS web interface is the Printers section. This lists the same kind of information, and lets you perform the same kind of tasks, as the Printer Setup Utility. Its main advantage is that it is accessible from other machines on the network when printer sharing is turned on. For more sophisticated control over how CUPS works and to exercise greater security over how your computer works as a network-accessible print server, you can edit the plain-text configuration files that CUPS uses that are located in the /etc/cups directory. You can find full documentation for configuring and administering CUPS online at http://www.cups.org, or by following the On-Line Help link from the CUPS configuration web interface. |
Epson, HP, Lexmark, Tektronix, and Xerox. For drivers for other printers, you'll need to check the printer manufacturer's web site. | Support for many printers that were previously unsupported under Mac OS X has been added thanks to CUPS and Gimp-Print , a set of open source printer drivers for many older (as well as newer) printers. You can even find a driver for the original Epson 9-pin dot matrix printer by looking under ESP in the Printer Model pull-down in the Add Printer dialog. You can find more information on Gimp-Print at http://gimpprint.sourceforge.net. |
|
Once a printer has been added, you need to make sure that it is configured properly. There are many settings, such as whether a printer has a duplexer for two-sided printing, or how much memory it has installed; these items can't always be automatically configured for you. To examine the configuration for a printer, select it in the list and click the Info button, or select Printers Show Info ( -I) from the menu bar. -I) from the menu bar. 10.3.1. Determining IP-Based Print Queue Names To add an IP-based printer, you'll need to know the IP address or hostname of the server, possibly the name of the queue for the printer you want to use if the server handles more than one printer, and the model of the printer. To get the name of a queue for a printer, you can either ask a network administrator or use the lpstat -a -h command, as shown in Example 10-4. Desktop Printers Users familiar with Mac OS 9 may miss having a printer on the desktop; you know, the little desktop printer alias that let you just drag, drop, and print. Fear not, for Mac OS X still offers this feature, it's just buried in the Printer Setup Utility. To add a desktop printer, select the desired printer in the Printer Setup Utility, and then select Printers Create Desktop Printer (Shift--D) from the menu bar. You'll be prompted with a name and a location to save the printer shortcut. Once you've created the desktop printer, you can drag and drop a file onto the printer icon to immediately send the job to the printer. You can also double-click the icon to view and manage its print queue. You can drag the desktop printer icon to your Dock, which makes it easier to access. |
Example 10-4. Using lpstat -a -h to list queue names on a machine $ lpstat -a -h TiBook.local HP_LaserJet_1012 accepting requests since Jan 01 00:00
The output from lpstat may contain more printers than those connected to the machine from which the information was requested. It also includes the other shared printer queue names on the network and indicates the hostnames that those queues are on. 10.3.2. Vendor-Specific Connections Depending on the drivers you have installed, there may be several additional items in the Add Printer pull-down menu. These are provided by printer manufacturers to handle situations that aren't covered by the built-in capabilities of Mac OS X. 10.3.3. Faxing As mentioned earlier, Mac OS X includes a virtual printer that uses your Mac's modem to fax print jobs. In addition, Mac OS X can be configured to listen for incoming faxes, which can then be saved, printed, or even emailed to you. To configure faxing , switch to the Faxing tab in the Print & Fax preferences, as shown in Figure 10-6. |