Section 9.3. Disk Utility
9.3. Disk UtilityThe primary tool for working with disks and filesystems is the Disk Utility (found in /Applications/Utilities), shown in Figure 9-5. The Disk Utility can be used to configure, format, eject, and partition disks of all kinds. On the left side of Disk Utility's interface is a list of the disks attached to your machine and the volumes that exist on those disks. Additionally, if you have any disk images mounted, a list of the most recently accessed files appears at the bottom of the left column. On the right side of the interface is a set of panels that give you access to the actions that you can accomplish with a drive. At the bottom of the window is a status display that gives you all sorts of information about the disk or volume you have selected. Figure 9-5. Disk Utility Some of the tasks you can perform with Disk Utility are:
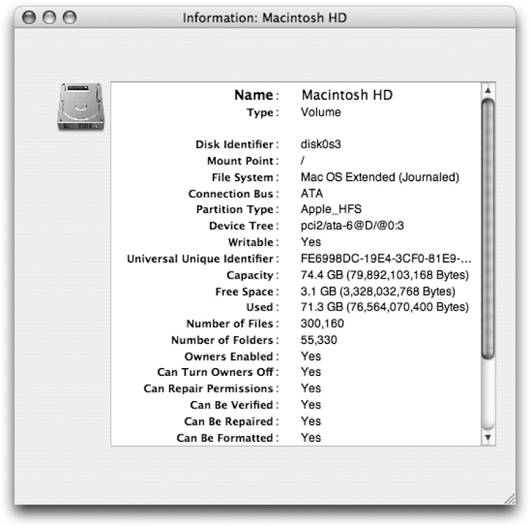
A command-line interface tool called diskutil can be used to perform all the features of the Disk Utility program and more. To get a list of the disks attached to your computer, execute the command diskutil list, as shown in Example 9-2. Example 9-2. Getting a list of drives using the diskutil command$ diskutil list /dev/disk0 #: type name size identifier 0: Apple_partition_scheme *74.5 GB disk0 1: Apple_partition_map 31.5 KB disk0s1 2: Apple_HFS Macintosh HD 74.4 GB disk0s3 /dev/disk1 #: type name size identifier 0: Apple_partition_scheme *1.0 GB disk1 1: Apple_HFS iDisk 1.0 GB disk1s2 /dev/disk2 #: type name size identifier 0: Apple_partition_scheme *37.3 GB disk2 1: Apple_partition_map 31.5 KB disk2s1 2: Apple_Driver43 28.0 KB disk2s2 3: Apple_Driver43 28.0 KB disk2s3 4: Apple_Driver_ATA 28.0 KB disk2s4 5: Apple_Driver_ATA 28.0 KB disk2s5 6: Apple_FWDriver 256.0 KB disk2s6 7: Apple_Driver_IOKit 256.0 KB disk2s7 8: Apple_Patches 256.0 KB disk2s8 9: Apple_HFS Iron 37.3 GB disk2s9 This view gives you much more information than the list of drives and volumes on the left side of the Disk Utility application. In particular, it shows you that more than just a single volume is associated with a disk. In fact, there are several parts, sometimes called slices, to a disk, each with an identifier. The first slice of the disk holds the partition map. This is a key to where everything is located on the rest of the disk. Then a group of other partitions follows. In the case of Example 9-2, slices 2 through 8 of disk2 hold disk drivers used by Mac OS 9, and slice 9 is the actual HFS+ volume of the drive. The Mac OS 9 drivers are installed by default when you a format a disk. If you format an internal boot drive without the OS 9 drivers, you'll see something like the output listed for disk0. 9.3.1. Examining a DiskTo take a closer look at a device attached to your computer or a volume associated with a device, select the disk or volume and then click the Info button in Disk Utility's toolbar. A window pops up listing all sorts of information about the device or volume, as shown in Figure 9-6. The following are some of the fields that you'll see in the Info window for a disk:
If you examine a volume on a disk with the Info button, you'll see more information about the disk, including:
You can also get information on a disk by using the diskutil tool. Two commands that can be used with diskutil are: diskutil info device diskutil info mountpoint The first command uses a disk identifier, such as disk0, to locate the disk to obtain the information on. The second command uses the location in the filesystem where the device is mounted, such as /. Example 9-3 shows the result of running diskutil info against the boot drive of a machine. Example 9-3. Getting disk information for the boot drive by using the disk identifier$ diskutil info disk0 Device Node: /dev/disk0 Device Identifier: disk0 Mount Point: Volume Name: Partition Type: Apple_partition_scheme Bootable: Not bootable Media Type: Generic Protocol: ATA SMART Status: Verified Total Size: 74.5 GB Free Space: 0.0 B Read Only: No Ejectable: No OS 9 Drivers: No Low Level Format: Not Supported Example 9-4 shows the information about the volume mounted at /. Example 9-4. Getting disk information for the root volume by using the mountpoint$ diskutil info / Device Node: /dev/disk0s3 Device Identifier: disk0s3 Mount Point: / Volume Name: Macintosh HD File System: Journaled HFS+ Journal size 8192 k at offset 0x256000 Owners: Enabled Partition Type: Apple_HFS Bootable: Is bootable Media Type: Generic Protocol: ATA SMART Status: Verified UUID: FE6998DC-19E4-3CF0-81E9-FC3BE0318265 Total Size: 74.4 GB Free Space: 3.1 GB Read Only: No Ejectable: No From this output, you can see that the filesystem is formatted as Journaled HFS+, and that the journal size is a mere 8192 KB. Even though it is modest in size, the journal has a large impact on the integrity of the filesystem and allows for many performance optimizations. 9.3.2. Verifying and Repairing Disk PermissionsOne of the most common things that can go wrong with a disk is that the permissions for the various files and directories on it get set incorrectly. Although the permissions for a disk should never get out of whack, quite a few installers that require an administrator's password seem to set the permissions on various directories of your disk to what they think they should be. This is one reason why many system administrators abhor old-style software installers and prefer to install software distributed on disk images, which can be drag-and-dropped into the Applications folder without harm. To see if the permissions on your disk are correct for your system, select the disk or volume you want to check and click the Verify Disk Permissions button in the First Aid panel of the Disk Utility interface. This determines what the correct file permissions are for your system and then checks your disk against those permissions. If your permissions are not set correctly, you should strongly consider repairing them by clicking the Repair Disk Permissions button. To check permissions from the command line, use the following syntax to diskutil: diskutil verifyPermissions [diskid | mountpoint] For example, to verify the permissions of the boot volume, you would use the following command: $ diskutil verifyPermissions / To repair permissions, use the following: $ diskutil repairPermissions /
9.3.3. Verifying and Repairing DisksTo ensure that the filesystem on a disk is working correctly, select the disk or volume that you want to check and click the Verify Disk button. This scans the various parts of the filesystem to make sure they are intact. If any problems are reported, you should use Disk Utility's Repair Disk button to correct the issues. To verify or repair a disk, Disk Utility must first unmount the drive, which removes the ability to access the files on the disk while it performs its work. This means you can't verify or repair the disk you booted from, and in most cases, that's the disk that you want to verify. There are two solutions to this problem, and they work equally well:
|
 Open Disk Utility from the menu bar so you can work on the local disk.
EAN: 2147483647
Pages: 166