6.2. Managing Users Traditional Unix systems typically store their user and group information in the /etc/passwd and /etc/group filesand if you go looking, you can find these files on your Mac. However, after Mac OS X boots, it does not use these files. Instead, it uses Open Directory (discussed in Chapter 7) to store its user and group information. This allows the system to work equally well in home setups where there is only one machine and in enterprise environments where there might be hundreds of machines that use a central server for authentication. While there are many ways to manage users on Mac OS X, the simplest and most direct by far is to use the Accounts preference panel. Managing Users from the Command Line Many hardcore Unix users are used to being able to manage users from the command line using tools like useradd,usermod,userdel,groupadd,groupmod,groupdel,gpasswd,grpconv, and grpunconv. Unfortunately, these commands don't exist on Mac OS X. The only tool of this kind on Mac OS X is the passwd command, which is used to change a user's password. While it is possible to perform some user management from the command line through direct manipulation of the NetInfo database using the niutil command (covered in Chapter 7), several pieces of data in a user's NetInfo record, such as the generateduid property, don't have command-line tools to manage them. For almost all purposes, and unless you really need to manage users from the command line, you should use the Accounts preference panel to manage users. |
6.2.1. Managing Users with the Accounts Panel When you open the Accounts preference panel, you are presented with a list of users on the system and a set of tabbed panes to modify users, as shown in Figure 6-1. Figure 6-1. The Accounts preference panel 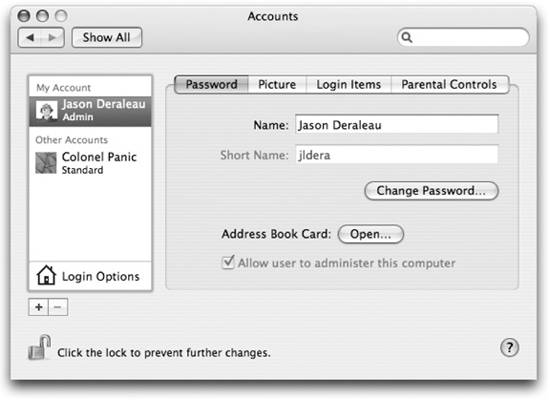
6.2.1.1. Creating a user To create a user, click the plus (+) button. A sheet drops down asking for information about the new user. The various fields are:
Name This is the full name for the user. This name shows up in most places where Mac OS X displays user information, such as the log in panel and any of the alert screens that prompt you for an administrator password.
Short Name This is the Unix-style name for the user and is what you'll typically see on the command line. The default short name runs your first and last names together with no spaces in it (e.g., jasonderaleau) and is represented in lowercase letters. Unix usernames of yore used to be limited to eight characters or less, while Mac OS X allows short usernames up to 255 characters.  | Don't feel like you have to stick with the Short Name that Mac OS X gives you. Having to type in your full name to login can be a bit of a pain, so if you want, change the Short Name to just your first name (e.g., jason), or something else (such as jldera) that makes sense to you. Remember, just because the system gives you something as a default doesn't necessarily mean that you have to use it. If the field is editable and you'd rather use something different, change it. |
|
Password & Verify This is where you set the password for the user.
Password Hint This is where you define a hint that will be displayed to the user if an incorrect password is entered more than three times.
Allow user to administer this computer If you enable this checkbox, the user account will be added to the admin group and given administrative privileges on the machine.
There are three tabs of the Accounts preference panel that allow you to fine-tune the settings for a user. They are:
Password This tab allows you to view the user's name, short name, and address book card entry. You can also change the user's password and grant administrative access. Remember, when you allow somebody to become an administrator, that user becomes a member of the admin group and can modify the system however she sees fit.
Password Assistant When you click the Change Password button, a sheet drops down prompting you for your current password and the password you want to change it to. Next to this New Password field, you'll find a small button with a key on it. Clicking the key will launch the Password Assistant in a separate window. Using this Assistant, you can have Mac OS X generate a password for you to use for your account. The Password Assistant offers several different types of passwords. Some of them are designed to be easy to remember while others are intended to be extremely difficult to crack. In today's age of identity theft, it's important to have a secure password, and the Password Assistant can be quite helpful in creating one. If you'd like to create your own password (or test an existing password's security), select Manual as the Type of password. Then, type in your password in the Suggestion field. As you create passwords, the Password Assistant will fill the Quality bar, indicating the security of the password. In addition, the Assistant offers you tips on how to make your intended password more secure. |
Picture This allows you to associate a picture with a user, which is handy for the various user lists. You can either use one of the Apple provided pictures or choose one of your own. Also, if you have an iSight camera connected to your computer, the Add Picture dialog box will let you take a snapshot, which you can use for this picture.
Login Items Shown only when viewing the current user's account, this list of applications is launched every time you log into your Mac. You can also specify that an application should load at login by enabling the Open at Login option on the app's Dock menu.
Parental Controls A new feature in Tiger, the Accounts panel's Parental Controls tab is used to restrict a user's access to various Mac OS X applications. While administrator accounts cannot be controlled through this means, it is quite useful for protecting younger Mac users from some of the dangers of the Internet. You can read more about their configuration in the "Parental Controls" section found later in this chapter.
When you've finished setting up a user, his Home folder is created in the /Users folder, and he will be able to log into the system. | When you create an account using the Accounts preference panel, all properties about that user are stored in the local NetInfo database managed by Open Directory. To see the contents of this database, use NetInfo Manager (/Applications/Utilities), which provides a barebones view of the NetInfo database and will allow you to make substantial changes. You'll see more about NetInfo Manager and how user records are stored in Open Directory in Chapter 7. |
|
6.2.1.2. Deleting a user To delete a user, select the name of the user from the list and click the minus button (-). You are presented with a dialog box asking whether you really want to delete the user and what you want to do with the contents of the user's Home folder. You can either archive the user's folder to a disk image (.dmg) file in the /Users/Deleted Users directory or quickly and permanently erase it, as shown in Figure 6-2. If you choose to save the contents, you can browse through them at any time by double-clicking the .dmg file. This mounts a temporary drive from which you can restore a user's data. Another option is to save the disk image and then burn it to CD or DVD for historical purposes. When you have decided that you no longer need the files for the user, you can delete the disk image from the /Users/Deleted Users directory as long as you have admin privileges. Disabling a User Some operating systems allow you to disable a user's account so it can't be used but the user's Home directory remains intact. Mac OS X doesn't let you disable a user per se. However, you can always accomplish the same thing by changing the user's password to something that only you, the administrator, will know. The user will be locked out, but the Home directory will still be intact. |
Figure 6-2. Deleting a user with the Accounts preference panel 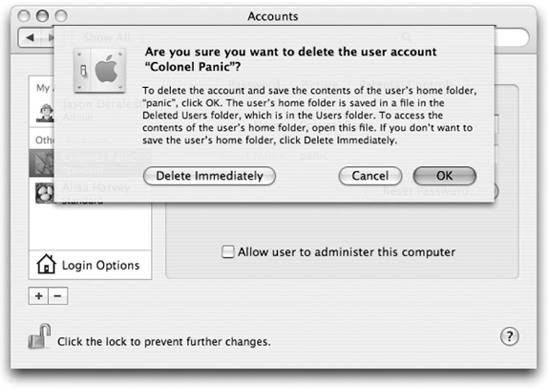
6.2.1.3. Parental Controls Though earlier versions of Mac OS X included a means to restrict a user's access to the Finder, Tiger takes restricting the user environment a step further with Parental Controls (see Figure 6-3). Parental Controls allow you to easily limit a user's experience in several bundled Mac OS X applications. While most of these controls are presented as a means for parents to protect their children, they could be just as useful in a business environment. Corporate systems administrators, however, will find that Mac OS X Server's Workgroup Manager provides a more flexible means of managing preferences. Figure 6-3. A user account's Parental Controls 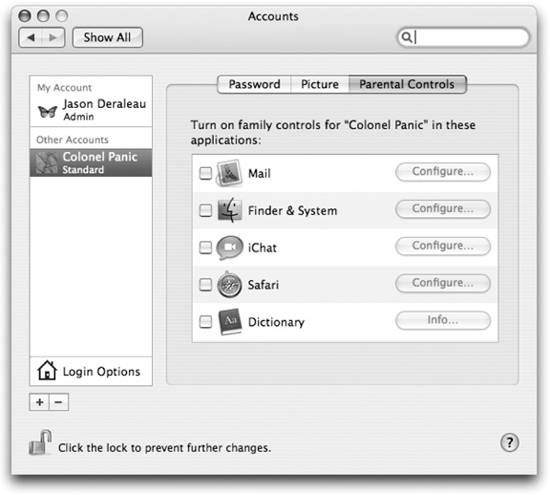
As shown in Figure 6-3, the applications that can be managed are:
Mail Mail can be configured to allow correspondence only with addresses that you specify. Additionally, permission emails can be sent to a parent's email address for review.
Finder You can choose to restrict the user to a version of Finder that provides a somewhat limited experience, or enable the Simple Finder and specify the exact documents, folders, and applications a user can access.
iChat Much like Mail, iChat can be configured with a list of users who may instant message the child's account.
Safari After enabling a user's Parental Controls for Safari, you cannot browse to pages that are not on the user's Bookmarks Bar, as shown in Figure 6-4. Attempting to modify the Bookmarks Bar will prompt you for an administrator's password, allowing for finite control of the user's browsing experience.
Dictionary Enabling Parental Controls for Dictionary prevents searches for words that may be considered inappropriate for children (just think of George Carlin's "Seven Words You Can't Say on Television" routine, and you get what I mean).
Figure 6-4. The restricted Safari in action 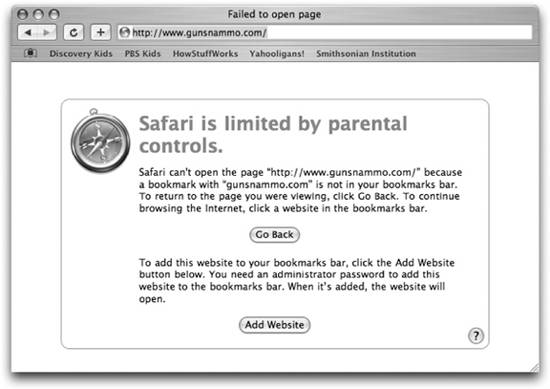
|