The New Desktop
The OpenVMS New Desktop is an implementation of the Common Desktop Environment (CDE). CDE combines the technologies of the X Window System, OSF /Motif, and other original components. CDE is supplied with several commercial systems, including a variety of UNIX systems from various vendors. Information about CDE, the X Window System, and Motif is available at
-
http://www.opengroup.org/desktop/
Logging out of the New Desktop
Before logging out, first save any work that has not been saved in any open applications.
There are several ways to log out of the New Desktop. You may click the exit control on the workspace switch (described later) or activate the Window menu of the Front panel (also described later) and select Log out, or right-click on an unoccupied area of the screen and select Log out from the workspace menu that appears.
Depending on your Style Manager settings, you may or may not be asked to confirm your desire to log out.
The Front Panel
The front panel is the bar located at the bottom of the screen with a variety of small graphical elements on it.
The front panel is present at all times under the New Desktop and is the starting point for most functions you will perform. It contains controls that perform a variety of functions. Some controls start applications. Others, such as the clock, only provide information.
A control may provide information and also start an application. For example, the mailer icon notifies you when there is new mail waiting, but it also starts the mail program when clicked. Certain controls, such as the trash can, are known as drop zones. For example, when you drag a file over the trash can and release it, the file is deleted.
![]()
Figure 15-11: The Front Panel
Parts of the Front Panel
The front panel is divided into three main sections. In the middle is the workspace switch. To either side are controls for applications, utilities, and subpanels.
The Front Panel Window Menu
Just as each window has a Window menu, so does the front panel itself. It is activated by the control located in the upper-left corner of the front panel, as shown in Figure 15-12.

Figure 15-12: The Front Panel Window Menu
It contains many of the same functions as any other menu (minimize, restore, etc.), but also contains a Log Out item that can be used to end your session.
The Workspace Switch
The New Desktop supports separate workspaces. Conceptually, workspaces are like having several separate monitors, each with a different set of applications and windows. By default, four workspaces are provided, named One through Four, but workspaces can be added, removed, and renamed at will. Each workspace can have its own background and color scheme as well. You may wish to use multiple workspaces to avoid too much clutter in one workspace or to group tasks into separate related units.
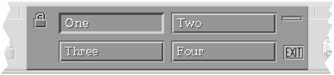
Figure 15-13: The Workspace Switch
To switch workspaces, click on the bar containing a workspace name. To add, remove, or rename a workspace, right-click on one of the workspace names and select the appropriate item from the pop-up menu that appears.
You may move a window to another workspace or make it present in all workspaces by selecting Occupy Workspace or Occupy all Workspaces from its Window menu (see "The Window Menu").
The workspace switch also contains three other controls: the lock, the activity indicator, and the exit control.
-
The Lock Clears the display and locks it from being accessed when clicked. To unlock the display, you must enter your password again.
Note Locking the workstation applies to the GUI only; it does not prevent such access as terminal logins or remote file access.
-
The Activity Indicator Flashes while the system is performing an activity. It is otherwise known as a busy indicator, but that name is inaccurate. You can usually initiate other activities while it is flashing, and it flashes only while the GUI-control software (not OpenVMS itself) is working.
-
The Exit Control Initiates a logout from the system when clicked. You may be asked to confirm your desire to log out, depending on your settings. If you confirm, all applications will be closed and your session will be ended.
Other Front Panel Controls
The rest of the front panel is divided into controls and subpanels (discussed later). The controls, from left to right, are as follows:
-
Clock This is an indicator of the time only and performs no other function.
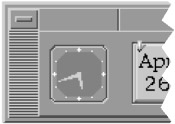
Figure 15-14: The Clock Control -
Calendar This indicates the current date. When clicked, it starts the calendar application, a combination calendar and day planner.
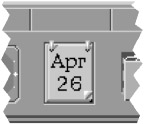
Figure 15-15: The Calendar Control -
File Manager When clicked, this starts a File Manager view of your home folder (directory). When dropped on, it starts a File Manager view of the folder that was dropped.

Figure 15-16: The File Manager Control -
Personal Application This position in the front panel is reserved for an application of your choice, which starts when clicked. Your personal application may differ from this example. Changing your personal application is discussed further on in the section "Adding to a Subpanel."
The default personal application is the text editor (the CDE editor, not EDT). Dropping a file onto the text editor icon causes the editor to start with the specified file loaded.
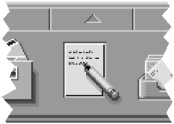
Figure 15-17: The Text Editor Control -
Mailer When clicked, this starts the GUI interface to OpenVMS mail. When dropped on, it starts mail with the specified file loaded. The appearance of the mailer icon changes when new mail messages are waiting.
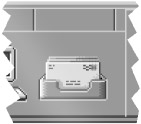
Figure 15-18: Mailer Control with No New Mail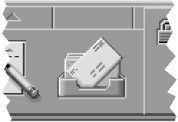
Figure 15-19: Mailer Control with New Mail -
Default Printer When dropped on, this prints the dropped file on your default printer. When clicked, it starts a dialog box that allows you to change your printer settings.
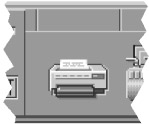
Figure 15-20: The Default Printer Control -
Style Manager When clicked, this starts the style manager, which allows you to change the screen background, colors, mouse settings, screen savers, etc.
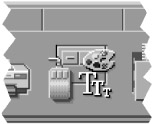
Figure 15-21: The Style Manager Control -
Application Manager When clicked, this opens the Application Manager window, which contains controls for starting most applications and tools.
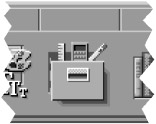
Figure 15-22: The Application Manager Control -
Help Manager When clicked, this opens the Help Manager. Use this application to obtain help on the New Desktop and its applications.
Figure 15-23: The Help Manager Control -
Trash Can When clicked, this opens the trash can window. When dropped on, it deletes the file that was dropped. The trash can window allows you to recover files previously selected for deletion, provided they have not yet been permanently deleted.
Figure 15-24: The Trash Can Control
Subpanels
A subpanel is a menu associated with a control slot on the front panel. You will notice that there is a small rectangular field just above each front-panel control. If this field contains an upward-pointing arrow, a subpanel is available.
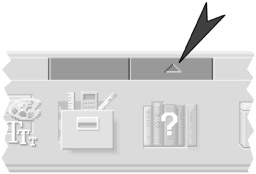
Figure 15-25: A Subpanel Control
Clicking the arrow displays the subpanel. Clicking the arrow again (now pointing downward) hides it.
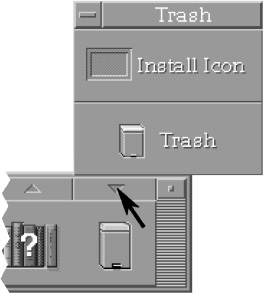
Figure 15-26: A Raised Subpanel
Each subpanel contains additional controls relevant to the front-panel control with which it appears. For example, the Personal Application subpanel contains personal applications, and the help subpanel holds help controls.
Selecting from a Subpanel
Simply hold the mouse pointer over the desired option and click.
Adding to a Subpanel
You may add an icon (e.g., an icon that starts an application) by dropping the icon onto the Install Icon control on a subpanel. The following example will add the Calculator application to the Personal Applications subpanel. The steps are as follows:
-
Open the Personal Applications subpanel by clicking the up-arrow symbol over the Personal Application control.
-
Open the Application Manager window by clicking the Application Manager control.
-
Double-click DECwindows Apps to display the window containing the Calculator application.
-
Locate the Calculator icon. Drag the calculator icon directly over the Install Icon control in the Personal Applications subpanel and drop (release the mouse button).
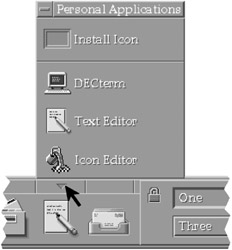
Figure 15-27: The Personal Applications Subpanel
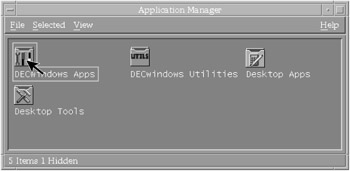
Figure 15-28: The Application Manager
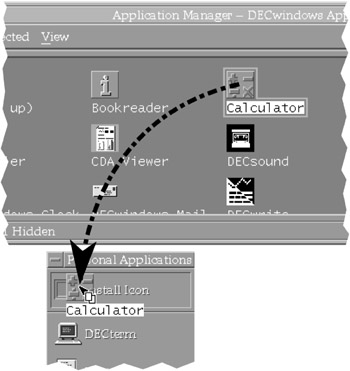
Figure 15-29: Adding an Icon to a Subpanel
The Calculator application is now added to the Personal Applications subpanel.
Setting Your Personal Application
To change your primary personal application, first add it to your Personal Applications subpanel, if necessary. This process is described above, in "Adding to a Subpanel."
While the Personal Applications subpanel is open, right-click on the application you wish to set as your default application. Click Copy to Main Panel.
Your selected application replaces the previous front panel control.
Deleting from a Subpanel
Use caution when deleting an item from a subpanel. Some items may be difficult to add again should it become necessary. In general, delete only items you have added yourself, thus ensuring that they can be replaced easily.
To delete from a subpanel, right-click on the desired control and click Delete.
Overview of Front-Panel Applications
This section briefly describes each application appearing on the front panel. It does not describe any applications in detail; instead, only major functions are briefly mentioned. Keep in mind that each application has a built-in Help menu that can answer most questions about its use.
Applications available via the Application Manager are discussed further on.
Calendar
This application is a traditional calendar as well as a day planner. It allows you to schedule events and send yourself notifications prior to their occurrences.
-
View Menu Month and Year display calendar pages for the current month and year, respectively. Selected, Today, and Day switch to a planner page for the appropriate date (Selected refers to a day you have highlighted on the Month or Year displays.)
-
Entry Menu The Entry menu appears only on a day-planner page. To use the items on it, you must create or select an entry on the planner page. You create an entry by clicking on a time of day and typing the name of an event. Selecting Edit from the Event menu allows you to customize the event. For example, you may elect to make the event repeat at weekly intervals or adjust how far in advance of the event you should be notified.
File Manager
The File Manager allows you to move around a directory tree and work with files. You may create files and directories (referred to as folders), list files by various criteria, and perform operations on them. For example, files may be dragged to the Printer, Text Editor, or Trash Can controls, which will automatically operate on the file. You may drag frequently used files directly onto the workspace for quick access.
Navigating the Directory Tree
When your view is set to By single folder, double-click on a folder shown in the view window to switch to that directory. When your view is set to By tree, click the "" sign beside a folder to reveal or hide the contents of that folder.
You may view folders other than your own if you have appropriate privileges. Use the Go To option from the File menu.
File Manager Menus
-
File Menu allows you to create files and folders, navigate the directory tree, open a DECterm window, or exit the File Manager.
-
Selected Menu allows you to perform operations on groups of files, such as moving, copying, or setting permissions on them.
-
View Menu allows you to customize the style in which files and folders are displayed.
Mailer
The Mailer is essentially a GUI interface to the OpenVMS mail facility, whose text interface was previously described. Operation is virtually the same, except that commands are chosen from menus as opposed to being typed at a terminal. (See Chapter 12, "E-mail")
Default Printer
When clicked, this opens a dialog box from which you can select a default printer and various printer settings. When selected directly from the front panel in this way, you select default settings only; no file is actually printed. To print a file, drag and drop the file onto the printer control on the front panel.
Style Manager
With the Style Manager, you control several options regarding the appearance and functionality of your display, keyboard, and mouse. The Style Manager options are as follows:
-
Color selects a color scheme for your workspace windows.
-
Font controls the size of the type font used by applications.
-
Backdrop selects from a variety of screen backgrounds. Each workspace may have its own backdrop.
-
Keyboard allows you to enable or disable keyboard autorepeat and set the volume of optional keyclick sounds.
-
Mouse allows you to adjust mouse settings (e.g., left-or right-handedness and pointer acceleration).
-
Beep allows you to set the pitch, volume, and duration of the standard beep sound.
-
Screen allows you to select an active screen background (screen saver) to run while the display is locked or the session is idle.
-
Window controls window behavior, including whether pointing or clicking in a window makes it active and whether an active window is automatically placed on top.
-
Startup controls the startup action of your session—Reset to home session or Resume previous session—and whether logouts are confirmed. It also allows you to set your current session as your home session (handy for selecting which applications to automatically start at login). An example of setting your startup session is included in the section "Starting Applications Automatically."
-
Security allows you to add or remove access control entries for access by accounts on your node or from other nodes on the DECnet network.
Application Manager
Use the Application Manager to start applications not present on the front panel or any of its subpanels. The Application Manager presents folders containing GUI applications in much the same way that the File Manager presents other files.
When started, the Application Manager presents four folders: DECwindows Apps, DECwindows Utilities, Desktop Apps, and Desktop Tools. To select a folder, double-click on it.
The four folders and their contents are listed below.
| Note | Applications can be added to and removed from the Application Manager folders; the applications on your system may differ from those described here. |
Application Manager: DECwindows Apps
The DECwindows Apps folder contains several DECwindows applications, which can be used under the New Desktop as well as the older DECwindows interface.
-
Bookreader an application for viewing DECwindows "books," including certain versions of the OpenVMS documentation kit on CD-ROM. (Other versions supply PostScript and/or PDF files.) DECwindows books are similar in look and feel to documents in PDF format.
-
Calculator an emulation of a hand-held calculator. In addition to simple arithmetic, it can perform some trigonometric functions, calculate square roots and exponents, and display decimal, octal, and hexadecimal representations.
-
Calendar the same Calendar application available on the front panel.
-
Cardfiler the cardfiler is an on-screen representation of a file of index cards. Cards might contain names and addresses of business contacts, for example. The Cardfiler can group and maintain separate sets of cards for different purposes.
-
CDA Viewer CDA stands for "Compound Document Architecture." This application is a viewer for documents in Digital Document Interchange Format (DDIF), PostScript files, and text files.
-
DECsound an application for playing sound files.
-
DECterm a terminal emulator program that acts as a Digital VT-style terminal. When started, DECterm is automatically logged into the system without the need to enter your username and password again. A DECterm window functions very much like a physical terminal connected to the system, but with some additional capabilities.
-
DECwindows Clock a program that simulates an analog or digital clock. It optionally displays the date and can function as an alarm clock.
-
DECwindows Mail the same mailer application as available on the front panel.
-
DECwrite a full-featured word processing application.
-
EVE Editor EVE (also referred to as TPU) is a text editor that can be used through text or GUI interfaces. This control starts the GUI version.
-
Image Viewer an application for displaying graphics files in .GIF, .JPEG, .TIFF, or .XPM format.
-
Message Window an application specifically designed to display broadcast messages. As discussed previously, OpenVMS sends a variety of broadcast messages to user terminals. In the GUI environment, you may or may not have a DECterm terminal session with which to receive these messages. The Message Window provides a destination for them.
-
Mosaic an HTTP client (Web browser). Future versions of OpenVMS may include the Mozilla browser instead.
-
Notepad a text editor. This is separate from EDT, EVE, and the CDE text editor, all mentioned previously. Common functions (e.g., include, find, replace, copy, cut, and paste) are included.
-
Paint a simple graphics program allowing you to create images in DDIF format.
-
Print Screen a utility for capturing screen images and saving them in DDIF, PostScript, or SIXEL (a Digital-specific) format. Many of the illustrations in this book were captured using this utility.
-
Puzzle a video representation of a simple puzzle game consisting of numbered squares that the user must put in order by sliding the pieces.
Application Manager: DECwindows Utilities
This folder contains utility programs mostly used to examine or modify the internal states of the GUI software, generally requiring a somewhat advanced knowledge of the GUI's internals to be of use. They are not discussed in this book.
Application Manager: Desktop Apps
This folder contains applications associated with the New Desktop. These are separate from the applications in the DECwindows Apps folder, many of which are associated with the older DECwindows environment.
-
Calculator This is a separate program from the DECwindows calculator program. It is similar in most respects, but has several additional features.
-
Create Action This is a tool with which you can create custom action icons for your desktop. You may use these icons to perform customized tasks. Further on, this chapter contains an example of creating an action.
-
File Manager This is the same File Manager application available on the front panel.
-
Help Viewer This is the same Help Viewer application available on the front panel.
-
Icon Editor This allows you to create and modify icons. For example, you might use this in conjunction with the "Create Action" application to place a new icon on your desktop and associate it with a custom action.
-
Man Page Viewer This is the viewer for UNIX-style Help entries concerning the New Desktop. These help entries are separate from the Help Viewer entries and the OpenVMS Help facility. To view a man page, start the viewer and type the name of the desired page. The available pages are located in directory SYS$COMMON:[CDE$DEFAULTS.SYSTEM.MAN]. This feature should be familiar to users accustomed to UNIX systems.
-
Style Manager This is the same Style Manager application available on the front panel.
-
Text Editor This is the CDE text editor. On many systems, this is the default personal application on the front panel. It is similar to the DECwindows Notepad application.
-
Trash Can This is the same Trash Can application available on the front panel.
Application Manager: Desktop Tools
This folder contains several utilities that are GUI interfaces to normal OpenVMS commands and X Window System utilities. Some entries are duplicates of items in other folders and will not be mentioned again here.
Except where noted, each of these tasks can be performed at the DCL prompt using the command indicated.
-
Compare Files invokes the OpenVMS DIFFERENCES command to compare two files and report any differences.
-
Delete File invokes the DELETE command to delete a file.
-
Directory/Full invokes the DIRECTORY/FULL command to display the complete attributes for files you specify.
-
Edit invokes the EDIT command to edit a file. The default editor is EVE (TPU), but it may be overridden by defining a symbol EDIT in your LOGIN.COM to invoke another editor.
-
Execute DCL Command executes an arbitrary DCL command that you supply.
-
Search Text invokes the SEARCH command to locate certain text within files.
-
Show Device invokes the SHOW DEVICE command to display information about disks, tapes, terminals, printers, and other devices.
-
Show Logical invokes the SHOW LOGICAL command to show the translation of a logical name. (See Chapter 7, "The User Environment:", "Logical Names.")
-
Watch Errors is essentially the same as the Message Window described earlier.
Help Manager
The Help Manager control starts the Help Manager with an introductory text and links for each piece of software that has registered its help materials. On a new OpenVMS system, the only topic shown will be the CDE itself.
Help on specific topics is available in the Help Manager subpanel, as well as in the Help menus within applications.
Trash Can
The Trash Can control is a drop zone; files you drag and drop to the trash can are discarded. Clicking the trash can control opens a view of files currently in the trash can, from which you may recover files before their actual deletion. You also may select "shred," which immediately deletes the selected file.
New Desktop Examples
Moving a Window Between Workspaces
You may move a window to other workspaces or make it present in all workspaces by using the Occupy Workspace and Occupy All Workspaces items from the Window menu.
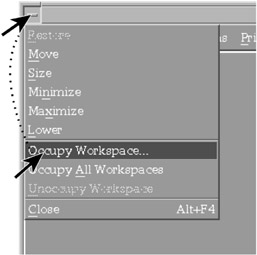
Figure 15-30: Moving a Window to Another Workspace
Copying an Application or File Directly to the Desktop
If you frequently use the same application or file, you may wish to copy it directly to the desktop. Copying an item to the desktop is easy. Simply drag the icon to the desktop and release.
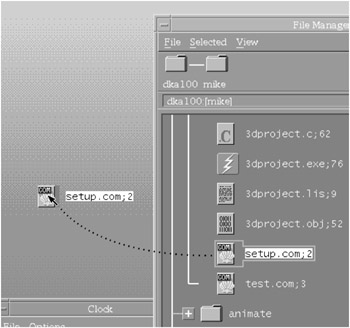
Figure 15-31: Copying an Item to the Desktop
To remove an item from the desktop, right-click in the icon and select Remove from Workspace.
Creating an Action
You can create your own icons to perform common tasks. The action performed is up to you and can be almost anything. This particular example will show you how to create an action to identify files in your home directory that have been modified during the past week.
| Note | This action is implemented as a command procedure. You may wish to refer to Chapter 9, "Command Procedures," for more information. |
-
The first step is to create a command procedure in your home directory called CHECK_FILES.COM. Use any text editor you like, whether it's the CDE editor on the front panel, EDT in a DECterm window, or another editor. CHECK_FILES.COM should have the following contents:
$ DIRECTORY *.* /MODIFIED/SINCE="-7-"/DATE=MODIFIED $ WRITE SYS$OUTPUT "" $ INQUIRE/NOPUNCTUATION YESNO "Press ENTER to close window" $ EXIT
-
Once CHECK_FILES.COM is created, start the Application Manager, double-click Desktop Apps, then double-click Create Action.
-
In the field Action Name enter Check Files.
-
In the field Command When Action Is Opened, enter "@check_files".
-
In the field Help Text for Action Item, enter "Shows recently modified files."
-
From the Window-Type drop-down box, select Terminal (auto-close). (To display the choices, click directly on the box containing Graphical (X-Window)).
-
From the File menu, select Save. A message will appear saying, "The new action Check Files has been placed in your home folder."
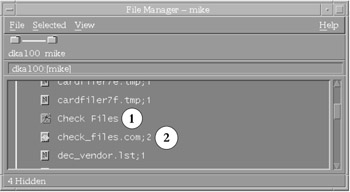
Figure 15-32: Check Files Action and Procedure As Shown in File Manager
The item Check Files now appears in the File Manager view of your home folder (1). Double-clicking it causes the command procedure to execute, showing recently modified files. You may execute it from the File Manager or copy it to the desktop, as described previously.
| Note | If the window appears briefly, but disappears too quickly to read its contents, an error has occurred. See below. |
You will note that in your File Manager view, the command procedure CHECK_FILES.COM will itself appear (2). Double-clicking it will also cause it to execute, but with the following differences: you will be prompted for parameters (which this action does not need), and the window will not automatically close when the procedure is finished.
There is a further distinction to be pointed out between executing the action versus the command procedure. Let's say you were to copy each of them to the desktop, as shown in Figure 15-33:
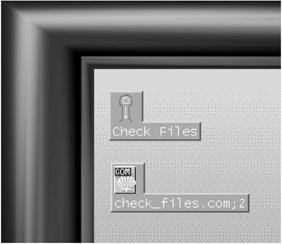
Figure 15-33: Check Files Action and Procedure on the Desktop
There is an important distinction between these two icons: The command procedure icon executes a specific version of the procedure, whereas the action icon executes the latest version. If you modify the command procedure after creating the icons, only the action icon will automatically use the new version. The command procedure icon will continue to execute the original version.
Actions may be created for purposes other than executing command procedures. You may specify an individual DCL command or an X Window System executable program to be executed instead of a command procedure.
If the Window Disappears Too Quickly To Read
The preceding paragraphs pointed out some advantages of executing command procedures from an action icon rather than a command procedure desktop icon. However, there is at least one drawback: Some errors can occur which cause the window to appear and disappear so quickly that you cannot read the error message.
If this happens, use the Create Action program to modify the action. From the File menu, select Open and choose the CHECK_FILES.DT action. Change the Window Type to Terminal (Manual Close) and select Save from the File menu.
Now when the action is executed, the window is left open, allowing you to read any error messages and correct the command procedure error that caused the problem. Afterward, use Create Action to switch the window back to Auto Close.
Starting Applications Automatically
Rather than having a startup window containing applications to start automatically when you log in, the CDE environment provides a way to save your entire session. The next time you log in, all of the same applications will start with their windows sized and positioned just as they were when you saved them.
To establish an initial set of applications, follow the following steps:
-
First, start any applications you would like to run automatically at startup.
-
Size and position their windows according to your preferences.
-
Exit any applications you do not wish to start automatically.
-
Add any desired icons to your workspace(s), and remove any undesired ones (these can be action, file, or application icons).
-
Once your session is set up the way you would like it to be at startup, save it as follows: Start the Style Manager and select Startup.
-
From that menu, select Set Home Session. This saves the current state of your session, except for the Style Manager. Ensure that At Login: Return to Home Session is selected.
At future logins, your session will be just as it was when you saved it, without the Style Manager windows.
On the other hand, if you would like logins to restore your session to the way it was when you logged out, see the following section, "Resuming Your Session at Next Login."
Resuming Your Session at Next Login
If you would like to have each login session resume exactly as it was when you logged out, follow these steps:
-
Start the Style Manager and select Startup.
-
From that menu, select At Login: Resume Current Session.
At each logout, the state of your session will be preserved. This means that at each login, applications and icons will be restored to the way they were at the preceding logout.
The DECwindows Interface
In addition to the New Desktop (CDE), OpenVMS provides the older DECwindows interface used with previous OpenVMS versions. It is maintained partially for upward-compatibility reasons. New users may prefer to use the New Desktop exclusively and, thus, may skip this section
DECwindows Basics
The concepts of applications, windows, menus, use of the mouse, and many other topics apply to DECwindows in essentially the same way as to the New Desktop and are not repeated here.
Starting DECwindows
To start DECwindows, click Options at the login screen. From Session, choose DECwindows Session.
When you start a DECwindows session, the Session Manager starts. The session manager is the starting point for most DECwindows functions and is discussed after the Window Manager.
The Window Manager
The Window Manager is actually a separate component that handles the manipulation of windows: moving, resizing, minimizing, and so forth. Without a window manager, it is still possible to run applications and perform many essential functions, but it is cumbersome and this book assumes that a window manager is running.
If a window manager starts automatically, you may ignore this section. You can tell whether a window manager is running by the appearance of the Session Manager when DECwindows starts.
![]()
Figure 15-34: No Window Manager

Figure 15-35: The MWM (New Desktop) Window Manager

Figure 15-36: The DECwindows Window Manager
| Note | If you are using an X Window System client, you may need to start a window manager manually. There may be more than one window manager application available, and an individual user may select one depending on his or her preferences. This book recommends the program DECW$MWM (fully specified as SYS$SYSTEM:DECW$MWM.EXE), if it is supported. If DECW$MWM is not supported, use DECW$WINMGR (the DECwindows Window Manager). The former is generally associated with the New Desktop, and the latter with DECwindows. If you need to start a window manager manually, the details are particular to the client software you are running. Consult your system or network manager for instructions on starting a window manager. |
Window Manipulation Under DECW$WINMGR
In most respects, the DECW$WINMGR (DECwindows) Window Manager is comparable to the DECW$MWM (New Desktop) Window Manager. However, there are some differences with regard to resizing, minimizing, maximizing, and restoring. The following paragraphs describe some differences to be found in DECW$WINMGR.
-
The Push-to-Back Control This control causes the window to be pasted below all other windows (all overlapping windows will now cover this one). This is useful to reveal a window that had been totally covered by other windows.
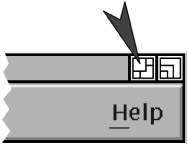
Figure 15-37: The Push-to-Back Control -
Resizing a Window Rather than dragging edges or corners of a window to a new size, the DECW$WINMGR Window Manager has a resize button in the upper-right corner of each window. Click the resize control (do not release) and then move the mouse pointer to touch the border you'd like to move. The border will now move along with the mouse pointer. Release the edge when it reaches the desired placement.
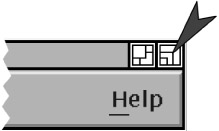
Figure 15-38: The Resize Control
The Session Manager
The starting point for most DECwindows functions is the Session Manager.

Figure 15-39: The Session Manager
| Note | Depending on your configuration, the Session Manager may be displayed as an icon at the beginning of your session. If so, double-click the icon to restore the Session Manager window. |
Figure 15-40: Session Manager as an Icon
The Session Manager contains four menus from which you may start applications, set options and preferences, and obtain help. Each of the four menus is described in the following sections.
Ending a DECwindows Session
From the Session Manager, click the Session menu and select End Session. Alternatively, use the window menu of the Session Manager and select Close.
The Session Menu
The Session menu contains functions that are mostly global in nature; they affect the entire session.
-
Logical Names This window allows you to define or examine a logical name. To examine a logical name, type its name in the Name input field, select a logical name table (Any, Job, Group, System, Other), and click Show. To define a logical name, follow the same steps but click Define. To deassign a logical name, enter its name and click Deassign. If you define a jobwide logical name, keep in mind that a process created by the DECterm application may not be in the same job tree. Consider creating a groupwide logical name instead.
Logical names are discussed elsewhere in this book.
-
Privileges This window allows you to show which account privileges are currently enabled and to enable or disable any for which you may be authorized. For some tasks, you may need to enable a specific privilege beforehand. You may not enable a privilege your system manager has not authorized in your user authorization file record (account profile).
Note Not all of the privileges available under the latest versions of OpenVMS may be accounted for here. In addition, settings in this window will not affect processes created with DECterm; use SET PROCESS /PRIVILEGE from the DECterm window instead.
-
Work in Progress This window shows which applications are currently running (DECterm is not represented) and allows you to stop them. However, it is recommended that you exit each application normally, from the application's own menu, unless it is impossible to do so.
-
Pause This option causes the GUI to be locked and all information on the screen to be hidden. You must enter your password to unlock the workstation. Locking the workstation applies to the GUI only; it does not prevent such access as terminal logins or remote file access.
-
End Session This allows you to log out of the DECwindows GUI and return to the login screen. From the login screen, you may choose DECwindows or the New Desktop.
The Applications Menu
This menu contains most of the same applications as previously discussed in "Application Manager: DECwindows Apps."
The most noticeable difference is the FileView application. This is similar in function to the New Desktop File Manager, but has a different look and feel.
For applications other than FileView, please refer to their descriptions in the section covering the New Desktop.
Applications: FileView
The FileView application performs the same basic functions as the New Desktop File Manager: navigating the directory tree and creating directories and printing files, to name a few.
However, FileView includes several menu selections that perform many of the functions that are separated under the New Desktop, such as executing a DCL command, comparing files, and examining X Window System internal information. The New Desktop has many of these functions spread out as separate applications, whereas FileView groups them together.
The following paragraphs briefly discuss how to use FileView and its menus.
FileView: Navigating Directories
In Figure 15-41 below the menu bar of FileView is the current disk and directory (1). Any subdirectories of the current directory are shown in the narrow frame occupying the left side of the window (2). Files within the current directory are shown in the large area occupying most of the window (4).
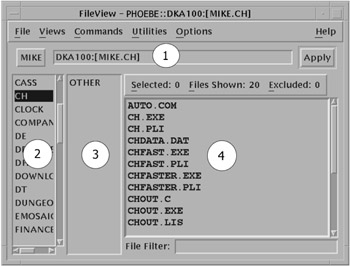
Figure 15-41: FileView
To navigate to a subdirectory, click on its name in the left-hand pane. When you move to the subdirectory, one of two things may happen. If you are at the top or bottom of a directory tree, a single pane of directories will be present (2). If you are not at the top or bottom, there will be two panes of directory levels shown (2, 3).
To navigate to an arbitrary directory, perhaps on another disk, click on the current directory name and edit it directly. Press ENTER or click Apply to move to the new directory.
To navigate to the parent directory, click its name, which appears in a box to the left of the current directory display. If you are already at the top of the tree, no entry will appear there.
| Note | The top of the directory tree may not represent the top-level directory of the disk. For example, your home directory may represent the top of the FileView tree but not of the directory tree of the disk that contains it. To establish a new top-of-tree, edit the directory name directly. |
FileView: The File Menu
This menu contains two items: New View and Quit. New View opens another window identical to the first. By having multiple views open, you may work with more than one directory tree at a time.
FileView: The Views Menu
This menu provides a quick way to change some of the common view options. You may decide to show all versions or only the highest version of files, include the size and date of files, or you may select a brief view that does not include this information. You may also return directly to your login directory via this menu.
FileView: The Commands Menu
This menu contains commands that have DCL equivalents and, in fact, are GUI shells around normal DCL commands.
-
Compare compares two files and reports any differences using the DIFFERENCES utility.
-
Copy makes a copy of a file or copies multiple existing files into a combined output file.
-
Delete deletes one or more files.
-
Edit starts a text editor (you may choose among EDT, EVE, Notepad, or another editor as defined on your particular system) and loads the specified file.
-
Print queues one or more files to a printer.
-
Protection changes the UIC-based protection on one or more files. File protections are explained elsewhere in this book.
-
Purge deletes earlier versions of specified files while keeping the latest version(s).
-
Read displays the contents of text files using the editor of your choice or the TYPE command.
-
Rename changes the name of one or more files.
-
Run executes a program or command procedure.
-
Search searches for text you specify in one or more files.
-
Show File performs a DIRECTORY/FULL on one of more files.
FileView: Utilities Menu
This menu contains commands that display the internal state of the GUI software. A somewhat advanced knowledge of the GUI is required for most of these utilities to be of use, so they are not covered here.
FileView: Options Menu
This menu contains commands that allow you to customize many aspects of the way FileView operates.
-
Layout allows you to specify which fields of a full file specification will be shown and that files be sorted by a variety of criteria.
-
Window allows you to customize the window in which FileView runs.
-
Menus allows you to add, remove, and reorder items in the FileView and Session Manager menus. It also allows you to add and populate new menus (see Menu Bar, next).
-
Menu Bar allows you to specify which menus appear in the FileView Menu bar. After you create a new menu, use this option to add it to the Menu bar.
-
File Types allows you to control what action the system takes when you double-click on files of a certain type. For example, double-clicking on a program (.EXE) file causes it to execute. This option allows you to change or add associations between actions and file types.
-
Show/Hide Work Area controls whether the directory, subdirectory, and file panes are visible or only the menu bar is.
-
Filter by Size allows you to exclude files from the display based on their sizes.
-
Filter by Date allows you to exclude files from the display based on their dates of creation, modification, backup, or expiration. [1]
-
Filter by Owner allows you to exclude files from the display based on their ownership.
The Options Menu
-
Automatic Startup allows you to specify which applications should automatically start at login time.
-
Window allows you to customize the window in which the Session Manager runs.
-
Menus allows you to add, remove, and reorder items in the FileView and Session Manager menus. It also allows you to add and populate new menus (see Menu Bar, next).
-
Menu Bar allows you to specify which menus appear in the Session Manager menu bar. After you create a new menu, use this option to add it to the menu bar.
-
Pause Screen allows you to control what text is displayed while the session is paused (while the workstation is locked). (See Pause under "The Session Menu").
-
End Session Prompts controls whether DECwindows asks you to confirm your desire to end a session. It also controls whether DECwindows notifies each application of the impending application shutdown. Some applications, upon receiving such a notification, automatically save unsaved data.
-
Screen Background allows you to choose the background colors and pattern for the screen. You may also choose that the screen go blank after a period of inactivity.
-
Window Colors allows you to choose foreground, background, highlight, and shadow colors to be used in application windows.
-
Keyboard allows you to set keyboard options, such as caps lock versus shift lock, autorepeat, cursor blinking, and others.
-
Language allows you to choose another language to be used by DECwindows, but requires the proper language support module to be installed on your system.
-
Pointer allows you to choose from different mouse pointers and set options including doubleclick timeout, handedness, and acceleration.
-
Security allows you to allow or disallow system access from other network users (typically via DECnet). This includes allowing remote logins and allowing the use of DECwindows applications by remote users.
Summary
This section has presented a brief overview of the DECwindows environment. As previously stated, DECwindows is no longer the default GUI environment for OpenVMS, but is still provided for compatibility reasons and for those users who became accustomed to it under previous OpenVMS versions.
[1]Many OpenVMS systems do not employ file expiration dates. An expiration date, if set, is for identification purposes only. The system takes no action when a file expires.
EAN: 2147483647
Pages: 215